19.2.8. The Marker, Picture and North Arrow Items
Along with the map or legend items in the print layout, you may want to decorate your realization with images or annotations. QGIS provides different tools to achieve this:
the picture item: decorates the layout with an image raster or SVG file (e.g. logos, pictures, north arrows, …)
the north arrow item: a picture item predefined with a north arrow image
the marker item: decorates the layout with QGIS vector symbols. It can be used to place markers over a map item or for creation of advanced custom legends.
19.2.8.1. 그림 항목
You can add a picture by dragging it from your file manager onto the
canvas, pasting it directly into the layout by using Ctrl+V or
and by using the  Add Picture,
following items creation instructions.
Then you can manipulate it, as explained in
대화형 조판기 항목 작업.
Add Picture,
following items creation instructions.
Then you can manipulate it, as explained in
대화형 조판기 항목 작업.
When using Add Picture, the picture item will be a
blank frame that you can customize using its
Item Properties panel.
Other than the items common properties,
this feature has the following functionalities:
Main properties
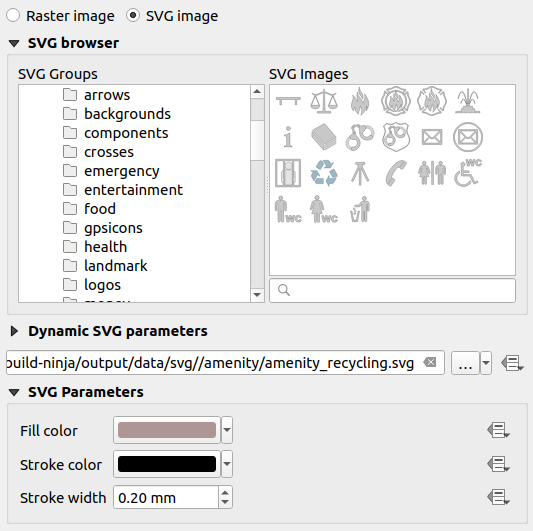
그림 19.50 그림 항목 속성 패널
The picture item supports two types of images:
Raster Image: a file selector widget can be used to fetch the data. Use the … Browse button to select a file on your computer or enter the path directly in the text field. You can even provide a remote URL that points to a picture. The associated image can also be embedded in the layout.
 data defined override 버튼을 클릭하면 피처 속성으로부터, 또는 정규 표현식을 이용해서 이미지 소스를 설정할 수 있습니다.
SVG Image: using by default the SVG libraries provided in . You can however use any other file, and the file selection follows the same rules as for the raster image. The SVG parameters can as well be set dynamic.
QGIS가 기본으로 지원하는
.svg파일은 사용자 지정 가능합니다. 즉 원본과는 다른 Fill color, Stroke color (투명도 포함) 및 Stroke width 를 SVG Parameters 그룹에 있는 대응 기능을 사용해서 쉽게 적용할 수 있다는 뜻입니다. 물론 이 속성들을 데이터 정의 할 수도 있습니다.이 속성들이 활성화되지 않은
.svg파일을 추가한 경우, 예를 들어 투명도를 지원하려면 파일에 다음 태그들을 추가해야 합니다:fill-opacity="param(fill-opacity)"stroke-opacity="param(outline-opacity)"
More details at Parametrizable SVG.
참고
Drag-and-drop an image file (raster or SVG) into the layout page will create a layout picture item with corresponding settings.
Size and placement
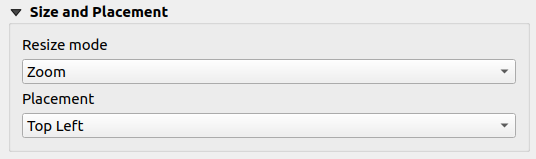
그림 19.51 Layout pictures size and placement properties
Resize mode 옵션을 통해 프레임 크기가 변경될 경우 이미지를 어떻게 표시할지 설정할 수 있습니다:
Zoom: 이미지의 종횡비를 유지한 채 이미지를 프레임에 맞춰 확대/축소합니다.Stretch: 프레임 내부에 맞춰 이미지를 늘립니다.Clip: 이 모드는 래스터 이미지 전용입니다. 이 모드는 크기 조정 없이 원본 이미지 크기를 유지한 채, 프레임으로 이미지를 잘라냅니다. 즉 프레임 내부에 들어오는 이미지의 일부만 보일 것이라는 뜻입니다.Zoom and resize frame: 이미지를 프레임에 맞춰 확대한 다음, 프레임 크기를 산출 이미지 크기에 맞춰 조정합니다.Resize frame to image size: 프레임 크기를 원본 이미지 크기에 맞춰 조정합니다. (이미지 크기를 조정하지 않습니다.)
Depending on the selected Resize mode, the Placement and Image rotation options may be disabled. Placement lets you select the position of the image inside its frame (top/middle/bottom and left/center/right).
Image rotation
Images can be rotated with the Image rotation field.
Activating the  Sync with map checkbox
synchronizes the rotation of the image with the rotation applied to the
selected map item.
This is a convenient feature to make any picture behave as a north arrow.
The North alignment can be:
Sync with map checkbox
synchronizes the rotation of the image with the rotation applied to the
selected map item.
This is a convenient feature to make any picture behave as a north arrow.
The North alignment can be:
도북(圖北, Grid north): 국가/지역(national/local) 수준 그리드 상의 중앙 경선(中央經線, central meridian)에 평행하는 그리드 선의 방향
진북(True north): 경도 자오선(meridian of longitude)의 방향
그림 기울기에 편각(declination) Offset 도 적용할 수 있습니다.
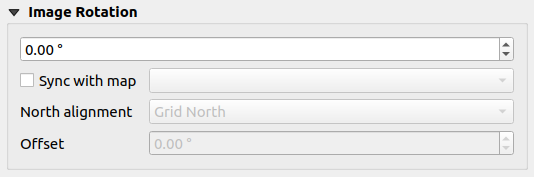
그림 19.52 Layout pictures image rotation properties
19.2.8.2. 방위표 항목
항목 생성 지침 을 따라 |addMap| Add North Arrow 버튼으로 방위표 항목을 추가하십시오. 이후 대화형 조판기 항목 작업 에서 설명한 내용과 동일한 방법으로 새 방위표 항목을 수정할 수 있습니다.
방위표는 이미지이기 때문에, North Arrow 항목은 그림 항목 과 동일한 속성을 가지고 있습니다. 주요 차이점은 다음과 같습니다:
새 항목 추가시 빈 프레임 대신 기본 방위표를 사용합니다.
방위표 항목은 기본적으로 맵 항목과 동기화됩니다: Sync with map 속성이 방위표가 렌더링되는 맵입니다. 기본 선택된 맵이 없다면, 참조 맵 으로 돌아가게 됩니다.
참고
방위표 대부분은 진북 방향에 N 표시가 없습니다. N 을 북쪽이라는 의미로 사용하지 않는 언어들이 많기 때문입니다.
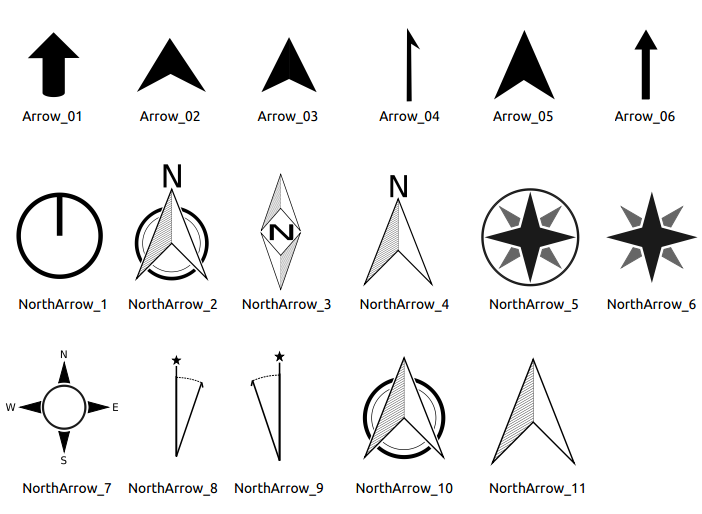
그림 19.53 SVG 라이브러리에서 선택하고 사용할 수 있는 방위표들
19.2.8.3. The Marker Item
To add a marker item, select the  Add Marker button,
and click on the page. A default point marker symbol is added.
Then you can manipulate it, as explained in 대화형 조판기 항목 작업.
But note that unlike most of the other items, you resize the item
given that its size is controlled by the embedded symbols properties.
Add Marker button,
and click on the page. A default point marker symbol is added.
Then you can manipulate it, as explained in 대화형 조판기 항목 작업.
But note that unlike most of the other items, you resize the item
given that its size is controlled by the embedded symbols properties.
The marker item can be customized from the Item Properties panel. Other than the items common properties, you can also:
modify the Symbol, relying on all the symbol widget capabilities
sync the marker item rotation with the map’s (see Image rotation), acting as a north arrow. The map rotation is added to any existing marker symbol level rotation (so .e.g if you have to rotate the triangle marker 90° to get it pointing straight up, it will still work nicely in north arrow mode!)
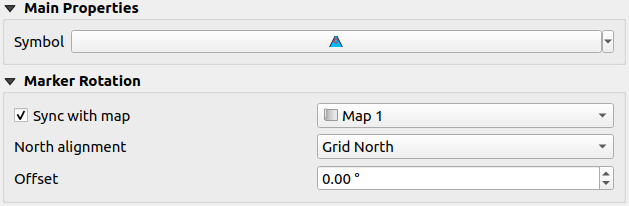
그림 19.54 The marker item custom properties