19.2.4. ラベルアイテム
ラベル アイテムは、地図をテキストで装飾して地図の理解を助けるためのツールです。ラベルテキストにはタイトル、作成者、データソースやその他の情報などが考えられます。  ラベルを追加 ツールを使用して、 アイテムの作成手順 に従いラベルを追加し、 レイアウトアイテムの操作 と同じ方法でラベルアイテムを操作します。
デフォルトでは、ラベルアイテムにはデフォルトのテキストが入っていますが、これは アイテムプロパティ パネルを使用して変更できます。 アイテムの共通プロパティ の他に、ラベルアイテムには以下の機能があります( 図 19.24 参照)。
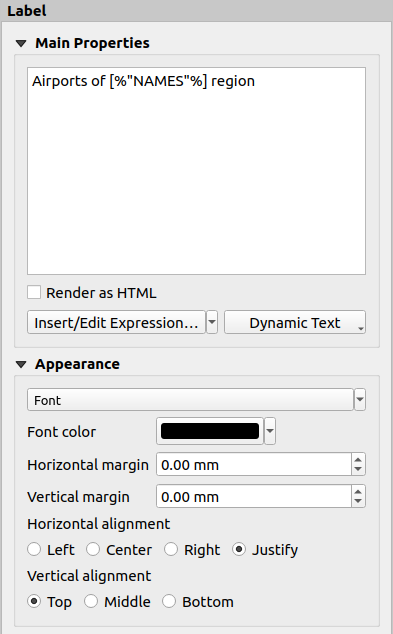
図 19.24 ラベルアイテムプロパティパネル
19.2.4.1. メインプロパティ
The Main properties group is the place to provide the text of the label.
The text can be static, dynamic with expression
functions and variables, and/or formatted with HTML.
Dynamic parts of a label need to be surrounded by [% and %]
in order to be interpreted and evaluated as such.
To use expressions in labels, you can click on Insert/Edit Expression... button, write your formula as usual and when the dialog is applied, QGIS automatically adds the surrounding characters.
ヒント
Clicking the Insert/Edit Expression... button when no selection is made in the textbox will append the new expression to the existing text. If you want to modify an existing expression, you need to first select the part of interest.
Because maps are usually filled with some common textual information (date, author, title, page number, ...), QGIS provides a direct access to the corresponding expressions or variables: press the Dynamic text button to select and insert them into your label.
ちなみに
The top menu can be used to create a new label item filled with the selected predefined expression.
It's possible to turn a dynamic label into static: press the drop-down arrow next to the Insert/Edit Expression... button and select Convert to Static. Any dynamic parts of the label's contents will be evaluated and replaced with their current values. You can then manually tweak the resulting text when needed.
Labels can be interpreted as HTML code: check
 Render as HTML. You can now insert HTML tags or styles, URL,
a clickable image that links to a web page, or something more complex...
Render as HTML. You can now insert HTML tags or styles, URL,
a clickable image that links to a web page, or something more complex...
The following code combines HTML rendering with expressions, for an advanced labeling and will output 図 19.25:
<html>
 <head>
   <style>
      /* Define some custom styles, with attribute-based size */
      name {color:red; font-size: [% ID %]px; font-family: Verdana; text-shadow: grey 1px 0 10px;}
      use {color:blue;}
   </style>
 </head>

 <body>
   <!-- Information to display -->
   <u>Feature Information</u>
   <ul style="list-style-type:disc">
     <li>Feature Id: [% ID %]</li>
     <li>Airport: <name>[% NAME %]</name></li>
     <li>Main use: <use>[% USE %]</use></li>
   </ul>
   Last check: [% concat( format_date( "control_date", 'yyyy-MM-dd'), ' by <b><i>', @user_full_name, '</i></b>' ) %]

   <!-- Insert an image -->
   <p align=center><img src="path/to/logos/qgis-logo-made-with-color.svg" alt="QGIS icon" style="width:80px;height:50px;"</p>
 </body>
</html>
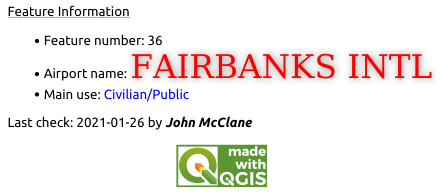
図 19.25 HTMLスタイリングを使用したラベルの活用
19.2.4.2. 外観
フォント... ボタンをクリックして フォント を定義したり、 色ウィジェット を押して フォントの色 を定義します。
水平方向や垂直方向のマージンを
mm単位で別々に指定できます。これは、レイアウトアイテムの端からの余白です。例えばラベルアイテムを他のアイテムと位置を揃える場合など、ラベル境界の外側にラベルを配置することもできます。この場合には、マージンに負の値を使用します。テキスト配置の使用は、ラベルを配置するもう一つの方法です。これには、以下の設定があります:
水平方向配置 については、 左 、 中央部 、 右 、 正当化する
垂直方向配置 については、 上部 、 中央部 、 Bottom
19.2.4.3. ラベルアイテムの式の探究
以下は、ラベルアイテムに興味深い情報入力するために使用できる式のいくつかの例です。コード、あるいは少なくとも計算式の部分は、 メインプロパティ フレームで [% と %] で囲む必要があります。
現在の地図帳地物の "field1" の値を使ったタイトルを表示する:
'This is the map for ' || "field1"
メインプロパティ セクションに書く場合には、以下のようにします:
This is the map for [% "field1" %]
現在の地図帳地物に関するページ番号を追加する(例
Page 1/10):concat( 'Page ', @atlas_featurenumber, '/', @atlas_totalfeatures )
共通の属性に基づいて、現在の地図帳領域地物に対する空港の名前を返す:
aggregate( layer := 'airports',
           aggregate := 'concatenate',
           expression := "NAME",
           filter := fk_regionId = attribute( @atlas_feature, 'ID' ),
           concatenator := ', '
         )
属性リレーション が設定されている場合には、次のようにもできます:
relation_aggregate( relation := 'airports_in_region_relation',
                    aggregate := 'concatenate',
                    expression := "NAME",
                    concatenator := ', '
                  )
空間関係に基づいて、現在の地図帳領域地物に含まれる空港の名前を返す:
aggregate( layer := 'airports',
           aggregate := 'concatenate',
           expression := "NAME",
           filter := contains( geometry( @parent ), $geometry ),
           concatenator := ', '
         )
または:
array_to_string( array:= overlay_contains( layer := 'airports',
                                           expression := "NAME" ),
                 delimiter:= ', '
               )
Map 1アイテムの範囲のX座標の最小値を返す:x_min( map_get( item_variables( 'Map 1' ), 'map_extent' ) )
現在のレイアウトの
Map 1アイテムのレイヤの名前を取得し、1行に1つのレイヤ名となるよう整形する:array_to_string( array_foreach( map_get( item_variables( 'Map 1' ), 'map_layers' ), -- retrieve the layers list layer_property( @element, 'name' ) -- retrieve each layer name ), '\n' -- converts the list to string separated by breaklines )
Display the list of layers with their license strings (usage rights) in a layout
Map 1item. You need to fill the layers' Access metadata properties first.array_to_string( map_credits( 'Map 1', true ) )