19.2.4. Het item Label
Het item Label is een gereedschap dat helpt bij het decoreren van uw kaart met teksten die zouden kunnen helpen hem beter te begrijpen; het kan de titel, auteur, gegevensbron of enige andere informatie zijn. U kunt een label toevoegen met het gereedschap  Label toevoegen door de instructies voor het maken van items te volgen en het op dezelfde manier te bewerken als is besproken in Werken met items voor lay-out.
Standaard verschaft het item Label een standaard tekst die u kunt aanpassen met behulp van zijn paneel Item-eigenschappen. Naast de algemene eigenschappen voor items, heeft dit object de volgende functionaliteiten (zie Fig. 19.24):
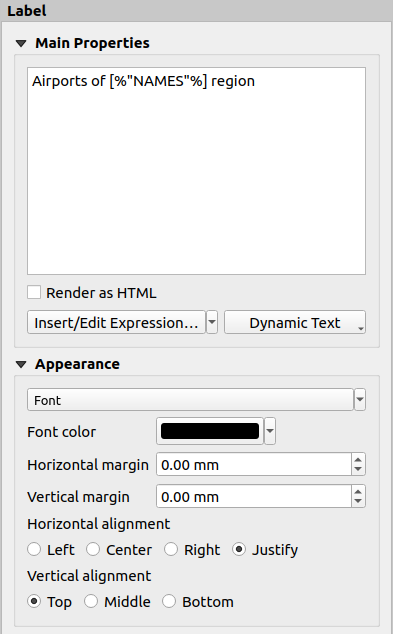
Fig. 19.24 Paneel Label Item-eigenschappen
19.2.4.1. Algemene eigenschappen
The Main properties group is the place to provide the text of the label.
The text can be static, dynamic with expression
functions and variables, and/or formatted with HTML.
Dynamic parts of a label need to be surrounded by [% and %]
in order to be interpreted and evaluated as such.
To use expressions in labels, you can click on Insert/Edit Expression… button, write your formula as usual and when the dialog is applied, QGIS automatically adds the surrounding characters.
Hint
Clicking the Insert/Edit Expression… button when no selection is made in the textbox will append the new expression to the existing text. If you want to modify an existing expression, you need to first select the part of interest.
Because maps are usually filled with some common textual information (date, author, title, page number, …), QGIS provides a direct access to the corresponding expressions or variables: press the Dynamic text button to select and insert them into your label.
Tip
The top menu can be used to create a new label item filled with the selected predefined expression.
It’s possible to turn a dynamic label into static: press the drop-down arrow next to the Insert/Edit Expression… button and select Convert to Static. Any dynamic parts of the label’s contents will be evaluated and replaced with their current values. You can then manually tweak the resulting text when needed.
Labels can be interpreted as HTML code: check
 Render as HTML. You can now insert HTML tags or styles, URL,
a clickable image that links to a web page, or something more complex…
Render as HTML. You can now insert HTML tags or styles, URL,
a clickable image that links to a web page, or something more complex…
The following code combines HTML rendering with expressions, for an advanced labeling and will output Fig. 19.25:
<html>
 <head>
   <style>
      /* Define some custom styles, with attribute-based size */
      name {color:red; font-size: [% ID %]px; font-family: Verdana; text-shadow: grey 1px 0 10px;}
      use {color:blue;}
   </style>
 </head>

 <body>
   <!-- Information to display -->
   <u>Feature Information</u>
   <ul style="list-style-type:disc">
     <li>Feature Id: [% ID %]</li>
     <li>Airport: <name>[% NAME %]</name></li>
     <li>Main use: <use>[% USE %]</use></li>
   </ul>
   Last check: [% concat( format_date( "control_date", 'yyyy-MM-dd'), ' by <b><i>', @user_full_name, '</i></b>' ) %]

   <!-- Insert an image -->
   <p align=center><img src="path/to/logos/qgis-logo-made-with-color.svg" alt="QGIS icon" style="width:80px;height:50px;"</p>
 </body>
</html>
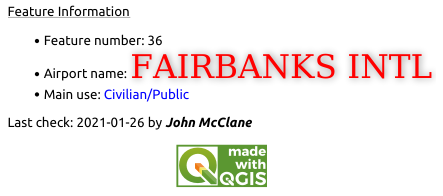
Fig. 19.25 Niveau van een label opwaarderen met opmaak in HTML
19.2.4.2. Uiterlijk
Definieer het Lettertype door te klikken op de knop lettertype… of een Lettertype kleur door te drukken op de widget Kleur.
U kunt de verschillende horizontale en verticale marges specificeren in
mm. Dat is de marge vanaf de rand van het item van afdruklay-out. Het label kan worden geplaatst buiten de begrenzingen van het label, bijv. om items label uit te lijnen met andere items. In dat geval dient u negatieve waarden voor de marge te gebruiken.Gebruiken van uitlijning is een andere manier om uw label te plaatsen. Het kan zijn:
Links, Centreren, Rechts of Uitvullen voor Horizontale uitlijning
en Boven, Centraal midden, Onder voor Verticale uitlijning.
19.2.4.3. Expressies verkennen in een item Label
Hieronder staan enkele voorbeelden van expressies die u kunt gebruiken om het label te vullen met interessante informatie - onthoud dat de code, of ten minste het berekende gedeelte, zou moeten zijn omsloten door [% en %] in de groep Algemene eigenschappen:
Een titel weergeven met de huidige waarde van “field1” van het huidige object van Atlas:
'This is the map for ' || "field1"
of, zoals geschreven in het gedeelte Algemene eigenschappen:
This is the map for [% "field1" %]
Paginanummering toevoegen voor verwerkte objecten van Atlas (bijv,
Pagina 1/10):concat( 'Page ', @atlas_featurenumber, '/', @atlas_totalfeatures )
Geef de naam terug van de airports van het huidige object region van atlas, gebaseerd op hun gemeenschappelijke attributen:
aggregate( layer := 'airports',
           aggregate := 'concatenate',
           expression := "NAME",
           filter := fk_regionId = attribute( @atlas_feature, 'ID' ),
           concatenator := ', '
         )
Of, indien een attributenrelatie is ingesteld:
relation_aggregate( relation := 'airports_in_region_relation',
                    aggregate := 'concatenate',
                    expression := "NAME",
                    concatenator := ', '
                  )
Geef de naam terug van de airports van het huidige object region van atlas, gebaseerd op hun ruimtelijke relatie:
aggregate( layer := 'airports',
           aggregate := 'concatenate',
           expression := "NAME",
           filter := contains( geometry( @parent ), $geometry ),
           concatenator := ', '
         )
OF:
array_to_string( array:= overlay_contains( layer := 'airports',
                                           expression := "NAME" ),
                 delimiter:= ', '
               )
Geef de laagste X-coördinaat terug van het bereik van het item
Kaart 1:x_min( map_get( item_variables( 'Map 1' ), 'map_extent' ) )
Haal de namen op van de lagen in de huidige lay-out van het item
Kaart 1, en maak die op met één naam per regel:array_to_string( array_foreach( map_get( item_variables( 'Map 1' ), 'map_layers' ), -- retrieve the layers list layer_property( @element, 'name' ) -- retrieve each layer name ), '\n' -- converts the list to string separated by breaklines )
Display the list of layers with their license strings (usage rights) in a layout
Map 1item. You need to fill the layers’ Access metadata properties first.array_to_string( map_credits( 'Map 1', true ) )