` `
Gebruikersinterface van QGIS
When QGIS starts, you are presented with the GUI as shown in the figure (the numbers 1 through 5 in yellow circles are discussed below).

Gebruikersinterface van QGIS met Alaska voorbeeld gegevensset
Notitie
De weergave van uw venster (titelbalk, etc) kan enigszins afwijken, afhankelijk van uw besturingssysteem en vensterbeheer.
De QGIS gebruikersinterface is onderverdeeld in 5 componenten:
Menubalk
Werkbalken
Panelen
Kaartvenster
Statusbalk
These five components of the QGIS interface are described in more detail in the following sections. Two more sections present keyboard shortcuts and context help.
Menubalk
The menu bar provides access to various QGIS features using a standard hierarchical menu. The top-level menus and a summary of some of the menu options are listed below, together with the associated icons as they appear on the toolbar, and keyboard shortcuts. The shortcuts presented in this section are the defaults; however, keyboard shortcuts can also be configured manually using the Configure shortcuts dialog, opened from Settings ‣ Configure Shortcuts....
Although most menu options have a corresponding tool and vice-versa, the menus are not organized exactly like the toolbars. The toolbar containing the tool is listed after each menu option as a checkbox entry. Some menu options only appear if the corresponding plugin is loaded. For more information about tools and toolbars, see section Werkbalken.
Notitie
QGIS is a cross-platform application meaning that though it provides you with the same tools, they may be placed in different menus according to the operating system specification. The lists below show the most common location and precise when there is a variation.
Project
Menuoptie |
Snelkoppeling |
Verwijzing |
Werkbalk |
|---|---|---|---|
|
Ctrl+N | see Projects | Project |
 Open Open |
Ctrl+O | see Projects | Project |
Nieuw van template ‣ |
see Projects | ||
Open recent ‣ |
see Projects | ||
|
Ctrl+S | see Projects | Project |
|
Ctrl+Shift+S | see Projects | Project |
 Save as Image... Save as Image... |
see Output | ||
| DXF Export... | see Output | ||
| DWG/DXF Import... | |||
 Project Properties... Project Properties... |
Ctrl+Shift+P | see Projects | |
 New Print Composer New Print Composer |
Ctrl+P | see Print Composer | Project |
 Composer manager... Composer manager... |
see Print Composer | Project | |
| Print Composers ‣ | see Print Composer | ||
|
Ctrl+Q |


 QGIS afsluiten
Onder  MacOS komt de opdracht QGIS afsluiten overeen met QGIS ‣ Quit QGIS (Cmd+Q).
Bewerken
Menuoptie |
Snelkoppeling |
Verwijzing |
Werkbalk |
|---|---|---|---|
|
Ctrl+Z | see Geavanceerd digitaliseren | Geavanceerd digitaliseren |
|
Ctrl+Shift+Z | see Geavanceerd digitaliseren | Geavanceerd digitaliseren |
|
Ctrl+X | see Het digitaliseren van een bestaande kaartlaag | Digitaliseren |
|
Ctrl+C | see Het digitaliseren van een bestaande kaartlaag | Digitaliseren |
|
Ctrl+V | see Het digitaliseren van een bestaande kaartlaag | Digitaliseren |
| Paste features as ‣ | see Werken met de attributentabel | ||
 Add Feature Add Feature |
Ctrl+. | see Het digitaliseren van een bestaande kaartlaag | Digitaliseren |
|
see Het digitaliseren van een bestaande kaartlaag | Digitaliseren |
|
|
see Het digitaliseren van een bestaande kaartlaag | Digitaliseren |
|
|
see Het digitaliseren van een bestaande kaartlaag | Digitaliseren |
|
|
see Het digitaliseren van een bestaande kaartlaag | Digitaliseren |
|
|
see Attribuutwaarden bewerken | Digitaliseren |
|
|
see Geavanceerd digitaliseren | Geavanceerd digitaliseren |
|
|
see Geavanceerd digitaliseren | Geavanceerd digitaliseren |
|
|
see Geavanceerd digitaliseren | Geavanceerd digitaliseren |
|
|
see Geavanceerd digitaliseren | Geavanceerd digitaliseren |
|
|
see Geavanceerd digitaliseren | Geavanceerd digitaliseren |
|
|
see Geavanceerd digitaliseren | Geavanceerd digitaliseren |
|
|
see Geavanceerd digitaliseren | Geavanceerd digitaliseren |
|
|
see Geavanceerd digitaliseren | Geavanceerd digitaliseren |
|
|
see Geavanceerd digitaliseren | Geavanceerd digitaliseren |
|
|
see Geavanceerd digitaliseren | Geavanceerd digitaliseren |
|
|
see Geavanceerd digitaliseren | Geavanceerd digitaliseren |
|
|
see Geavanceerd digitaliseren | Geavanceerd digitaliseren |
|
 Merge Attr. of Selected Features Merge Attr. of Selected Features |
see Geavanceerd digitaliseren | Geavanceerd digitaliseren |
|
 Node Tool Node Tool |
see Het digitaliseren van een bestaande kaartlaag | Digitaliseren |
|
|
see Geavanceerd digitaliseren | Geavanceerd digitaliseren |
|
|
see Geavanceerd digitaliseren | Geavanceerd digitaliseren |


After activating  Toggle editing mode for a layer,
you will enable the Add Feature icon in the Edit menu
depending on the layer type (point, line or polygon).
Toggle editing mode for a layer,
you will enable the Add Feature icon in the Edit menu
depending on the layer type (point, line or polygon).
Edit (extra)
Menuoptie |
Snelkoppeling |
Verwijzing |
Werkbalk |
|---|---|---|---|
| Add Feature |
see Het digitaliseren van een bestaande kaartlaag | Digitaliseren |
|
 Add Feature Add Feature |
see Het digitaliseren van een bestaande kaartlaag | Digitaliseren |
|
 Add Feature Add Feature |
see Het digitaliseren van een bestaande kaartlaag | Digitaliseren |
Beeld
Menuoptie |
Snelkoppeling |
Verwijzing |
Werkbalk |
|---|---|---|---|
|
see Zoomen en verschuiven | Kaart navigatie |
|
|
Kaart navigatie |
||
|
Ctrl+Alt++ | see Zoomen en verschuiven | Kaart navigatie |
|
Ctrl+Alt+- | see Zoomen en verschuiven | Kaart navigatie |
Selecteren ‣ |
see Objecten selecteren | Attributen |
|
|
Ctrl+Shift+I | see Identify Features | Attributen |
Opmeten ‣ |
see Meten | Attributen |
|
|
see Paneel Statistisch overzicht | Attributen |
|
|
Ctrl+Shift+F | Kaart navigatie |
|
|
Kaart navigatie |
||
|
Ctrl+J | Kaart navigatie |
|
|
Kaart navigatie |
||
|
Kaart navigatie |
||
 Zoom To Native Resolution Zoom To Native Resolution |
Kaart navigatie |
||
Decoraties ‣ |
see Decoraties | ||
modus Voorvertoning ‣ |
|||
 Map Tips Map Tips |
see Tonen | Attributen |
|
|
Ctrl+B | see Favoriete plaatsen | Attributen |
|
Ctrl+Shift+B | see Favoriete plaatsen | Attributen |
|
F5 | Kaart navigatie |
|
Panelen ‣ |
see Panelen en werkbalken | ||
Werkbalken ‣ |
see Panelen en werkbalken | ||
Volledig scherm aan/uit |
F11 |


Under  Linux KDE, Panels ‣, Toolbars ‣
and Toggle Full Screen Mode are rather placed in Settings
menu.
Preview mode ‣ is not available under macOS.
Linux KDE, Panels ‣, Toolbars ‣
and Toggle Full Screen Mode are rather placed in Settings
menu.
Preview mode ‣ is not available under macOS.
Kaartlagen
Menuoptie |
Snelkoppeling |
Verwijzing |
Werkbalk |
|---|---|---|---|
Laag maken ‣ |
see Creating new vector layers | Manage Layers | |
Laag toevoegen ‣ |
see Gegevensindelingen en velden verkennen | Manage Layers | |
Kaartlagen en groepen inbedden ... |
see Projecten in een project | ||
Vanuit Laag-definitiebestand toevoegen ... |
|||
 Copy style Copy style |
see Laageigenschappen opslaan en delen | ||
 Paste style Paste style |
see Laageigenschappen opslaan en delen | ||
|
F6 | see Werken met de attributentabel | Attributen |
|
see Het digitaliseren van een bestaande kaartlaag | Digitaliseren |
|
|
see Het digitaliseren van een bestaande kaartlaag | Digitaliseren |
|
|
see Het digitaliseren van een bestaande kaartlaag | Digitaliseren |
|
| Save As... | see Creating new layers from an existing layer | ||
| Save As Layer Definition File... | |||
|
Ctrl+D | ||
|
|||
Zichtbaarheidsschaal instellen |
|||
Instellen laag-CRS |
Ctrl+Shift+C | ||
Project-CRS van laag overnemen |
|||
Eigenschappen... |
see Het dialoogvenster Vectoreigenschappen | ||
| Filter... | Ctrl+F | see Querybouwer | |
|
see Labeleigenschappen | ||
 Add to Overview Add to Overview |
Ctrl+Shift+O | Manage Layers | |
 Add All To Overview Add All To Overview |
|||
 Remove All From Overview Remove All From Overview |
|||
|
Ctrl+Shift+U | Manage Layers | |
|
Ctrl+Shift+H | Manage Layers | |
 Show selected Layers Show selected Layers |
|||
 Hide selected Layers Hide selected Layers |


Instellingen
Menuoptie |
Snelkoppeling |
Verwijzing |
Werkbalk |
|---|---|---|---|
 Custom CRS... Custom CRS... |
see Aangepast Coördinaten ReferentieSysteem | ||
 Style Manager... Style Manager... |
see De Stijl manager | ||
 Configure shortcuts... Configure shortcuts... |
see Snelkoppelingen toetsenbord | ||
| Customization... |
see Aanpassingen | ||
|
see Opties | ||
‘Opties voor ‘snappen’... |
see Het instellen van de toleranties voor snappen en Zoekradius |
Under Linux KDE, you’ll find more tools in Settings
menu such as Project Properties, Panels ‣,
Toolbars ‣ and Toggle Full Screen Mode.
Plug-ins
Menuoptie |
Snelkoppeling |
Verwijzing |
Werkbalk |
|---|---|---|---|
|
see Het dialoogvenster Plug-ins | ||
| Python Console | Ctrl+Alt+P |

De eerste keer wanneer QGIS wordt gestart worden niet alle bronplug-ins geladen.
Vector
Menuoptie |
Snelkoppeling |
Verwijzing |
Werkbalk |
|---|---|---|---|
| OpenStreetMap ‣ | see OpenStreetMap vectors Importeren | ||
 Analysis Tools ‣ Analysis Tools ‣ |
see Menu Vector | ||
 Research Tools ‣ Research Tools ‣ |
see Menu Vector | ||
 Geoprocessing Tools ‣ Geoprocessing Tools ‣ |
see Menu Vector | ||
 Geometry Tools ‣ Geometry Tools ‣ |
see Menu Vector | ||
 Data Management Tools ‣ Data Management Tools ‣ |
see Menu Vector |
When starting QGIS for the first time not all core plugins are loaded. Many of the above-mentioned sub-menus require the core plugin Processing to be activated.
Raster
Menuoptie |
Snelkoppeling |
Verwijzing |
Werkbalk |
|---|---|---|---|
| Raster calculator... | see Rasterberekeningen | ||
Rasters uitlijnen... |
see Raster uitlijnen | ||
| Analysis ‣ |
see Plug-in GDAL Tools | ||
| Projection ‣ |
see Plug-in GDAL Tools | ||
| Conversion ‣ |
see Plug-in GDAL Tools | ||
| Miscellaneous ‣ |
see Plug-in GDAL Tools | ||
| Extraction ‣ |
see Plug-in GDAL Tools |
When starting QGIS for the first time not all core plugins are loaded. Many of the above-mentioned sub-menus require the core plugin Processing to be activated.
Database
Menuoptie |
Snelkoppeling |
Verwijzing |
Werkbalk |
|---|---|---|---|
| Database ‣ | see Plug-in DB Manager | Database |
De eerste keer wanneer QGIS wordt gestart worden niet alle bronplug-ins geladen.
Web
Menuoptie |
Snelkoppeling |
Verwijzing |
Werkbalk |
|---|---|---|---|
| Metasearch | see MetaSearch Catalog Client | Web |
De eerste keer wanneer QGIS wordt gestart worden niet alle bronplug-ins geladen.
Processing
Menuoptie |
Snelkoppeling |
Verwijzing |
Werkbalk |
|---|---|---|---|
 Toolbox Toolbox |
see The toolbox | ||
|
see Grafische modellen bouwen | ||
 History and log... History and log... |
see Beheren van de geschiedenis | ||
 Options... Options... |
see Configuring the processing framework | ||
 Results viewer... Results viewer... |
see Configureren externe toepassingen | ||
 Commander Commander |
Ctrl+Alt+M | see De QGIS commando’s |

De eerste keer wanneer QGIS wordt gestart worden niet alle bronplug-ins geladen.
Help
Menuoptie |
Snelkoppeling |
Verwijzing |
Werkbalk |
|---|---|---|---|
|
F1 | Help | |
 What’s This? What’s This? |
Shift+F1 | Help | |
API documentatie |
|||
Een fout melden |
|||
Commerciële ondersteuning nodig? |
|||
|
Ctrl+H | ||
 Check QGIS Version Check QGIS Version |
|||
 About About |
|||
|


QGIS
Dit menu is alleen beschikbaar onder MacOS en bevat enkele aan OS gerelateerde opdrachten.
Menuoptie |
Snelkoppeling |
Verwijzing |
|---|---|---|
Voorkeuren |
||
Over QGIS |
||
QGIS verbergen |
||
Alles tonen |
||
Andere verbergen |
||
QGIS afsluiten |
Cmd+Q |
Voorkeuren en Over QGIS zijn dezelfde opdrachten als Extra ‣ Opties en Help ‣ Info. QGIS afsluiten correspondeert met Project ‣ QGIS afsluiten op de andere platformen.
Panelen en werkbalken
From the View menu (or Settings), you can
switch on and off QGIS widgets (Panels ‣) or toolbars
(Toolbars ‣). You can (de)activate any of them by
right-clicking the menu bar or a toolbar and choose the item you want.
Each panel or toolbar can be moved and placed wherever you feel comfortable
within QGIS interface.
The list can also be extended with the activation of Core or external
plugins.
Werkbalken
The toolbar provides access to most of the same functions as the menus, plus additional tools for interacting with the map. Each toolbar item has pop-up help available. Hold your mouse over the item and a short description of the tool’s purpose will be displayed.
Elke werkbalk kan verplaatst worden naar waar u wilt. Daarnaast kunt u werkbalken tijdelijk verwijderen via het snelmenu, dat verschijnt wanneer u de rechter muisknop indrukt of wanneer de muisaanwijzer zich boven een werkbalk bevindt.
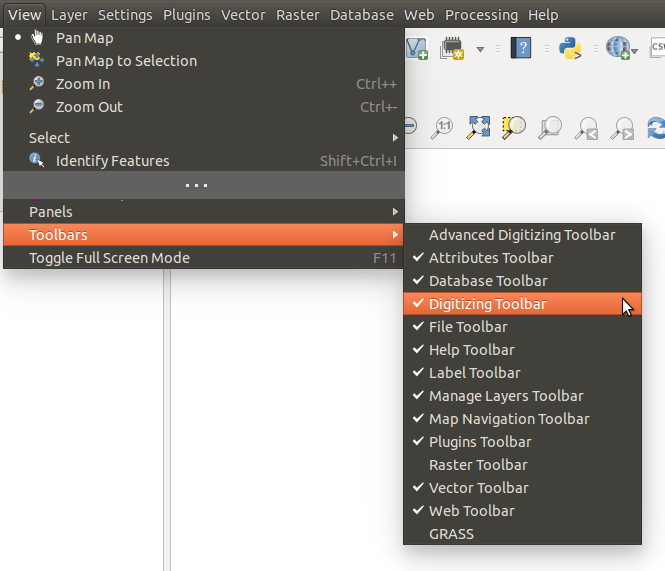
Menu Werkbalken
Tip
Werkbalken weer terugzetten
Indien u per ongeluk een werkbalk hebt verborgen, kunt u die terugkrijgen door te kiezen voor de menuoptie Beeld ‣ Werkbalken ‣ (of Extra ‣ Werkbalken ‣). Als om enige reden een werkbalk (of enig ander widget) totaal verdwijnt uit de interface, vindt u tips om die terug te halen op initiële GUI herstellen.
Panelen
Besides toolbars, QGIS provides by default many panels to work with. Panels are special widgets that you can interact with (selecting options, checking boxes, filling values...) in order to perform a more complex task.

Menu Panelen
Hieronder zijn de door QGIS verschafte panelen vermeld:
het Paneel Lagen
- the Browser Panel
Kaartvenster
Ook wel kaartvenster genoemd, dit is het “zakelijke gedeelte” van QGIS — kaarten worden in dit gebied weergegeven. De kaart die in dit venster wordt weergegeven is afhankelijk van de vector- en rasterlagen die u heeft uitgekozen om te laden.
When you add a layer (see e.g. Gegevens openen), QGIS automatically looks for its Coordinate Reference System (CRS) and zooms to its extent if you work in a blank QGIS project. The layer’s CRS is then applied to the project. If there are already layers in the project, and in the case the new layer has the same CRS as the project, its features falling in the current map canvas extent will be visualized. If the new layer is in a different CRS from the project’s, you must Enable on-the-fly CRS transformation from the Project ‣ Project Properties ‣ CRS (see Gelijktijdige CRS transformatie gebruiken). The added layer should now be visible if data are available in the current view extent.
The map view can be panned, shifting the focus of the map display to another region, and it can be zoomed in and out. Various other operations can be performed on the map as described in the Werkbalken description. The map view and the legend are tightly bound to each other — the maps in view reflect changes you make in the legend area.
Tip
Het kaartvenster in/uitzoomen met het muiswiel
Met het muiswiel kunt u in- en uitzoomen op de kaart. Plaats de muisaanwijzer in het kaartvenster en rol het muiswiel naar voren (van u af) om in te zoomen en achteruit (naar u toe) om uit te zoomen. De plaats van de muisaanwijzer is de plaats waar het in-/uitzoomen gebeurd. U kunt het gedrag van de muiswiel instellen in het menu Opties Extra ‣ Opties op de tab Kaartgereedschap.
Tip
Verschuiven van het kaartvenster met de pijltjestoetsen en de spatiebalk
You can use the arrow keys to pan the map. Place the mouse cursor inside the map area and click on the right arrow key to pan east, left arrow key to pan west, up arrow key to pan north and down arrow key to pan south. You can also pan the map using the space bar or the click on mouse wheel: just move the mouse while holding down space bar or click on mouse wheel.
Statusbalk
The status bar provides you with general information about the map view, and actions processed or available and offers you tools to manage the map view.
On the left side of the status bar, you can get a summary of actions you’ve done (such as selecting features in a layer, removing layer) or a long description of the tool you are hovering over (not available for all tools). On startup, the bar status also informs you about availability of new or upgradeable plugins (if checked in Plugin Manager settings).
In case of lengthy operations, such as gathering of statistics in raster layers or rendering several layers in map view, a progress bar is displayed in the status bar to show the current progress of the action.
The ![]() Coordinate option shows the current position of the mouse,
following it while moving across the map view. You can set the unit (and precision)
to use in the project properties, General tab.
Click on the small button at the left of the textbox to toggle between
the Coordinate option and the
Coordinate option shows the current position of the mouse,
following it while moving across the map view. You can set the unit (and precision)
to use in the project properties, General tab.
Click on the small button at the left of the textbox to toggle between
the Coordinate option and the  Extents option that displays
in map units, the coordinates of the current lower leftmost and upper rightmost
points of the map view, as you pan and zoom in and out.
Extents option that displays
in map units, the coordinates of the current lower leftmost and upper rightmost
points of the map view, as you pan and zoom in and out.
Next to the coordinate display you will find the Scale display. It shows the scale of the map view. If you zoom in or out, QGIS shows you the current scale. There is a scale selector, which allows you to choose among predefined and custom scales to assign to the map view.
On the right side of the scale display you can define a current magnification level for your map view. This allows to zoom in to a map without altering the map scale, making it easier to accurately tweak the positions of labels and symbols. The magnification level is expressed as a percentage. If the Magnifier has a level of 100%, then the current map is not magnified. Additionally, a default magnification value can be defined within Settings ‣ Options ‣ Rendering ‣ Rendering behaviour, which is very useful for high resolution screen to avoid too small symbols.
Rechts naast het gereedschap Vergrootglas kunt u een huidige rotatie met de klok mee definiëren voor uw kaartweergave in graden.
On the right side of the status bar, there is a small checkbox which can be used to temporarily prevent layers being rendered to the map view (see section Renderen).
To the right of the render functions, you find the  Current CRS: icon with the EPSG code of the current
project CRS. Clicking on this lets you Enable ‘on the fly’ CRS
transformation properties for the current project and apply another CRS to the
map view.
Current CRS: icon with the EPSG code of the current
project CRS. Clicking on this lets you Enable ‘on the fly’ CRS
transformation properties for the current project and apply another CRS to the
map view.
Finally, the  Messages button opens the Log
Messages Panel which informs you on underlying process (QGIS startup, plugins
loading, processing tools...)
Messages button opens the Log
Messages Panel which informs you on underlying process (QGIS startup, plugins
loading, processing tools...)
Tip
Rekenen met de correcte schaal in het kaartvenster
When you start QGIS, the default CRS is WGS 84 (epsg 4326) and
units are degrees. This means that QGIS will interpret any
coordinate in your layer as specified in degrees. To get correct scale values,
you can either manually change this setting, e.g. to meters, in the General
tab under Project ‣ Project Properties, or you can use
the Current CRS: icon seen above. In the latter case,
the units are set to what the project projection specifies (e.g., +units=us-ft).
Onthoud dat de keuze voor het CRS bij het opstarten kan worden ingesteld in Extra ‣ Opties ‣ CRS.