24.6. バッチ処理インターフェイス
24.6.1. はじめに
すべてのアルゴリズム(モデルを含む)はバッチ処理として実行できます。つまりアルゴリズムは、必要な回数を繰り返し実行することで、一つの入力セットだけでなく複数の入力セットを使用して実行できます。大量のデータを処理する際にツールボックスからアルゴリズムを何回も起動する必要がないので、これは便利です。
アルゴリズムをバッチ処理として実行する場合は、ツールボックスの名前を右クリックして表示されるポップアップメニューで、 バッチ処理として実行 を選択して下さい。
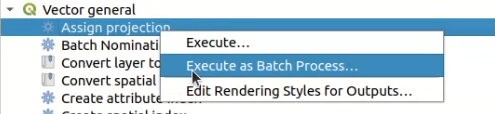
図 24.29 右クリックからバッチ処理
そのアルゴリズムの実行ダイアログボックスが開いている場合は、バッチ処理として実行... ボタンをクリックすると、そこからもバッチ処理インターフェイスを起動できます。
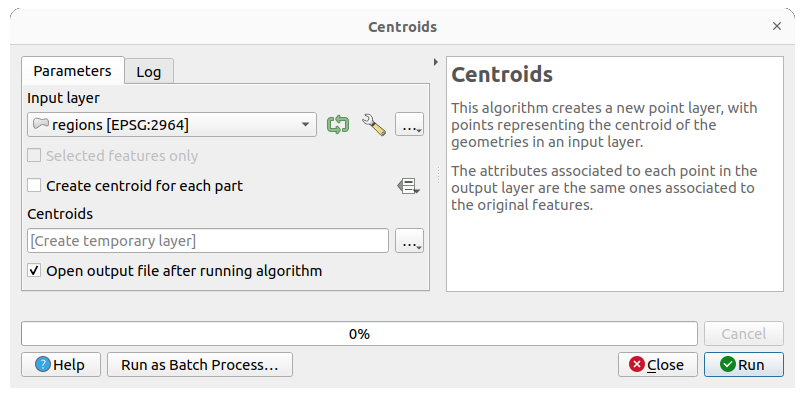
図 24.30 アルゴリズムダイアログからバッチ処理
24.6.2. パラメーターテーブル
Executing a batch process is similar to performing a single execution of an algorithm. Parameter values have to be defined, but in this case we need not just a single value for each parameter, but a set of them instead, one for each time the algorithm has to be executed. Values are introduced using a table like the one shown next, where each row is an iteration and columns are the parameters of the algorithm.
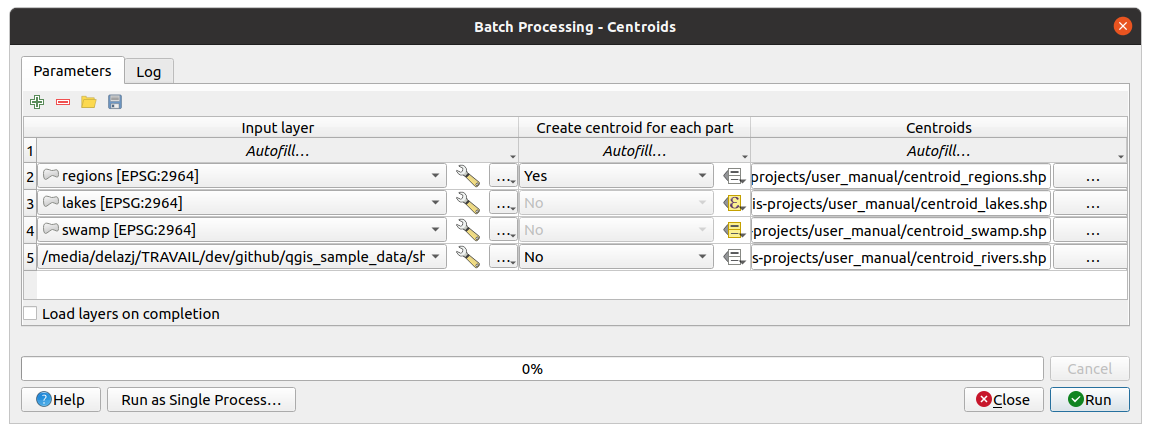
図 24.31 バッチ処理
From the top toolbar, you can:
 Add row: adds a new processing entry for configuration
 Remove row(s): remove selected rows from the table.
Row selection is done by clicking the number at the left and allows
keyboard combination for multi selection.
Remove row(s): remove selected rows from the table.
Row selection is done by clicking the number at the left and allows
keyboard combination for multi selection. Open a batch processing configuration file
 Save the batch processing configuration to a
 .JSONfile that can be run afterwards
By default, the table contains just two rows:
The first row displays in each cell an drop-down menu with options to quickly fill the cells below. Available options depend on the parameter type.
The second row (as well as each subsequent one) represents a single execution of the algorithm, and each cell contains the value of one of the parameters. It is similar to the parameters dialog that you see when executing an algorithm from the toolbox, but with a different arrangement.
At the bottom of the table, you can set whether to  Load
layers on completion.
Load
layers on completion.
テーブルのサイズが設定されると適切な値で埋められます.
24.6.3. パラメーターテーブルの入力
For most parameters, setting the value is trivial. The appropriate widget, same as in the single process dialog, is provided, allowing to just type the value, or select it from a list of possible values, depending on the parameter type. This also includes data-define widget, when compatible.
To automate the batch process definition and avoid filling the table cell by cell, you may want to press down the Autofill... menu of a parameter and select any of the following options to replace values in the column:
Fill Down will take the input for the first process and enter it for all other processes.
 Calculate by Expression... will allow you
to create a new QGIS expression to use to update all existing values within
that column. Existing parameter values (including those from other columns)
are available for use inside the expression via variables.
E.g. setting the number of segments based on the buffer distance of each layer:
Calculate by Expression... will allow you
to create a new QGIS expression to use to update all existing values within
that column. Existing parameter values (including those from other columns)
are available for use inside the expression via variables.
E.g. setting the number of segments based on the buffer distance of each layer:CASE WHEN @DISTANCE > 20 THEN 12 ELSE 8 END
Add Values by Expression... will add new rows using the values from an expression which returns an array (as opposed to Calculate by Expression..., which works only on existing rows). The intended use case is to allow populating the batch dialog using complex numeric series. For example adding rows for a batch buffer using the expression
generate_series(100, 1000, 50)for distance parameter results in new rows with values 100, 150, 200, .... 1000.When setting a file or layer parameter, more options are provided:
Add Files by Pattern... adds new rows to the table for matching files found using a file pattern and folder, with the option to
Search recursively. E.g. *.shp.Select files
Add all files from a directory
Select from open layers
Output data parameter exposes the same capabilities as when executing the algorithm as a single process. Depending on the algorithm, the output can be:
skipped, if the cell is left empty
saved as a temporary layer: fill the cell with
TEMPORARY_OUTPUTand remember to tick the Load layers on completion checkbox.saved as a plain file (
.SHP,.GPKG,.XML,.PDF,.JPG,...) whose path could be set with the Autofill options exposed beforehand. E.g. use Calculate by Expression... to set output file names to complex expressions like:'/home/me/stuff/buffer_' || left(@INPUT, 30) || '_' || @DISTANCE || '.shp'
You can also type the file path directly or use the file chooser dialog that appears when clicking on the accompanying ... button. Once you select the file, a new dialog is shown to allow for auto-completion of other cells in the same column (same parameter).
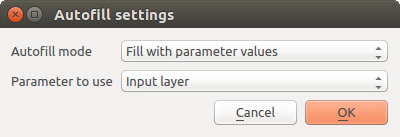
図 24.32 バッチ処理を保存
If the default value (Do not autofill) is selected, it will just put the selected filename in the selected cell from the parameters table. If any of the other options is selected, all the cells below the selected one will be automatically filled based on a defined criteria:
Fill with numbers: incrementally appends a number to the file name
Fill with parameter values: you can select a parameter whose value in the same row is appended to the file name. This is particularly useful for naming output data objects according to input ones.
saved as a layer within a database container:
# Indicate a layer within a GeoPackage file
ogr:dbname='C:/Path/To/Geopackage.gpkg' table="New_Table" (geom)

# Use the "Calculate By Expression" to output to different layers in a GeoPackage
'ogr:dbname=\'' || @project_folder || '/Buffers.gpkg\' table="' || @INPUT || '_' || @DISTANCE || '" (geom)'
24.6.4. バッチ処理を実行する
To execute the batch process once you have introduced all the necessary values, just click on Run. The Log panel is activated and displays details and steps of the execution process. Progress of the global batch task will be shown in the progress bar in the lower part of the dialog.