Wichtig
Übersetzen ist eine Gemeinschaftsleistung Sie können mitmachen. Diese Seite ist aktuell zu 100.00% übersetzt.
24.2. Live-GPS-Verfolgung
QGIS kann Ihnen helfen, Feldkartierungen mit einem GPS-Empfänger durchzuführen. Eine solche Live-Tracking-Operation wird mit der GPS Werkzeugleiste durchgeführt. Einige Gerätekonfigurationen können erforderlich sein, bevor Sie QGIS und den GPS-Empfänger verbinden können.
24.2.1. GPS Werkzeugleiste
Die GPS-Werkzeugleiste bietet die wichtigsten Werkzeuge zur Steuerung einer Live-Tracking-Sitzung. Sie kann über aktiviert werden. Sie verfolgt den Status des Projekts, des GPS und des aktuellen GPS-Tracks und aktiviert Aktionen nur dann, wenn sie sinnvoll sind. Sobald ein Gerät von QGIS erkannt wird, können Sie mit ihm interagieren:
 Mit GPS verbinden
 Verbindung zum GPS-Gerät beenden
 Karte auf GPS-Position zentrieren: die Karte wird sofort auf der aktuellen GPS-Position neu zentriert, unabhängig vom Parameter automatische Neupositionierung.
 Ziellayer für GPS-digitalisierte Objekte setzen: Standardmäßig wird QGIS Dem aktiven Layer folgen für die Digitalisierung von Objekten verwenden. Das bedeutet, dass sich die GPS-Digitalisierungswerkzeuge an den Layer anpassen, der im Bedienfeld Layer ausgewählt wurde, und die erstellten Objekte entsprechend in diesem Layer gespeichert werden. Dies kann zwar in manchen Kontexten nützlich sein, erfordert aber auch eine sorgfältige Interaktion mit anderen Layern, um zu vermeiden, dass Objekte versehentlich im falschen Layern gespeichert werden. Mit dieser Option können Sie während der Live-Tracking-Sitzung explizit einen Layer für die Datenspeicherung angeben, den Sie je nach Bedarf wechseln können. Exponierte Werkzeuge passen sich ebenfalls an den gewählten Layer-Typ an.
Der Layer für das GPS-Ziel wird automatisch editierbar gemacht, wenn ein Objekt erstellt wird, und der Benutzer wird entsprechend informiert.
Aktionen zur Erstellung von Objekten:
 Stützpunkt der aktuellen GPS-Position zur GPS-Spur hinzufügen
 Neues Punktobjekt an der aktuellen GPS-Position erzeugen
 Neues Linienobjekt an der aktuellen GPS-Position erzeugen
 Neues Polygonobjekt an der aktuellen GPS-Position erzeugen
 Spur zurücksetzen
 GPS-Informationsfenster anzeigen: üffent das GPS-Information Bedienfeld
ein Anzeigefeld für den schnellen Zugriff auf einige GPS-Informationskomponenten, die Sie möglicherweise benötigen:
 Position anzeigen
- Höhe anzeigen (geoid)
- Höhe anzeigen (WGS84-Ellipsoid)
- Geschwindigkeit über Grund anzeigen
- Kurs anzeigen
- Spurgesamtlänge anzeigen
- Entfernung zum Spurbeginn anzeigen
Die Schaltfläche
 Einstellungen öffnet ein Dropdown-Menü mit allgemeinen Einstellungen, die während der Sitzung geändert werden können:
- Positionsmarkierung anzeigen
- Kurslinie anzeigen
- Karte in GPS-Richtung drehen
Optionen zur Steuerung der Kartenneuausrichtung:
 Karte immer neu zentrieren, wenn die GPS-Position um einen bestimmten Abstand (im Verhältnis zur Kartenansicht) von der Mitte der Kartenansicht abweicht
 Karte beim Verlassen des Bereichs neu zentrieren
- Niemals neu zentrieren
- Spurstützpunkte automatisch hinzufügen wenn neue Standorte vom GPS-Gerät empfangen werden.
- Hinzugefügte Objekte automatisch speichern: Objekte, die anhand von GPS-Positionen erstellt wurden, werden sofort auf die entsprechenden Layer übertragen (der übliche Layer-Bearbeitungspuffer wird übersprungen).
Zeitstempelziel legt das Feld fest, in dem ein Zeitstempel der Erfassung gespeichert wird
- In GeoPackage/Spatialite protokollieren…: Nach der Aktivierung wird der Benutzer aufgefordert, eine vorhandene GeoPackage/SpatiaLite-Datei auszuwählen oder einen neuen Dateinamen einzugeben. In der Datei wird eine Tabelle
gps_pointsundgps_tracksmit einer vordefinierten Struktur erstellt.Alle eingehenden GPS-Nachrichten werden im Layer
gps_pointsaufgezeichnet, zusammen mit Informationen über Geschwindigkeit, Peilung, Höhe und Genauigkeit des GPS.Wenn das GPS abgetrennt (oder QGIS geschlossen) wird, wird der gesamte aufgezeichnete GPS-Track in die Tabelle
gps_trackseingetragen (zusammen mit einigen berechneten Informationen wie Tracklänge, Start- und Endzeit). - NMEA-Sätze protokollieren…: ermöglicht die Aufzeichnung aller NMEA-Rohdaten des Geräts in eine Textdatei
- GPS Einstellungen… für den Zugriff auf den GPS-Reiter in den globalen Optionen
Tipp
Live-Statusleiste mit Informationen zur Position
Wenn ein GPS-Gerät angeschlossen ist und der Benutzer den Cursor über die Kartenansicht bewegt, zeigt eine Live-Statusleiste die Entfernung und Peilung vom Cursor zur GPS-Position an. Die Einstellungen für Projektentfernung und -peilung werden in dieser Anzeige berücksichtigt. Auf einem Touchscreen-Gerät können Sie die Meldung in der Statusleiste durch Antippen und Halten auslösen.
24.2.2. Das Bedienfeld GPS-Information
Für die vollständige Überwachung eines Live-GPS-Trackings in QGIS müssen Sie möglicherweise das Bedienfeld GPS-Infomation aktivieren ( oder drücken Sie Strg+0).
In der oberen rechten Ecke des Bedienfelds GPS-Information können Sie QGIS durch Klicken mit einem angeschlossenen GPS-Empfänger Verbinden oder die Verbindung zu diesem wieder Trennen.
Oben links auf dem Bedienfeld sind folgende Schaltflächen zugänglich:
- Position: Live-Details zur GPS-Position und zu den Sensoren
 Signal: Signalstärke der Satellitenverbindung
|Optionen| Einstellungen: Dropdown-Menü für Live-Tracking-Optionen, die Sie während einer Sitzung eventuell ändern müssen
24.2.2.1. Positionskoordinaten und weitere Attribute
Auf der Registerkarte |Metadaten| Position sehen Sie, wenn das GPS Signale von Satelliten empfängt, Ihre Position in geografischer Breite, Länge und Höhe zusammen mit zusätzlichen Attributen.
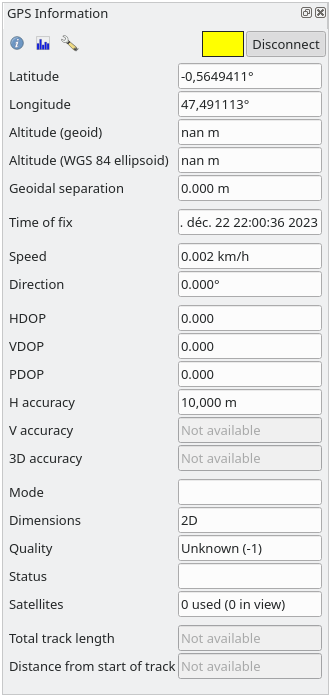
Abb. 24.3 GPS Tracking Position und zusätzliche Attribute
Breitengrad
Längengrad
Höhe (geoid): Höhe/Höhenlage über oder unter dem mittleren Meeresspiegel
Höhe (WGS 84-Ellipsoid): Höhe/Höhenlage über oder unter dem WGS-84-Erdellipsoid
Geoidale Trennung: Differenz zwischen dem WGS-84-Erdellipsoid und dem mittleren Meeresspiegel (Geoid),
-bedeutet, dass der mittlere Meeresspiegel unter dem Ellipsoid liegtZeit des Fix
Geschwindigkeit: Geschwindigkeit über Grund
Richtung: Peilung, gemessen in Grad im Uhrzeigersinn vom geografischen Norden zur Fahrtrichtung
HDOP: Horizontale Verringerung der Genauigkeit (‚Horizontal dilution of precision‘)
VDOP: Vertikale Verringerung der Genauigkeit (‚Vertical dilution of precision‘)
PDOP: Verringerung der Positionsgenauigkeit (‚Positional Dilution of precision‘)
H-Genauigkeit: Horizontale Genauigkeit in Metern
V-Genauigkeit: Vertikale Genauigkeit in Metern
3D Genauigkeit: 3D Root Mean Square (RMS) in Metern
Modus: GPS-Empfängerkonfiguration 2D/3D-Modus, kann
automatischodermanuellseinDimensionen: Positionsfixierung, kann
2D,3DoderKeine FixierungseinQualität: Indikator für die Positionierungsqualität
Status: Status der Positionsbestimmung, kann
GültigoderUngültigseinSatelliten: Anzahl der Satelliten, die für die Ermittlung des Fixes verwendet wurden
Spurengesamtlänge: Gesamtlänge des aktuellen GPS-Tracks
Entfernung zum Spurbeginn: Direkte Entfernung vom ersten Punkt des aktuellen GPS-Tracks zum letzten Punkt
24.2.2.2. Signal
Mit Signal können Sie die Signalstärke der Satelliten sehen, von denen Sie Signale empfangen.
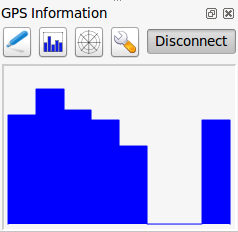
Abb. 24.4 GPS Tracking Signalstärke
24.2.3. Ein Bluetooth GPS fürs Live Tracking anbinden
Mit QGIS können Sie ein Bluetooth GPS für das Aufnehmen von Felddaten anbinden. Um dies durchzuführen, benötigen Sie ein GPS-Gerät mit Bluetooth-Funktion und einen Bluetooth Empfänger an Ihrem Computer.
Als Erstes müssen Sie Ihr GPS Gerät über Bluetooth mit dem Computer verbinden. Stellen Sie das GPS an, gehen Sie zum Bluetooth Icon in Ihrem Infobereich und suchen Sie nach einem neuen Gerät.
Vergewissern Sie sich, dass auf der rechten Seite der Geräteauswahlmaske alle Geräte ausgewählt sind, damit Ihr GPS-Gerät auch unter den verfügbaren Geräten angezeigt wird. Im nächsten Schritt sollte ein serieller Verbindungsdienst verfügbar sein, wählen Sie ihn aus und klicken Sie auf die Schaltfläche Konfigurieren.
Merken Sie sich die Nummer des COM-Ports, der der GPS-Verbindung zugewiesen ist, wie sie den Bluetooth-Eigenschaften zu entnehmen ist.
Machen Sie die Kopplung für die Verbindung nachdem das GPS erkannt wurde. Meist ist der Authorisationskode 0000 oder 1234.
Öffnen Sie nun das Bedienfeld GPS-Information und wechseln Sie zum Bildschirm |Optionen| GPS-Optionen. Wählen Sie den COM-Port, der der GPS-Verbindung zugewiesen ist, und klicken Sie auf Verbinden. Nach einer Weile sollte ein Cursor erscheinen, der Ihre Position anzeigt.
Wenn QGIS keine GPS Daten empfangen kann, sollten Sie Ihr GPS Gerät neustarten, 5-10 Sekunden warten und dann wieder eine Verbindung versuchen. Normalerweise funktioniert diese Lösung. Wenn Sie wieder einen Verbindungsfehler erhalten, vergewissern Sie sich, dass kein anderer Bluetoothempfänger, der an die gleiche GPS Einheit gekoppelt ist, in Ihrer Nähe ist.
24.2.4. Beispiele für die Anbindung von GPS-Geräten in QGIS
24.2.4.1. GPSMAP 60cs verwenden
MS Windows
Der einfachste Weg, dies zu erreichen, ist die Verwendung einer Middleware (Freeware, nicht offen) namens GPSGate.
Starten Sie das Programm, lassen Sie es nach GPS-Geräten suchen (funktioniert sowohl für USB- als auch für BT-Geräte) und dann in QGIS:
In , erkennen Sie das eingesteckte Gerät. Sie können den Modus
Autodetect verwenden.Drücken Sie Verbinden im Bedienfeld GPS-Information.
Ubuntu/Mint GNU/Linux
Wie unter Windows ist der einfachste Weg einen Server, in diesem Fall GPSD, dazwischen zu benutzen, also:
Installieren Sie das Programm:
sudo apt install gpsd
Laden Sie dann das
garmin_gpsKernelmodulsudo modprobe garmin_gps
Dann schließen Sie das Gerät an und überprüfen mit
dmesgdas tatsächliche Laufwerk, das von dem Gerät benutzt wird, zum Beispiel/dev/ttyUSB0.Jetzt können Sie gpsd starten
gpsd /dev/ttyUSB0
Und verbinden Sie sich zuletzt mit dem QGIS Live Tracking Tool.
24.2.4.2. BTGP-38KM Datenlogger verwenden (nur Bluetooth)
Sie können GPSD (unter Linux) oder GPSGate (unter Windows) mühelos verwenden.
24.2.4.3. BlueMax GPS-4044 Datenlogger verwenden (sowohl BT als auch USB)
MS Windows
Das Live-Tracking funktioniert sowohl für den USB- als auch für den BT-Modus, mit GPSGate oder auch ohne GPSGate, indem Sie einfach den Modus Autodetect verwenden oder das Tool auf den richtigen Port richten.
Ubuntu/Mint GNU/Linux
Für USB
Das Live Tracking funktioniert sowohl mit GPSD
gpsd /dev/ttyACM3
alsauch ohne es, indem man das QGIS Live Tracking Tool direkt mit dem Gerät verbindet (zum Beispiel /dev/ttyACM3).
Für Bluetooth
Das Live Tracking funktioniert sowohl mit GPSD
gpsd /dev/rfcomm0
oder ohne es, indem man das QGIS Live Tracking Tool direkt mit dem Gerät verbindet (zum Beispiel /dev/rfcomm0).