Wichtig
Übersetzen ist eine Gemeinschaftsleistung Sie können mitmachen. Diese Seite ist aktuell zu 100.00% übersetzt.
19. Arbeiten mit Vektorkacheln (Vector Tiles)
19.1. Was sind Vektorkacheln?
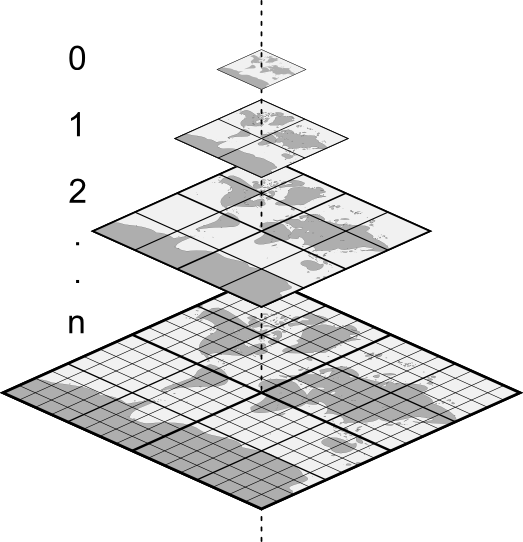
Bei Vektorkacheln handelt es sich um Pakete mit geographischen Daten, die in vordefinierte ungefähr quadratische „Kacheln“ gepackt wurden, um sie über das Internet zu übertragen. Sie kombinieren vorgerenderte Raster- und Vektorkartenkacheln. Der Vektorkachelserver schickt anstelle eines vorgerenderten Kartenbilds vektorbasierte Kartendaten, die auf die Grenzen der Kacheln zugeschnitten wurden. Die zugeschnittenen Kacheln stellen die Maßstabsebenen des Vektorkacheldienstes dar und werden über einen Pyramidenansatz abgeleitet. Mit dieser Datenstruktur wird die Menge der zu übertragenden Daten gegenüber einem ungekachelten Vektordatensatz verringert. Es müssen nämlich nur die Daten des aktuellen Kartenausschnitts im aktuellen Maßstab übermittelt werden. Gegenüber einem gekachelten Rasterdatensatz wird die Datenübertragungsrate auch erheblich reduziert, weil Vektordaten typischerweise deutlich kleiner als eine Bilddatei sind. Vektorkacheln haben keine Darstellungsinformationen, so dass QGIS einen Darstelllungsstil anwenden muss, um die Daten darzustellen.

Abb. 19.1 Pyramidenstruktur eines Vektorkacheldatensatzes mit Maßstabsebenen
19.2. Unterstützte Formate
Vektorkacheln werden in folgenden Formaten unterstützt:
entfernte Quellen (HTTP/S) - im XYZ-Muster -
type=xyz&url=http://example.com/{z}/{x}/{y}.pbflokale Dateien - im XYZ-Muster - z.B.
type=xyz&url=file:///path/to/tiles/{z}/{x}/{y}.pbfeine lokale MBTile-Datenbank - z.B.
type=mbtiles&url=file:///path/to/file.mbtiles
Sie laden einen Vektorkacheldatensatz in QGIS über den Tab  Vector Tile im Dialog Datenquellenverwaltung . Lesen Sie Verwendung von Vector Tiles-Diensten (Vektorkacheln) wie Sie dabei im Detail vorgehen.
19.3. Eigenschaften von Vektorkacheldatensätzen
Der Dialog Layereigenschaften bietet für Vektorkacheln die folgenden Bereiche:
[1] Auch im Bedienfeld Layergestalltung verfügbar
19.3.1. Eigenschaften Information
Der Tab Information kann nicht editiert werden und ist ein guter Platz, um schnell zusammengefasste Informationen und Metadaten des aktuellen Layers nachzuschlagen. Hier erhalten Sie folgende Informationen:
auf der Grundlage des Providers des Layers: Name, URI, Typ und Pfad der Datenquelle, Anzahl der Maßstabsebenen
das Koordinatenbezugssystem: Name, Einheiten, Methode, Genauigkeit, Referenz (d.h., ob es statisch oder dynamisch ist)
von dem was bei den Metadaten ausgefüllt wurde: Zugang, Ausdehnung, Links, Kontakt, Protokoll…
19.3.2. Eigenschaften Quelle
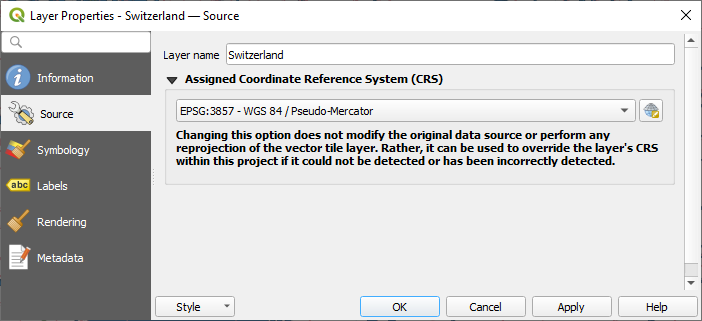
Auf dem Reiter  Quelle werden grundlegende Informationen über die ausgewählte Vektorkachelquelle angezeigt, darunter:
der Layername, der im Layer-Bedienfeld angezeigt wird;
das Koordinatenreferenzsystem: Zeigt das Koordinatenreferenzsystem (KBS) des Layers an. Sie können das KBS des Layers ändern, indem Sie ein kürzlich verwendetes KBS aus der Dropdown-Liste auswählen oder auf die Schaltfläche
 KBS wählen klicken (siehe Auswahl des Koordinatenbezugssystems). Verwenden Sie dieses Verfahren nur, wenn das KBS falsch oder nicht angegeben ist.

Abb. 19.2 Vektorkachellayereigenschaften - Quelle-Reiter
19.3.3. Eigenschaften der Reiter Symbolisierung und Beschriftung

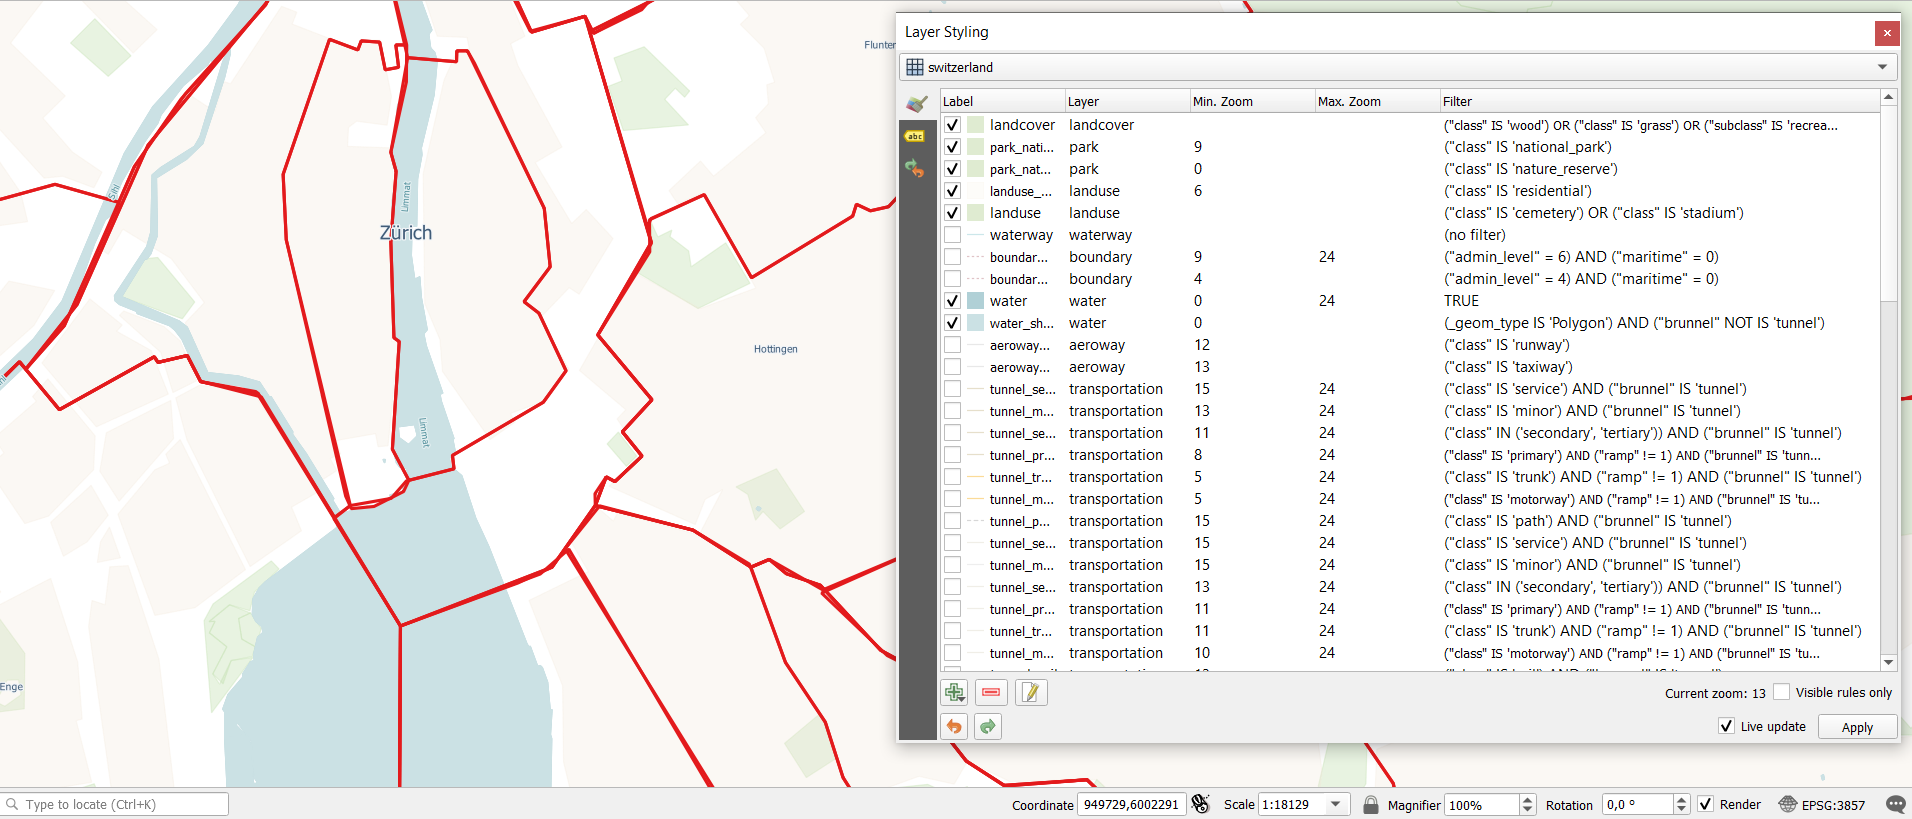
Abb. 19.3 Symbolisierung von Vektorkachellayern
19.3.3.1. Regeln definieren
Da Vektorkacheln aus Punkt-, Linien- und Polygongeometrien bestehen sind die jeweiligen Symbolisierungen verfügbar. Um eine kartografische Darstellung anzuwenden (mit Symbolisierung und/oder Beschriftung) können Sie entweder:
Eine Stil URL benutzen, während Sie eine Vektorkachelverbindung herstellen. Die Symbolisierung wird sofort im Reiter
 Symbolisierung angezeigt, nachdem der Layer in QGIS geladen wurde.
Oder Sie machen Ihre eigene Symbolisierung und Beschriftung in den entsprechenden Reitern der Layereigenschaften. Standardmäßig weist QGIS den Objekten auf Basis ihres Geometrietyps das selbe Symbol zu.
In beiden Fällen muss eine Darstellung für Vektorkacheln einen regelbasierten Renderer auf die Objekte anwenden, der folgendes enthält:
ein Symbol oder eine Beschriftung für Vektoren
eine Beschriftung, also einen Titel, um die Regel verständlich zu identifizieren
den Namen eines bestimmten Layers, auf den die Regel angewendet werden soll, falls nicht
(alle Layer)benutzt werden sollMin. Zoom und Max. Zoom, für den Darstellungsbereich. Symbolisierung und Beschriftung können vom Zoom abhängen.
ein Filter, also ein QGIS-Ausdruck, um die Objekte festzulegen, auf die der Stil angewendet wird
Sie fügen eine Regel hinzu, indem Sie die Schaltfläche  Regel hinzufügen drücken und den Symboltyp (Markierung, Linie, Füllung) entsprechend des Geoemtrietyps auswählen. Sie können auch die
  Gewählte Regel löschen oder die
  Aktuelle Regel bearbeiten.
Unten im Fenster sehen Sie den Aktuellen Zoom. Haken Sie die Option Nur sichtbare Regeln oben im Dialog an, um die Regelliste auf diejenigen einzuschränken, die im aktuellen Zoom sichtbar sind. Das erleichtert es Ihnen, mit komplexen Vektorstilen zu arbeiten und hilft Ihnen, problematische Regeln zu identifizieren. Die Eingabezeile  Filterregeln hilft Ihnen dabei, schnell eine bestimmte Regel zu finden, indem sie die Felder Beschriftung, Layer und Filter durchsucht.
In der Abbildung Abb. 19.3 machen wir einen Stil für den Layer landuse von OpenStreetMap. Für das bessere Verständnis sind die meisten Regeln ausgeschaltet.
19.3.3.2. Layerdarstellung
Auf der Registerkarte Symbolisierung können Sie auch einige Optionen einstellen, die sich immer auf alle Objekte des Layers auswirken:
Deckkraft: Mit diesem Werkzeug können Sie den darunter liegenden Layer in der Kartenansicht sichtbar machen. Verwenden Sie den Schieberegler, um die Sichtbarkeit Ihres Beschriftungslayers an Ihre Bedürfnisse anzupassen. Sie können den Prozentsatz der Sichtbarkeit auch im Menü neben dem Schieberegler genau festlegen.
Mischmodus: Mit diesen Werkzeugen können Sie spezielle Rendering-Effekte erzielen, die Sie bisher nur von Graphikprogrammen her kennen. Die Pixel von sich überlagernden Layern werden durch die verwendete Einstellungen gemischt, wie in Mischmodi beschrieben.
19.3.3.3. Stile
Auf den meisten Reitern finden Sie unten die Menüauswahl , die einen schnellen Weg bietet, Stile zu speichern, zu laden, zu erzeugen sowie zu wechseln um sie auf die Vektorkacheln anzuwenden. Vektorkachelstile können von QGIS als QML-Dateien gespeichert werden und sie können aus folgenden Formaten geladen werden:
QML-Dateien (QML - Das QGIS-Stil-Dateiformat)
MapBox GL Json Stildateien
Weitere Details unter Layer-Eigenschaften speichern und teilen.
19.3.4. Eigenschaften Darstellung
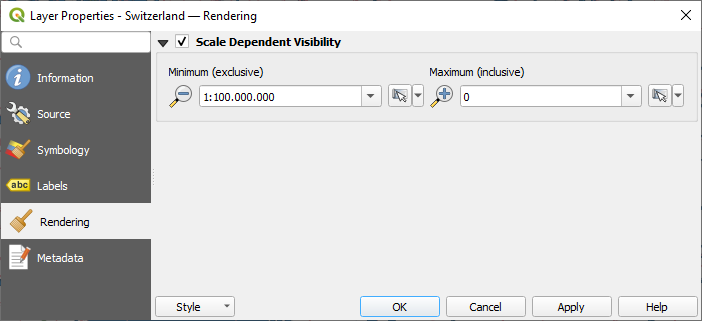
Unter Maßstabsabhängige Sichtbarkeit können Sie die Maßstäbe Maximum (inklusive) und Minimum (exklusive) festlegen und damit einen Bereich von Maßstäben definieren, in dem die Objekte des Layers sichtbar sind. Außerhalb dieses Bereichs werden sie ausgeblendet. Die Schaltfläche  Auf aktuellen Kartenmaßstab setzen hilft Ihnen, den aktuellen Maßstab der Kartenansicht als Grenze für den Sichtbarkeitsbereich zu verwenden. Siehe Einstellen des Sichtbarkeitsmaßstabs für weitere Informationen.

Abb. 19.4 Vektorkachellayereigenschaften - Darstellungs-Reiter
19.3.5. Eigenschaften Metadaten
Der Tab  Metadaten ermöglicht es Ihnen, Metadaten für Ihren Layer zu erstellen oder zu editieren. Siehe Metadaten für weitere Informationen.


