21.2. Live GPS tracking
To activate live GPS tracking in QGIS, you need to select  GPS Information Panel or press Ctrl+0.
You will get a new docked window on the left side of the canvas.
GPS Information Panel or press Ctrl+0.
You will get a new docked window on the left side of the canvas.
There are three possible screens in this GPS tracking window:
 Position: GPS position coordinates and an interface for manually entering
vertices and features
Position: GPS position coordinates and an interface for manually entering
vertices and features Signal: signal strength of satellite connections
 Options:GPS options screen (see Abb. 21.5)
With a plugged-in GPS receiver (has to be supported by your operating system), a simple click on Connect connects the GPS to QGIS. A second click (now on Disconnect) disconnects the GPS receiver from your computer. For GNU/Linux, gpsd support is integrated to support connection to most GPS receivers. Therefore, you first have to configure gpsd properly to connect QGIS to it.
With the Recenter button the map will jump to the current GPS position.
Warnung
Wenn Sie Ihre Position in die Oberfläche aufnehmen wollen müssen Sie erst einen neuen Vektorlayer erstellen und diesen in den Bearbeitungsmodus bringen um Ihren Track aufnehmen zu können.
When a GPS device is connected and the user moves the cursor over the map canvas, a live status bar message displays the distance and bearing from the cursor to the GPS position. Project distance and bearing settings are respected in this display.
Tipp
Touch Screen Devices
On a touch screen device use a tap-and-hold event to trigger the live status bar message.
21.2.1. Positionskoordinaten
If the GPS is receiving signals from satellites, you will
see your position in latitude, longitude and altitude together with additional
attributes.
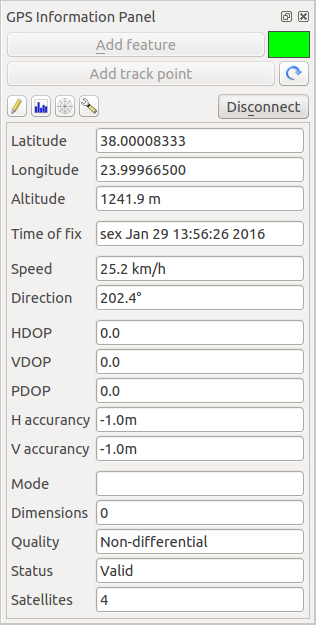
Abb. 21.3 GPS Tracking Position und zusätzliche Attribute
21.2.2. GPS Signalstärke
Hier können Sie die Signalstärke der Satelliten von denen Sie Signale empfangen sehen.
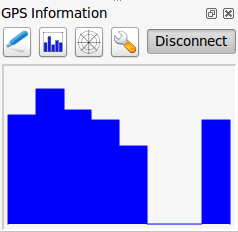
Abb. 21.4 GPS Tracking Signalstärke
21.2.3. GPS Optionen
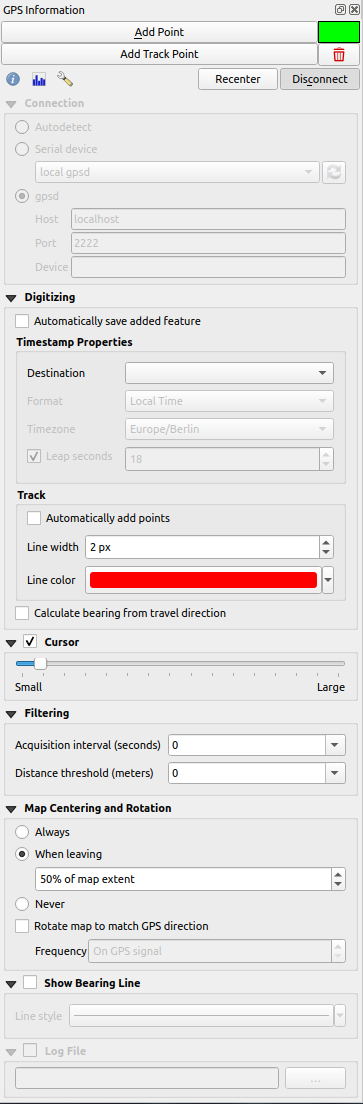
Abb. 21.5 GPS Tracking Optionsansicht
Here you can specify:
Connection
In case of connection problems, you can switch between:
 Automatisch feststellen
 Serial device (reload required if a new GPS Device is connected)
- gpsd (wählt den Host, Port und das Gerät mit dem Ihr GPS verbunden ist)
A click on Connect again initiates the connection to the GPS receiver.
Digitizing
Sie können
aktivieren wenn Sie sich im Bearbeitungsmodus befinden. Oder Sie können Punkte automatisch hinzufügen aktivieren um Punkte mit einer bestimmten Größe und Farbe der Kartenansicht hinzuzufügen.The Calculate bearing from travel direction can be used if the device reports faulty bearing measurements and it will calculate the GPS bearing based on the previous two recorded locations.
Cursor: you can use a slider
 to shrink
and grow the position cursor on the canvas.
to shrink
and grow the position cursor on the canvas.Filtering: You can also set an Acquisition interval (seconds) and a Distance threshold (meters) parameters to keep the cursor still active when the receiver is in static conditions.
Map Centering and Rotation
Das Aktivieren des Radioknopfes
Karte zentrieren ermöglicht es auszuwählen, wie das Kartenfenster aktualisiert werden soll. Dies enthält ‚immer beim Verlassen‘, wenn die aufgenommenen Koordinaten den Bereich des Kartenfensters verlassen oder ‚niemals‘, um die Kartenausschnitt beizubehalten.Activating Rotate map to match GPS direction will automatically rotate the map canvas so that it is oriented in the same direction as the GPS bearing.
Activating Show Bearing Line will show a line from the GPS location pointing in current path direction of the GPS.
Schliesslich können Sie das Kontrollkästchen
Logdatei aktivieren und einen Pfad angeben, wo die Logdateien über die GPS-Messung abgelegt werden.
If you want to set a feature manually, you have to go back to
Position and click on Add Point or Add Track Point.
21.2.4. Ein Bluetooth GPS fürs Live Tracking anbinden
Mit |qg| können Sie ein Bluetooth GPS für das Aufnehmen von Felddaten anbinden. Um dies durchzuführen benötigen Sie ein Bluetooth Gerät und einen Bluetooth Empfänger auf Ihrem Computer.
Als erstes müssen Sie Ihr GPS Gerät erkennen lassen und mit dem Computer verbinden. Stellen Sie das GPS an, gehen Sie zum Bluetooth Icon in Ihrem Infobereich und suchen Sie nach einem Neuen Gerät.
On the right side of the Device selection mask make sure that all devices are selected so your GPS unit will probably appear among those available. In the next step a serial connection service should be available, select it and click on Configure button.
Denken Sie daran dass die an die GPS Verbindung angebundenen COM Ports aus den Bluetooth Eigenschaften resultieren.
Machen Sie die Kopplung für die Verbindung nachdem das GPS erkannt wurde. Normalerweise ist der Authorisationskode 0000.
Now open GPS information panel and switch to GPS
options screen. Select the COM port assigned to the GPS connection and click
the Connect. After a while a cursor indicating your position should
appear.
Wenn |qg| keine GPS Daten empfangen kann sollten Sie Ihr GPS Gerät neustarten, 5-10 Sekunden warten und dann wieder eine Verbindung versuchen. Normalerweise funktioniert diese Lösung. Wenn Sie wieder einen Verbindungsfehler erhalten vergewissern Sie sich dass kein anderer Bluetoothempfänger, der an die gleiche GPS Einheit gekoppelt ist, in Ihrer Nähe ist.
21.2.5. GPSMAP 60cs verwenden
21.2.5.1. MS Windows
Easiest way to make it work is to use a middleware (freeware, not open) called GPSGate.
Launch the program, make it scan for GPS devices (works for both USB and BT
ones) and then in QGIS just click Connect in the Live tracking panel
using the Autodetect mode.
21.2.5.2. Ubuntu/Mint GNU/Linux
Wie unter Windows ist der einfachste Weg einen Server, in diesem Fall GPSD, dazwischen zu benutzen, also
sudo apt install gpsd
Laden Sie dann das garmin_gps Kernelmodul
sudo modprobe garmin_gps
Und verbinden Sie dann die Einheit. Überprüfen Sie dann mit dmesg die aktuelle von dem Gerät verwendete Einheit, zum Beispiel /dev/ttyUSB0. Starten Sie jetzt gpsd
gpsd /dev/ttyUSB0
Und verbinden Sie sich zuletzt mit dem |qg| Live Tracking Tool.
21.2.6. BTGP-38KM Datenlogger verwenden (nur Bluetooth)
Sie können GPSD (unter Linux) oder GPSGate (unter Windows) mühelos verwenden.
21.2.7. BlueMax GPS-4044 Datenlogger verwenden (sowohl BT als auch USB)
21.2.7.1. MS Windows
Das Live Tracking funktioniert mit USB und BT Modus, mit oder ohne GPSGate, benutzen Sie einfach den Automatisch feststellen Modus oder stellen Sie das Tool auf den richtigen Port ein.
21.2.7.2. Ubuntu/Mint GNU/Linux
Für USB
Das Live Tracking funktioniert sowohl mit GPSD
gpsd /dev/ttyACM3
oder ohne es, indem man das |qg| Live Tracking Tool direkt mit dem Gerät verbindet (zum Beispiel /dev/ttyACM3).
Für Bluetooth
Das Live Tracking funktioniert sowohl mit GPSD
gpsd /dev/rfcomm0
oder ohne es, indem man das |qg| Live Tracking Tool direkt mit dem Gerät verbindet (zum Beispiel /dev/rfcomm0).