Wichtig
Übersetzen ist eine Gemeinschaftsleistung Sie können mitmachen. Diese Seite ist aktuell zu 100.00% übersetzt.
22.2.7. Das Tabellen-Element
Sie können Tabellen-Elemente verwenden, um Ihre Karte zu dekorieren und zu erklären:
Attribut-Tabelle: zeigt eine Zusammenstellung der Attribute eines Layers, basierend auf vordefinierten Regeln
Feste Tabelle: fügt eine einfache Texttabelle ein, in der Informationen unabhängig von den Layern enthalten sein können.
22.2.7.1. Das Attributtabellen-Element
Für jeden Layer im Projekt können die Attribute im Drucklayout angezeigt werden. Verwenden Sie das Werkzeug  Attribut-Tabelle hinzufügen wie in der Anleitung zur Erstellung von Elementen beschrieben, um ein neues Tabellen-Element hinzuzufügen. Dies können Sie dann, wie in Interaktion mit Layout-Elementen dargestellt, bearbeiten.
Standardmäßig lädt ein neues Attributtabellen-Element die ersten Zeilen des ersten (alphabetisch sortierten) Layers mit allen Feldern. Sie können die Tabelle jedoch dank des Bedienfelds Elementeigenschaften anpassen. Abgesehen von den gemeinsamen Eigenschaften verfügt dieses Element über die folgenden Funktionalitäten (siehe Abb. 22.38):
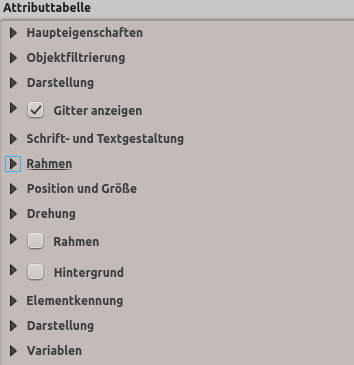
Abb. 22.38 Übersicht über die Elementeigenschaften eines Attributtabellen-Elements
Haupteigenschaften
Der Bereich Haupteigenschaften der Attributtabelle bietet die folgenden Funktionalitäten (siehe Abb. 22.39):
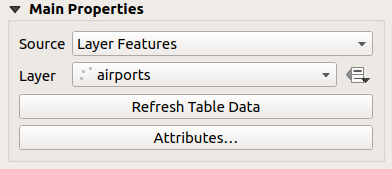
Abb. 22.39 Die Haupteigenschaften eines Attributtabellen-Elements
Für Quelle können Sie standardmäßig nur Layer-Objekte auswählen, sodass Sie einen Layer aus den im Projekt geladenen Vektorlayern auswählen können.
Die Schaltfläche
 Datendefinierte Übersteuerung neben der Layer-Liste ermöglicht es Ihnen, den Layer, der zur Befüllung der Tabelle verwendet wird, dynamisch zu ändern, z.B. könnten Sie die Attributtabelle mit verschiedenen Layer-Attributen pro Atlas-Seite füllen. Beachten Sie, dass die verwendeten Tabellenfelder (Abb. 22.42) diejenigen des Layers sind, der in der Dropdown-Liste Layer ausgewählt ist, und dass diese Struktur nicht verändert wird. Das bedeutet, dass eine datendefinierte Einstellung auf die Tabelle eines anderen Layers, mit anderen Feldern, zu leeren Spalten in der Tabelle führt.
Falls Sie im Bedienfeld Atlas die Option
 Einen Atlas erzeugen aktiviert haben (siehe Einen Atlas erzeugen), stehen zwei weitere Optionen unter Quelle zur Verfügung:
Aktuelles Atlas- Objekt (siehe Abb. 22.40): es wird keine Option zur Auswahl des Layers angezeigt und das Tabellen-Element wird nur eine Zeile mit den Attributen des aktuellen des Atlas-Objekts anzeigen.
Beziehungskinder (siehe Abb. 22.41): Drop-down-Menü mit den Beziehungsnamen wird angezeigt. Diese Funktion kann nur verwendet werden, wenn Sie eine Beziehung mit Ihrem Atlas Coverage Layer als übergeordnetes Objekt definiert haben. Die Tabelle zeigt dann die untergeordneten Zeilen des aktuellen Objekts des Atlas Coverage Layers.
Die Schaltfläche Tabellendaten aktualisieren kann verwendet werden, um die Tabelle zu aktualisieren, wenn sich der aktuelle Inhalt der Tabelle geändert hat.
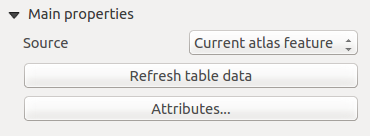
Abb. 22.40 Die Haupteigenschaften eines Attributtabellen-Elements bei der Auswahl ‚Aktuelles Atlas-Objekt‘
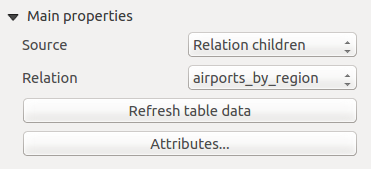
Abb. 22.41 Die Haupteigenschaften eines Attributtabellen-Elements bei der Auswahl „Beziehungskinder“
Die Schaltfläche Attribute… startet den Dialog Attribute wählen (siehe Abb. 22.42), mit dem man den sichtbaren Inhalt der Tabelle ändern kann. Der obere Teil des Fensters zeigt die Liste der anzuzeigenden Attribute und der untere Teil hilft beim Sortieren der Daten.
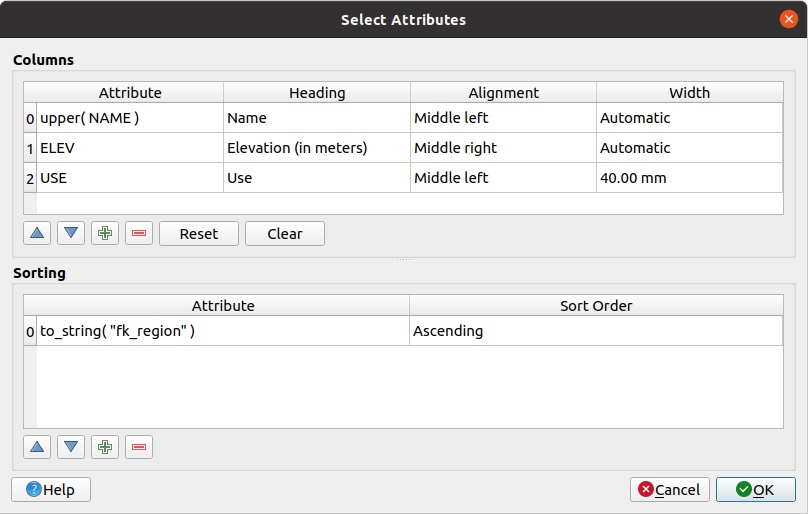
Abb. 22.42 Der Dialog Attribute wählen
Im oberen Abschnitt Spalten können Sie:
Verschieben Sie Attribute in der Liste nach oben oder unten, indem Sie die Zeilen markieren und dann mit den Schaltflächen
 und
und  die Zeilen verschieben. Es können mehrere Zeilen gleichzeitig ausgewählt und verschoben werden.
Fügen Sie ein Attribut mit der Schaltfläche
 hinzu. Dadurch wird am unteren Ende der Tabelle eine leere Zeile eingefügt, in der Sie ein Feld als Attributwert auswählen oder ein Attribut über einen regulären Ausdruck erstellen können.
Entfernen Sie ein Attribut mit der Schaltfläche
 . Es können mehrere Zeilen auf einmal ausgewählt und entfernt werden.
Setzen Sie die Attributtabelle mit der Schaltfläche Rücksetzen auf ihren Standardzustand zurück.
Löschen Sie die Tabelle mit der Schaltfläche Leeren. Dies ist nützlich, wenn Sie eine große Tabelle haben, aber nur eine kleine Anzahl von Attributen anzeigen möchten. Anstatt jede Zeile manuell zu entfernen, kann es schneller sein, die Tabelle zu löschen und die benötigten Zeilen hinzuzufügen.
Zellüberschriften können durch Änderung des Textes in der Spalte Überschrift angepasst werden.
Die Textausrichtung der Zellen kann mit der Spalte Ausrichtung verwaltet werden, die die Position des Textes innerhalb der Tabellenzelle festlegt.
Die Zellenbreite kann manuell verwaltet werden, indem benutzerdefinierte Werte in die Spalte Breite eingetragen werden.
Im unteren Abschnitt Sortierung können Sie:
Fügen Sie ein Attribut hinzu, nach dem die Tabelle sortiert werden soll: Drücken Sie die Schaltfläche
 und eine neue leere Zeile wird hinzugefügt. Fügen Sie ein Feld oder einen Ausdruck in die Spalte Attribut ein und setzen Sie die Sortierreihenfolge auf Aufsteigend oder Absteigend.
Wählen Sie eine Zeile in der Liste aus und verwenden Sie die Schaltflächen
 und
und  , um die Sortierpriorität auf Attributsebene zu ändern. Wenn Sie eine Zelle in der Spalte Sortierung auswählen, können Sie die Sortierreihenfolge des Attributfeldes ändern.
Verwenden Sie die Schaltfläche
 , um ein Attribut aus der Sortierliste zu entfernen.
Objektfiltrierung
Der Bereich Objektfiltrierung der Attributtabelle bietet die folgenden Funktionalitäten (siehe Abb. 22.43):
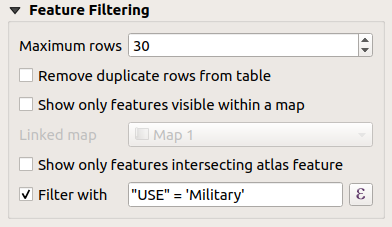
Abb. 22.43 Der Bereich Objektfiltrierung eines Attributtabellen-Elements
Sie können:
Die Maximalen Zeilen, die dargestellt werden sollen, festlegen.
 Doppelte Zeilen aus der Tabelle entfernen aktivieren, um nur eindeutige Datensätze zu zeigen.
Aktivieren Sie das Kontrollkästchen Nur auf der Karte sichtbare Objekte anzeigen und wählen Sie die entsprechende Verknüpfte Karte, deren Attribute für sichtbare Objekte angezeigt werden sollen.
Die Option
 Nur das Atlas-Objekt schneidende Objekte anzeigen ist nur verfügbar, wenn
  Einen Atlas erzeugen aktiviert ist. Wenn die Option aktiviert ist, werden in der Tabelle nur Objekten angezeigt, die das aktuelle Atlas-Objekt schneiden.
Aktivieren Sie
 :guilabel:`Filtern nach‘ und geben Sie einen Filter direkt in die Eingabezeile ein verwenden Sie die Schaltfläche
  um mit dem Ausdruckseditor einen Filter zu erzeugen. Ein paar Beispiele für Filteranweisungen, die Sie verwenden können, wenn Sie den Layer „airports“ aus dem Alaska-Datensatz geladen haben:
ELEV > 500NAME = 'ANIAK'NAME NOT LIKE 'AN%'regexp_match( attribute( $currentfeature, 'USE' ) , '[i]')
Der letzte reguläre Ausdruck wird nur die Flughäfen einfügen die einen Buchstaben ‚i‘ in der Attributspalte ‚USE‘ haben.
Darstellung
Der Bereich Erscheinungsbild der Attributtabelle bietet die folgenden Funktionalitäten (siehe Abb. 22.44):
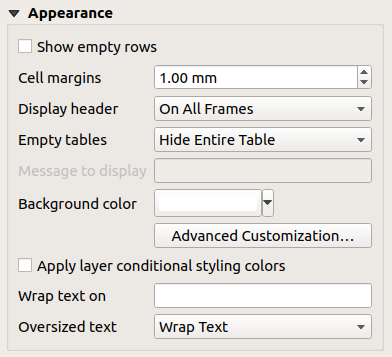
Abb. 22.44 Der Bereich Erscheinungsbild eines Attributtabellen-Elements
Klicken Sie
 Zeige leere Zeilen, um die Attributtabelle mit leeren Zellen zu füllen, diese Option kann auch verwendet werden, um zusätzliche leere Zellen zu schaffen, wenn Sie ein Ergebnis anzeigen wollen.
Mit Zellenränder können Sie die Ränder um den Text in jeder Zelle der Tabelle definieren.
Mit Kopf anzeigen können Sie von einer Liste eine der voreingestellten Optionen ‚Im ersten Rahmen‘, ‚Auf allen Rahmen‘ oder ‚Kein Kopf‘ auswählen.
Die Option Leere Tabellen kontrolliert, was dargestellt wird, wenn die Ergebnisauswahl leer ist:
Nur Kopf zeichnen zeichnet nur den Kopf, außer Sie haben ‚Kein Kopf‘ bei Kopf anzeigen ausgewählt.
Ganze Tabelle ausblenden zeichnet nur den Hintergrund der Tabelle. Sie können im Bereich Rahmen
 Hintergrund nicht anzeigen, wenn Rahmen leer ist aktivieren, um die Tabelle komplett auszublenden.
Eingestellte Meldung anzeigen zeichnet den Kopf und fügt eine Zelle ein, die sich über alle Spalten erstreckt und eine Nachricht wie ‚Kein Ergebnis‘ kann in der Option Anzuzeigende Melkdung bereitgestellt werden.
Die Option Anzuzeigende Meldung ist nur aktiviert, wenn Sie Eingestellte Meldung anzeigen bei Leere Tabelle gewählt haben. Die angegebene Nachricht wird in der Tabelle in der ersten Zeile gezeigt, wenn das Ergebnis eine leere Tabelle ist.
Mit Hintergrundfarbe können Sie die Hintergrundfarbe der Tabelle mit Hilfe des FArbauswahl-Werkzeugs festlegen. Mit der Option Fortgeschrittene Anpassung können Sie verschiedene Hintergrundfarben für jede Zelle definieren (siehe Abb. 22.45)
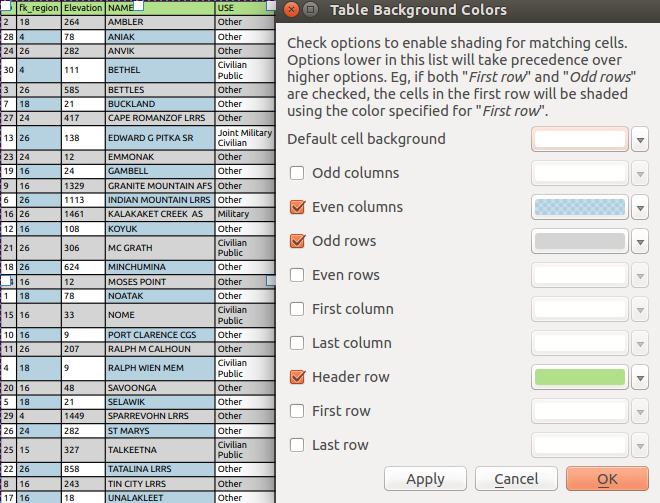
Abb. 22.45 Der Dialog Tabellenhintergrundfarben
 Bedingte Layergestaltungsregeln verwenden: die im Layer vorhandene bedingte Tabellenformatierung wird innerhalb der Layout-Attribut-Tabelle angewendet (Hintergrundfarbe, Schriftfamilie und Eigenschaften wie fett, kursiv, durchgestrichen, unterstrichen, Farbe, …). Bedingte Formatierungsregeln haben Vorrang vor anderen Formatierungseinstellungen in der Layouttabelle, z. B. haben sie Vorrang vor anderen Einstellungen für die Hintergrundfarbe von Zellen wie alternierenden Zeilenfarben.
Mit der :gui-Label:`Textumbruch bei` Option können Sie ein Zeichen definieren, bei dem der Zellinhalt umgebrochen wird
Mit Übergroßer Text definieren Sie das Verhalten, wenn die für eine Spalte eingestellte Breite kleiner ist als die Länge ihres Inhalts. Es kann Text umbrechen oder Text abschneiden sein.
Bemerkung
Weitere Eigenschaften des Attributtabellen-Elements werden im Anschluss im Abschnitt Gemeinsame Funktionalitäten der Tabellen beschrieben.
22.2.7.2. Das Feste Tabellenelement
Zusätzliche Informationen über die Karte können manuell in eine Tabelle eingefügt werden, indem man  Feste Tabelle hinzufügen wählt und der Anleitung zur Erstellung von Layout-Elementen folgt, um ein neues Tabellenelement hinzuzufügen. Dieses können Sie dann, wie in Interaktion mit Layout-Elementen dargestellt, bearbeiten.
Standardmäßig wird im Kartenlayout eine leere Tabelle mit zwei minimierten Spalten und Zeilen angezeigt. Sie müssen die Tabelle im Bedienfeld Elementeigenschaften anpassen. Abgesehen von den gemeinsamen Elementeigenschaften, hat dieses Element die folgenden Funktionalitäten:
Haupteigenschaften
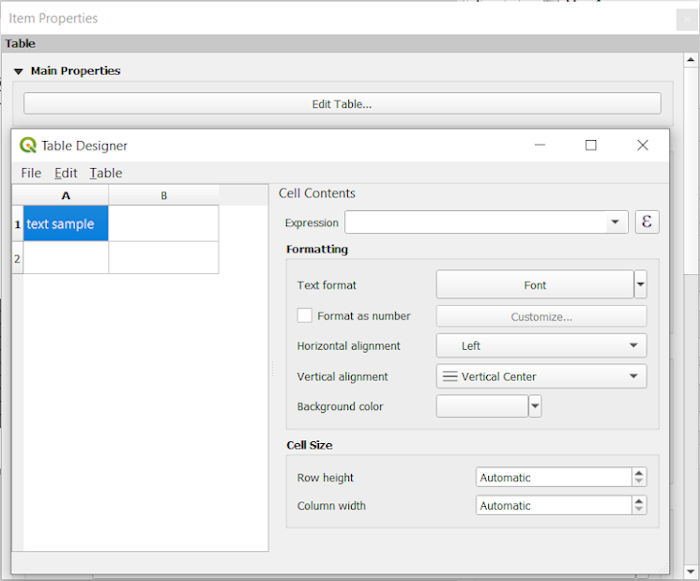
Abb. 22.46 Bearbeitungsfeld für ein festes Tabellen-Elemente
In den Haupteigenschaften können Sie mit dem Tabellenentwurf arbeiten, wenn Sie auf die Schaltfläche Tabelle bearbeiten… klicken:
Sie können in die Tabelle klicken und Texte manuell einfügen.
Über die Menüs im oberen Bereich ist es möglich:
Inhalt aus Zwischenablage importieren, indem Sie zu Datei gehen (dies überschreibt die vorhandenen Eingaben).
mit Auswahlfunktionen für Zeilen und Spalten arbeiten, indem Sie zu Bearbeiten gehen.
Zeilen einfügen, Spalten einfügen, Zeilen löschen, Spalten löschen sowie die Verwendung der Option
 Kopfzeile einschließen.
Sie können mit dem Abschnitt Zellinhalt auf der rechten Seite arbeiten und:
Definieren Sie das Textformat der ausgewählten Zellen unter Formatierung.
indem Sie auf die Schaltfläche |Ausdruck| klicken und einen regulären Ausdruck für die Eingabe in der Zelle verwenden
durch Auswahl des Textformats
durch die Definition von Horizontaler Ausrichtung und Vertikaler Ausrichtung
durch Auswahl einer Hintergrundfarbe
Definieren Sie die Zellengröße mit Zeilenhöhe und Spaltenbreite.
Darstellung
Der Bereich Erscheinungsbild der festen Tabelle bietet die folgenden Funktionalitäten:
Klicken Sie auf
 Zeige leere Zeilen, um die Attributtabelle mit leeren Zellen zu füllen.
Mit Zellenränder können Sie die Ränder um den Text in jeder Zelle der Tabelle definieren.
Mit Kopf anzeigen können Sie von einer Liste eine der voreingestellten Optionen ‚Im ersten Rahmen‘, ‚Auf allen Rahmen‘ oder ‚Kein Kopf‘ auswählen.
Mit Hintergrundfarbe können Sie die Hintergrundfarbe der Tabelle mit dem Farbauswahl Werkzeug einstellen. Mit der Option Fortgeschrittene Anpassungen… können Sie verschiedene Hintergrundfarben für jede Zelle definieren.
Mit Übergroßer Text definieren Sie das Verhalten, wenn die für eine Spalte eingestellte Breite kleiner ist als die Länge ihres Inhalts. Es kann Text umbrechen oder Text abschneiden sein.
Bemerkung
Weitere Eigenschaften des festen Tabellenelements sind im Abschnitt Gemeinsame Funktionalitäten der Tabellen beschrieben.
22.2.7.3. Gemeinsame Funktionalitäten der Tabellen
Gitter anzeigen
Die Gruppe Gitter anzeigen der Tabellenelemente bietet die folgenden Funktionen (siehe Abb. 22.47):
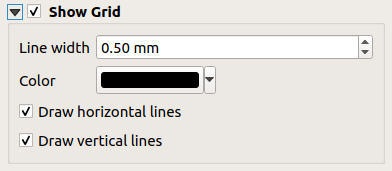
Abb. 22.47 Der Bereich Gitter anzeigen von Tabellen-Elementen
Aktivieren Sie das Kontrollkästchen Gitter anzeigen, wenn Sie das Gitter, also die Umrisse der Tabellenzellen, anzeigen wollen. Sie können Horizontale Linien anzeigen oder Vertikale Linien anzeigen einzeln oder zusammen aktivieren.
Mit Linienstärke können Sie die Dicke der Linien, die im Gitter verwendet werden, festlegen.
Die :guilabel:`Farbe‘ des Gitters kann mit Hilfe des Farbauswahl-Werkzeugs eingestellt werden.
Schrift- und Textgestaltung
Der Bereich Schrift- und Textgestaltung eines Tabellen-Elements bietet die folgenden Funktionen (siehe Abb. 22.48):
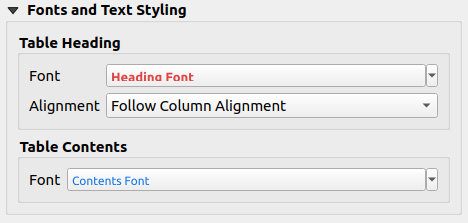
Abb. 22.48 Der Bereich Schrift- und Textgestaltung von Tabellen-Elementen
Sie können Schriftart-Eigenschaften für Tabellenkopf und Tabelleninhalt definieren, unter Verwendung des erweiterten Texteinstellungen-Werkzeug (mit Puffer, Schatten, Farbeffekten, Transparenz, Hintergrund, Farbgebung, …). Beachten Sie, dass diese Änderungen keine Auswirkungen auf die Zellen haben, denen eine benutzerdefinierte Schriftart zugewiesen wurde, entweder aus dem Abschnitt Erscheinungsbild oder aus dem Dialog Tabellenentwurf. Es werden nur Zellen mit der Standarddarstellung überschrieben.
Für Tabellenkopf können Sie zusätzlich die Ausrichtung auf
Spaltenausrichtung folgensetzen oder diese Einstellung durch die Wahl vonLinks,ZentriertoderRechtsüberschreiben. Die Spaltenausrichtung wird mithilfe des Dialogs Attribute auswählen eingestellt (siehe Abb. 22.42 ).
Rahmen
Der Bereich Rahmen der Tabellenelementeigenschaften bietet die folgenden Funktionen (siehe Abb. 22.49):
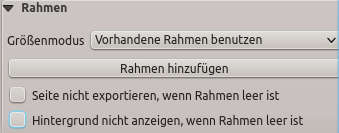
Abb. 22.49 Der Bereich Rahmen von Tabellen-Elementen
Mit dem Größenmodus können Sie auswählen, wie der Inhalt der Attributtabelle gerendert wird:
Vorhandene Rahmen verwendenzeigt das Ergebnis nur im ersten Rahmen und den hinzugefügten Rahmen an.Auf nächste Seite erweiternerstellt so viele Rahmen (und entsprechende Seiten), wie nötig sind, um die gesamte Auswahl der Attributtabelle anzuzeigen. Jeder Rahmen kann im Layout verschoben werden. Wenn Sie die Größe eines Rahmens ändern, wird die resultierende Tabelle auf die anderen Rahmen aufgeteilt. Der letzte Rahmen wird so zugeschnitten, dass er in die Tabelle passt.Bis zum Ende wiederholenerzeugt ebenso viele Rahmen wie die Option „Auf nächste Seite erweitern“, allerdings haben alle Rahmen die gleiche Größe.
Verwenden Sie die Schaltfläche Rahmen hinzufügen, um einen weiteren Rahmen mit der gleichen Größe wie der ausgewählte Rahmen hinzuzufügen. Das Ergebnis der Tabelle, das nicht in den ersten Rahmen passt, wird im nächsten Rahmen fortgesetzt, wenn Sie den Modus „Größe ändern“ „Vorhandene Rahmen verwenden“ verwenden.
Aktivieren Sie
 Seite nicht exportieren, wenn der Rahmen leer ist verhindert, dass die Seite exportiert wird, wenn der Tabellenrahmen keinen Inhalt hat. Das bedeutet, dass alle anderen Layoutelemente, Karten, Skalenleisten, Legenden usw. im Ergebnis nicht sichtbar sind.
Das Aktivieren von
 Hintergrund nicht anzeigen, wenn Rahmen leer ist verhindert, dass der Hintergrund gezeichnet wird, wenn der Rahmen keinen Inhalt hat.