9. QGIS配置
QGIS是高度可配置的。通过 菜单,提供了以下不同工具:
 样式管理器...: 创建和管理 符号, 样式和颜色渐变.
 自定义投影...: 创建您自己的 坐标参照系.
 键盘快捷键...: 定义您自己的一组 键盘快捷键. 此外, 工程属性 可以在每个QGIS会话期间替换它们 (可在 菜单下访问).
 界面自定义...: 配置 应用程序界面, 隐藏您可能不需要的对话框或工具.
 选项...: 设置全局 选项 以应用于软件的不同领域. 这些首选项保存在当前 用户配置 设置中, 并在使用此配置文件打开新工程时默认应用.
9.1. 选项
可以使用 选项 对话框选择QGIS的一些基本选项。选择菜单选项 , 您可以根据需要修改选项, 某些更改可能需要重新启动QGIS才能生效。
下面介绍了可以自定义选项的选项卡。
备注
插件可以在选项对话框中嵌入它们的设置
虽然以下只展示了核心设置,但请注意,通过 installed plugins 在标准选项对话框中插件可展现自己的选项,并以此扩展列表。这避免了每个插件都有自己的配置对话框,并为它们提供额外的菜单项...
9.1.1. 通用设置
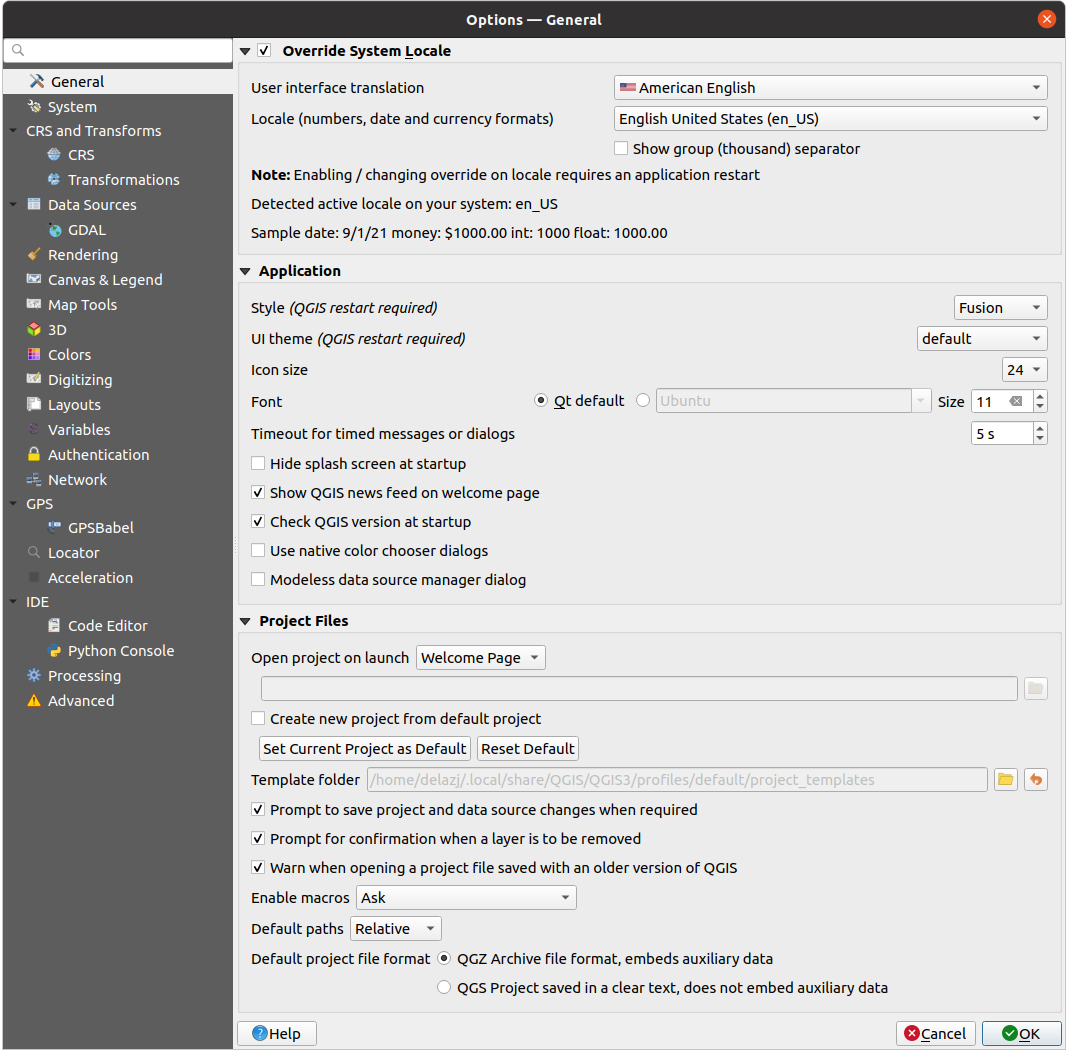
图 9.1 General Settings in QGIS
本地化语言环境
默认情况下,QGIS依赖于您的操作系统配置来设置语言和控制数值。启用该组允许您自定义自己的行为习惯。
从 用户界面语言 选择要应用于GUI的语言
在 本地化 (数字、日期和货币格式) 选择输入和呈现日期和数值的语言系统
 显示数字分组 (千位) 分隔符
框架底部会显示选中设置的摘要以及这些设置的作用。
应用软件
选择 样式 (重启QGIS生效) , 即窗口控件在对话框中的外观和位置。可能的值取决于您的操作系统。
定义 用户界面主题 (重启QGIS生效)
 . 可以是 'default', 'Night Mapping' 或 'Blend of Gray'
定义 图标大小
定义 字体 和 字号. 字体可以是
 Qt默认 或用户从操作系统安装的字体进行选择
更改 限时信息或对话框超时
 启动时隐藏初始界面
- 在欢迎页面显示QGIS动态资讯: 在欢迎页面上显示精选的QGIS动态消息,让您直接了解项目新闻 (用户/开发人员会议日期和摘要、社区调查、发布公告、各种提示...)
- 打开QGIS软件时检查更新 如果发布了新版本,将在启动软件时检查并通知您
- 使用操作系统颜色选择对话框 (参见 Color Selector)
- 非模态数据源管理器对话框 保持 数据源管理器 对话框处于打开状态,并允许向工程添加图层时与QGIS界面进行交互
工程文件
启动时打开工程为
'欢迎页面' (默认): 可以显示 用户配置 的动态资讯、工程模板和最近工程 (带有缩略图)。默认情况下不打开任何工程。
'新建': 基于默认模板打开一个新工程
'最近': 重新打开上次保存的工程
'特定': 打开一个特定的工程,使用 ... 按钮定义默认情况下要使用的工程文件。
- 由默认工程创建新工程. 您可以选择 设置当前工程为默认工程 或 重置为默认. 可以浏览文件并定义目录,并在其中找到用户定义的工程模板。如果您先激活 由默认工程创建新工程, 然后将工程保存在工程模板文件夹中,这将被添加到 列表中。
- 需要时提示保存工程和数据源更改情况 避免丢失所做的更改。
- 移除图层时提示确认
- 当打开旧版QGIS格式的工程文件时提出警告. 您始终可以打开使用较旧版本QGIS创建的工程,但一旦保存该工程,尝试使用较低版本打开可能会失败,这是因为该版本没有相对于高版本可用的功能。
启用宏
. 创建此选项是为了处理用于对工程事件执行操作的宏。您可以在 '从不'、'询问'、'仅在该会话中' 和 '始终 (不建议)' 之间进行选择。Default paths: defines whether paths to files and layers used in new projects are stored as 'Absolute' or 'Relative' to the project file. This setting can be overwritten at the project level.
默认工程文件格式
- QGZ:存档文件格式,嵌入辅助数据 (请参见 辅助数据)
 QGS:工程文件以明码文本保存,未嵌入辅助数据: 辅助数据存储在单独的
 .qgd文件,工程文件则在同一目录存储不同后缀名的同名文件。
9.1.2. 系统设置
SVG路径
添加或移除 可伸缩矢量图形 (SVG) 符号的搜索路径. 这些SVG文件可用于符号化、标注要素或装饰地图构图。
Also read Remote or embedded file selector for different ways to refer to svg files in a QGIS path.
插件路径
添加或移除 附加C++插件库的搜索路径.
文档路径
添加或移除用于QGIS帮助的 文档路径 。默认情况下,会添加与所用版本对应的官方在线用户手册的链接。但是,您可以添加其他链接并从上到下排列它们的优先级:每次单击对话框中的 帮助 按钮时,都会优先检查最上面的链接,如果没有找到相应的页面,则会尝试下一个链接,依此类推。
备注
文档仅针对QGIS长期发行版 (LTR) 进行版本控制和翻译,这意味着如果您运行的是常规版本 (如QGIS 3.0),帮助按钮默认打开下一版LTR手册页面 (即3.4 LTR),其中可能包含较新版本 (3.2和3.4) 的功能描述。如果没有可用的LTR文档,则使用较新和开发版本功能描述的 测试 文档。
设置
如果进行了任何 自定义 设置,它可以帮助您 重置用户界面为默认设置 (重启QGIS生效) 。
环境
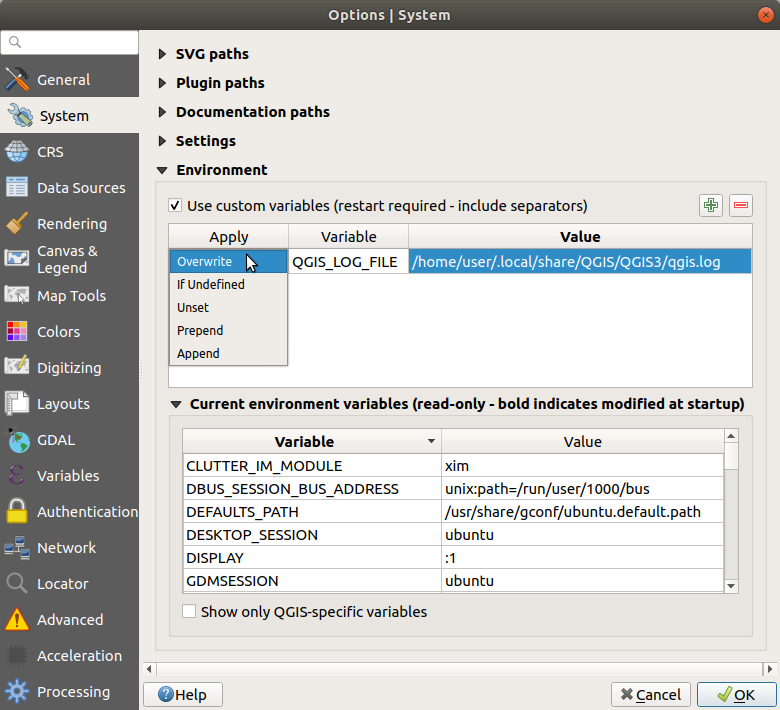
图 9.2 QGIS中的系统环境变量
可以在 环境 组中查看和配置系统环境变量。这对平台很有用,例如Mac,因为GUI应用程序不一定继承用户的Shell环境,它还可以用于设置和查看由处理工具箱 (例如SAGA、GRASS) 控制的外部工具集的环境变量,以及打开源代码特定部分的调试输出。
使用自定义变量 (重启QGIS生效 - 包括分隔符). 您可以 添加 和 移除 变量。已定义的环境变量显示在 当前环境变量 中,可以通过勾选 仅显示QGIS特殊变量 进行过滤。
9.1.3. CRS设置
备注
有关QGIS如何处理图层投影的更多信息,请阅读 使用投影 专区。
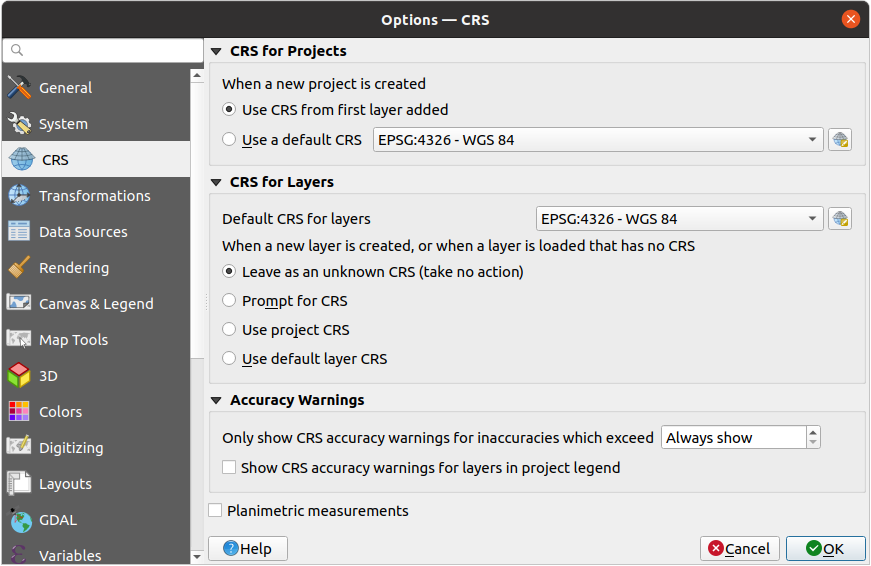
图 9.3 QGIS中的CRS设置
工程的CRS
有个选项可以自动设置新建工程的CRS:
- 使用添加的第一个图层的CRS: 工程的CRS将设置为加载到其中的第一个图层的CRS
- 使用默认CRS: 预选CRS将默认应用于新建工程,并在向工程添加图层时保持不变。
该选项将保存供后续QGIS会话使用,工程的坐标参照系仍然可以从 选项卡进行重新定义。
图层CRS
默认图层CRS: 选择创建图层时要使用的默认CRS
还可以定义创建新图层或加载不含CRS的图层时要执行的操作。
- 保留未知CRS (无动作)
- 提示选择CRS
- 使用工程CRS
- 使用默认CRS
Accuracy warnings
Only show warnings for CRS inaccuracies which exceed a given
distance: occurs when you are explicitly creating or modifying a dataset and
select a CRS based on a datum ensemble with lower
accuracy. The default is to Always show the warning if any inaccuracy.
Requires a QGIS version using at least PROJ 8.0.
Show warning for CRS inaccuracies for layers in project legend:
If checked, any layer with a CRS with accuracy issues (i.e. a dynamic crs with
no coordinate epoch available, or a CRS based on a datum ensemble with inherent inaccuracy
exceeding the user-set limit) will have the  warning icon
in the Layers panel reflecting that it is a low-accuracy layer.
warning icon
in the Layers panel reflecting that it is a low-accuracy layer.
This is designed for use in engineering, BIM, asset management, and other fields where inaccuracies of meter/submeter level are potentially very dangerous or expensive!
平面测量: 为新创建的工程设置 "平面测量" 属性的默认值。
9.1.4. 变换设置
 变换 选项卡可帮助您将图层加载到工程或重投影图层时要应用的设置坐标变换和操作。
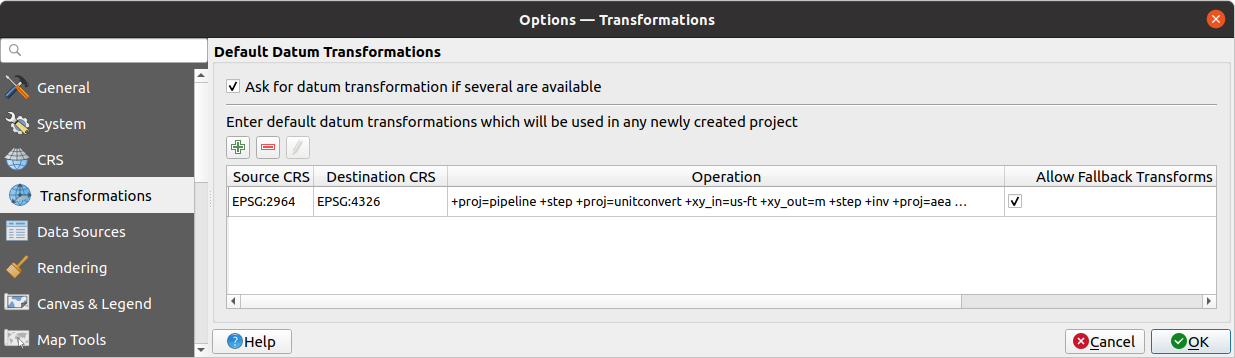
图 9.4 变换设置
默认基准面变换
在该组中,您可以控制是否应将图层重投影到另一个CRS:
使用QGIS默认变换设置自动处理;
和/或更多由您通过自定义首选项控制,例如:
- 存在多个时询问基准面变换
默认情况下要应用的预定义基准变换列表。更多信息,请参阅 Datum Transformations 。
9.1.5. 数据源设置
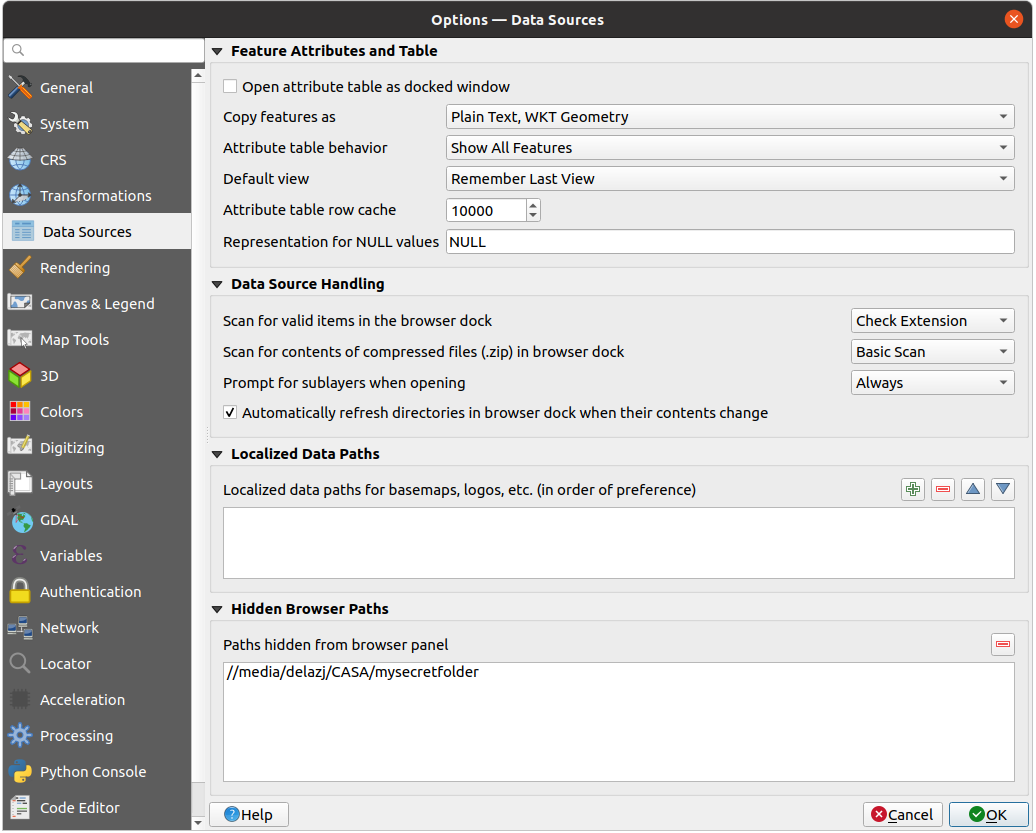
图 9.5 QGIS中的数据源设置
要素属性和表格
- 以停靠窗口方式打开属性表
在其他应用程序中粘贴要素时 要素复制为 '纯文本, 无几何图形', '纯文本, WKT几何图形', 或 'GeoJSON'
属性表行为
: 默认打开属性表时设置过滤选项。有三种可能: '显示所有要素', '显示选中的要素' 和 '显示地图上可见的要素' 。默认视图: 定义每次打开属性表的视图模式。它可以是 '记住最后视图', '表格视图' 或 '表单视图' 。
属性表记录缓存
 . 该行缓存可以保存最后加载的N个属性记录,以便更快地处理属性表。关闭属性表时,缓存将被删除。
空值表示为. 在此,您可以为包含空值 (NULL) 的数据字段定义一个值。
小技巧
改进大数据属性表的打开速度
处理有大量记录的图层时,打开属性表的速度可能会很慢,因为对话框会索取图层中的所有行。将 属性表行为 设置为 显示地图可见要素 将使QGIS在打开表时仅请求当前地图画布中的要素,从而允许快速加载数据。
请注意,此属性表实例中的数据将始终关联到打开时使用的画布范围,这意味着选择 显示所有要素 将不会显示新要素。但是,您可以通过更改画布范围并在属性表选择 显示地图可见要素 选项来更新显示的要素集。
数据源处理
在浏览器停靠区扫描有效项
. 您可以在 '检查扩展名' 和 '检查文件内容' 之间进行选择。在浏览器停靠区扫描压缩文件 (.zip) 的内容
定义在查询此类文件时浏览器面板底部的控件信息的详细程度,'否', '基本扫描' 和 '深度扫描' 是可能的选项。打开栅格子图层时显示提示. 有些栅格支持子图层 --- 它们在GDAL中被称为子数据集。例如netCDF文件 --- 如果有许多netCDF变量,GDAL会将每个变量视为一个子数据集。该选项允许您控制在打开包含子图层的文件时如何进行处理。您有以下选择:
‘始终’: 始终询问 (如果存在子图层)
‘需要时’: 询问图层是否没有波段,但有子图层
‘从不’: 从不提示,不会加载任何内容
‘全部加载’: 从不提示,但加载所有子图层
- Automatically refresh directories in browser dock when
their contents change: Allows you to manually opt-out of monitoring directories
in the Browser panel by default (eg, to avoid potential slow down
due to network latency).
Localized data paths
可以对任何类型的基于文件的数据源使用本地路径,它们是用于抽象数据源位置的路径列表。例如,如果 C:\my_maps 列在本地路径中,则 C:\my_maps\my_country\ortho.tif 作为数据源的图层将在工程中保存后使用 localized:my_country\ortho.tif.
路径按优先顺序列出,换句话说,QGIS将首先在第一个路径中查找文件,然后在第二个路径中查找文件,以此类推。
Hidden browser paths
此控件列出了您在 浏览器面板 中选择隐藏的所有文件夹,从列表中移除文件夹将使其在 浏览器 面板中可用。
9.1.6. 渲染设置
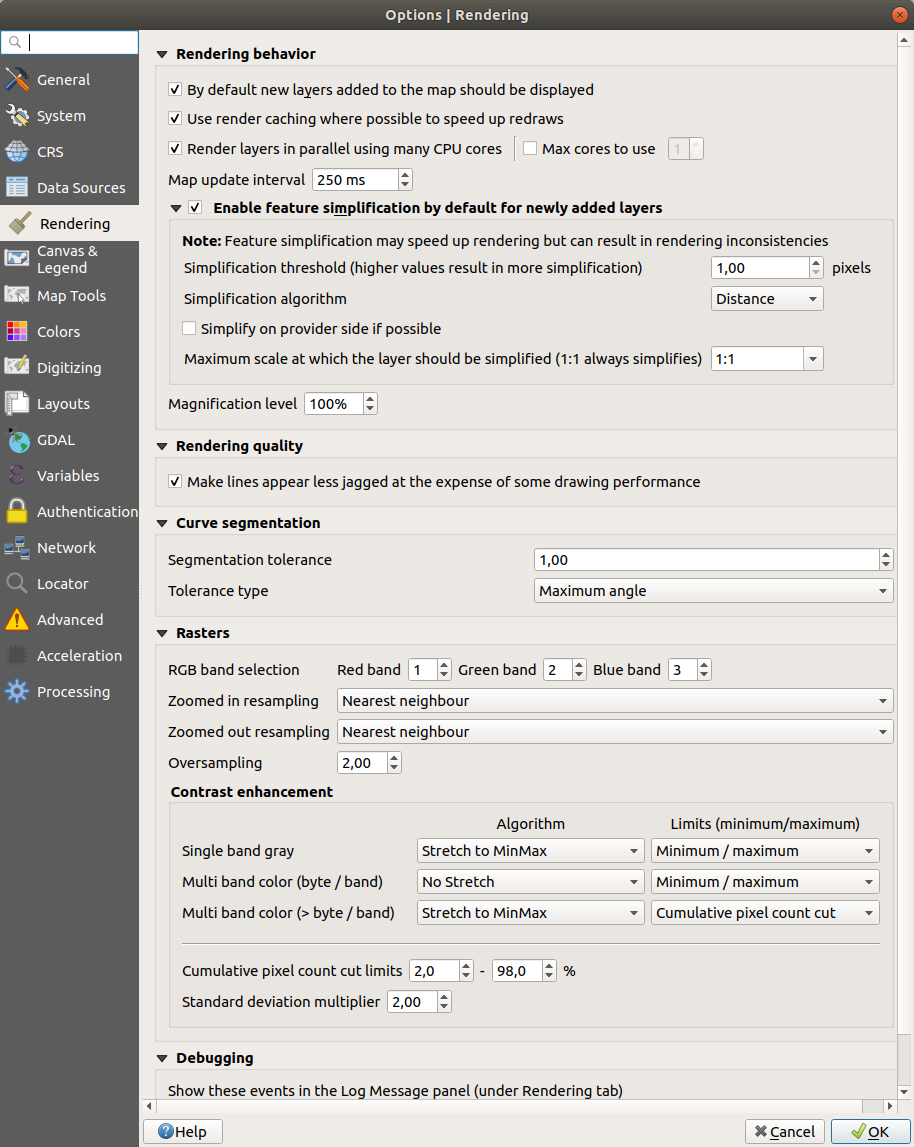
图 9.6 工程属性对话框的渲染选项卡
渲染行为
- 默认显示地图中新添加的图层: 在加载多个图层时,取消勾选此选项会很有用,这可以避免在画布中渲染每个新图层和减慢处理过程
- 在可能的情况下使用渲染缓存以加速图形重绘
- 使用多个CPU核心并行渲染图层
- 最大可用核心数
地图刷新间隔 (默认是250毫秒)
- 默认对新添加的图层启用要素简化
简化阈值
简化算法: 该选项会对要素进行局部 "动态 (on-the-fly)" 简化,并加快几何图形渲染速度。它不会更改从数据提供程序获取的几何图形。当您有使用要素几何图形的表达式 (例如面积计算) 时,这一点很重要 - 它确保这些计算是在原始几何图形上而不是在简化几何图形上完成的。为此,QGIS提供了三种算法: '距离' (默认)、'捕捉到网格' 和 'Visvalingam'。
- 若可能,在数据源端简化: 几何图形由提供程序 (PostGIS、Oracle等) 进行简化,与本地简化不同,基于几何图形的计算可能会受到影响
图层简化最大比例
 放大倍率 (参见 magnifier)
备注
除了全局设置外,还可以从其 菜单中为任何特定图层设置要素简化
渲染质量
- 牺牲绘制效率使线的显示更光滑
曲线分割
分割容差: 此设置控制圆弧的渲染方式。 较小的 最大角度 (两个连续顶点与曲线中心之间的角度,以度为单位) 或最大差值 (两个顶点的线段与曲线之间的距离,单位为地图单位) ,渲染时将使用 更多直线 段。
容差类型: 可以是 最大角度 ,也可以是近似值和曲线之间的 最大差值 。
栅格
通过 RGB波段选择, 您可以定义红色、绿色和蓝色波段的编号。
可以定义 放大重采样 和 缩小重采样 方法。对于 放大重采样 您可以在三种重采样方法中选择:"最近邻插值"、"双线性" 和 "三次方"。对于:guilabel:缩小重采样 可以在 "最近邻插值" 和 "平均" 之间进行选择。您还可以设置 过采样 值 (介于0.0和99.99之间 - 较大的值意味着QGIS更大的工作量 - 默认值为2.0)。
对比度增强
对比度增强选项可应用于 单波段灰度, 多波段颜色 (字节/波段) 或 多波段颜色 (>字节/波段). 对于每个选项,您可以设置:
要使用的 算法, 其值可以是 '不拉伸', '拉伸至极小极大', '拉伸并裁剪至极小极大' 或 '裁剪到极小极大'
要应用的 限制 (最小/最大值), 其值包括 '累计像素总数裁剪', '最小值/最大值', '平均 +/- 标准差'。
对于栅格渲染,还可以定义以下选项:
累计像素总数裁剪限制
标准差乘数
调试
- 地图画布刷新 到 日志信息 面板的调试渲染持续时间。
9.1.7. 画布和图例设置
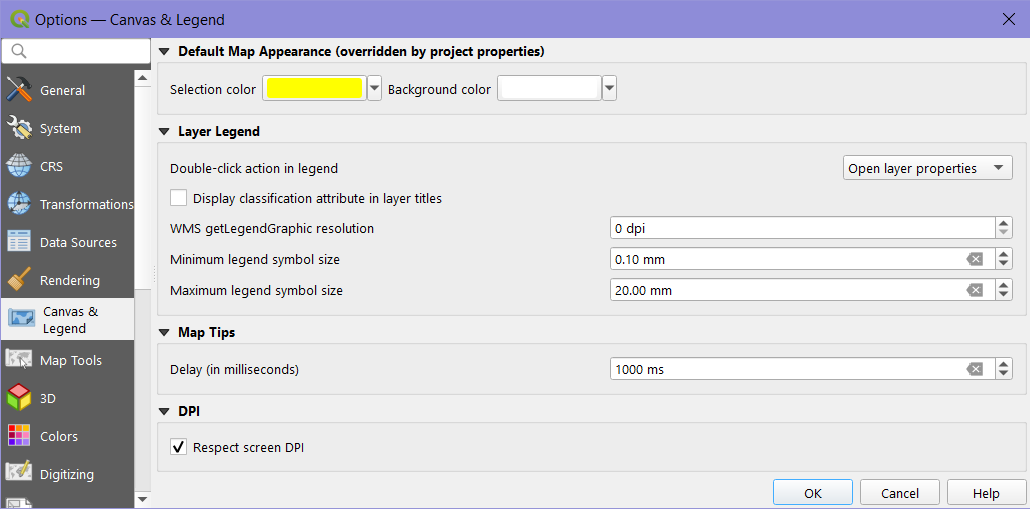
图 9.7 画布和图例设置
这些属性允许您设置:
默认地图外观 (由工程属性覆盖): 包括 选中要素颜色 和 背景颜色 。
图层图例 交互操作:
双击图例的操作
. 您可以双击 '打开图层属性对话框', '打开属性表' 或 '打开图层样式停靠栏'。在图层面板
显示类别属性名称, 例如,在应用分类或基于规则的渲染器时 (有关更多信息,请参阅 Symbology Properties )。WMS获取图例图形分辨率
控制 图层 面板符号大小显示的 最小图例符号尺寸 和 最大图例符号尺寸
以毫秒为单位的图层 地图提示 显示 延迟
Whether QGIS should
Respect screen DPI: If enabled,
QGIS will attempt to display the canvas with physically
accurate scale on screen, depending on the monitor's physical DPI. Symbology with specified
display size will also be rendered accurately, e.g. a 10mm
symbol will show as 10mm on screen. However, label font sizes on canvas may differ from those in
QGIS' UI or other applications. If this setting is turned off, QGIS will use the operating
system's logical DPI, which will be consistent with other applications on the system. However,
canvas scale and symbology size may be physically inaccurate on screen. In particular, on
high-dpi screens, symbology is likely to appear too small.For best experience, it is recommended to enable
Respect screen DPI,
especially when using multiple or different monitors and preparing visually high-quality maps.
Disabling Respect screen DPI will generate output that
may be more suitable for mapping intended for on-screen use only, especially
where font sizes should match other applications.
备注
Rendering in layouts is not affected by the Respect screen DPI setting; it always respects the specified DPI for the target output device. Also note that this setting uses the physical screen DPI as reported by the operating system, which may not be accurate for all displays.
9.1.8. 地图工具设置
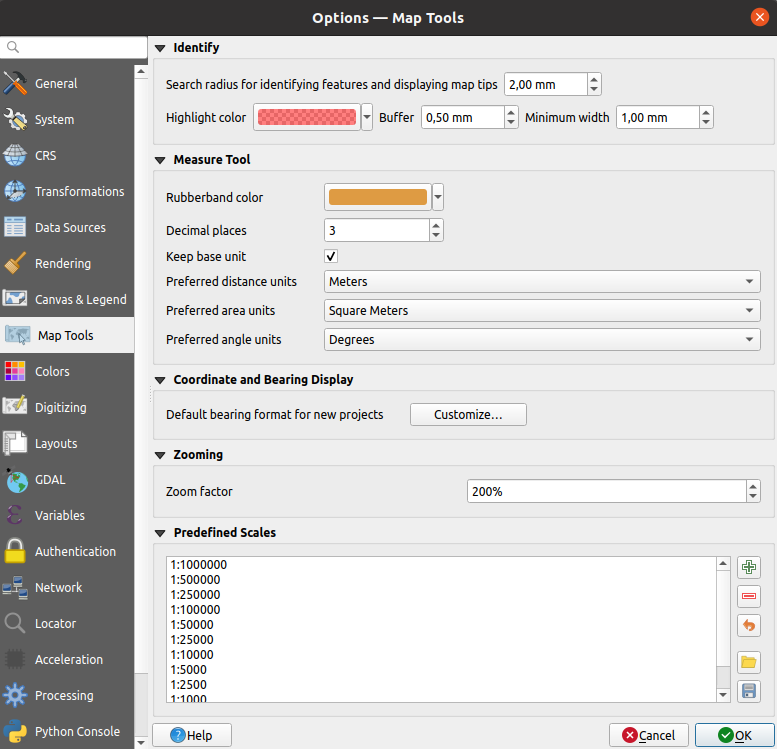
图 9.8 QGIS中的地图工具设置
此选项卡提供了有关 识别工具 行为的一些选项。
识别要素和显示地图提示的搜索半径 是一个容差距离,只要在该容差范围内单击,识别工具就会描述结果。
突出显示颜色 允许您选择突出显示所识别要素的颜色。
轮廓 确定要从识别突出显示的轮廓渲染的缓冲距离。
最小宽度 决定突出显示对象轮廓的宽度。
测量工具
定义测量工具的 橡皮筋颜色
定义 小数位数
- 保持基本单位 不自动转换大数目单位 (例如,米到千米)
首选距离单位: 选项有 '米', '千米', '英尺, '码', '英里', '海里', '厘米', '毫米', '度' 或 '地图单位'
首选面积单位: 选项有 '平方米', '平方千米', '平方英尺', '平方码', '平方英里', '公顷', '英亩', '平方海里', '平方厘米', '平方毫米', '平方度' 或 '地图单位'
首选角度单位: 选项有 '度', '弧度', '百分度', '角分', '角秒', '转数/圈数 (Turns/revolutions)', 毫弧度 (SI 定义) 或 密位 (北约军用定义)
坐标和方位角显示
定义 新建工程默认方位角格式: 用于平移地图画布时在状态栏显示鼠标坐标。可以在工程属性对话框中对其覆盖设置。
平移和缩放
为缩放工具或鼠标滚轮定义 缩放因子
预定义比例
Here, you find a list of predefined scales to display in the status
bar Scale drop-down widget, for quick zoom. With the  and
and  buttons you can add or remove your personal scales.
You can also import or export scales from/to a
buttons you can add or remove your personal scales.
You can also import or export scales from/to a .XML file. Note that you
still have the possibility to remove your changes and reset to the predefined
list.
9.1.9. 3D Settings
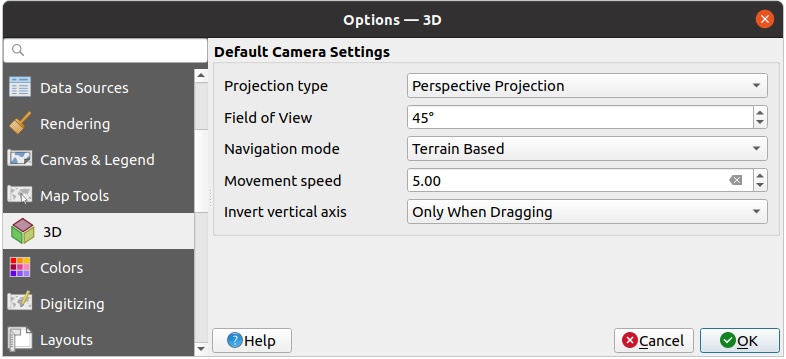
图 9.9 3D Settings
The  3D menu helps you configure some default settings to use
for any 3D Map view. These can refer to Default Camera Settings:
3D menu helps you configure some default settings to use
for any 3D Map view. These can refer to Default Camera Settings:
Projection type: allowing to view the 3D scene in a:
Perspective projection (default): Parallel lines appear to meet in the distance. Objects appear to shrink the farther they are from the camera.
or an Orthogonal projection: Parallel lines appear parallel. Objects appear the same size regardless of distance.
Camera's Field of view: only relevant in perspective projection, specifies the current vertical field of view in degrees and determines how much of the scene is visible to the camera. Default value is 45°.
Navigation mode: provides different means to interact with the 3D scene. Available modes are:
Terrain based: the camera follows around a fixed position on the surface of the terrain as the scene is navigated.
Walk mode (first person)
Depending on the selected mode, navigation commands differ.
Movement speed
Invert vertical axis: Controls whether vertical axis movements should be inverted from their normal behaviour. Only affects movement in the Walk mode. It can be set to:
Never
Only when dragging: causes the vertical motion to inverted only when performing a click-and-drag camera rotation
and Always: causes the motions to be inverted when both click-and-dragging and when the camera movement is locked to the cursor (via a ~ key press)
9.1.10. 颜色设置
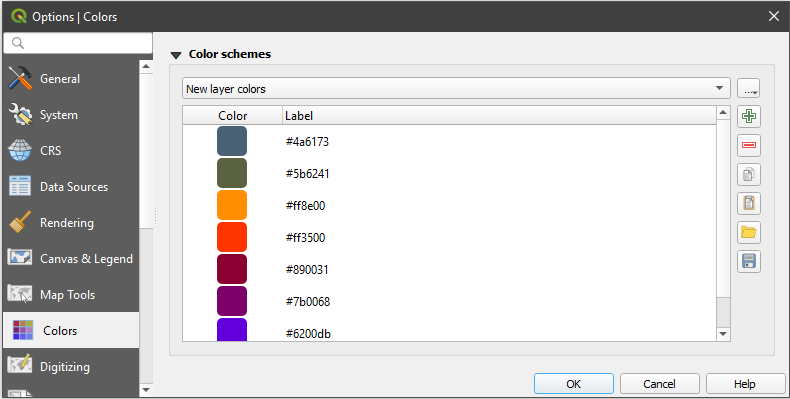
图 9.10 颜色设置
此菜单允许您在 颜色选择控件 中创建或更新整个应用程序使用的颜色调色板。您可以选择:
最近使用过的颜色 显示最近使用的颜色
标准颜色, 默认调色板的颜色
工程颜色, 特定于当前工程的一组颜色 (更多信息,请参阅 默认样式属性 )
新建图层颜色, 将新图层添加到QGIS时默认使用的一组颜色
或自定义调色板,您可以使用调色板组合框旁边的 ... 按钮创建或导入调色板。
默认情况下,不能移除 最近使用过的颜色, 标准颜色 和 工程颜色 调色板,并将其设置为显示在颜色按钮下拉列表中。使用 在颜色按钮中显示 选项,还可以将自定义调色板添加到此控件中。
对于任何调色板,都可以使用框架旁边的工具组管理颜色列表,即:
- 添加 或 移除 颜色
 复制 或
复制 或  粘贴 颜色
粘贴 颜色 导入 或
导入 或  导出 颜色集从/到
 .gpl文件。
双击列表中的颜色,在 选择颜色 对话框中对其进行调整或替换,也可以通过双击 标注 列对其进行重命名。
9.1.11. 数字化设置
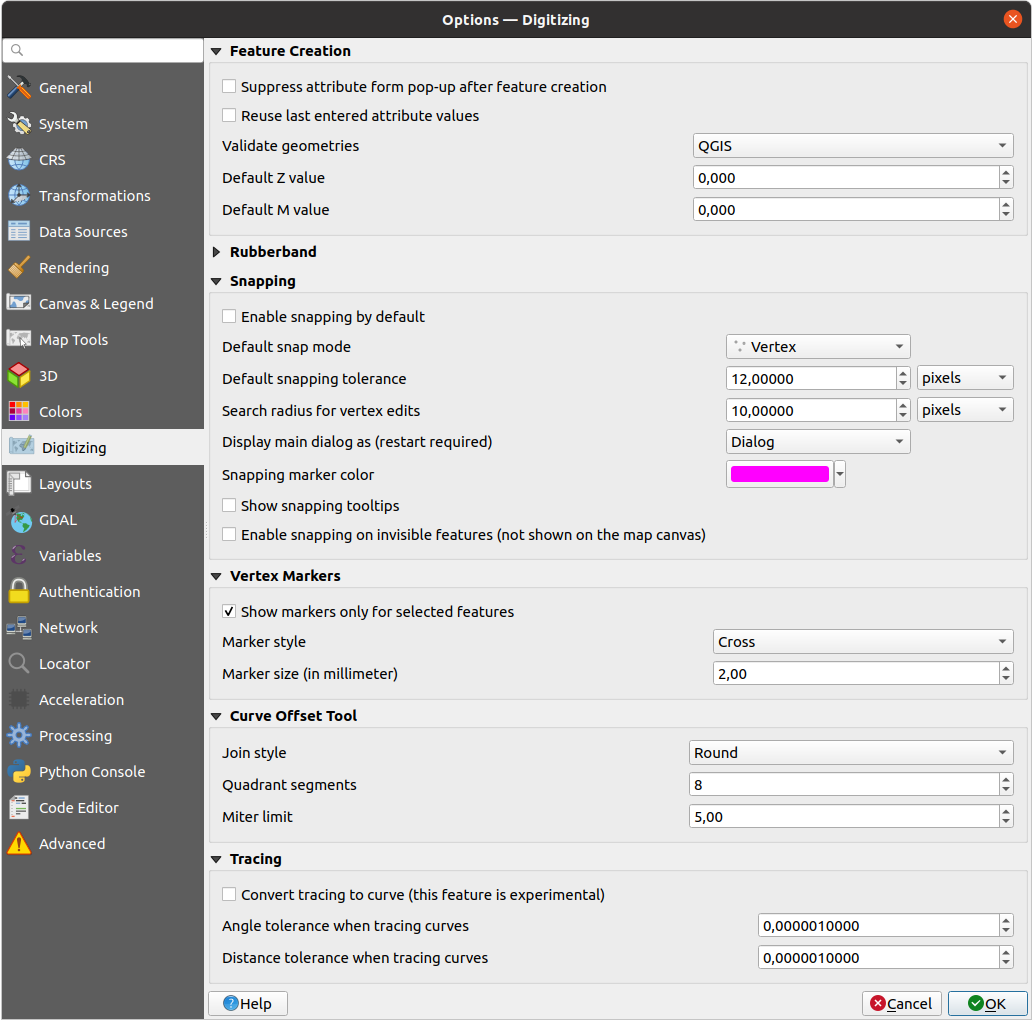
图 9.11 QGIS中的数字化设置
此选项卡可帮助您在 编辑矢量图层 (属性和几何图形) 时配置常规设置。
创建要素
- 要素创建后不要弹出属性表单: 可以在每个图层属性对话框中重写此选项。
- Reuse last entered attribute values: remember the last
used value of every attribute and use it as default for the next feature being digitized.
Works per layer. This behavior can also be controled on a per-field basis
(see Configure the field behavior).
验证几何图形. 编辑具有多个节点的复杂线和多边形可能会导致渲染速度非常慢。这是因为QGIS中的默认验证过程可能需要很多时间。要加快渲染速度,可以选择GEOS几何图形验证 (从GEOS 3.3开始) 或将其关闭。GEOS几何图形验证要快得多,但缺点是只报告第一个几何图形问题。
请注意,根据选择,几何图形错误报告可能会有所不同 (请参阅 Types of error messages and their meanings)
默认Z值 用于创建新的3D要素。
橡皮筋
定义橡皮筋的 线宽, 线颜色 和 填充颜色.
编辑顶点时不更新橡皮筋.
捕捉
- 默认启用捕捉 打开工程时激活捕捉
Define Default snap mode
('Vertex', 'Segment', 'Centroid',
'Middle of segments', Line endpoints', 'Area')以地图单位或像素为单位定义 默认捕捉容差
以地图单位或像素为单位定义 顶点编辑的搜索半径
主对话框显示为 (重启QGIS生效): 设置高级捕捉对话框应显示为 "对话框" 还是 "停靠"。
捕捉标记颜色
- 显示捕捉工具提示 例如您要捕捉其要素图层的名称,当多个要素重叠时很有帮助。
- 对不可见的要素 (未在地图画布中显示) 也启用捕捉
顶点标记
- 仅为选中的要素显示标记
定义顶点的 标记样式
('十字' (默认), '半透明圆圈' 或 '无')定义顶点的 标记尺寸 (毫米)
曲线偏移工具
接下来的3个选项是指 Advanced digitizing 中的  偏移曲线 工具。通过各种设置,可以影响线偏移的形状。从 GEOS 3.3 开始可以使用这些选项。
连接样式: '圆角', '尖角' 或 '斜角'
相限区段
尖角限制
追踪
通过激活 将追踪转换为曲线 您可以在数字化时创建曲线段。请记住,您的数据提供程序必须支持此功能。
9.1.12. 布局设置
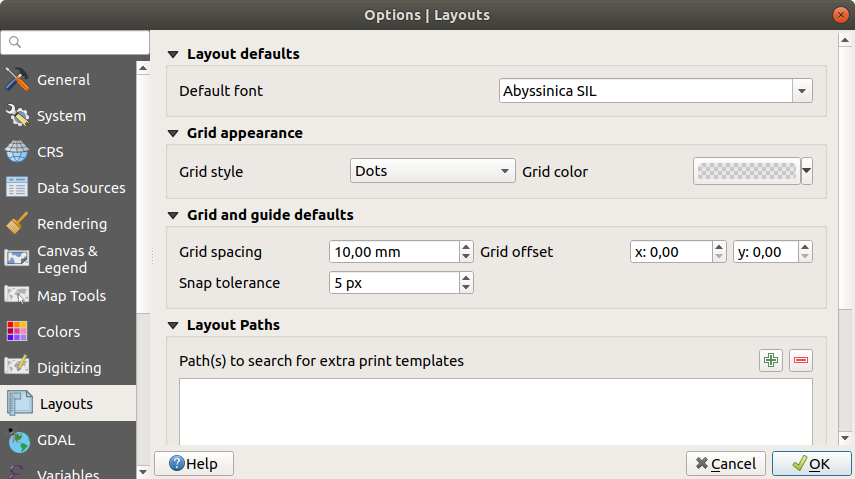
图 9.12 QGIS中的布局设置
缺省布局
您可以定义在 打印布局 中使用的 默认字体 。
网格外观
定义 网格样式
('实线', '点', '十字')定义 网格颜色
网格和参考线默认值
定义 网格间距
定义X和Y的 网格偏移
定义 捕捉容差
布局路径
定义 附加打印模板的搜索路径: 包含自定义布局模板的文件夹列表,可在创建新模板时使用。
9.1.13. GDAL设置
GDAL 是一个支持大量矢量和栅格格式的地理空间数据的数据交换库。它提供了以这些格式读取和 (通常) 写入数据的驱动程序。 GDAL 选项卡显示了栅格和矢量格式的驱动程序及其功能。
9.1.13.1. GDAL栅格和矢量驱动
The Raster Drivers and Vector Drivers tabs allow you to define which GDAL driver is enabled to read and/or write files, as in some cases more than one GDAL driver is available.
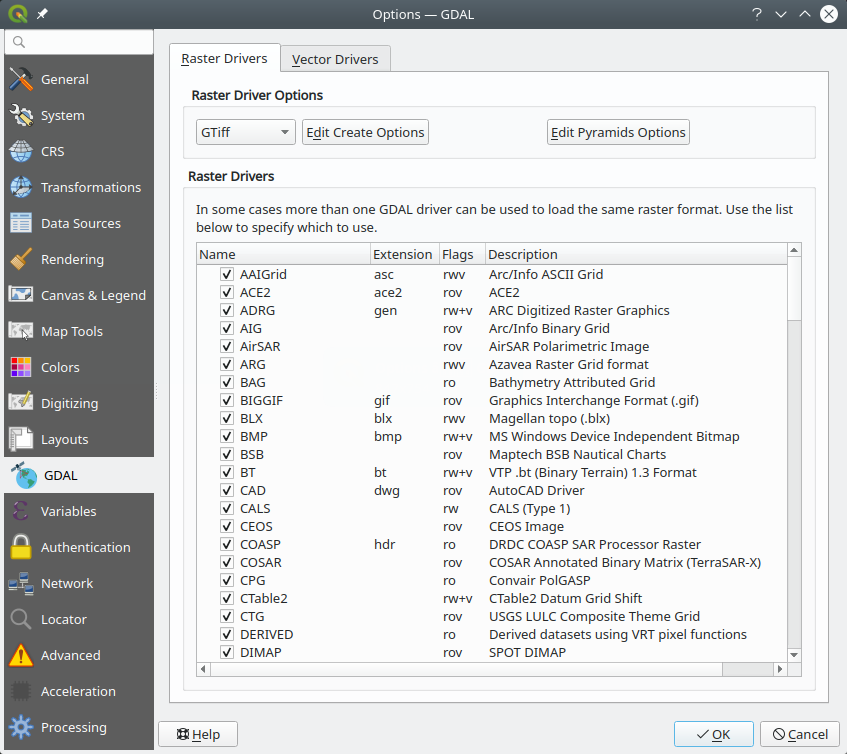
图 9.13 QGIS中的GDAL设置 - 栅格驱动
小技巧
双击允许读写访问的栅格驱动 (rw+(v)) 打开 编辑创建选项 对话框进行自定义编辑。
9.1.13.2. 栅格驱动选项
此框架提供了自定义支持读写访问的栅格驱动程序行为的方法:
编辑创建选项: 允许您编辑或添加不同的文件转换配置文件,即在输出栅格文件时使用一组预定义的参数组合 (压缩类型和层级、块大小、概述、色度、透明度…)。参数取决于驱动程序。
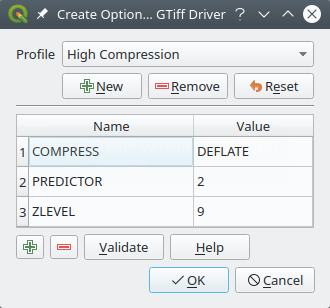
图 9.14 创建选项配置文件示例 (适用于GeoTiff)
对话框的上半部分列出了当前配置文件,并允许您添加新配置文件或删除其中任何一个。如果您更改了配置文件的默认参数,也可以将其重置为默认参数。一些驱动程序 (例如GeoTiff) 有一些可以使用的配置文件样本。
在对话框底部:
- 按钮允许您添加行以填充参数名称和值
- 按钮删除所选参数
单击 验证 按钮,检查为给定格式输入的创建选项是否有效
使用 帮助 按钮查找要使用的参数,或参考 GDAL栅格驱动程序文档 。
编辑金字塔选项

图 9.15 金字塔配置文件示例
9.1.14. 变量设置
变量 选项卡列出了全局级别的所有可用变量。
它还允许用户管理全局级别的变量。单击 按钮添加新的自定义全局级别变量;同样,从列表中选择一个自定义全局级别变量,然后单击 按钮将其删除。
有关变量的更多信息,请参见 Storing values in Variables 章节。
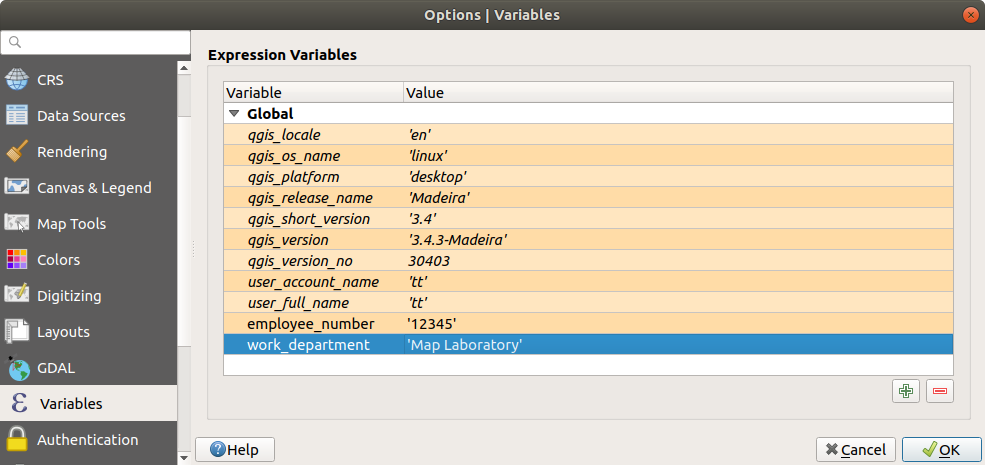
图 9.16 QGIS中的变量设置
9.1.15. 认证设置
在 认证 选项卡中,可以设置认证配置和管理PKI证书。更多信息,请参阅 认证系统 。
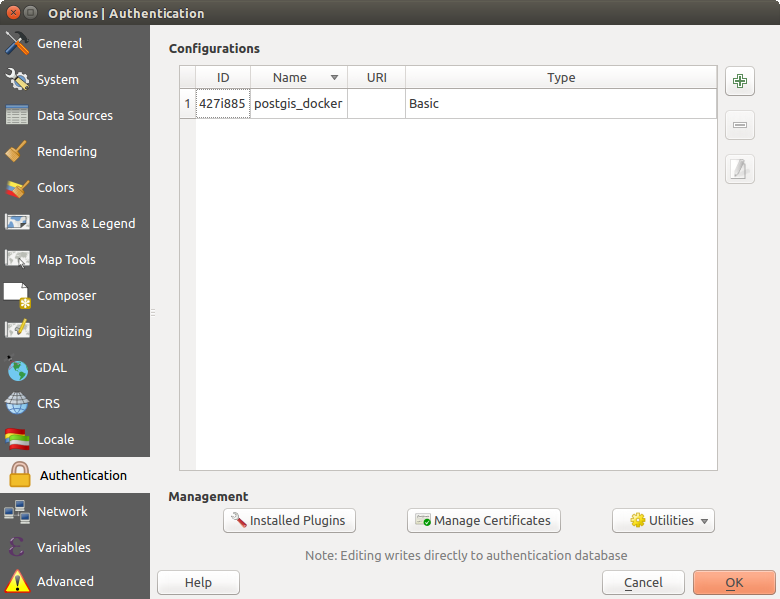
图 9.17 QGIS中的认证设置
9.1.16. 网络设置
通用
定义 网络请求超时 (毫秒) - 默认是 60000
定义 WMS功能描述的默认有效期 (小时) - 默认是 24
定义 WMS-C/WMTS瓦片的默认过期时间 (小时) - 默认是 24
定义 瓦片或要素请求遇到错误时的最大重试次数
定义 用户代理
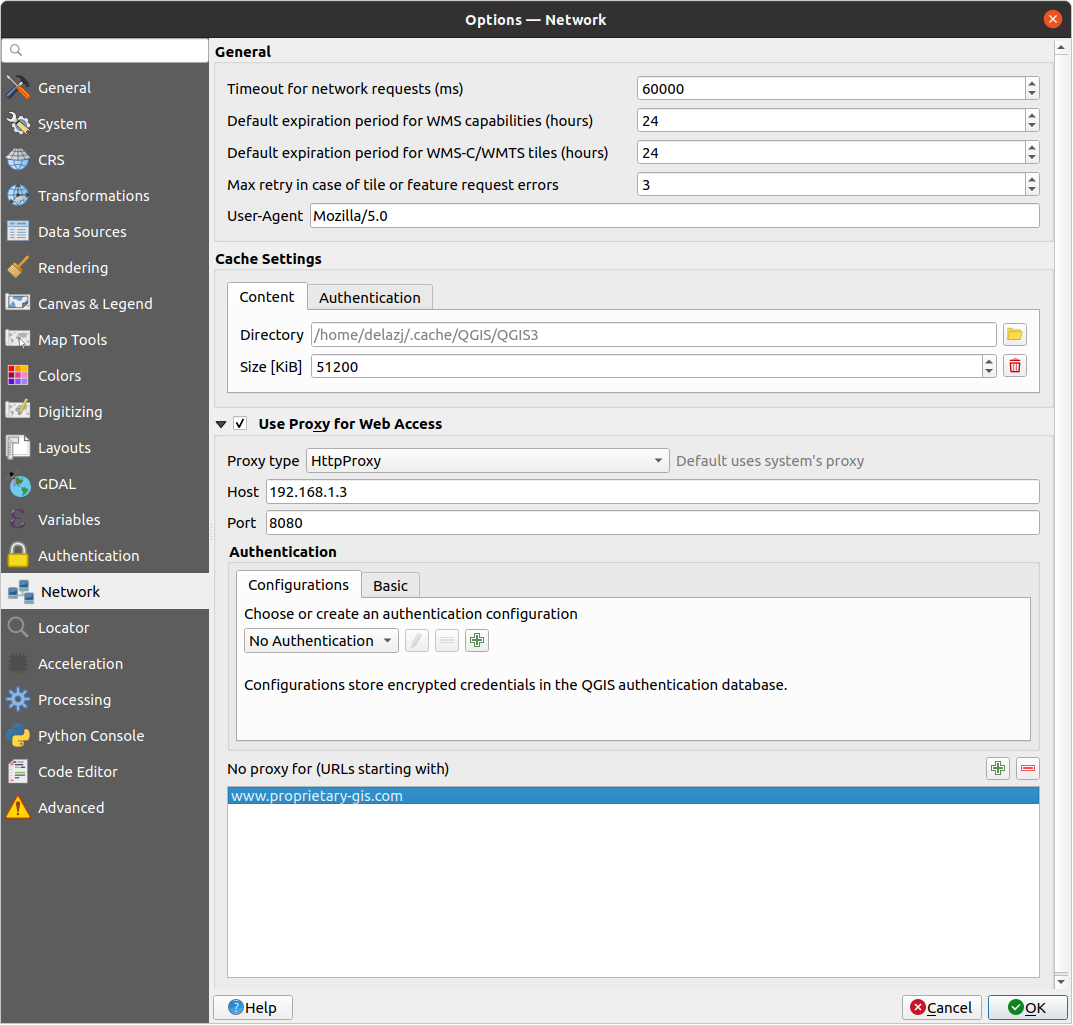
图 9.18 QGIS中的代理设置
缓存设置
定义缓存的 目录 和 大小, 还提供了 发生SSL错误时自动清除连接认证缓存 (推荐) 的工具。
Web访问代理
- Web访问使用代理
根据需要设置 代理类型
, 并定义 "主机" 和 "端口"。可用的代理类型包括:: 代理根据系统的代理确定
: 任何类型连接的通用代理,支持TCP、UDP、绑定到端口 (传入连接) 和认证。
: 使用 "CONNECT" 命令实现,只支持传出TCP连接;支持认证。
: 使用普通的HTTP命令实现,仅在HTTP请求的上下文中有用。
: 使用FTP代理实现,仅在FTP请求的上下文中有用。
使用 认证控件 设置代理的凭据。
排除部分URL可以添加到代理设置下方的文本框中 (请参阅 图 9.18). 如果目标URL以此文本框中列出的字符串之一开头,则不会使用代理。
If you need more detailed information about the different proxy settings, please refer to the manual of the underlying QT library documentation at https://doc.qt.io/archives/qt-5.9/qnetworkproxy.html#ProxyType-enum
小技巧
使用代理
使用代理有时会很棘手,通过对上述代理类型进行 "反复试验" 来检查它们在您的实例中是否成功,是很必要的。
9.1.17. 搜索设置
 The 搜索 选项卡允许您配置 搜索栏, 这是状态栏上的一个快速搜索控件,可帮助您在应用程序中执行搜索。它提供了一些默认过滤 (带有前缀) 供使用:
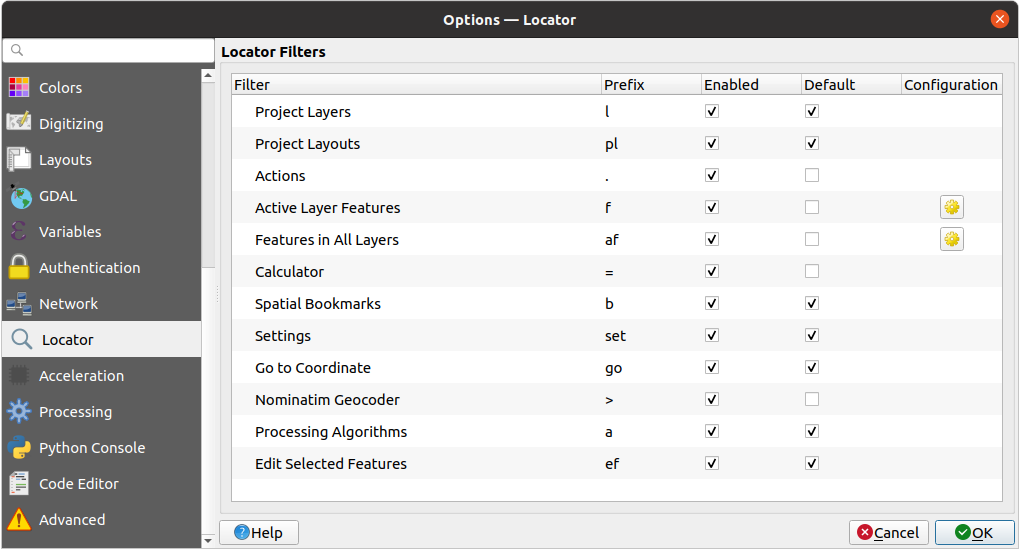
图 9.19 QGIS中的搜索设置
工程图层 (
l): 在 图层 面板中查找并选择图层。工程布局 (
pl): 查找并打开打印布局。动作 (
.): 查找并执行QGIS动作;动作可以是QGIS中的任何工具或菜单、打开面板...活动图层要素 (
f): 在当前活动图层的任何字段中搜索匹配的属性,并缩放到选中的要素。按 配置最大结果数。
所有图层中的要素 (
af): 在每个 可搜索图层 的 显示名称 中搜索匹配的属性,并缩放到选中的要素。按 可配置 "每个图层最大结果数" 和 "最大结果数"。计算器 (
=): 允许计算任何QGIS表达式,如果有效,则提供将结果复制到剪贴板的选项。空间书签 (
b): 查找并缩放到书签范围。设置 (
set): 浏览并打开工程和应用程序范围内的属性对话框。前往坐标 (
go): 将地图画布平移到由逗号或空格分隔的x和y坐标对或格式化URL (例如OpenStreetMap、Leaflet、OpenLayer、谷歌地图等) 定义的位置。坐标应位于 WGS 84 (epsg:4326) 和/或地图画布CRS中。Nominatim geocoder (
>): geocodes using the Nominatim geocoding service of the OpenStreetMap Foundation.处理算法 (
a): 搜索并打开处理算法对话框。编辑选中的要素 (
ef): 提供快速访问,并在活动图层上运行兼容的 modify-in-place 处理算法。
在对话框中,您可以:
自定义过滤 前缀, 即用于触发过滤的关键字
设置是否 启用 过滤:可以在搜索中使用过滤,并在搜索栏菜单中提供快捷键
设置过滤是否为 默认: 不使用过滤的搜索只返回默认过滤类别的结果。
一些过滤提供了配置搜索结果数量的方法。
默认搜索过滤集可以通过插件进行扩展,例如用于 OSM Nominatim 搜索、直接数据库搜索、图层目录搜索等
9.1.18. 加速设置
OpenCL加速设置。
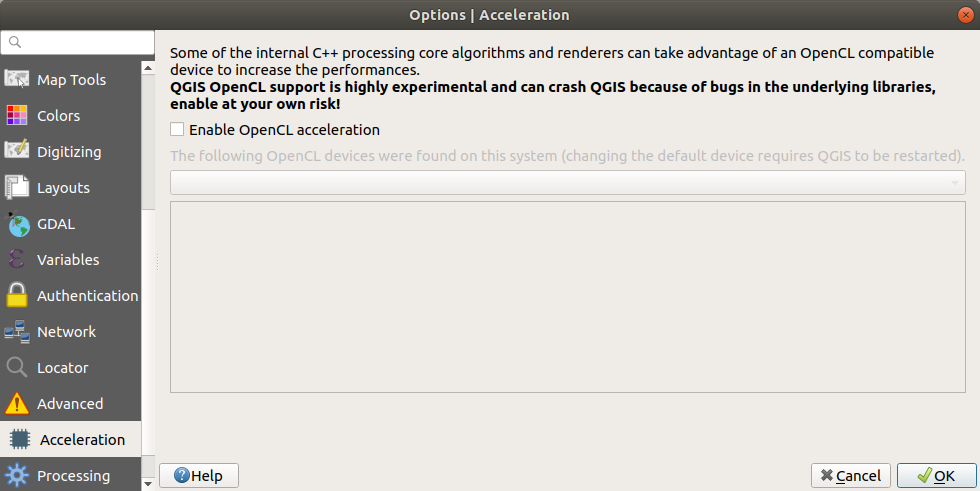
图 9.20 加速选项卡
根据您的硬件和软件情况,可能需要安装其他库来启用OpenCL加速。
9.1.19. 数据处理设置
 数据处理 选项卡为您提供QGIS处理框架中使用的工具和数据提供程序的常规设置。更多信息请访问 QGIS处理架构 。

图 9.21 QGIS中的数据处理设置选项卡
9.1.20. Python控制台设置
 Python控制台 设置可帮助您管理和控制Python编辑器 (交互式控制台, 代码编辑器, 工程宏, 自定义表达式, ...) 的行为,也可以使用以下 选项... 按钮进行访问:
Python控制台 工具栏
Python控制台 控件的上下文菜单
以及代码编辑器的上下文菜单。
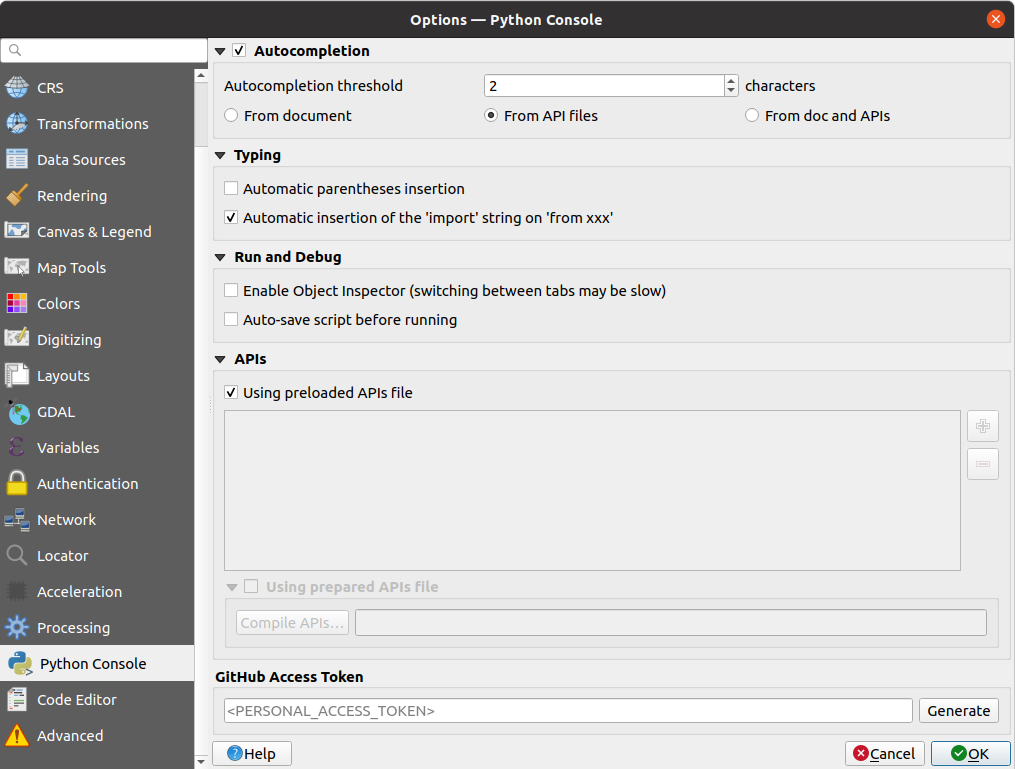
图 9.22 Python控制台设置选项卡
您可以指定:
- 自动补全: 启用代码自动完成。您可以从当前文档、已安装的API文件或两者中获取自动补全阈值。
自动补全阈值: 设置显示自动补全列表的阈值 (以字符为单位)
在 键盘输入 下面
- 自动插入括号: 启用括号的自动关闭功能
- 遇到 'from xxx' 字符串时自动插入 'import': 在指定导入时允许插入 'import' 字符
在 运行和调试 下面
- 启用对象检查器 (标签页间切换时可能会较慢): 启用对象检查器。
- 运行之前自动保存的脚本: 执行时自动保存脚本。此操作将储存一个临时文件 (在临时系统目录中),该文件将在运行后自动删除。
对于 API 您可以指定:
- 使用预加载的API文件: 您可以选择是否要使用预加载的API文件。如果未勾选此选项,可以添加API文件,还可以选择是否使用准备好的API文件 (请参见下一选项)。
- 使用预备的API文件: 如果勾选,所选
*.pap文件将用于代码完成。要生成预备的API文件,必须至少加载一个*.api文件,然后通过单击 编译API... 按钮对其进行编译。
Under GitHub access token, you can generate a personal token allowing you to share code snippets from within the Python code editor. More details on GitHub authentication
9.1.21. 代码编辑器设置
在  代码编辑器 选项卡,可以控制代码编辑器控件 (Python交互式控制台和编辑器、表达式控件和函数编辑器等) 的外观和行为。
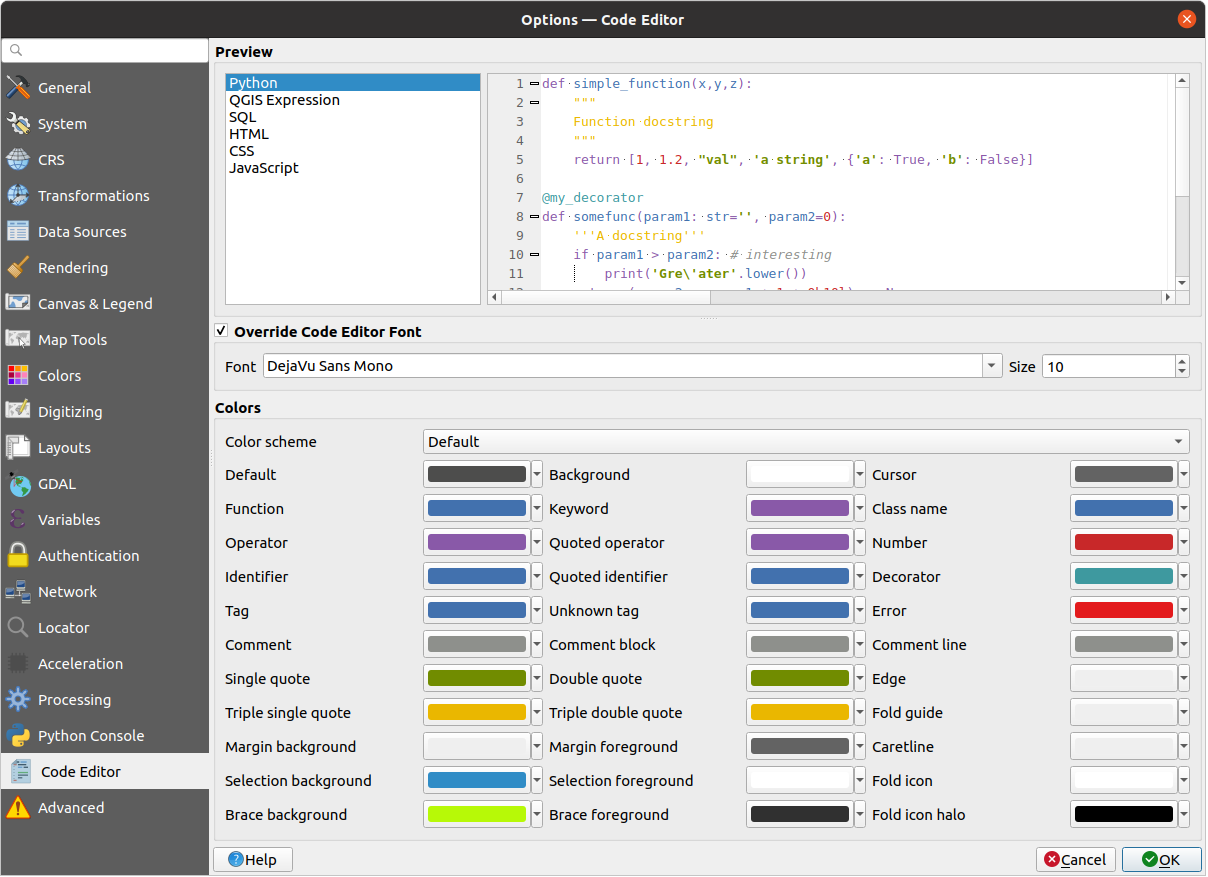
图 9.23 代码编辑器设置选项卡
在对话框顶部,控件以各种编码语言 (Python, QGIS表达式, HTML, SQL, JavaScript) 提供当前设置的实时预览。调整设置的个性化方法如下:
勾选
更换代码编辑器默认字体 可以修改默认 字体 和 字号 。在 颜色 组下,您可以:
选择 颜色方案: 预定义方案的设置为
默认,曝光暗和曝光亮。一旦修改颜色,就会触发自定义方案,并且可以通过选择预定义方案进行重置。在编写代码时更改每个元素的 颜色, 例如用于注释、引号、函数、背景等的颜色。
9.1.22. 高级设置
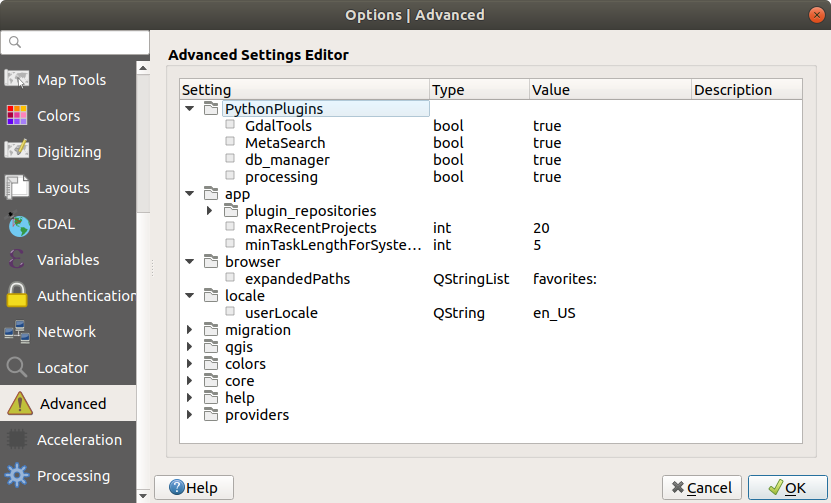
图 9.24 QGIS中的高级设置选项卡
所有与QGIS相关的设置 (UI、工具、数据提供程序、处理配置、默认值和路径、插件选项、表达式、几何图形检查…) 都保存在当前 用户配置 目录下的 QGIS/QGIS3.ini 文件中。通过将此文件复制到其他设备,可以共享配置。
在QGIS中, 高级 选项卡提供了通过 高级设置编辑器 管理这些设置的方法。在您保证要小心之后,这个控件将被一个包含所有现有设置的树所填充,您可以编辑它们的值。右键单击设置或组,可以将其删除 (要添加设置或组,必须编辑 QGIS3.ini 文件)。所做更改会自动保存在 QGIS3.ini 文件中。
警告
避免盲目使用高级选项卡设置
鉴于更改会自动应用,因此修改此对话框中的项时一定要小心。在不知情的情况下进行更改可能会以各种方式破坏QGIS设置。
9.2. 使用用户配置文件
菜单提供设置和访问用户配置文件的功能。用户配置文件是统一的应用程序配置,允许在单个文件夹中储存:
所有 全局设置, 包括语言环境、投影、认证设置、调色板、快捷键等
GUI配置和 定制
为基准变换而安装的网格文件和其他Proj辅助文件
已安装的 插件 及其配置
工程模板和保存工程的历史记录及其图像预览
数据处理设置 、日志、脚本和模型。
默认情况下,QGIS安装包含一个名为 default 的单用户配置文件夹。但您可以创建任意数量的用户配置文件夹:
单击 新建配置... 条目。
系统将提示您提供配置文件名,并在
~/<UserProfiles>/下创建同名文件夹,其中:~represents the HOME directory, which on Windows is usually
something like
Windows is usually
something like C:\Users\<username>.和
<UserProfiles>表示主配置文件夹,即:
.local/share/QGIS/QGIS3/profiles/-
%AppData%\Roaming\QGIS\QGIS3\profiles\ 
Library/Application Support/QGIS/QGIS3/profiles/
可以使用 打开当前配置文件夹 从QGIS打开用户配置文件夹。
使用原始的配置启动QGIS新实例,之后您可以设置自定义配置。
如果您的QGIS设置中有多个配置文件,当前配置文件的名称将显示在应用程序标题栏的方括号之间。
由于每位用户配置文件都包含独立的设置、插件和历史记录,因此非常适合不同的工作流、演示、同一台计算机的用户或测试设置等。您可以通过 菜单,或从 命令行 使用特定用户的配置文件运行QGIS。
除非更改,否则最后关闭QGIS会话的配置文件将用于之后的QGIS会话。
小技巧
在新用户配置文件下运行QGIS,以检查Bug的持久性
当您在QGIS遇到某些功能有奇怪的行为时,请创建一个新的用户配置文件,然后再次运行这些命令。有时,Bug与当前用户配置文件中的一些遗留问题有关,创建一个新用户配置文件可能会进行修复,因为现在使用新的 (原始) 配置文件重新启动QGIS。
9.3. 工程属性
在 下的工程属性窗口中,可以设置工程特定的选项。特定于工程的选项将重写上述 选项 对话框中的等效选项。
9.3.1. 通用属性
In the  General tab, the General settings let you:
查看工程文件的位置
set the folder for the project home (available in the Project home item of the Browser panel). The path can be relative to the folder of the project file (type it in) or absolute. The project home can be used for storing data and other content that is useful for the project. Convenient when dataset and project files are not stored at the same place. If not filled, the Project home defaults to the project file folder.
在工程文件路径旁边指定工程的标题
选择要素被选中时要使用的颜色
选择背景色:用于地图画布的颜色
设置工程中图层的路径应保存为绝对 (完整) 还是相对于工程文件位置。当图层和工程文件都可以移动或共享,或从不同平台的计算机访问工程时,您可能更喜欢相对路径。
选择在工程渲染为地图瓦片时避免伪影。请注意,勾选此选项可能会导致性能下降。
计算面积和距离是GIS中的常见需求。但是,这些值实际与基础投影设置有关。 计量 框架允许您控制这些参数,您可以选择:
椭球体, 距离和面积的计算完全基于此,可以是:
无/平面: 这种情况下,返回的值是笛卡尔测量值。
自定义 : 您需要设置长半轴和短半轴的值。
或预定义列表中的现有椭球体 (Clarke 1866, Clarke 1880 IGN, New International 1967, WGS 84...)。
长度和周长的 距离计量单位 和 面积计量单位 。这些设置默认为QGIS选项中设置的单位,但随后会重写当前工程中的单位,用于:
属性表字段更新栏
字段计算器的计算
识别工具得到的长度、周长和面积值
测量对话框显示的默认单位
坐标和方位角显示 允许您选择和自定义用于在状态栏显示鼠标坐标的方位角格式和单位格式,以及通过识别工具显示的衍生坐标。
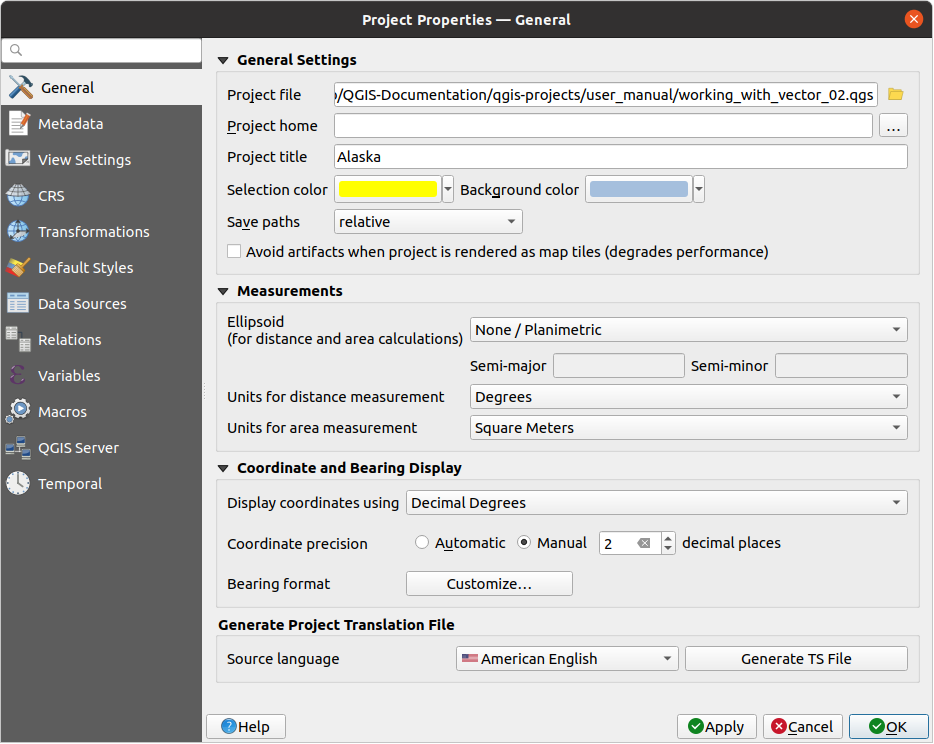
图 9.25 工程属性对话框的通用选项卡
9.3.2. 元数据属性
The  Metadata tab allows detailed metadata to be defined,
including (among the others): author, creation date, language, abstracts,
categories, keywords, contact details, links, history. There is also a
validation functionality that checks if specific fields were filled, anyway
this is not enforced. See vector layer metadata properties for some details.
Metadata tab allows detailed metadata to be defined,
including (among the others): author, creation date, language, abstracts,
categories, keywords, contact details, links, history. There is also a
validation functionality that checks if specific fields were filled, anyway
this is not enforced. See vector layer metadata properties for some details.
9.3.3. View Settings
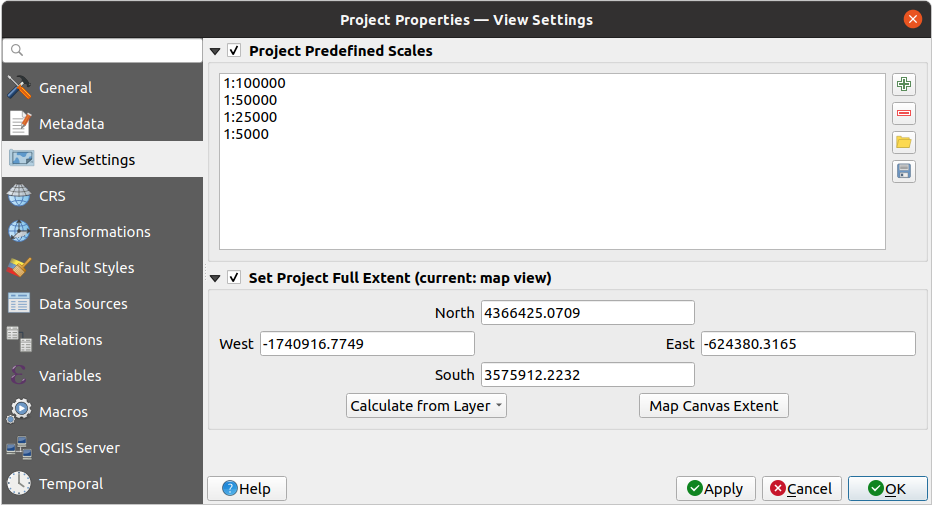
图 9.26 View Settings tab of the Project Properties dialog
The  View Settings tab provides means to control
the project map canvas. You can:
View Settings tab provides means to control
the project map canvas. You can:
set Project predefined scales: the list of scales to display in the status bar Scale drop-down widget. This overrides the global predefined scales.
Set Project full Extent: this extent will be used instead of the extent of all layers when zooming to full map extent (
 ).
It's useful when a project contains web layers/national layers/global layers
yet the actual area of interest for the project is a smaller geographic area.
The project full extent coordinates can be set with the extent selector widget.
).
It's useful when a project contains web layers/national layers/global layers
yet the actual area of interest for the project is a smaller geographic area.
The project full extent coordinates can be set with the extent selector widget.
9.3.4. CRS属性
备注
有关QGIS如何处理工程投影的更多信息,请阅读 使用投影 专用章节。
 CRS 选项卡可帮助您设置要在此工程中使用的坐标参照系。它可以是:
- 无CRS (或未知/非地球投影): 图层是根据其原始坐标绘制的
或者现有坐标参照系,可以是 地理, 投影 或 用户自定义 。添加到工程中的图层会动态转换到此CRS,以便叠加它们,而不考虑其原始CRS。
9.3.5. 变换属性
变换 选项卡通过配置要应用于当前工程的基准面变换首选项,帮助您控制图层重投影设置。照例,这些设置会覆盖任何相应的全局设置。更多信息,请参阅 Datum Transformations 。
9.3.6. 默认样式属性
The  Default Styles tab lets you control how new layers
will be drawn in the project when they do not have an existing
Default Styles tab lets you control how new layers
will be drawn in the project when they do not have an existing .qml style
defined. You can:
根据图层几何图形类型以及默认 颜色渐变 ,设置要应用的默认符号 (标记, 线, 填充)
将默认 不透明度 应用于新建图层
- 给符号指派随机颜色, 修改符号填充颜色,从而避免对所有图层进行相同的渲染。
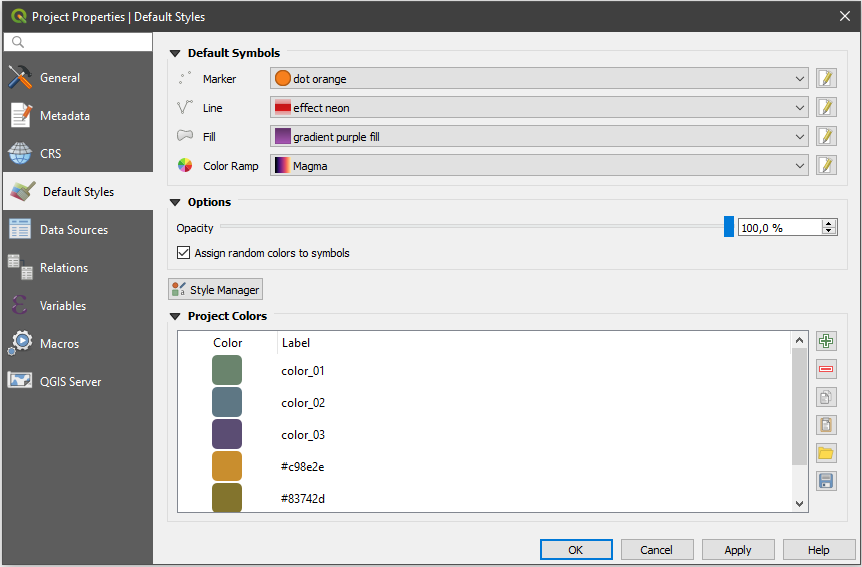
图 9.27 默认样式选项卡
使用 样式管理器 按钮,还可以快速访问 样式管理器 对话框,并配置符号和颜色渐变。
还有附加部件,您可以在其中为正在运行的工程定义指定的颜色。与 全局颜色 一样,您可以:
- 添加 或 移除 颜色
- 复制 或 粘贴 颜色
- 导入 或 导出 颜色集从/到
.gpl文件。
双击列表中的颜色,在 选择颜色 对话框中对其进行调整或替换,也可以通过双击 标注 列对其进行重命名。
这些颜色被认定为 工程颜色 ,并作为 颜色控件 的一部分列出。
小技巧
使用工程颜色快速分配和更新颜色控件
工程颜色可以使用其标注来引用,并且所使用的颜色控件与之绑定。这意味着您不必为许多属性设置相同的颜色而重复替换,为了避免繁琐的更新,您可以:
将颜色定义为工程颜色
单击要设置颜色属性旁边的 数据定义重写控件
将鼠标悬停在 颜色 菜单上并选择工程颜色。然后,属性被指定表达式
project_color('color_label'),颜色控件反映该颜色。根据需要重复步骤 2 和 3
每次更新工程颜色,所做的更改就会反映在使用工程颜色的任何地方。
9.3.7. 数据源属性
In the  Data Sources tab, you can:
- Automatically create transaction groups where possible:
When this mode is turned on, all
layers from the same database are synchronised in their edit state,
i.e. when one layer is put into edit state, all are, when one layer is committed
or one layer is rolled back, so are the others. Also, instead of buffering edit
changes locally, they are directly sent to a transaction in the database which
gets committed when the user clicks save layer.
Note that you can (de)activate this option only if no layer is being edited
in the project.
- Evaluate default values on provider side: When adding
new features in a PostgreSQL table, fields with default value constraint are
evaluated and populated at the form opening, and not at the commit moment.
This means that instead of an expression like
nextval('serial'), the field in the Add Feature form will display expected value (e.g.,25). - Trust project when data source has no metadata:
To speed up project loading by skipping data checks. Useful in QGIS Server context
or in projects with huge database views/materialized views. The extent of layers
will be read from the QGIS project file (instead of data sources) and when
using the PostgreSQL provider the primary key unicity will not be
checked for views and materialized views.
Configure the Layers Capabilities, i.e.:
Set (or disable) which layers are
identifiable, i.e. will respond to the identify tool. By default, layers are set queryable.Set whether a layer should appear as
read-only, meaning that it can not be edited by the user, regardless of the data provider's capabilities. Although this is a weak protection, it remains a quick and handy configuration to avoid end-users modifying data when working with file-based layers.Define which layers are
searchable, i.e. could be queried using the locator widget. By default, layers are set searchable.Define which layers are defined as
required. Checked layers in this list are protected from inadvertent removal from the project.Define which layers are
private, i.e. hidden from the Layers panel. This is meant for accessory layers (basemap, join, lookups for value-relations, most probably aspatial layers, ...) that you still need in a project but you don't want them to pollute the legend tree and other layer selection tools. If set visible, they are still displayed in the map canvas and rendered in the print layout legend. Use the option in the
Layers panel top toolbar to temporarily turned them on
for any interaction.
option in the
Layers panel top toolbar to temporarily turned them on
for any interaction.
The Layers Capabilities table provides some convenient tools to:
Select multiple cells and press Toggle Selection to have them change their checkbox state;
- Show spatial layers only, filtering out non-spatial
layers from the layers list;
- Filter layers... and quickly find a particular layer to
configure.
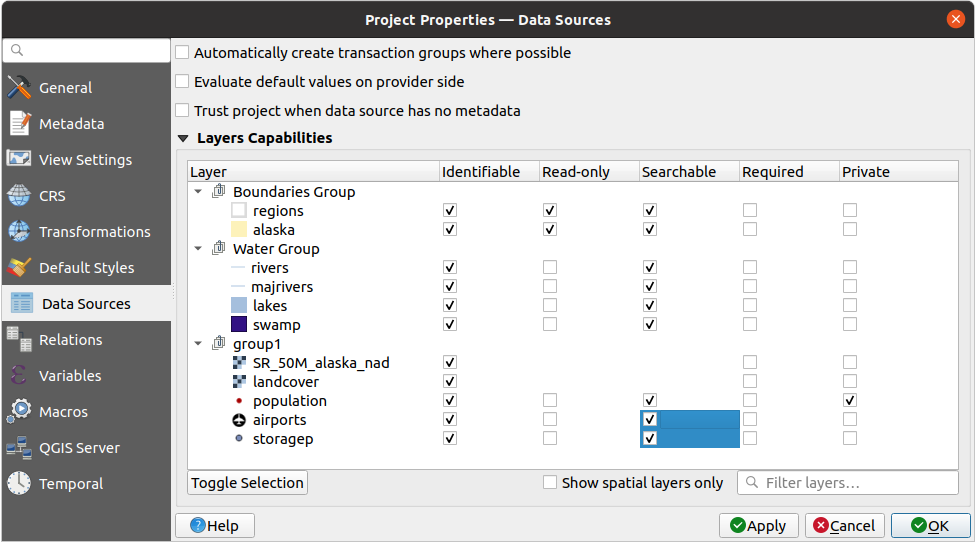
图 9.28 Data Sources tab
9.3.8. Relations Properties
The  Relations tab is used to define 1:n relations and
polymorphic relations. The relations
are defined in the project properties dialog. Once relations exist for a layer,
a new user interface element in the form view (e.g. when identifying a feature
and opening its form) will list the related entities. This provides a powerful
way to express e.g. the inspection history on a length of pipeline or road segment.
You can find out more about 1:n relations support in Section Creating one or many to many relations.
Relations tab is used to define 1:n relations and
polymorphic relations. The relations
are defined in the project properties dialog. Once relations exist for a layer,
a new user interface element in the form view (e.g. when identifying a feature
and opening its form) will list the related entities. This provides a powerful
way to express e.g. the inspection history on a length of pipeline or road segment.
You can find out more about 1:n relations support in Section Creating one or many to many relations.
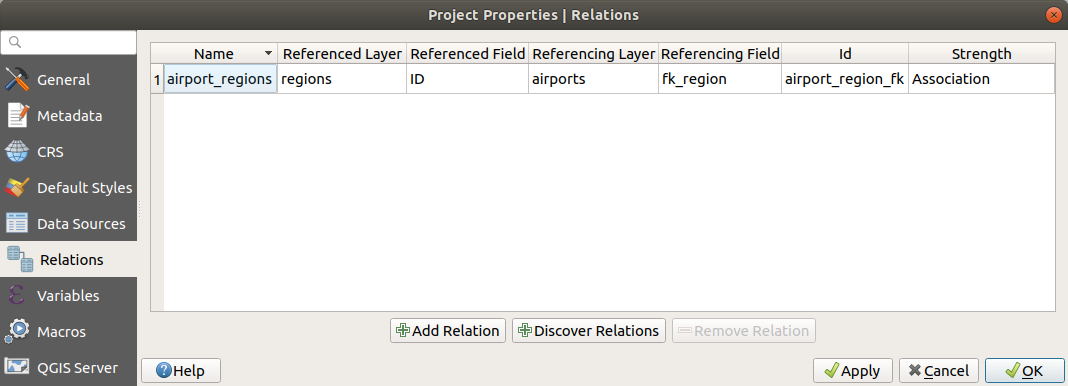
图 9.29 Relations tab
9.3.9. Variables Properties
The  Variables tab lists all the variables available at
the project's level (which includes all global variables). Besides, it
also allows the user to manage project-level variables. Click the
button to add a new custom project-level variable. Likewise, select a custom
project-level variable from the list and click the button to
remove it.
More information on variables usage in the General Tools
Storing values in Variables section.
Variables tab lists all the variables available at
the project's level (which includes all global variables). Besides, it
also allows the user to manage project-level variables. Click the
button to add a new custom project-level variable. Likewise, select a custom
project-level variable from the list and click the button to
remove it.
More information on variables usage in the General Tools
Storing values in Variables section.
9.3.10. Macros Properties
The  Macros tab is used to edit Python macros for projects.
Currently, only three macros are available:
Macros tab is used to edit Python macros for projects.
Currently, only three macros are available: openProject(), saveProject()
and closeProject().
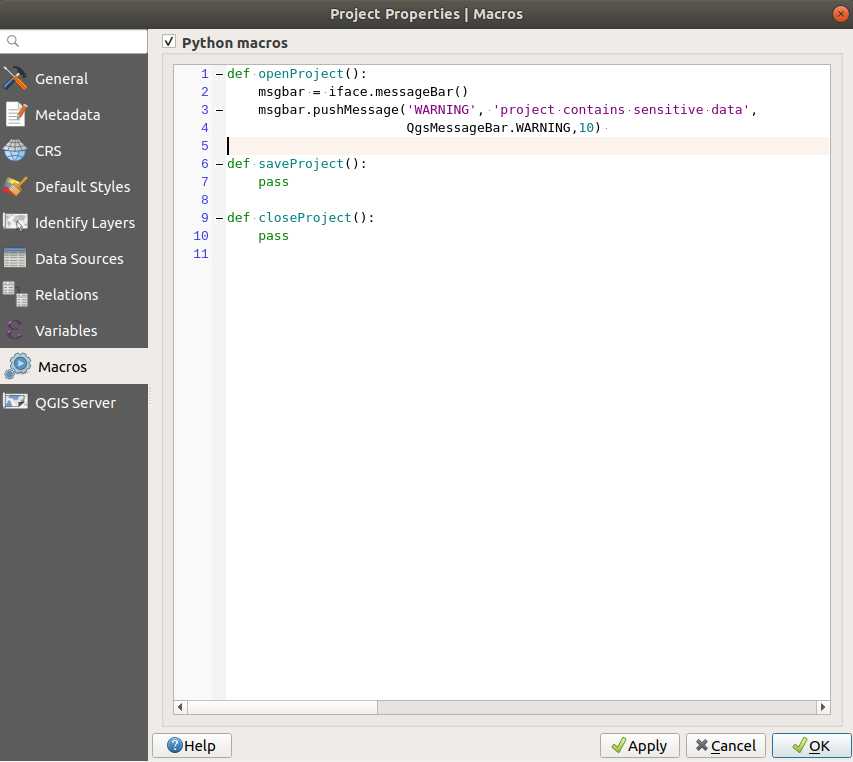
图 9.30 Macro settings in QGIS
9.3.11. QGIS Server Properties
The QGIS Server tab allows you to configure your project
in order to publish it online. Here you can define information about the QGIS
Server WMS and WFS capabilities, extent and CRS restrictions. More information
available in section Configure your project and subsequent.
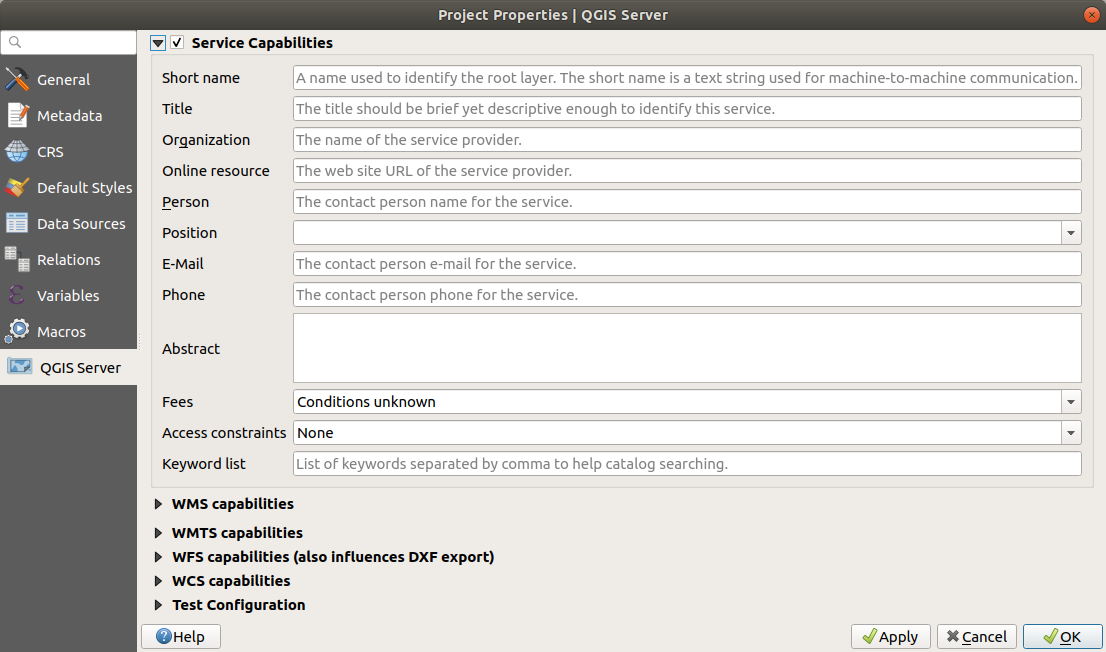
图 9.31 QGIS Server settings tab
9.3.12. Temporal Properties
The  Temporal tab is used to set the temporal range of your project,
either by using manual Start date and End date inputs
or by calculating it from the current project temporal layers.
The project time range can then be used in the Temporal controller
panel to manage the map canvas temporal navigation.
Temporal tab is used to set the temporal range of your project,
either by using manual Start date and End date inputs
or by calculating it from the current project temporal layers.
The project time range can then be used in the Temporal controller
panel to manage the map canvas temporal navigation.
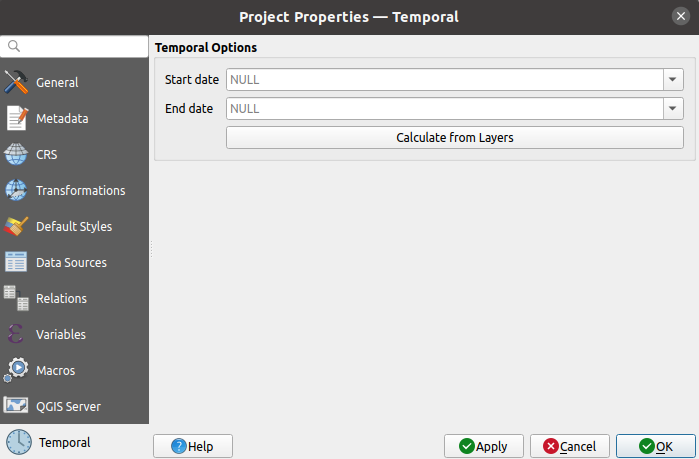
图 9.32 Project Temporal tab
9.4. Customization
The Customization dialog lets you (de)activate almost every element in the QGIS user interface. This can be very useful if you want to provide your end-users with a 'light' version of QGIS, containing only the icons, menus or panels they need.
备注
Before your changes are applied, you need to restart QGIS.
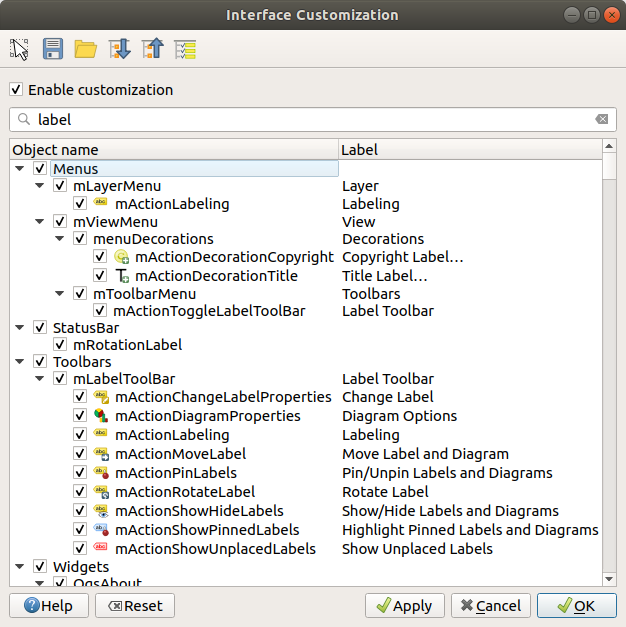
图 9.33 The Customization dialog
Ticking the Enable customization checkbox is the first step
on the way to QGIS customization. This enables the toolbar and the widget
panel from which you can uncheck and thus disable some GUI items.
The configurable item can be:
a Menu or some of its sub-menus from the 菜单栏
a whole Panel (see 面板和工具栏)
the Status bar described in 状态栏 or some of its items
a Toolbar: the whole bar or some of its icons
or any widget from any dialog in QGIS: label, button, combobox...
With  Switch to catching widgets in main application, you
can click on an item in QGIS interface that you want to be hidden and
QGIS automatically unchecks the corresponding entry in the Customization dialog.
You can also use the Search box to find items by their name or label.
Switch to catching widgets in main application, you
can click on an item in QGIS interface that you want to be hidden and
QGIS automatically unchecks the corresponding entry in the Customization dialog.
You can also use the Search box to find items by their name or label.
Once you setup your configuration, click Apply or OK to validate your changes. This configuration becomes the one used by default by QGIS at the next startup.
The modifications can also be saved in a .ini file using
Save To File button. This is a handy way to share a common QGIS
interface among multiple users. Just click on Load from File
from the destination computer in order to import the .ini file.
You can also run command line tools and save various
setups for different use cases as well.
小技巧
Easily restore predefined QGIS
The initial QGIS GUI configuration can be restored by one of the methods below:
unchecking
Enable customization option in the
Customization dialog or click the  Check All button
pressing the Reset button in the Settings frame under menu, System tab
launching QGIS at a command prompt with the following command line
qgis --nocustomizationsetting to
falsethe value of variable under menu, Advanced tab (see the warning).
In most cases, you need to restart QGIS in order to have the change applied.
9.5. Keyboard shortcuts
QGIS provides default keyboard shortcuts for many features. You can find them in
section 菜单栏. Additionally, the menu option
allows you to change the default keyboard shortcuts and add new
ones to QGIS features.
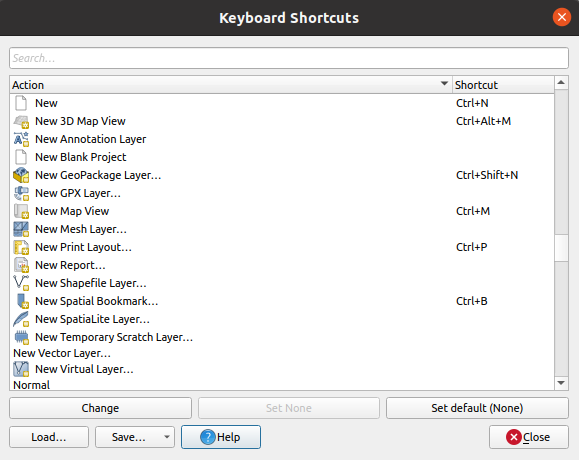
图 9.34 Define shortcut options
Configuration is very simple. Use the search box at the top of the dialog to find a particular action, select it from the list and click on :
Change and press the new combination you want to assign as new shortcut
Set None to clear any assigned shortcut
or Set Default to backup the shortcut to its original and default value.
Proceed as above for any other tools you wish to customize. Once you have
finished your configuration, simply Close the dialog to have your changes
applied. You can also Save the changes either as an .XML file
with only the User Shortcuts or with all Shortcuts or as an .PDF file with
all Shortcuts and Load them into another QGIS installation.
9.6. Running QGIS with advanced settings
9.6.1. Command line and environment variables
We've seen that launching QGIS is done as for any
application on your OS.
QGIS provides command line options for more advanced use cases (in some cases
you can use an environment variable instead of the command line option).
To get a list of the options, enter qgis --help on the command line, which
returns:
QGIS is a user friendly Open Source Geographic Information System.
Usage: /usr/bin/qgis.bin [OPTION] [FILE]
  OPTION:
        [--version]     display version information and exit
        [--snapshot filename]   emit snapshot of loaded datasets to given file
        [--width width] width of snapshot to emit
        [--height height]       height of snapshot to emit
        [--lang language]       use language for interface text (changes existing override)
        [--project projectfile] load the given QGIS project
        [--extent xmin,ymin,xmax,ymax]  set initial map extent
        [--nologo]      hide splash screen
        [--noversioncheck]      don't check for new version of QGIS at startup
        [--noplugins]   don't restore plugins on startup
        [--nocustomization]     don't apply GUI customization
        [--customizationfile path]      use the given ini file as GUI customization
        [--globalsettingsfile path]     use the given ini file as Global Settings (defaults)
        [--authdbdirectory path] use the given directory for authentication database
        [--code path]   run the given python file on load
        [--defaultui]   start by resetting user ui settings to default
        [--hide-browser]        hide the browser widget
        [--dxf-export filename.dxf]     emit dxf output of loaded datasets to given file
        [--dxf-extent xmin,ymin,xmax,ymax]      set extent to export to dxf
        [--dxf-symbology-mode none|symbollayer|feature] symbology mode for dxf output
        [--dxf-scale-denom scale]       scale for dxf output
        [--dxf-encoding encoding]       encoding to use for dxf output
        [--dxf-map-theme maptheme]      map theme to use for dxf output
        [--take-screenshots output_path]        take screen shots for the user documentation
        [--screenshots-categories categories]   specify the categories of screenshot to be used (see QgsAppScreenShots::Categories).
        [--profile name]        load a named profile from the user's profiles folder.
        [--profiles-path path]  path to store user profile folders. Will create profiles inside a {path}\profiles folder
        [--version-migration]   force the settings migration from older version if found
        [--openclprogramfolder]         path to the folder containing the sources for OpenCL programs.
        [--help]                this text
        [--]            treat all following arguments as FILEs

  FILE:
    Files specified on the command line can include rasters,
    vectors, and QGIS project files (.qgs and .qgz):
     1. Rasters - supported formats include GeoTiff, DEM
        and others supported by GDAL
     2. Vectors - supported formats include ESRI Shapefiles
        and others supported by OGR and PostgreSQL layers using
        the PostGIS extension
小技巧
Example Using command line arguments
You can start QGIS by specifying one or more data files on the command
line. For example, assuming you are in the qgis_sample_data
directory, you could start QGIS with a vector layer and a raster file
set to load on startup using the following command:
qgis ./raster/landcover.img ./gml/lakes.gml
9.6.1.1. --version
This option returns QGIS version information.
9.6.1.2. --snapshot
This option allows you to create a snapshot in PNG format from the current view. This comes in handy when you have many projects and want to generate snapshots from your data, or when you need to create snapshots of the same project with updated data.
Currently, it generates a PNG file with 800x600 pixels. The size can be adjusted
using the --width and --height arguments. The filename can
be added after --snapshot. For example:
qgis --snapshot my_image.png --width 1000 --height 600 --project my_project.qgs
9.6.1.3. --width
This option returns the width of the snapshot to be emitted (used with --snapshot).
9.6.1.4. --height
This option returns the height of the snapshot to be emitted (used with --snapshot).
9.6.1.5. --lang
Based on your locale, QGIS selects the correct localization. If you would like
to change your language, you can specify a language code. For example,
qgis --lang it starts QGIS in Italian localization.
9.6.1.6. --project
Starting QGIS with an existing project file is also possible. Just add the
command line option --project followed by your project name and QGIS will
open with all layers in the given file loaded.
9.6.1.7. --extent
To start with a specific map extent use this option. You need to add the bounding box of your extent in the following order separated by a comma:
--extent xmin,ymin,xmax,ymax
This option probably makes more sense when paired with the --project option
to open a specific project at the desired extent.
9.6.1.8. --nologo
This option hides the splash screen when you start QGIS.
9.6.1.9. --noversioncheck
Skip searching for a new version of QGIS at startup.
9.6.1.10. --noplugins
If you have trouble at start-up with plugins, you can avoid loading them at start-up with this option. They will still be available from the Plugins Manager afterwards.
9.6.1.11. --nocustomization
Using this option, any existing GUI customization will not be applied at startup. This means that any hidden buttons, menu items, toolbars, and so on, will show up on QGIS start up. This is not a permanent change. The customization will be applied again if QGIS is launched without this option.
This option is useful for temporarily allowing access to tools that have been removed by customization.
9.6.1.12. --customizationfile
Using this option, you can define a UI customization file, that will be used at startup.
9.6.1.13. --globalsettingsfile
The equivalent environment variable is QGIS_GLOBAL_SETTINGS_FILE.
Using this option, you can specify the path for a Global Settings
file (.ini), also known as the Default Settings. The settings in the specified
file replace the original inline default ones, but the user profiles'
settings will be set on top of those.
QGIS looks for the default global settings file in the following order and only the first found file will be used:
path specified by the commandline parameter
path defined by the environment variable
the AppDataLocation folder, where persistent application data can be stored; it is managed by the user or system administrator and is not touched by installer and does not require any additional setup like passing commandline parameters or settings environment variable. Depending on the OS, it is:
-
$HOME/.local/share/QGIS/QGIS3/ -
C:\Users\<username>\%AppData%\Roaming\QGIS\QGIS3\ -
$HOME/Library/Application Support/QGIS/QGIS3/
the installation directory, i.e.
your_QGIS_package_path/resources/qgis_global_settings.ini.
Presently, there's no way to specify a file to write settings to; therefore, you can create a copy of an original settings file, rename, and adapt it.
Setting the qgis_global_setting.ini file path to a network shared
folder, allows a system administrator to change global settings and defaults in
several machines by only editing one file.
9.6.1.14. --authdbdirectory
This option is similar to --globalsettingsfile, but defines the path to the
directory where the authentication database will be stored and loaded.
9.6.1.15. --code
This option can be used to run a given python file directly after QGIS has started.
For example, when you have a python file named load_alaska.py with
following content:
from qgis.utils import iface
raster_file = "/home/gisadmin/Documents/qgis_sample_data/raster/landcover.img"
layer_name = "Alaska"
iface.addRasterLayer(raster_file, layer_name)
Assuming you are in the directory where the file load_alaska.py is
located, you can start QGIS, load the raster file landcover.img and give
the layer the name 'Alaska' using the following command:
qgis --code load_alaska.py
9.6.1.16. --defaultui
On load, permanently resets the user interface (UI) to the default settings. This option will restore the panels and toolbars visibility, position, and size. Unless it's changed again, the default UI settings will be used in the following sessions.
Notice that this option doesn't have any effect on GUI
customization. Items hidden by GUI customization (e.g. the
status bar) will remain hidden even using the --defaultui option. See also
the --nocustomization option.
9.6.1.17. --hide-browser
On load, hides the Browser panel from the user interface. The panel
can be enabled by right-clicking a space in the toolbars or using the
( in  Linux KDE).
Unless it's enabled again, the Browser panel will remain hidden in the following sessions.
9.6.1.18. --dxf-*
These options can be used to export a QGIS project into a DXF file. Several options are available:
--dxf-export: the DXF filename into which to export the layers;
--dxf-extent: the extent of the final DXF file;
--dxf-symbology-mode: several values can be used here:
none(no symbology),symbollayer(Symbol layer symbology),feature(feature symbology);--dxf-scale-denom: the scale denominator of the symbology;
--dxf-encoding: the file encoding;
--dxf-map-theme: choose a map theme from the layer tree configuration.
9.6.1.19. --take-screenshots
Takes screenshots for the user documentation. Can be used together with
--screenshots-categories to filter which categories/sections of the
documentation screenshots should be created (see QgsAppScreenShots::Categories).
9.6.1.20. --profile
Loads QGIS using a specific profile from the user's profile folder. Unless changed, the selected profile will be used in the following QGIS sessions.
9.6.1.21. --profiles-path
With this option, you can choose a path to load and save the profiles (user
settings). It creates profiles inside a {path}\profiles folder, which
includes settings, installed plugins, processing models and scripts, and so on.
This option allows you to, for instance, carry all your plugins and settings in a flash drive, or, for example, share the settings between different computers using a file sharing service.
The equivalent environment variable is QGIS_CUSTOM_CONFIG_PATH.
9.6.1.22. --version-migration
If settings from an older version are found (e.g., the .qgis2 folder from QGIS
2.18), this option will import them into the default QGIS profile.
9.6.1.23. --openclprogramfolder
Using this option, you can specify an alternative path for your OpenCL programs. This is useful for developers while testing new versions of the programs without needing to replace the existing ones.
The equivalent environment variable is QGIS_OPENCL_PROGRAM_FOLDER.
9.6.2. Deploying QGIS within an organization
If you need to deploy QGIS within an organization with a custom configuration file,
first you need to copy/paste the content of the default settings file located in
your_QGIS_package_path/resources/qgis_global_settings.ini. This file already
contains some default sections identified by a block starting with [].
We recommend that you keep these defaults values and add your own sections at the bottom
of the file. If a section is duplicated in the file, QGIS will take the last
one from top to bottom.
You can change allowVersionCheck=false to disable
the QGIS version check.
If you do not want to display the migration window after a fresh install, you need the following section:
[migration]
fileVersion=2
settings=true
If you want to add a custom variable in the global scope:
[variables]
organisation="Your organization"
To discover the possibilities of the settings INI file, we suggest that you set
the config you would like in QGIS Desktop and then search for it in your INI
file located in your profile using a text editor. A lot of settings can be set
using the INI file such as WMS/WMTS, PostGIS connections, proxy settings, maptips…
Finally, you need to set the environment variable QGIS_GLOBAL_SETTINGS_FILE
to the path of your customized file.
In addition, you can also deploy files such as Python macros, color palettes, layout templates, project templates… either in the QGIS system directory or in the QGIS user profile.
Layout templates must be deployed in the
composer_templatesdirectory.Project templates must be deployed in the
project_templatesdirectory.Custom Python macros must be deployed in the
pythondirectory.