10. 使用投影
坐标参照系统,或简称CRS, 是一种将数值坐标与地球表面上的位置相关联的方法。 QGIS 支持大约 7,000 个标准 坐标参照系统,每个都有不同的用例、优缺点!为您的 QGIS 项目和数据选择合适的坐标参照系统可能是一项复杂的任务,但幸运的是 QGIS 可以帮助您完成选择,并让使用不同的 坐标参照系尽可能透明和准确。
10.1. 投影支持概述
QGIS 支持大约 7,000 个已知的坐标参照系。这些标准坐标参照系基于欧洲石油调查组 (EPSG) 和法国国家地理研究所 (IGNF) 定义的标准,并通过底层的“Proj”投影库在 QGIS 中提供。通常,这些标准投影是通过使用“管理机构:代码”组合来识别的,其中管理机构是组织名称,例如“EPSG”或“IGNF”,代码是与特定 CRS 关联的唯一编号。例如,常见的 WGS 84 经纬度坐标参照系 的标识符为``EPSG:4326``,而网络地图标准坐标参照系为``EPSG:3857``。
自定义的、用户创建的坐标参照系存储在用户坐标参照系数据库中。有关管理自定义坐标参照系统的信息,请参阅:ref:`sec_custom_projections`部分。
10.2. 图层坐标参照系
为了将数据正确投影到特定目标坐标参照系,您的数据必须包含有关其坐标参照系的信息,或者您需要手动将正确的坐标参照系分配给图层。对于 PostGIS 图层,QGIS 使用创建该 PostGIS 图层时指定的空间参照标识符。对于 OGR 或 GDAL 支持的数据,QGIS 依赖于公认方法指定的坐标参照系。例如,对于 Shapefile 格式,这是一个包含用ESRI Well-Known Text (WKT) 表示的图层坐标参照系的文件。此投影文件具有与:file:.shp 文件相同的基本名称和 .prj 扩展名。例如,:file:`alaska.shp`将有一个名为:file:`alaska.prj`的对应投影文件。
每当将图层加载到 QGIS 中时,QGIS 都会尝试自动确定该图层的正确坐标参照系。在某些情况下可能无法成功,例如当提供了一个不包含坐标系信息的图层时。当 QGIS 无法自动确定图层的正确坐标参照系时,您可以手动配置 QGIS :
打开:menuselection:设置 -->

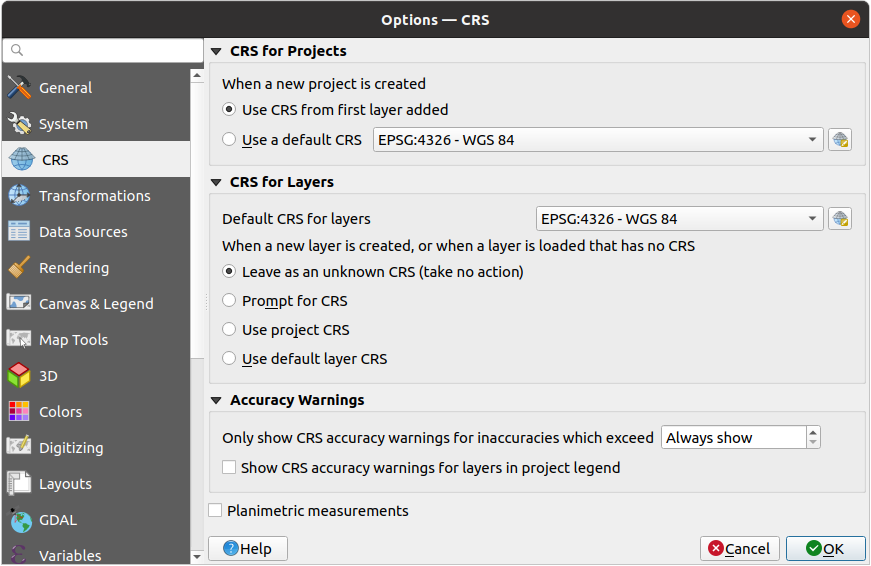
图 10.1 QGIS选项对话框中的CRS选项卡
在:guilabel:图层CRS 选项组中,设置 :guilabel:`当创建新图层或加载没有CRS的图层时`的操作。从以下选择其一:
 保留未知CRS (无动作):加载没有 CRS 的图层时,将不会提示选择 CRS,将 CRS 选择推迟到以后。一次加载很多图层时很方便。在:guilabel:`图层`面板中这些图层旁边将会显示 |indicatorNoCRS|图标。它们也将是无参照的,来自该图层的坐标被视为纯数字的、非地球的值,也就是说,当:ref:`一个项目被设置为没有CRS时<project_crs> `,所有图层的行为都是一样的。
 提示选择CRS:
- Use project CRS
- Use default layer CRS, as set in the
Default CRS for layers combobox above.
小技巧
To assign the same CRS to multiple layers that have no crs or have a wrong one in one operation:
Select the layers in the Layers panel
使用快捷键:kbd:Ctrl+Shift+C,或者右键单击选中图层以进入CRS选择选单:menuselection:图层CRS --> 设置图层CRS
找到并选择正确的CRS
点击:guilabel:OK.现在检查图层属性对话框下的:guilabel:`源`标签页的信息,图层的CRS已被正确地设置
请注意,在此设置中更改CRS并不会修改原始数据源,而只是改变了当前QGIS工程下QGIS对该图层原始坐标的解释。
10.3. 投影坐标参照系
Every project in QGIS also has an associated Coordinate Reference System. The project CRS determines how data is projected from its underlying raw coordinates to the flat map rendered within your QGIS map canvas.
QGIS supports "on the fly" CRS transformation for both raster and vector data. This means that regardless of the underlying CRS of particular map layers in your project, they will always be automatically transformed into the common CRS defined for your project. Behind the scenes, QGIS transparently reprojects all layers contained within your project into the project's CRS, so that they will all be rendered in the correct position with respect to each other!
It is important to make an appropriate choice of CRS for your QGIS projects. Choosing an inappropriate CRS can cause your maps to look distorted, and poorly reflect the real-world relative sizes and positions of features. Usually, while working in smaller geographic areas, there will be a number of standard CRSs used within a particular country or administrative area. It's important to research which CRSs are appropriate or standard choices for the area you are mapping, and ensure that your QGIS project follows these standards.
By default, QGIS starts each new project using a global default projection.
This default CRS is EPSG:4326 (also known as "WGS 84"), and it is a global
latitude/longitude based reference system.
This default CRS can be changed via the CRS for New Projects
setting in the CRS tab under
(see 图 10.1).
There is an option to automatically set the project's CRS
to match the CRS of the first layer loaded into a new project, or alternatively
you can select a different default CRS to use for all newly created projects.
This choice will be saved for use in subsequent QGIS sessions.
The project CRS can also be set through the CRS tab of the dialog. It will also be shown in the lower-right of the QGIS status bar.
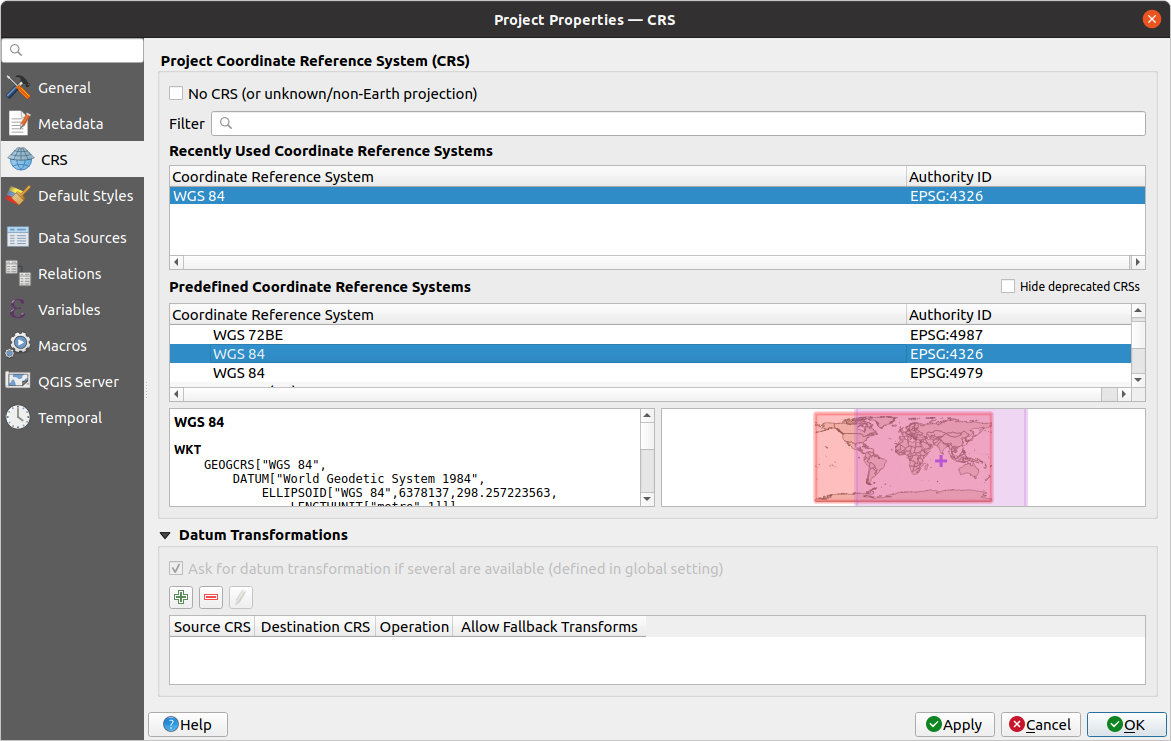
图 10.2 Project Properties Dialog
Available options are:
 No CRS (or unknown/non-Earth projection):
Checking this setting will disable ALL projection handling within the QGIS
project, causing all layers and map coordinates to be treated as simple 2D
Cartesian coordinates, with no relation to positions on the Earth's surface.
It can be used to guess a layer CRS (based on its raw coordinates or when
using QGIS for non earth uses like role-playing game maps, building mapping
or microscopic stuff. In this case:
No CRS (or unknown/non-Earth projection):
Checking this setting will disable ALL projection handling within the QGIS
project, causing all layers and map coordinates to be treated as simple 2D
Cartesian coordinates, with no relation to positions on the Earth's surface.
It can be used to guess a layer CRS (based on its raw coordinates or when
using QGIS for non earth uses like role-playing game maps, building mapping
or microscopic stuff. In this case:No reprojection is done while rendering the layers: features are just drawn using their raw coordinates.
The ellipsoid is locked out and forced to
None/Planimetric.The distance and area units, and the coordinate display are locked out and forced to "unknown units"; all measurements are done in unknown map units, and no conversion is possible.
or an existing coordinate reference system that can be geographic, projected or user-defined. A preview of the CRS extent on earth is displayed to help you select the appropriate one. Layers added to the project are translated on-the-fly to this CRS in order to overlay them regardless their original CRS. Use of units and ellipsoid setting are available and make sense and you can perform calculations accordingly.
Whenever you select a new CRS for your QGIS project, the measurement units will automatically be changed in the General tab of the Project properties dialog () to match the selected CRS. For instance, some CRSs define their coordinates in feet instead of meters, so setting your QGIS project to one of these CRSs will also set your project to measure using feet by default.
小技巧
Setting the project CRS from a layer
You can assign a CRS to the project using a layer CRS:
In the Layers panel, right-click on the layer you want to pick the CRS
Select Set project CRS from Layer.
The project's CRS is redefined using the layer's CRS. Map canvas extent, coordinates display are updated accordingly and all the layers in the project are on-the-fly translated to the new project CRS.
10.4. Coordinate Reference System Selector
This dialog helps you assign a Coordinate Reference System to a project or a layer, provided a set of projection databases. Items in the dialog are:
Filter: If you know the EPSG code, the identifier, or the name for a Coordinate Reference System, you can use the search feature to find it. Enter the EPSG code, the identifier or the name.
Recently used coordinate reference systems: If you have certain CRSs that you frequently use in your everyday GIS work, these will be displayed in this list. Click on one of these items to select the associated CRS.
Coordinate reference systems of the world: This is a list of all CRSs supported by QGIS, including Geographic, Projected and Custom coordinate reference systems. To define a CRS, select it from the list by expanding the appropriate node and selecting the CRS. The active CRS is preselected.
PROJ text: This is the CRS string used by the PROJ projection engine. This text is read-only and provided for informational purposes.
The CRS selector also shows a rough preview of the geographic area for which a selected CRS is valid for use. Many CRSs are designed only for use in small geographic areas, and you should not use these outside of the area they were designed for. The preview map shades an approximate area of use whenever a CRS is selected from the list. In addition, this preview map also shows an indicator of the current main canvas map extent.
10.5. Custom Coordinate Reference System
If QGIS does not provide the coordinate reference system you need, you can
define a custom CRS. To define a CRS, select  Custom CRS... from the menu. Custom CRSs
are stored in your QGIS user database. In addition to your custom CRSs, this
database also contains your spatial bookmarks and other custom data.
Custom CRS... from the menu. Custom CRSs
are stored in your QGIS user database. In addition to your custom CRSs, this
database also contains your spatial bookmarks and other custom data.
Defining a custom CRS in QGIS requires a good understanding of the PROJ projection library. To begin, refer to "Cartographic Projection Procedures for the UNIX Environment - A User's Manual" by Gerald I. Evenden, U.S. Geological Survey Open-File Report 90-284, 1990 (available at https://pubs.usgs.gov/of/1990/of90-284/ofr90-284.pdf).
This manual describes the use of proj and related command line
utilities. The cartographic parameters used with proj are described in
the user manual and are the same as those used by QGIS.
The Custom Coordinate Reference System Definition dialog requires only two parameters to define a user CRS:
A descriptive name
The cartographic parameters in PROJ or WKT format
To create a new CRS:
Click the
 Add new CRS button
Enter a descriptive name
Select the format: it can be Proj String or WKT
Add the CRS Parameters.
备注
Prefer storing the CRS definition in WKT format
Although both
Proj StringandWKTformats are supported, it's highly recommended to store projection definitions in the WKT format. Therefore, if the available definition is in the proj format, select that format, enter the parameters and then switch to WKT format. QGIS will convert the definition to the WKT format that you can later save.Click Validate to test whether the CRS definition is an acceptable projection definition.
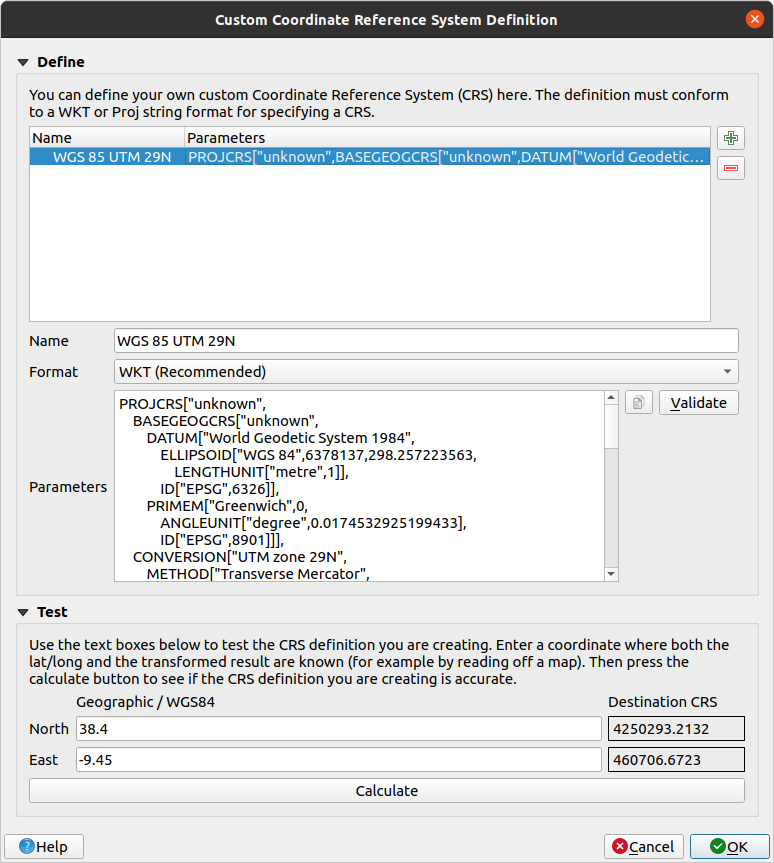
图 10.3 Custom CRS Dialog
You can test your CRS parameters to see if they give sane results. To do this, enter known WGS 84 latitude and longitude values in North and East fields, respectively. Click on Calculate, and compare the results with the known values in your coordinate reference system.
10.5.1. Integrate an NTv2-transformation in QGIS
To integrate an NTv2 transformation file in QGIS you need one more step:
Place the NTv2 file (.gsb) in the CRS/Proj folder that QGIS uses (e.g.
C:\OSGeo4W64\share\projfor windows users)Add nadgrids (
+nadgrids=nameofthefile.gsb) to the Proj definition in the Parameters field of the Custom Coordinate Reference System Definition ().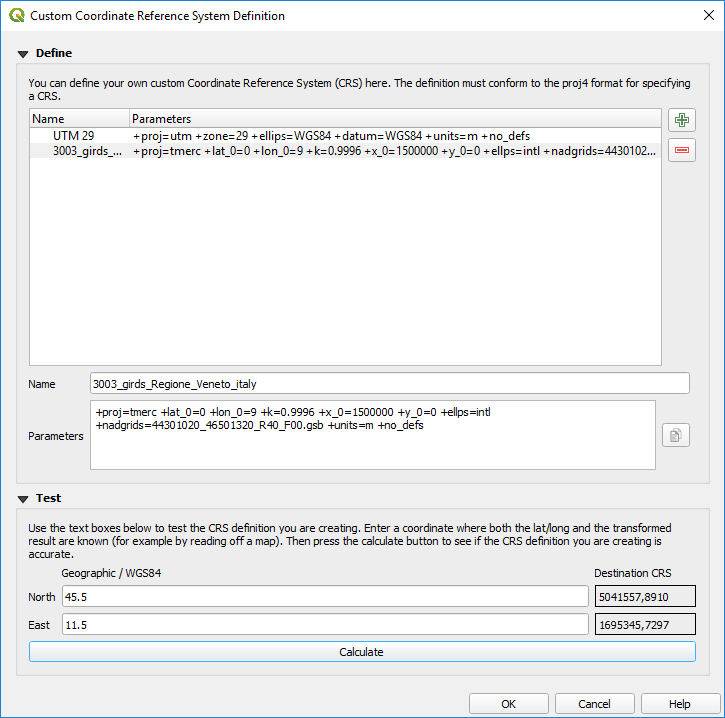
图 10.4 Setting an NTv2 transformation
10.6. Datum Transformations
In QGIS, 'on-the-fly' CRS transformation is enabled by default, meaning that whenever you use layers with different coordinate systems QGIS transparently reprojects them to the project CRS. For some CRS, there are a number of possible transforms available to reproject to the project's CRS!
By default, QGIS will attempt to use the most accurate transformation available.
However, in some cases this may not be possible, e.g. whenever additional
support files are required to use a transformation. Whenever a more accurate
transformation is available, but is not currently usable, QGIS will show
an informative warning message advising you of the more accurate transformation
and how to enable it on your system. Usually, this requires download of
an external package of transformation support files, and extracting these
to the proj folder under your QGIS user profile
folder.
If desired, QGIS can also prompt you whenever multiple possible transformations can be made between two CRSs, and allow you to make an informed selection of which is the most appropriate transformation to use for your data.
This customization is done in the
tab menu under the
Default datum transformations group:
using
 Ask for datum transformation if several are
available: when more than one appropriate datum transformation exist for a
source/destination CRS combination, a dialog will automatically be opened
prompting users to choose which of these datum transformations to use for
the project. If the Make default checkbox is ticked when
selecting a transformation from this dialog, then the choice is remembered
and automatically applied to any newly created QGIS projects.
Ask for datum transformation if several are
available: when more than one appropriate datum transformation exist for a
source/destination CRS combination, a dialog will automatically be opened
prompting users to choose which of these datum transformations to use for
the project. If the Make default checkbox is ticked when
selecting a transformation from this dialog, then the choice is remembered
and automatically applied to any newly created QGIS projects.or defining a list of appropriate datum transformations to use as defaults when loading a layer to a project or reprojecting a layer.
Use the
button to open the Select Datum Transformations
dialog. Then:Choose the Source CRS of the layer, using the drop-down menu or the
 Select CRS widget.
Provide the Destination CRS in the same way.
A list of available transformations from source to destination will be shown in the table. Clicking a row shows details on the settings applied and the corresponding accuracy and area of use of the transformation.
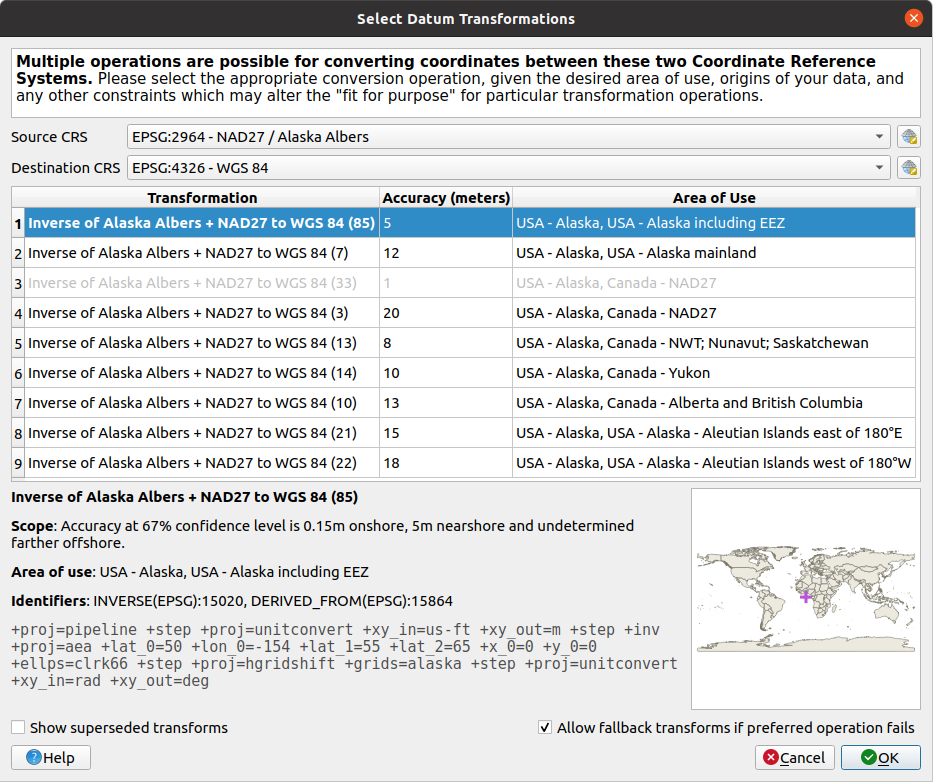
图 10.5 Selecting a preferred default datum transformation
In some cases a transformation may not be available for use on your system. In this case, the transformation will still be shown (greyed) in this list but can not be picked until you install the required package of transformation support. Usually, a button is provided to download and install the corresponding grid, which is then stored under the
projfolder in the active user profile directory.Find your preferred transformation and select it
Set whether you
Allow fallback transforms if preferred
operation failsClick OK.
A row is added to the table under Default Datum Transformations with information about the Source CRS, the Destination CRS, the Operation applied for the transformation and whether Allow fallback Transforms is enabled.
From now, QGIS automatically uses the selected datum transformations for further transformation between these two CRSs until you remove it (
 ) from the list or change the entry (
 ) in
the list.
) in
the list.
Datum transformations set in the
tab will be inherited by all
new QGIS projects created on the system. Additionally, a particular project
may have its own specific set of transformations specified via the
CRS tab of the Project properties dialog
(). These settings apply
to the current project only.