24.5. O modelador gráfico
The graphical modeler allows you to create complex models using a simple and easy-to-use interface. When working with a GIS, most analysis operations are not isolated, rather part of a chain of operations. Using the graphical modeler, that chain of operations can be wrapped into a single process, making it convenient to execute later with a different set of inputs. No matter how many steps and different algorithms it involves, a model is executed as a single algorithm, saving time and effort.
The graphical modeler can be opened from the Processing menu ().
24.5.1. A interface gráfica de modelagem
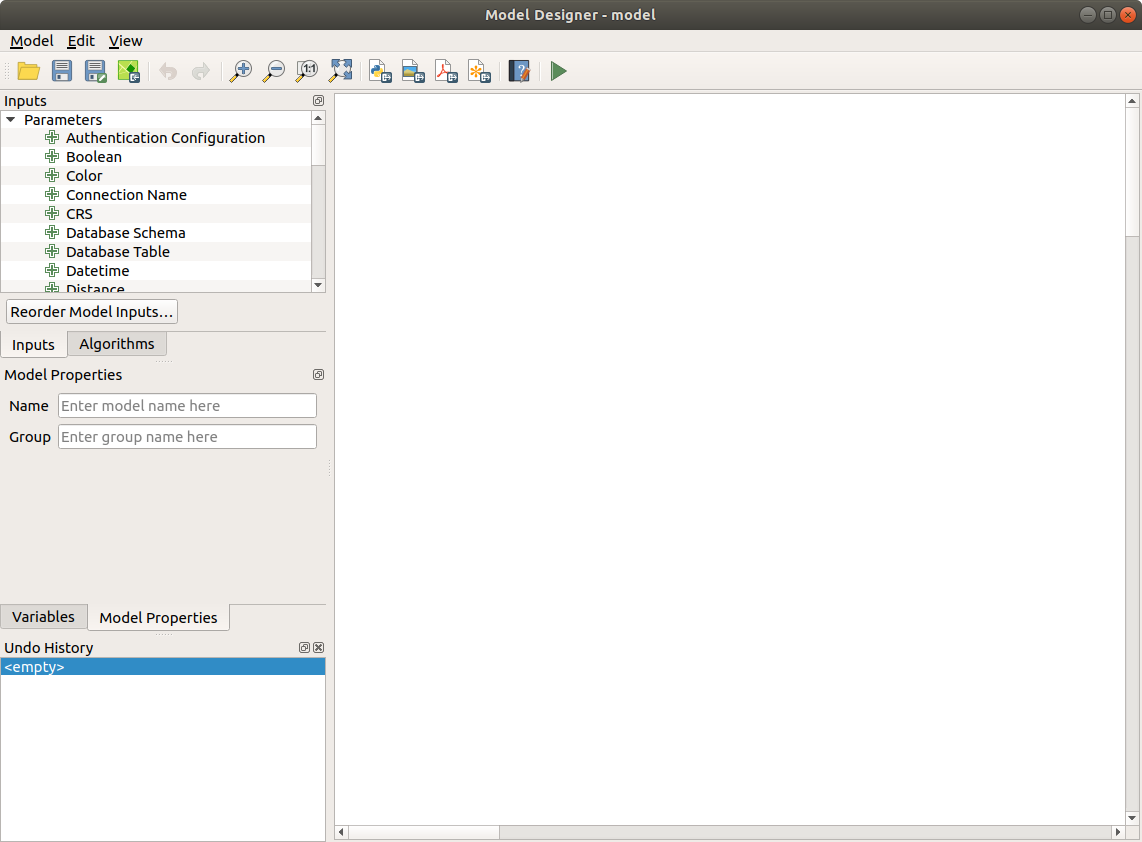
Fig. 24.16 Modelador
In its main part, the modeler has a working canvas where the structure of the model and the workflow it represents can be constructed.
At the top of the dialog, different menus and the Navigation toolbar give access to a variety of tools.
24.5.1.1. Menu modelo
Etiqueta |
Atalho |
Barra de ferramentas de navegação |
Descrição |
|---|---|---|---|
|
Checks whether the algorithms and inputs used in the model exist. Convenient before releasing a model. |
||
|
F5 |
Executa o modelo |
|
guilabel:Reordenar entradas do modelo… |
Sets the order in which inputs are presented to the user in the algorithm dialog. |
||
|
Ctrl+O |
Opens a |
|
|
Ctrl+S |
Saves the model to disk as a |
|
|
Ctrl+Shift+S |
Saves the model to disk as a new |
|
|
Incorpora o arquivo de modelo no arquivo de projeto, tornando-o disponível ao compartilhar o arquivo de projeto. |
||
|
Uma interface para documentar o modelo, os algoritmos, os parâmetros e as saídas, bem como o autor e versão |
||
|
Salva o design gráfico do modelo em um formato de arquivo de imagem (para fins de ilustração) |
||
|
Saves the model’s graphical design to a |
||
|
Saves the model’s graphical design to an |
||
|
Gera um arquivo de script python incluindo as instruções do modelo |


24.5.1.2. Editar menu
Etiqueta |
Atalho |
Barra de ferramentas de navegação |
Descrição |
|---|---|---|---|
|
kbd:Ctrl+A |
Seleciona todos os componentes do modelo no design |
|
Snap selected components to Grid |
snaps and aligns the elements into a grid |
||
|
Ctrl+Y |
Rollback the latest canceled action. See also the Undo/Redo panel. |
|
|
Ctrl+Z |
Cancel the previous change. See also the Undo/Redo panel. |
|
|
Ctrl+X |
Corta uma seleção de componentes do modelo. |
|
|
Ctrl+C |
Copia uma seleção de componentes do modelo. |
|
|
Ctrl+V |
Cola uma seleção recortada ou copiada de componentes de um modelo para outro ou dentro do mesmo modelo. Os componentes selecionados mantêm suas propriedades e comentários originais. |
|
|
Del |
Remove um componente do modelo. |
|
Add Group Box |
Adds a box at the background of related components in order to visually group them. Particularly useful in big models to keep the workflow clean. |


24.5.1.3. View menu
Etiqueta |
Atalho |
Barra de ferramentas de navegação |
Descrição |
|---|---|---|---|
Zooms to the selected group box extent |
|||
|
Ctrl++ |
||
|
Ctrl+- |
||
|
Ctrl+1 |
||
|
Ctrl+0 |
Displays all the components in the designer current canvas |
|
|
Displays comments associated to every algorithm or input in the graphical designer |
||
|
|||
|
Ctrl+Tab |
Switches ON or OFF the panels in the designer |


24.5.1.4. Painéis
The left part of the window is a section with five panels that can be used to add new elements to the model:
Model Properties: specify the name (required) of the model and the group in which it will be displayed in the Processing Toolbox
Inputs: all the input parameters that could shape your model
Algorithms: the available Processing algorithms
Variables: Models can contain dedicated variables that are unique and only available to them. These variables can be accessed by any expression used within the model. They are useful to control algorithms within a model and control multiple aspects of the model by changing a single variable. The variables can be viewed and modified in the Variables panel.
Undo History: this panel will register everything that happens in the modeler, making it easy to cancel things you did wrong.
24.5.1.5. Sobre os algoritmos disponíveis
Some algorithms that can be executed from the toolbox do not appear in the list of available algorithms when you are designing a model. To be included in a model, an algorithm must have the correct semantic. If an algorithm does not have such a well-defined semantic (for instance, if the number of output layers cannot be known in advance), then it is not possible to use it within a model, and it will not appear in the list of algorithms that you can find in the modeler dialog. On the other hand some algorithms are specific to the modeler. Those algorithms are located within the group ‘Modeler Tools’.
24.5.2. Criando um modelo
A criação de um modelo envolve duas etapas básicas:
Definition of necessary inputs. These inputs will be added to the parameters window, so the user can set their values when executing the model. The model itself is an algorithm, so the parameters window is generated automatically as for all algorithms available in the Processing framework.
Definition of the workflow. Using the input data of the model, the workflow is defined by adding algorithms and selecting how they use the defined inputs or the outputs generated by other algorithms in the model.
24.5.2.1. Definição das entradas
The first step is to define the inputs for the model. The following elements are found in the Inputs panel on the left side of the modeler window:
Nota
Hovering with the mouse over the inputs will show a tooltip with additional information.
When double-clicking on an element, a dialog is shown that lets you define its characteristics. Depending on the parameter, the dialog will contain at least one element (the description, which is what the user will see when executing the model). For example, when adding a numerical value, as can be seen in the next figure, in addition to the description of the parameter, you have to set a default value and the range of valid values.
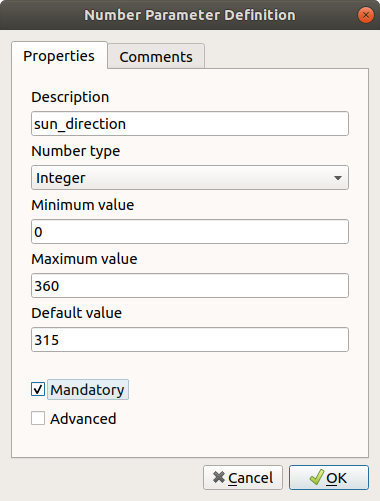
Fig. 24.17 Definição dos Parâmetros do Modelo
You can define your input as mandatory for your model by checking the

Mandatory option and by checking the 
Advanced
checkbox you can set the input to be within the Advanced section. This is
particularly useful when the model has many parameters and some of them are not
trivial, but you still want to choose them.
For each added input, a new element is added to the modeler canvas.

Fig. 24.18 Parâmetros do modelo
You can also add inputs by dragging the input type from the list and dropping it at the position where you want it in the modeler canvas. If you want to change a parameter of an existing input, just double click on it, and the same dialog will pop up.
When using a model within another model, the inputs and outputs necessary will be displayed in the canvas.
24.5.2.2. Definição do fluxo de trabalho
In the following example we will add two inputs and two algorithms. The aim of
the model is to copy the elevation values from a DEM raster layer to a line layer
using the Drape algorithm, and then calculate the total ascent of the line
layer using the Climb Along Line algorithm.
In the Inputs tab, choose the two inputs as Vector Layer for the line and
Raster Layer for the DEM.
We are now ready to add the algorithms to the workflow.
Algorithms can be found in the Algorithms panel, grouped much in the same way as they are in the Processing toolbox.
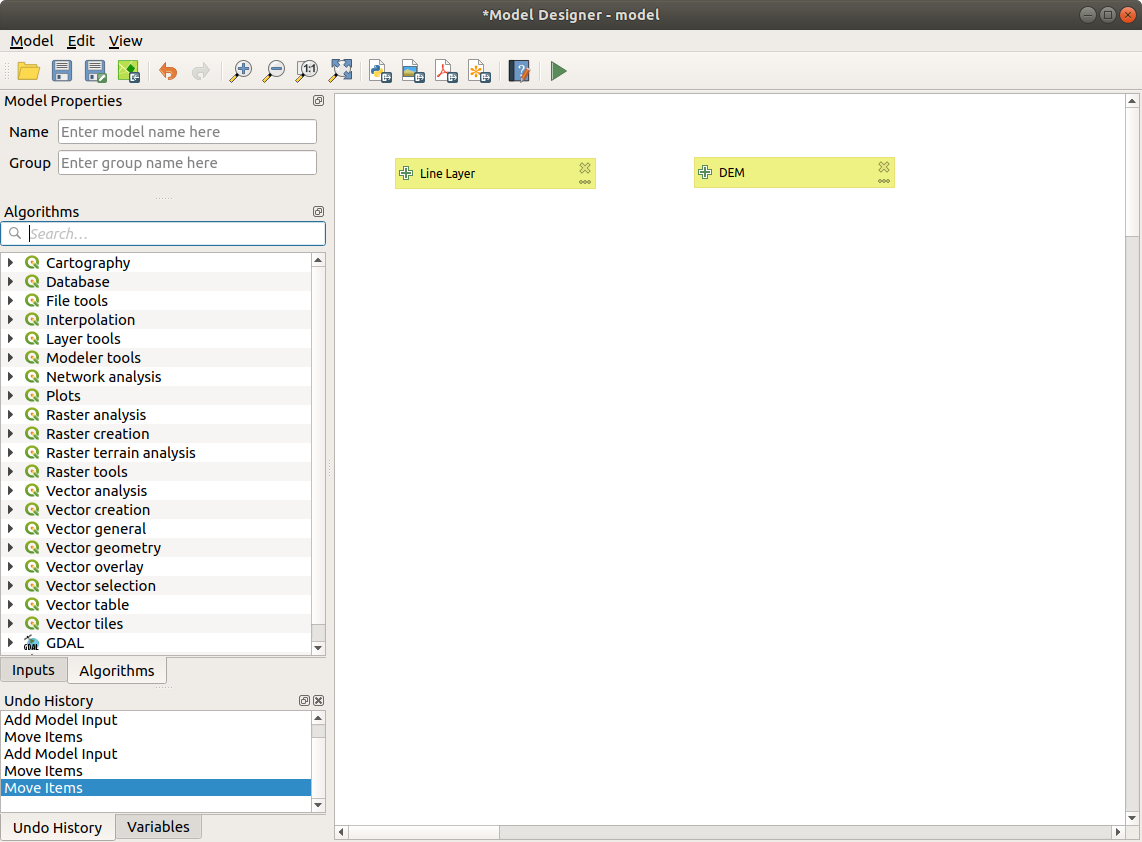
Fig. 24.19 Model Inputs
To add an algorithm to a model, double-click on its name or drag and
drop it, just like for inputs. As for the inputs you can change the description
of the algorithm and add a comment.
When adding an algorithm, an execution dialog will appear, with a content similar
to the one found in the execution panel that is shown when executing the
algorithm from the toolbox.
The following picture shows both the Drape (set Z value from raster) and the
Climb along line algorithm dialogs.
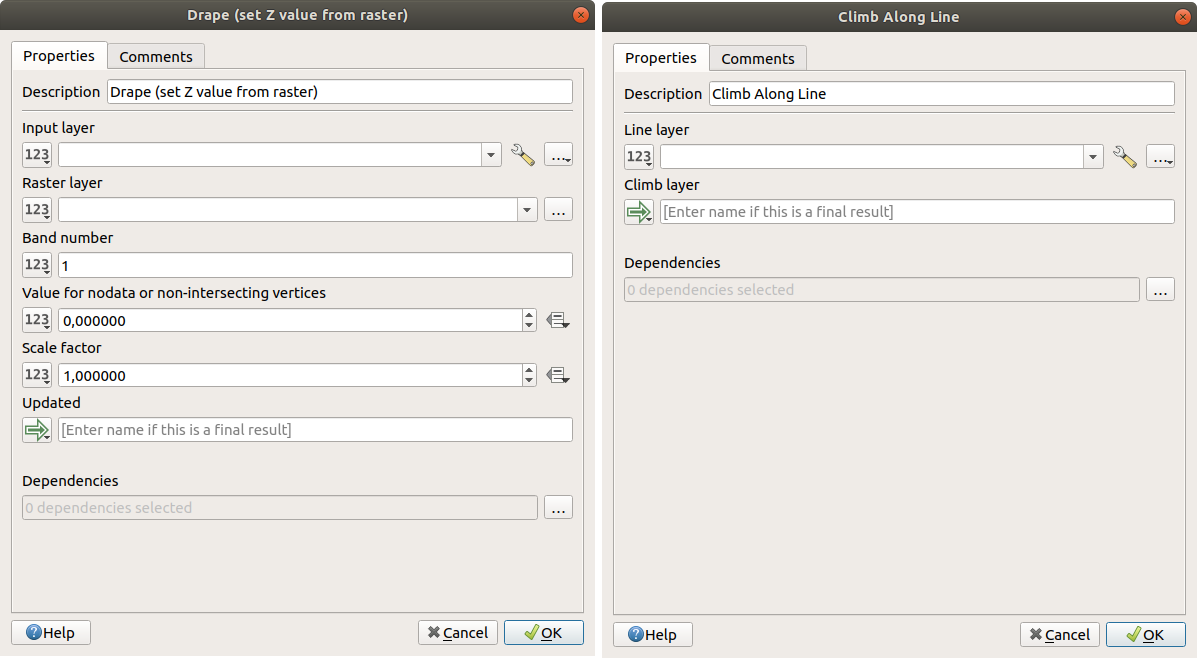
Fig. 24.20 Model Algorithm parameters
As you can see, there are however some differences. Each parameter has a drop-down menu next to it allowing to control how it will be served during the workflow:

Value: allows you to set the parameter from a loaded layer in the QGIS project or to browse a layer from a folder
Pre-calculated Value: with this option you can open the Expression Builder and define your own expression to fill the parameter. Model inputs together with some other layer statistics are available as variables and are listed at the top of the Search dialog of the Expression Builder
Model Input: choose this option if the parameter comes from an input of the model you have defined. Once clicked, this option will list all the suitable inputs for the parameter
Algorithm Output: is useful when the input parameter of an algorithm is an output of another algorithmoutputs parameters have the addditional

Model Outputoption that makes the output of the algorithm available in the model. If a layer generated by the algorithm is only to be used as input to another algorithm, don’t edit that text box.In the following picture you can see the two input parameters defined as
Model Inputand the temporary output layer: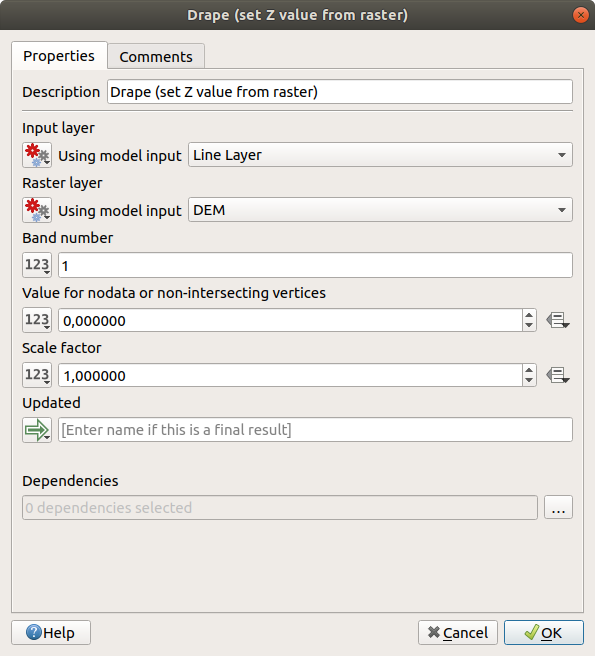
Fig. 24.21 Parâmetros de entrada e saída de algoritmo
You will also find an additional parameter named Dependencies that is not available when calling the algorithm from the toolbox. This parameter allows you to define the order in which algorithms are executed, by explicitly defining one algorithm as a parent of the current one. This will force the parent algorithm to be executed before the current one.
When you use the output of a previous algorithm as the input of your algorithm, that implicitly sets the previous algorithm as parent of the current one (and places the corresponding arrow in the modeler canvas). However, in some cases an algorithm might depend on another one even if it does not use any output object from it (for instance, an algorithm that executes a SQL sentence on a PostGIS database and another one that imports a layer into that same database). In that case, just select the previous algorithm in the Dependencies parameter and they will be executed in the correct order.
Once all the parameters have been assigned valid values, click on OK and the algorithm will be added to the canvas. It will be linked to the elements in the canvas (algorithms or inputs) that provide objects that are used as inputs for the algorithm.
Elements can be dragged to a different position on the canvas using the
 Select/Move Item tool.
This is useful to make the structure of the model clearer and more intuitive.
You can also resize the elements, grasping their border.
This is particularly useful if the description of the input or algorithm is long.
With option checked, items resizing
or displacement can be bound to a virtual grid, for a more visually structured
algorithm design.
Select/Move Item tool.
This is useful to make the structure of the model clearer and more intuitive.
You can also resize the elements, grasping their border.
This is particularly useful if the description of the input or algorithm is long.
With option checked, items resizing
or displacement can be bound to a virtual grid, for a more visually structured
algorithm design.
Os links entre os elementos são atualizados automaticamente e você pode ver um botão + na parte superior e inferior de cada algoritmo. Clicar no botão listará todas as entradas e saídas do algoritmo para que você possa ter uma visão geral rápida.
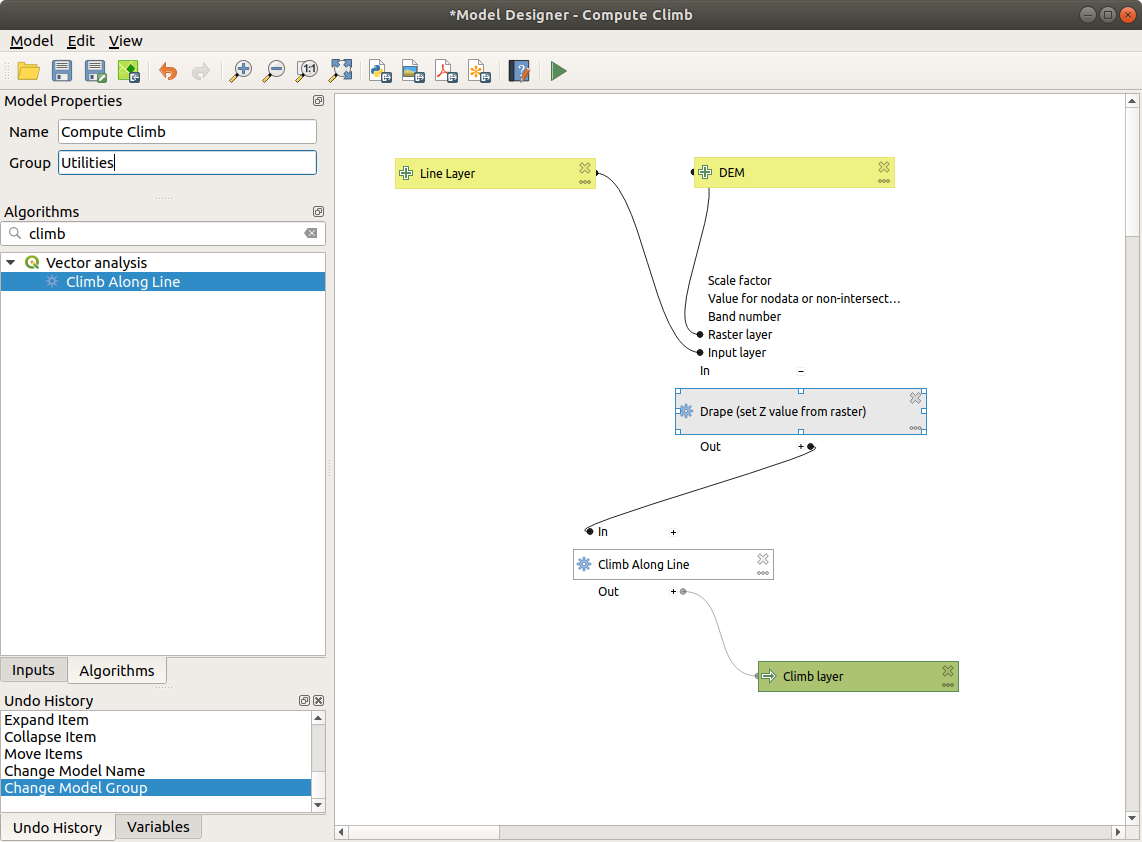
Fig. 24.22 Um modelo completo
With the tool, you can add a draggable box to the canvas. This feature is very useful in big models to group related elements in the modeler canvas and to keep the workflow clean. For example we might group together all the inputs of the example:
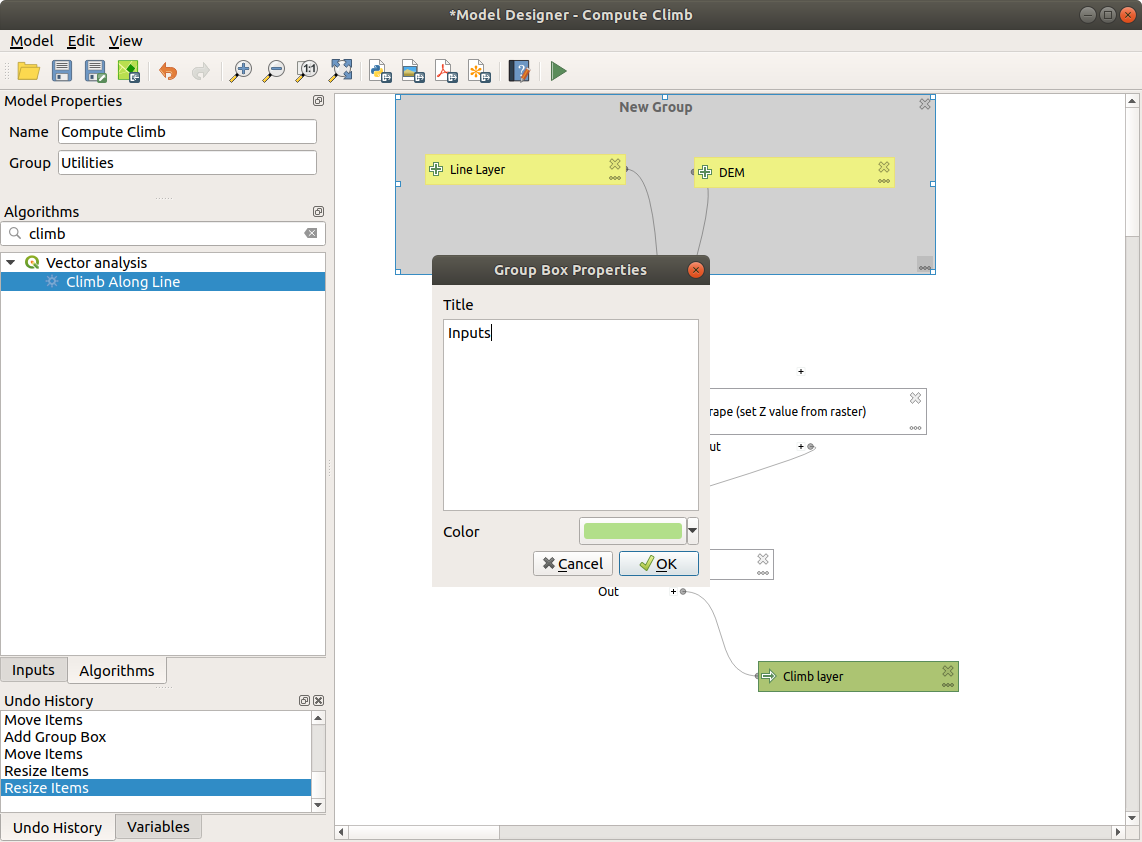
Fig. 24.23 Model Group Box
You can change the name and the color of the boxes. Group boxes are very useful when used together with tool, allowing you to zoom to a specific part of the model. You can also zoom in and out by using the mouse wheel.
You might want to change the order of the inputs and how they are listed in the
main model dialog. At the bottom of the Input panel you will find the
Reorder Model Inputs... button and by clicking on it a new dialog pops up
allowing you to change the order of the inputs:
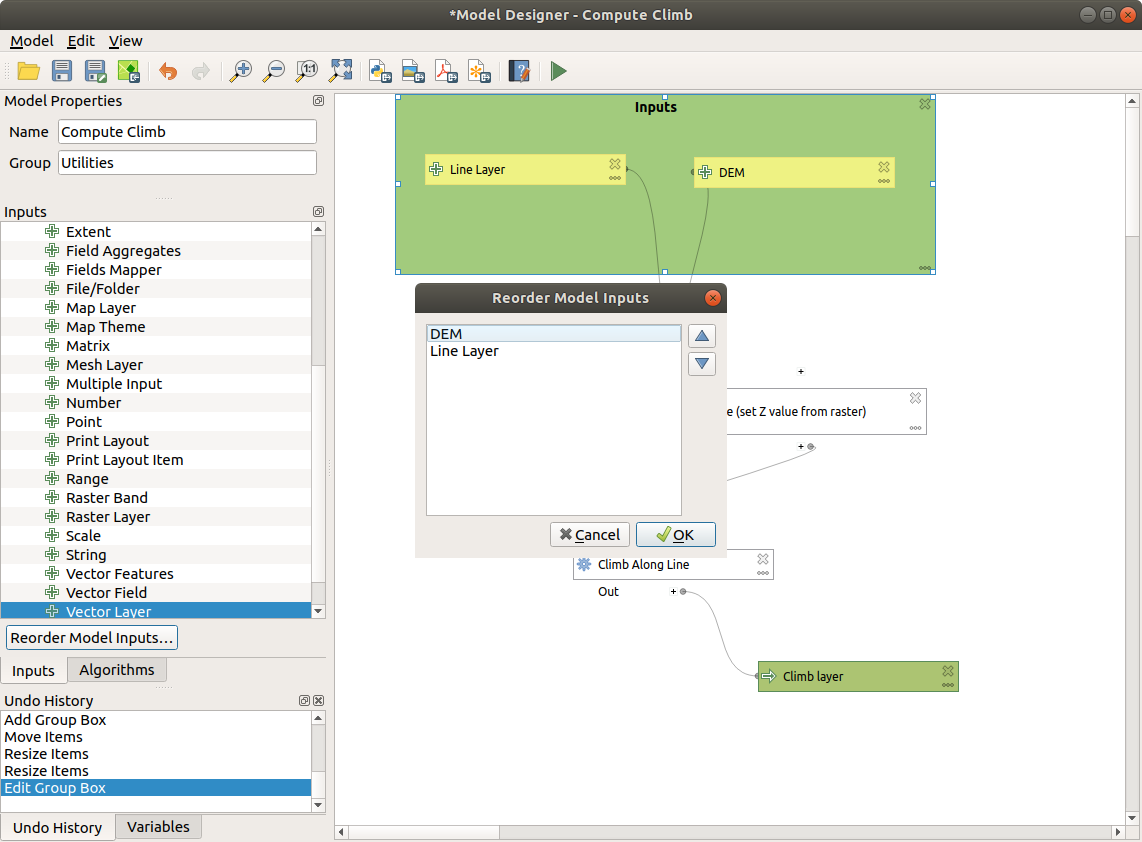
Fig. 24.24 Reorder Model Inputs
Comments can also be added to inputs or algorithms present in the modeler. This can be done by going in the Comment tab of the item or with a right-click. In the same tab a color can be set manual for individual model comments. Comments are visible only in the modeler canvas and not in the final algorithm dialog; they can be hidden by deactivating .
You can run your algorithm any time by clicking on the  Run model button.
When using the editor to execute a model, any non-default values will be
saved in the inputs. This means that executing the model at a later time from
the editor will have the dialog prefilled with those values on any subsequent run.
Run model button.
When using the editor to execute a model, any non-default values will be
saved in the inputs. This means that executing the model at a later time from
the editor will have the dialog prefilled with those values on any subsequent run.
In order to use the algorithm from the toolbox, it has to be saved and the modeler dialog closed, to allow the toolbox to refresh its contents.
24.5.2.3. Documentando seu modelo
You need to document your model, and this can be done from the modeler itself.
Click on the  Edit model help button, and a
dialog like the one shown next will appear.
Edit model help button, and a
dialog like the one shown next will appear.
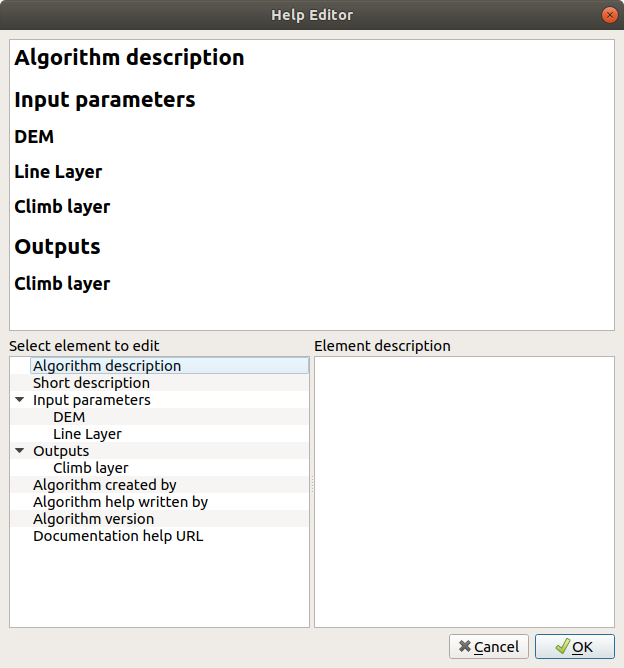
Fig. 24.25 Editing Help
No lado direito irá ver uma página simples HTML, criada usando a descrição dos parâmetros de entrada e de saída do algoritmo, juntamente com itens adicionais como uma descrição geral do modelo ou o seu autor. A primeira vez que abre o editor da ajuda, todas as ajudas estão vazias, mas pode editá-los usando os elementos do lado esquerdo do diálogo. Selecione um elemento na parte superior e escreva a descrição na caixa de texto em baixo.
Model help is saved as part of the model itself.
24.5.3. Salvando e carregando os modelos
24.5.3.1. Salvando modelos
Use the  Save model button to save the current model and the
 Open Model button to open a previously saved model.
Models are saved with the
Open Model button to open a previously saved model.
Models are saved with the .model3 extension.
If the model has already been saved from the modeler window,
you will not be prompted for a filename.
Since there is already a file associated with the model, that file
will be used for subsequent saves.
Antes de salvar um modelo, você deve inserir um nome e um grupo para ele nas caixas de texto na parte superior da janela.
Models saved in the models folder (the default folder when you
are prompted for a filename to save the model) will appear in the
toolbox in the corresponding branch.
When the toolbox is invoked, it searches the models folder for
files with the .model3 extension and loads the models they
contain.
Since a model is itself an algorithm, it can be added to the toolbox
just like any other algorithm.
Models can also be saved within the project file using the
 Save model in project button.
Models saved using this method won’t be written as
Save model in project button.
Models saved using this method won’t be written as .model3 files
on the disk but will be embedded in the project file.
Project models are available in the
 Project models menu of the toolbox.
The models folder can be set from the Processing configuration dialog, under the Modeler group.
Models loaded from the models folder appear not only in the
toolbox, but also in the algorithms tree in the Algorithms
tab of the modeler window.
That means that you can incorporate a model as a part of a bigger model,
just like other algorithms.
Models will show up in the Browser panel and can be run from there.
24.5.3.2. Exportando um modelo como um script Python
As we will see in a later chapter, Processing algorithms can be called from the QGIS Python console, and new Processing algorithms can be created using Python. A quick way to create such a Python script is to create a model and then export it as a Python file.
To do so, click on the  Export as Script Algorithm…
in the modeler canvas or right click on the name of the model in the Processing
Toolbox and choose Export Model as Python Algorithm….
Export as Script Algorithm…
in the modeler canvas or right click on the name of the model in the Processing
Toolbox and choose Export Model as Python Algorithm….
24.5.3.3. Exportando um modelo como imagem, PDF ou SVG
A model can also be exported as an image, SVG or PDF (for illustration
purposes) by clicking  Export as image,
 Export as PDF or
  Export as SVG.
24.5.4. Editando um modelo
Você pode editar o modelo que está criando atualmente, redefinindo o fluxo de trabalho e os relacionamentos entre os algoritmos e as entradas que definem o modelo.
If you right-click on an algorithm in the canvas, you will see a context menu like the one shown next:
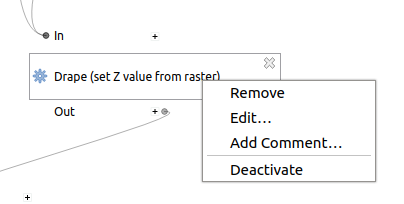
Fig. 24.26 Modeler Right Click
Selecionando a opção Remover irá fazer com que o algoritmo seja removido. Um algoritmo só pode ser removido apenas se existir outros algoritmos dependentes dele. Isto é, se não estiver sendo usado num arquivo de saída de um algoritmo usado como arquivo de entrada diferente. Se tentar remover um algoritmo que tenha outros que dependam dele, uma mensagem de aviso igual à que vê aqui em baixo:
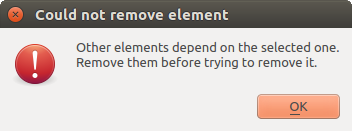
Fig. 24.27 Não é Possível Excluir o Algoritmo
Selecting the Edit… option will show the parameter dialog of the algorithm, so you can change the inputs and parameter values. Not all input elements available in the model will appear as available inputs. Layers or values generated at a more advanced step in the workflow defined by the model will not be available if they cause circular dependencies.
Select the new values and click on the OK button as usual. The connections between the model elements will change in the modeler canvas accordingly.
The Add comment… allows you to add a comment to the algorithm to better describe the behavior.
A model can be run partially by deactivating some of its algorithms. To do it, select the Deactivate option in the context menu that appears when right-clicking on an algorithm element. The selected algorithm, and all the ones in the model that depend on it will be displayed in grey and will not be executed as part of the model.
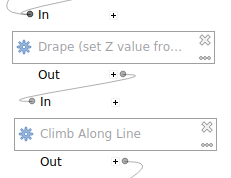
Fig. 24.28 Model With Deactivated Algorithms
When right-clicking on an algorithm that is not active, you will see a Activate menu option that you can use to reactivate it.