24.5. 그래픽 모델 생성기
그래픽 모델 생성기 는 사용하기 쉽고 간단한 인터페이스를 통해 복잡 모델을 생성할 수 있게 해줍니다. GIS 작업시, 대부분의 분석 작업은 각각 분리된 작업이라기 보다는 연속 작업들의 일부인 경우가 더 많습니다. 그래픽 모델 생성기를 사용하면, 그런 연속 공간 처리 작업들을 단일 공간 처리 작업으로 묶을 수 있습니다. 서로 다른 입력 집합에 대해 여러 작업을 연속해서 처리하는 것보다 단일 공간 처리 작업을 실행하는 편이 더 편리하기 때문입니다. 몇 단계를 거치든, 몇 개의 서로 다른 알고리즘을 사용하든 상관없이 모델은 단일 알고리즘처럼 실행되기 때문에, 시간과 노력을 절약할 수 있습니다.
Processing 메뉴에서 () 모델 생성기를 열 수 있습니다.
24.5.1. The graphical modeler interface
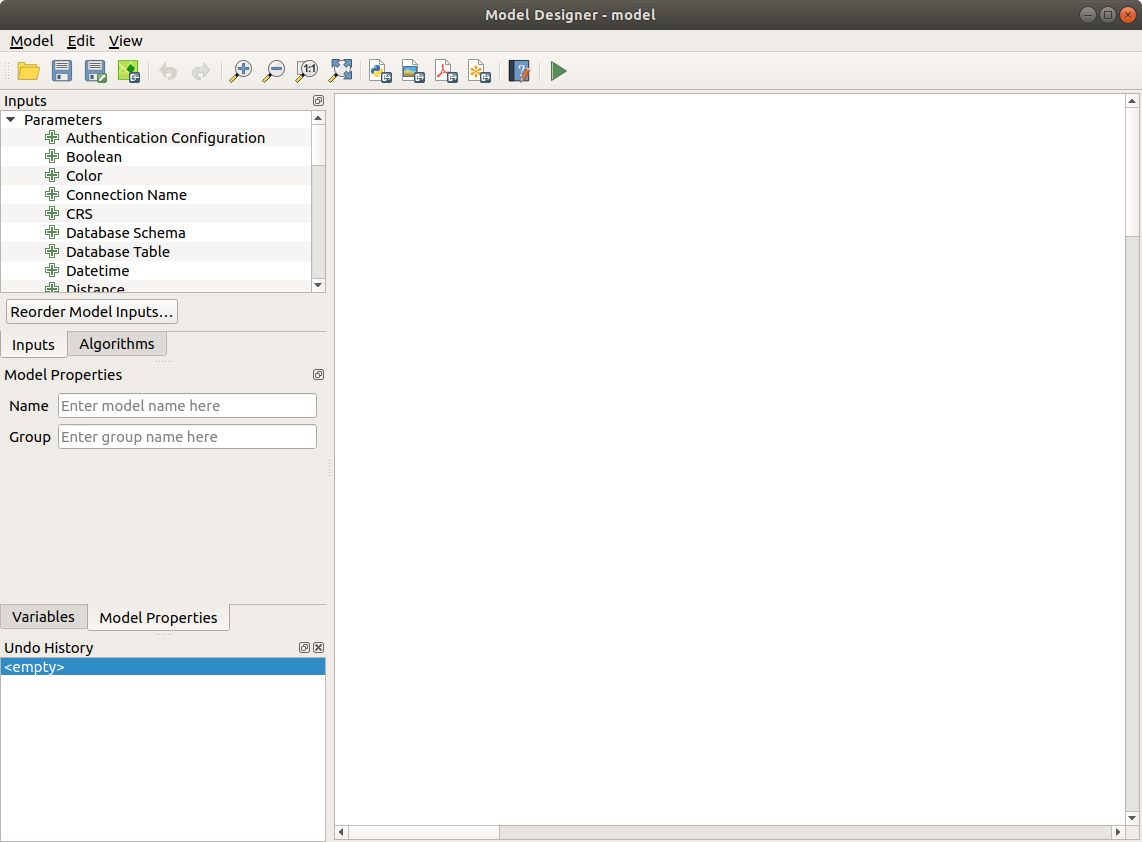
그림 24.16 모델 생성기 대화창
In its main part, the modeler has a working canvas where the structure of the model and the workflow it represents can be constructed.
At the top of the dialog, different menus and the Navigation toolbar give access to a variety of tools.
24.5.1.1. Model menu
Label |
Shortcut |
Navigation Toolbar |
Description |
|---|---|---|---|
|
Checks whether the algorithms and inputs used in the model exist. Convenient before releasing a model. |
||
|
F5 |
|
Executes the model |
Reorder Model Inputs… |
Sets the order in which inputs are presented to the user in the algorithm dialog. |
||
|
Ctrl+O |
|
Opens a |
|
Ctrl+S |
|
Saves the model to disk as a |
|
Ctrl+Shift+S |
|
Saves the model to disk as a new |
|
|
Embeds the model file in the project file, making it available when sharing the project file. |
|
|
|
An interface to document the model, the algorithms, the parameters and outputs, as well as the author and versioning |
|
|
|
Saves the model’s graphical design to an image file format (for illustration purpose) |
|
|
Saves the model’s graphical design to a |
||
|
Saves the model’s graphical design to an |
||
|
|
Generates a python script file including the model’s instructions |


24.5.1.2. Edit menu
Label |
Shortcut |
Navigation Toolbar |
Description |
|---|---|---|---|
|
Ctrl+A |
Selects all the model components in the designer |
|
Snap selected components to Grid |
snaps and aligns the elements into a grid |
||
|
Ctrl+Y |
|
Rollback the latest canceled action. See also the Undo/Redo panel. |
|
Ctrl+Z |
|
Cancel the previous change. See also the Undo/Redo panel. |
|
Ctrl+X |
Cuts a selection of components from the model. |
|
|
Ctrl+C |
Copies a selection of components from the model. |
|
|
Ctrl+V |
Pastes a cut or copied selection of components from a model to another or within the same model. The selected components keep their original properties and comments. |
|
|
Del |
Removes a component from the model. |
|
Add Group Box |
Adds a box at the background of related components in order to visually group them. Particularly useful in big models to keep the workflow clean. |


24.5.1.3. View menu
Label |
Shortcut |
Navigation Toolbar |
Description |
|---|---|---|---|
Zooms to the selected group box extent |
|||
|
Ctrl++ |
|
|
|
Ctrl+- |
|
|
|
Ctrl+1 |
|
|
|
Ctrl+0 |
|
Displays all the components in the designer current canvas |
|
Displays comments associated to every algorithm or input in the graphical designer |
||
|
|||
|
Ctrl+Tab |
Switches ON or OFF the panels in the designer |


24.5.1.4. Panels
The left part of the window is a section with five panels that can be used to add new elements to the model:
Model Properties: specify the name (required) of the model and the group in which it will be displayed in the Processing Toolbox
Inputs: all the input parameters that could shape your model
Algorithms: the available Processing algorithms
Variables: Models can contain dedicated variables that are unique and only available to them. These variables can be accessed by any expression used within the model. They are useful to control algorithms within a model and control multiple aspects of the model by changing a single variable. The variables can be viewed and modified in the Variables panel.
Undo History: this panel will register everything that happens in the modeler, making it easy to cancel things you did wrong.
24.5.1.5. 사용 가능한 알고리즘에 관해
Some algorithms that can be executed from the toolbox do not appear in the list of available algorithms when you are designing a model. To be included in a model, an algorithm must have the correct semantic. If an algorithm does not have such a well-defined semantic (for instance, if the number of output layers cannot be known in advance), then it is not possible to use it within a model, and it will not appear in the list of algorithms that you can find in the modeler dialog. On the other hand some algorithms are specific to the modeler. Those algorithms are located within the group ‘Modeler Tools’.
24.5.2. Creating a model
모델 생성은 기본 2단계로 이루어집니다:
필요한 입력물을 정의하기: 입력해야 할 항목들이 Inputs 패널의 Parameters 창에 추가되어 모델 실행 시 사용자가 그 값들을 설정할 수 있습니다. 모델은 그 자체로 알고리즘으로서, 공간 처리 프레임워크에서 사용할 수 있는 모든 알고리즘과 마찬가지로 파라미터 창을 자동적으로 생성합니다.
작업 흐름을 정의하기: 모델의 입력 데이터를 사용해서, 알고리즘을 추가하고 해당 알고리즘이 정의된 입력물을 또는 모델 안에 있는 다른 알고리즘이 생성하는 산출물을 어떻게 사용할지 선택함으로써 작업 흐름을 정의합니다.
24.5.2.1. 입력물 정의
모델 생성의 첫 단계는 모델에 필요한 입력물을 정의하는 것입니다. 모델 생성기 대화창 좌측에 있는 Inputs 패널에서 다음 항목들을 볼 수 있습니다:
참고
입력물 위로 마우스를 가져가면 추가적인 정보를 가진 도움말(tooltip)을 표시할 것입니다.
이 항목들 가운데 어느 항목을 더블클릭해도 그 특성을 정의할 수 있는 대화창이 열립니다. 파라미터에 따라, 해당 대화창이 적어도 하나 이상의 요소(모델 실행시 사용자가 보게 될 파라미터 설명)를 담고 있을 수도 있고 또는 하나 이상의 옵션을 담고 있을 수도 있습니다. 예를 들어 숫자 값을 추가하는 경우, 다음 그림에서 볼 수 있는 것처럼 파라미터 설명 이외에도 기본값을 설정하고 유효값의 범위도 설정해야 합니다.
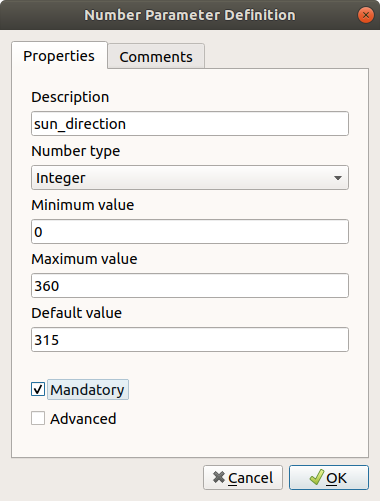
그림 24.17 모델 파라미터 정의하기

Mandatory 옵션을 체크하면 사용자 입력물을 사용자 모델을 위한 필수 입력물로 정의할 수 있고, 
Advanced 체크박스를 체크하면 Advanced 부분에서 입력물을 설정할 수 있습니다. 이 옵션은 모델에 파라미터가 많이 있는데 그 가운데 몇 개가 평범한 파라미터가 아니지만 그래도 선택하고자 하는 경우 특히 유용합니다.
입력물을 추가할 때마다, 모델 생성기 캔버스에 새 항목이 추가됩니다.

그림 24.18 캔버스에 표시되는 모델 파라미터
파라미터 목록에서 입력물 유형을 모델 생성기 캔버스 상의 원하는 위치로 드래그해서 입력물을 추가할 수도 있습니다. 기존 입력물의 파라미터를 변경하고 싶다면, 그냥 입력물을 더블클릭하기만 하면 동일한 대화창이 뜰 것입니다.
When using a model within another model, the inputs and outputs necessary will be displayed in the canvas.
24.5.2.2. 작업 흐름 정의
다음 예시에서 입력물 2개와 알고리즘 2개를 추가할 것입니다. 이 모델의 목적은 Drape 알고리즘을 사용해서 DEM 래스터 레이어에서 라인 레이어로 표고 값을 복사한 다음, Climb Along Line 알고리즘을 사용해서 라인 레이어의 총 오르막(total ascent)을 계산하는 것입니다.
Inputs 탭에서 라인을 Vector Layer 로, DEM을 Raster Layer 로 두 입력물을 선택합니다. 이제 워크플로에 알고리즘을 추가할 준비가 끝났습니다.
Algorithms 패널에서 알고리즘을 찾을 수 있습니다. 공간 처리 툴박스와 거의 동일한 방식으로 알고리즘이 그룹으로 정리돼 있습니다.
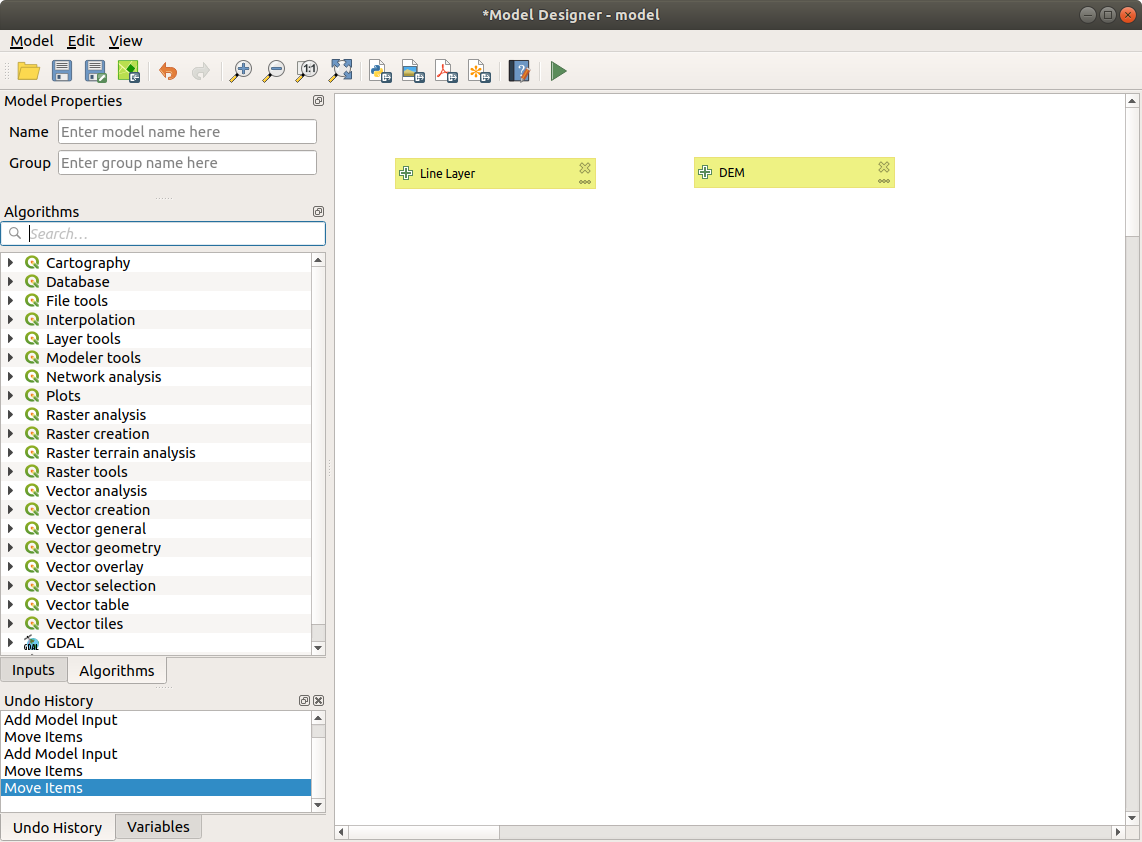
그림 24.19 모델 입력물
모델에 알고리즘을 추가하려면, 입력물을 추가할 때와 마찬가지로 알고리즘 명칭을 더블 클릭하거나 모델 생성기 캔버스로 드래그&드롭하십시오. 입력물과 마찬가지로 알고리즘의 설명을 변경하고 코멘트를 추가할 수 있습니다. 알고리즘을 추가하면, 툴박스에서 알고리즘을 실행할 때 열리는 실행 패널에 있는 내용과 비슷한 내용을 담은 실행 대화창이 열릴 것입니다. 다음 그림은 Drape (set Z value from raster) 및 Climb along line 알고리즘 대화창입니다.
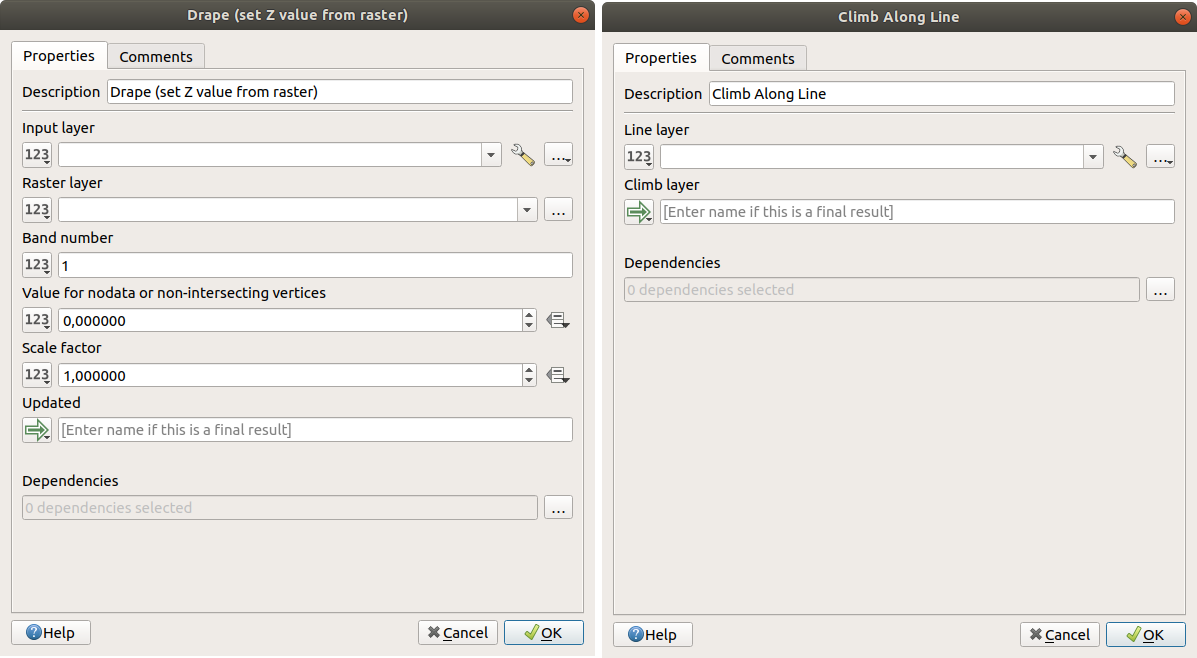
그림 24.20 모델 알고리즘 파라미터
As you can see, there are however some differences. Each parameter has a drop-down menu next to it allowing to control how it will be served during the workflow:

Value: QGIS 프로젝트에 불러온 레이어에서 또는 폴더에서 레이어를 탐색해서 파라미터를 설정할 수 있습니다.
Pre-calculated Value: 이 옵션을 사용하면 표현식 작성기를 열어 파라미터를 채우기 위한 사용자 고유의 표현식을 정의할 수 있습니다. 몇몇 다른 레이어의 통계를 가진, 사용할 수 있는 모델 입력물이 표현식 작성기의 검색 대화창 최상단에 변수 로 목록화되어 있습니다.
Model Input: 사용자가 정의했던 모델의 입력물에서 파라미터를 가져오는 경우 이 옵션을 선택하십시오. 한번 클릭하기만 하면, 이 옵션이 해당 파라미터에 대해 적합한 모든 입력물의 목록을 표시할 것입니다.
Algorithm Output: 이 옵션은 알고리즘의 입력 파라미터가 또다른 알고리즘의 산출물인 경우 유용합니다.outputs parameters have the addditional

Model Outputoption that makes the output of the algorithm available in the model. If a layer generated by the algorithm is only to be used as input to another algorithm, don’t edit that text box.다음 그림에서 두 입력 파라미터가
Model Input과 임시 산출 레이어로 정의된 것을 볼 수 있습니다: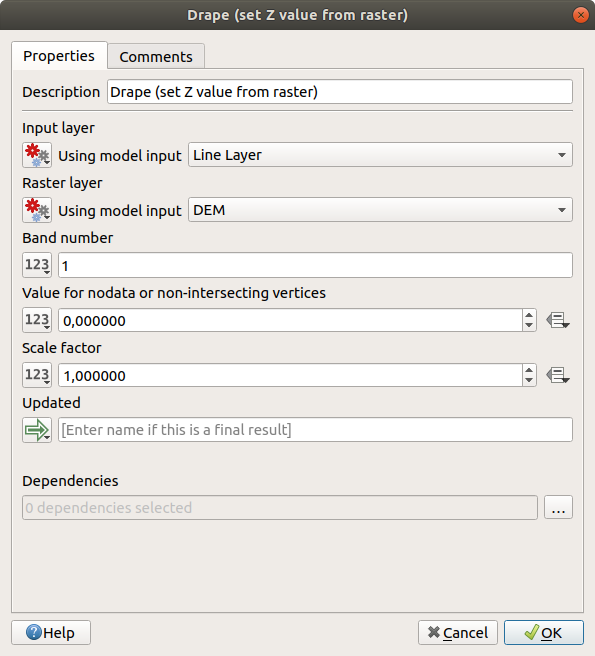
그림 24.21 알고리즘 입력 및 출력 파라미터
You will also find an additional parameter named Dependencies that is not available when calling the algorithm from the toolbox. This parameter allows you to define the order in which algorithms are executed, by explicitly defining one algorithm as a parent of the current one. This will force the parent algorithm to be executed before the current one.
이전 알고리즘의 산출물을 현재 알고리즘의 입력물로 사용하면, 암묵적으로 이전 알고리즘을 현재 알고리즘의 부모로 설정하는 것입니다. (그리고 모델 생성기 캔버스에도 그에 대응하는 화살표를 배치합니다.) 하지만, 어떤 경우 (예를 들면, 한 알고리즘은 PostGIS 데이터베이스에 대해 SQL문을 실행하고 다른 알고리즘은 동일 데이터베이스로 레이어를 가져오는 경우) 현재 알고리즘이 또다른 알고리즘에 ─ 이 알고리즘의 어떤 산출 객체도 사용하지 않더라도 ─ 종속하고 있을 수도 있습니다. 이런 경우에는 그냥 Dependencies 파라미터에서 이전 알고리즘을 선택만 해주면 두 알고리즘이 정확한 순서로 실행될 것입니다.
모든 파라미터에 유효한 값을 할당하고 나면, OK 버튼을 누르십시오. 알고리즘이 캔버스에 추가될 것입니다. 해당 알고리즘은 캔버스에 있는 다른 모든 항목들과 ─ 해당 알고리즘에 입력되는 객체를 제공하는 알고리즘이든 입력물이든 ─ 연결돼 있을 것입니다
Elements can be dragged to a different position on the canvas using the
 Select/Move Item tool.
This is useful to make the structure of the model clearer and more intuitive.
You can also resize the elements, grasping their border.
This is particularly useful if the description of the input or algorithm is long.
With option checked, items resizing
or displacement can be bound to a virtual grid, for a more visually structured
algorithm design.
Select/Move Item tool.
This is useful to make the structure of the model clearer and more intuitive.
You can also resize the elements, grasping their border.
This is particularly useful if the description of the input or algorithm is long.
With option checked, items resizing
or displacement can be bound to a virtual grid, for a more visually structured
algorithm design.
Links between elements are updated automatically and you can see a + button
at the top and at the bottom of each algorithm. Clicking the button will list
all the inputs and outputs of the algorithm so you can have a quick overview.
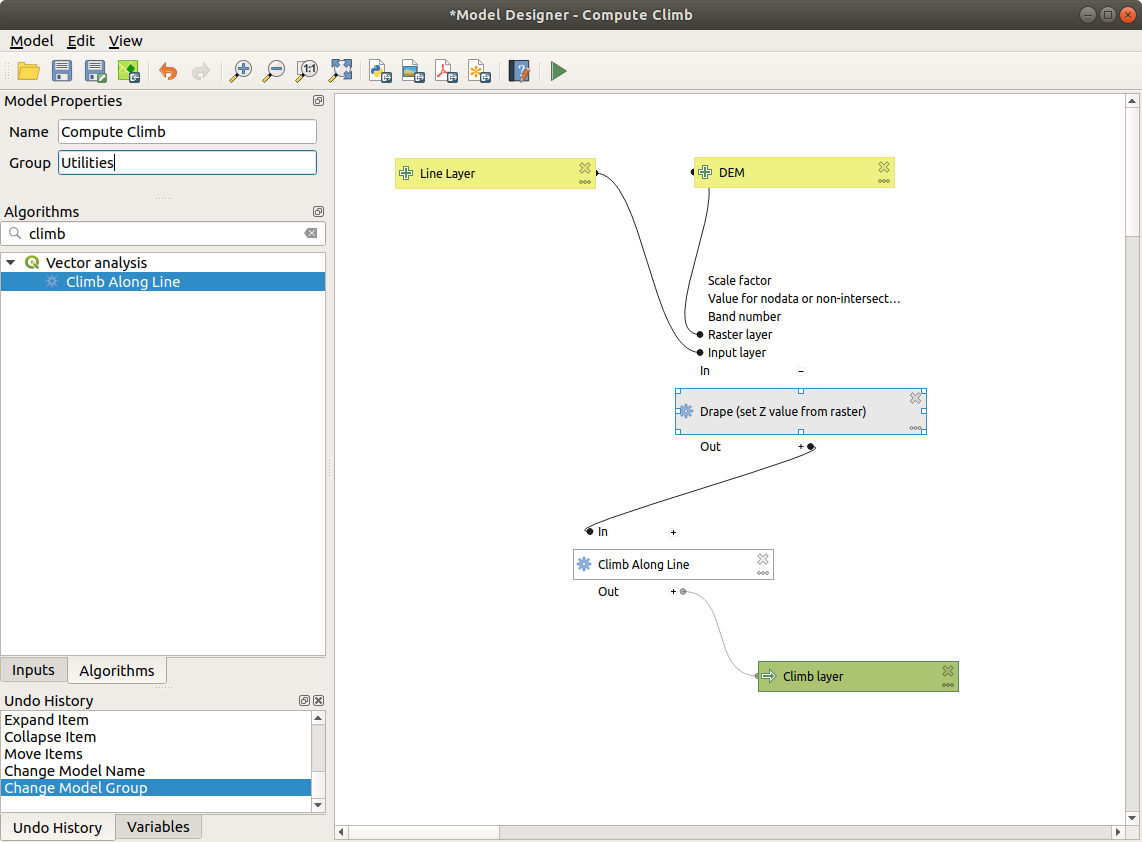
그림 24.22 완성 모델
With the tool, you can add a draggable box to the canvas. This feature is very useful in big models to group related elements in the modeler canvas and to keep the workflow clean. For example we might group together all the inputs of the example:
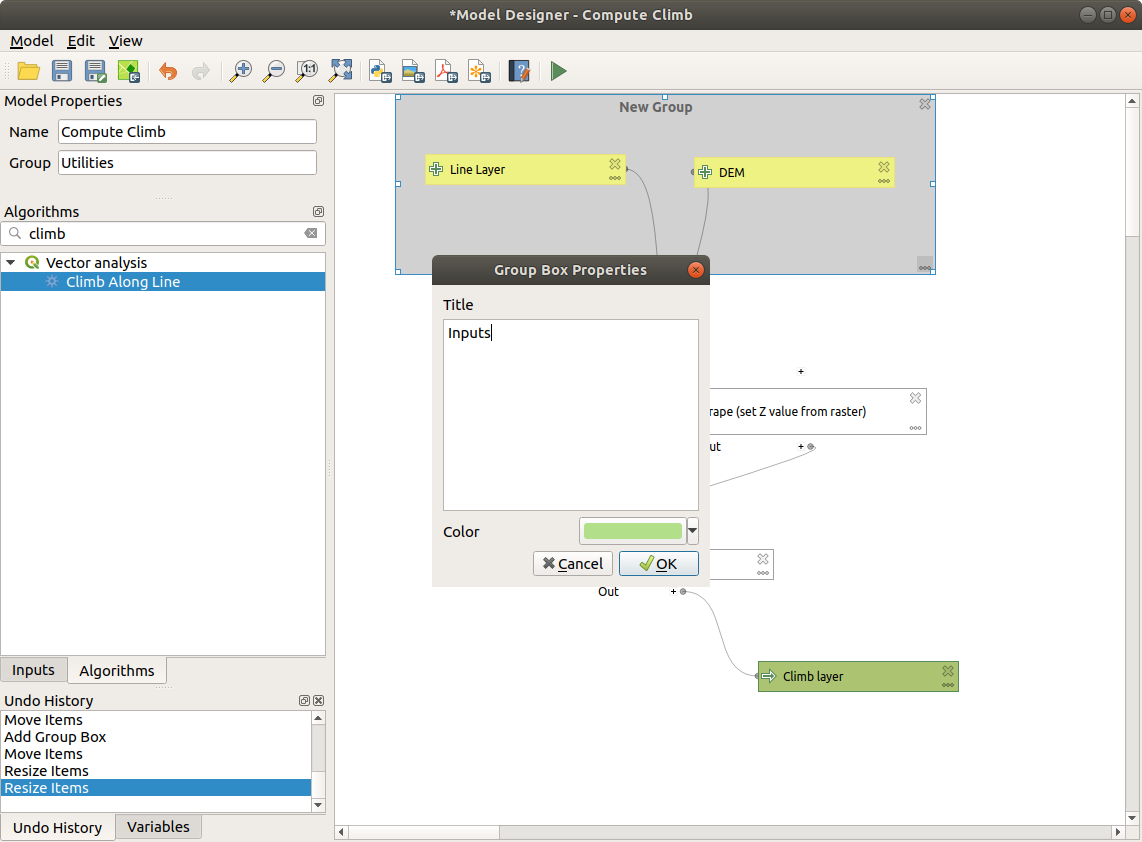
그림 24.23 모델 그룹 상자
You can change the name and the color of the boxes. Group boxes are very useful when used together with tool, allowing you to zoom to a specific part of the model. You can also zoom in and out by using the mouse wheel.
입력물의 순서 및 메인 모델 대화창에 목록화된 순서를 변경하고 싶을 수도 있습니다. Input 패널 하단에 Reorder Model Inputs... 버튼이 있는데, 이 버튼을 클릭하면 입력물의 순서를 변경할 수 있는 새 대화창이 뜹니다.
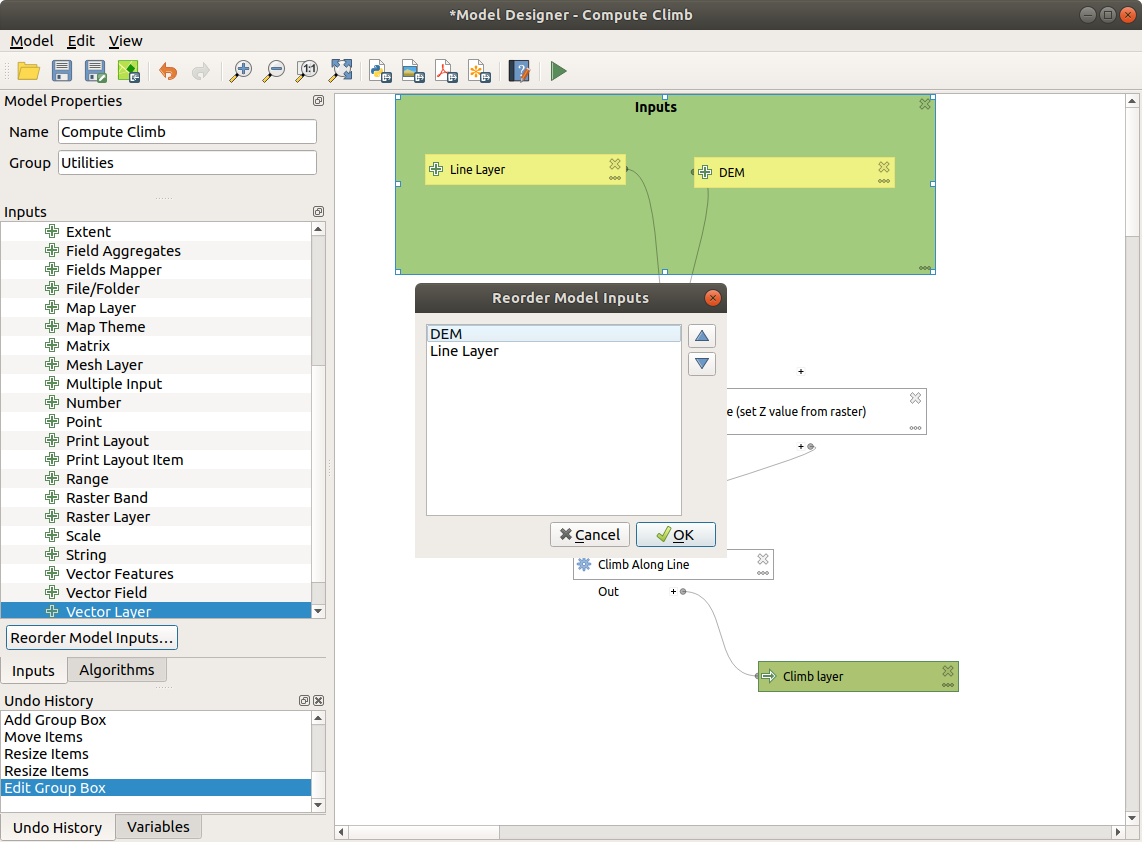
그림 24.24 모델 입력물 재정렬
Comments can also be added to inputs or algorithms present in the modeler. This can be done by going in the Comment tab of the item or with a right-click. In the same tab a color can be set manual for individual model comments. Comments are visible only in the modeler canvas and not in the final algorithm dialog; they can be hidden by deactivating .
You can run your algorithm any time by clicking on the  Run model button.
When using the editor to execute a model, any non-default values will be
saved in the inputs. This means that executing the model at a later time from
the editor will have the dialog prefilled with those values on any subsequent run.
Run model button.
When using the editor to execute a model, any non-default values will be
saved in the inputs. This means that executing the model at a later time from
the editor will have the dialog prefilled with those values on any subsequent run.
In order to use the algorithm from the toolbox, it has to be saved and the modeler dialog closed, to allow the toolbox to refresh its contents.
24.5.2.3. Documenting your model
You need to document your model, and this can be done from the modeler itself.
Click on the  Edit model help button, and a
dialog like the one shown next will appear.
Edit model help button, and a
dialog like the one shown next will appear.
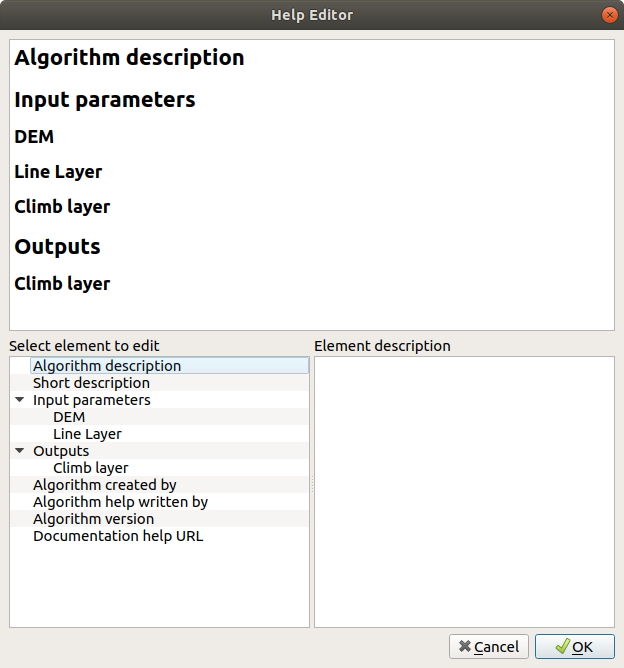
그림 24.25 도움말 편집하기
대화창 상단에는 간소한 HTML 페이지 창이 있습니다. 입력 파라미터 및 알고리즘 산출물의 명칭과 모델 또는 모델 생성자에 대한 일반적인 설명을 함께 사용해서 이 페이지의 내용을 생성합니다. 처음 도움말 편집기를 열면, 이 모든 내용이 비어 있습니다. 그러나 대화창 좌하단에 있는 항목들을 이용하면 이를 편집할 수 있습니다. 좌하단 패널에서 항목을 선택한 다음 우하단 텍스트 란에 명칭 및 설명을 작성하십시오.
모델 도움말은 모델의 일부로 저장됩니다.
24.5.3. 모델 저장 및 불러오기
24.5.3.1. Saving models
 Save model 버튼을 클릭하면 현재 모델을 저장하고,
  Open Model 버튼을 누르면 이전에 저장한 모델을 불러올 수 있습니다. 모델은
 .model3 확장자로 저장됩니다. 모델 생성기 대화창에서 이전에 저장한 모델인 경우, 저장시 파일명을 묻지 않을 것입니다. 이미 해당 모델과 연관된 파일이 있기 때문에, 이후 동일한 파일에 저장됩니다.
모델을 저장하기 전에, 대화창 상단에 있는 텍스트란에 모델의 명칭 및 속하게 될 그룹을 입력해야 합니다.
models 폴더(모델 저장시 파일명을 물어볼 때의 기본 폴더)에 저장된 모델은 툴박스의 해당 그룹에 나타납니다. 툴박스를 열 때, models 폴더에서 .model3 확장자를 가진 파일을 찾아서 파일이 담고 있는 모델을 불러옵니다. 모델이 그 자체로 알고리즘이기 때문에, 다른 모든 알고리즘처럼 툴박스에 추가할 수 있습니다.
 Save model in project 버튼을 클릭해서 프로젝트 파일 안에 모델을 저장할 수도 있습니다. 이 방법으로 저장한 모델은 디스크 상에
 .model3 파일로 작성되지 않고, 프로젝트 파일 안에 내장될 것입니다.
공간 처리 툴박스의  Project models 메뉴를 통해 프로젝트 모델을 사용할 수 있습니다.
Processing Options 환경 설정 대화창의 Modeler 그룹에서 Model folder 를 설정할 수 있습니다.
models 폴더에서 불러온 모델은 툴박스뿐만 아니라 모델 생성기 대화창의 Algorithms 탭에 있는 알고리즘 트리에도 나타납니다. 즉 모델에 다른 알고리즘을 추가하는 것과 마찬가지로 모델을 더 큰 모델의 일부분으로 포함시킬 수 있다는 뜻입니다.
모델은 탐색기 패널에도 표시되며 해당 패널에서 실행할 수 있습니다.
24.5.3.2. 모델을 파이썬 스크립트로 내보내기
이 사용자 지침서의 이후 부분에서 설명하겠지만, QGIS 파이썬 콘솔에서 공간 처리 알고리즘을 호출할 수 있습니다. 파이썬을 이용해서 새 공간 처리 알고리즘을 생성할 수도 있습니다. 모델을 생성한 다음 이를 파이썬 파일로 내보내면 이런 파이썬 스크립트를 손쉽게 생성할 수 있습니다.
모델을 파이썬 스크립트 파일로 내보내려면, 모델 생성기 캔버스에서  Export as Script Algorithm… 을 클릭하거나 공간 처리 툴박스에 있는 모델명을 오른쪽 클릭한 다음 Export Model as Python Algorithm… 을 선택하십시오.
24.5.3.3. 모델을 이미지, PDF 또는 SVG로 내보내기
 Export as image,
  Export as PDF 또는
  Export as SVG 를 클릭해서 모델을 SVG 또는 PDF 이미지로 (도해(圖解) 목적으로) 내보낼 수도 있습니다.
24.5.4. 모델 편집
현재 생성 중인 모델을 편집해서 작업 흐름 및 모델 그 자체를 정의하는 알고리즘과 입력물 사이의 관계를 재정립할 수 있습니다.
캔버스에 있는 알고리즘을 오른쪽 클릭하면, 다음 그림과 같은 컨텍스트 메뉴가 나타납니다:
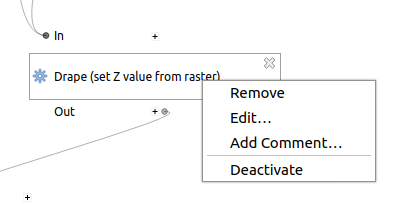
그림 24.26 모델 생성기 오른쪽 클릭
Remove 옵션을 선택하면 선택한 알고리즘이 제거될 것입니다. 선택한 알고리즘에 종속되는 다른 알고리즘이 없는 경우에만 ─ 즉, 선택한 알고리즘의 산출물이 다른 알고리즘의 입력물로 사용되지 않는 경우에만 ─ 제거할 수 있습니다. 다른 알고리즘이 종속하고 있는 알고리즘을 제거하려 하는 경우, 다음 그림과 같은 경고 메시지를 보게 될 것입니다:
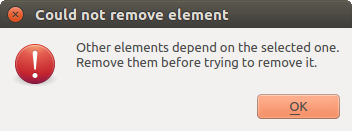
그림 24.27 알고리즘을 삭제할 수 없습니다
Edit… 옵션을 선택하면 해당 알고리즘의 파라미터 대화창이 열려서, 입력물 및 파라미터 값을 변경할 수 있습니다. 이 경우 모델에서 사용 가능한 모든 항목이 사용할 수 있는 입력물로 나타나지는 않을 것입니다. 모델이 정의하는 작업 흐름 상 더 진행된 단계에서 생성된 레이어 또는 값이 순환 종속성(circular dependency)을 유발하는 경우, 이를 사용할 수 없습니다.
새 값을 선택한 다음 이전과 같이 OK 버튼을 클릭하십시오. 모델 생성기 캔버스에서 모델 항목들 사이의 연결이 변경 사항에 맞춰 변경될 것입니다.
Add comment… 옵션을 선택하면 알고리즘의 습성을 자세히 설명하기 위한 코멘트를 추가할 수 있습니다.
모델의 알고리즘 가운데 일부를 비활성화시키면 모델을 부분 실행시킬 수 있습니다. 알고리즘 항목을 오른쪽 클릭했을 때 나타나는 컨텍스트 메뉴에 있는 Deactivate 옵션을 선택하면 됩니다. 선택한 알고리즘 및 모델에서 해당 알고리즘에 종속된 모든 알고리즘이 회색조로 표시되고, 모델의 일부로서 실행되지 않을 것입니다.
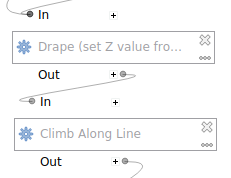
그림 24.28 알고리즘이 비활성화된 모델
활성화 상태가 아닌 알고리즘을 오른쪽 클릭하는 경우, 선택한 알고리즘을 다시 활성화할 수 있는 Activate 메뉴가 나타날 것입니다.