19. Working with OGC / ISO protocols
Das Open Geospatial Consortium (OGC) ist eine internationale Organisation mit mehr als 300 Mitgliedern aus kommerziellen, behördlichen Bereichen, aus der Forschung sowie aus Non-Profit Organisationen Vereinen. Die Mitglieder entwickeln und implementieren Standards für den Austausch räumlicher Daten, GIS-Datenprocessing und standardisierte Bereitstellung von Geodaten.
Describing a basic data model for geographic features, an increasing number of specifications are developed by OGC to serve specific needs for interoperable location and geospatial technology, including GIS. Further information can be found at https://www.opengeospatial.org/.
Wichtige von QGIS unterstützte OGC Spezifikationen sind:
WMS — Web Map Service (WMS/WMTS Client)
WMTS — Web Map Tile Service (WMS/WMTS Client)
WFS — Web Feature Service (WFS und WFS-T Klient)
WFS-T — Web Feature Service - Transactional (WFS und WFS-T Klient)
WCS — Web Coverage Service (WCS Client)
WPS — Web Processing Service
CSW — Catalog Service for the Web
SFS — Simple Features for SQL (PostGIS Layers)
GML — Geography Markup Language
OGC-Dienste werden vermehrt zum Austausch von geographischen Daten zwischen unterschiedlichen GIS-Systemen und -implementierungen verwendet. QGIS unterstützt mittlerweile die oben genannten Spezifikationen als Client in Form von SFS (durch den Postgresql/PostGIS Datenprovider, vgl. PostGIS Layers).
You can also share your maps and data through the WMS, WMTS, WFS, WFS-T and WCS protocols using a webserver with QGIS Server, UMN MapServer or GeoServer installed.
19.1. WMS/WMTS Client
19.1.1. Übersicht über die WMS-Unterstützung
Derzeit kann QGIS als WMS-Klient eingesetzt werden. Es unterstützt die Versionen 1.1, 1.1.1 und 1.3 der WMS-Server. Gut getestet wurden die öffentlich verfügbaren Server wie beispielsweise DEMIS.
WMS-Server liefern Daten aufgrund einer Anfrage eines Klienten (hier QGIS) als Rasterbild aus. Dabei spielen Ausdehnung, Anzahl der angefragten Layer, Symbolisierungen und Transparenz eine Rolle. Der WMS-Server holt die benötigten Daten dann aus seiner Datenquelle hervor, rendert diese in eine Rasterkarte und sendet das fertige Bild zurück zum Klienten. Das für QGIS typische Rasterformat ist in aller Regel JPEG oder PNG.
WMS ist ein komplett auf Übertragung ausgelegter Dienst (REST = Representational State Transfer). Daraus resultiert die Tatsache, dass die von QGIS generierte URL für das Bild auch in einem Browser eingesetzt werden kann. Das Resultat dieser Anfrage sieht in der Regel genauso aus wie in QGIS. Das ist besonders hilfreich, wenn es beim Einsatz von WMS Probleme geben sollte. Da es sehr viele unterschiedle WMS-Server-Anbieter am Markt gibt (und alle die WMS-Spezifikation etwas unterschiedlich interpretieren), ist eine Überprüfung im Browser sehr hilfreich.
WMS-Layer können sehr einfach hinzugefügt werden, solange man die URL des Servers kennt, eine Verbindung über HTTP zu diesem Server besteht und der angefragte Server auch HTTP versteht.
Darüber hinaus speichert QGIS Ihre WMS-Antworten (d. h. Bilder) 24 Stunden lang im Cache, solange die GetCapabilities-Anforderung nicht ausgelöst wird. Die GetCapabilities-Anforderung wird jedes Mal ausgelöst, wenn die Schaltfläche: guilabel: Connect im Dialogfeld: guilabel:` Layer von WMS (T) Server hinzufügen` verwendet wird, um die WMS-Capabilities abzurufen. Dies ist eine automatische Funktion zur Optimierung der Projektladezeit. Wenn ein Projekt mit einer WMS-Ebene gespeichert wird, werden die entsprechenden WMS-Kacheln beim nächsten Öffnen des Projekts aus dem Cache geladen, sofern sie nicht älter als 24 Stunden sind.
19.1.2. Überblick über die WMTS Unterstützung
|qg| kann auch als WMTS Client fungieren. WMTS ist ein OGC Standard zum Bereitstellen von Tile Sets von räumlichen Daten. Dies ist ein schnellerer und effizienterer Weg als die Bereitstellung über einen WMS weil bei WMTS die Tile Sets vorgeneriert werden und der Client nur die Übermittlung von Tiles, nicht Ihre Erstellung abfragt. Ein WMS beinhaltet typischerweise sowohl die Erstellung als auch die Übermittlung der Daten. Ein bekanntes Beispiel eines nicht-OGC Standards zum Darstellen von gekachelten räumlichen Daten ist Google Maps.
Um die Daten in einer Vielzahl von Maßstäben je nach Anforderung darzustellen werden die WMTS Tile Sets in mehreren verschiedenen Maßstäben erstellt und dem GIS Client zur Abfrage bereitgestellt.
Das Diagramm veranschaulicht das Konzept der Tile Sets:
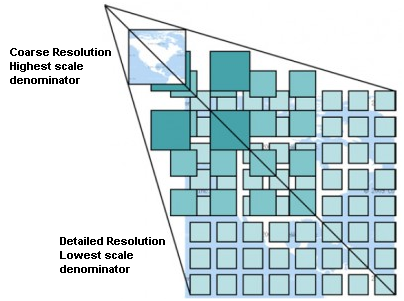
Abb. 19.1 Konzept der WMTS Tile Sets
Dei zwei Typen von WMTS Schnittstellen die QGIS unterstützt sind die über Key-Value-Pairs (KVP) und RESTful. Diese zwei Schnittstellen sind unterschiedlich und Sie müssen diese für QGIS unterschiedlich spezifizieren.
Um einen WMTS KVP Service anzubinden muss ein QGIS Benutzer die WMS/WMTS Schnittstelle öffnen und die folgenden Zeichenkette zu der URL des WMTS Tile Service hinzufügen:
"?SERVICE=WMTS&REQUEST=GetCapabilities"Ein Beispiel für diesen Typ von Adresse ist
https://opencache.statkart.no/gatekeeper/gk/gk.open_wmts?\
  service=WMTS&request=GetCapabilities
Zu Testzwecken funktioniert der topo2 Layer in diesem WMTS gut. Indem man diese Zeichenfolge hinzufügt gibt man an dass ein WMTS Web Service anstatt eines WMS Service benutzt werden soll.
Der RESTful WMTS Service erfordert eine andere Form, eine einfache URL. Das von der OGC empfohlene Format ist:
{WMTSBaseURL}/1.0.0/WMTSCapabilities.xml
This format helps you to recognize that it is a RESTful address. A RESTful WMTS is accessed in QGIS by simply adding its address in the WMS setup in the URL field of the form. An example of this type of address for the case of an Austrian basemap is https://maps.wien.gv.at/basemap/1.0.0/WMTSCapabilities.xml.
Bemerkung
You can still find some old services called WMS-C. These services are quite similar
to WMTS (i.e., same purpose but working a little bit differently). You can manage
them the same as you do WMTS services. Just add ?tiled=true at the end
of the url. See https://wiki.osgeo.org/wiki/Tile_Map_Service_Specification for more
information about this specification.
Wenn Sie WMTS lesen können Sie auch an WMS-C denken.
19.1.3. WMS/WMTS Server auswählen
Wenn Sie das WMS Feature das erste Mal in QGIS verwenden sind keine Server definiert.
You then need to create connections to the server you are targeting:
Go to the
 WMS/WMTS tab of the Data Source
Manager dialog, either by:
WMS/WMTS tab of the Data Source
Manager dialog, either by:clicking the
 Open Data Source Manager button
(or pressing Ctrl+L) and enabling the tab
Open Data Source Manager button
(or pressing Ctrl+L) and enabling the tabclicking the
 Add WMS layer button on the
Manage Layers toolbar
Add WMS layer button on the
Manage Layers toolbaror selecting
menu
Press New from the Layers tab. The Create a New WMS/WMTS Connection… dialog appears.
Tipp
Right-click the
WMS/WMTS entry from within the
Browser panel and select New Connection…
also opens the Create a New WMS/WMTS Connection… dialog.Then enter the parameters to connect to your desired WMS server, as listed below:
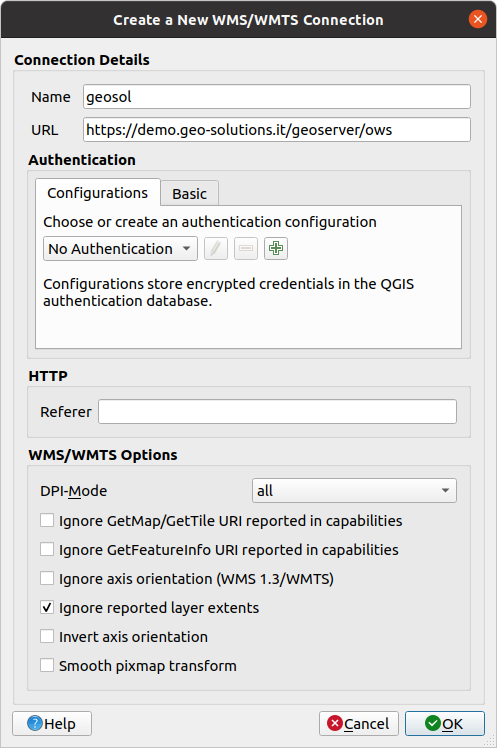
Abb. 19.2 Creating a connection to a WMS server
Name: A name for the connection. This name will be used in the Server Connections drop-down box so that you can distinguish it from other WMS servers.
URL: URL of the server providing the data. This must be a resolvable host name – the same format as you would use to open a telnet connection or ping a host, i.e. the base URL only. For example, you shouldn’t have fragments such as
request=GetCapabilitiesorversion=1.0.0in your URL.Authentication (optional): using a stored configuration or a basic authentication with Username and Password.
Warnung
Entering username and password in the Authentication tab will keep unprotected credentials in the connection configuration. Those credentials will be visible if, for instance, you shared the project file with someone. Therefore, it’s advisable to save your credentials in a Authentication configuration instead (configurations tab). See Authentifizierungssystem for more details.
HTTP Referer
DPI-Mode: Available options are all, off, QGIS, UMN and GeoServer
 Ignore GetMap/GetTile URI reported in capabilities:
if checked, use given URI from the URL field above.
Ignore GetMap/GetTile URI reported in capabilities:
if checked, use given URI from the URL field above.- Ignore GetFeatureInfo URI reported in capabilities:
if checked, use given URI from the URL field above.
- Ignore axis orientation (WMS 1.3/WMTS)
- Ignore reported layer extents: because the extent
reported by raster layers may be smaller than the actual area which can
be rendered (notably for WMS servers with symbology which takes more space
than the data extent), check this option to avoid cropping raster layers
to their reported extents, resulting in truncated symbols on the borders
of these layers.
- Invert axis orientation
- Smooth pixmap transformation
Press OK
Wenn Sie die WMS-Verbindung einmal gesetzt haben, ist sie für zukünftige QGIS Sitzungen gespeichert.
If you need to set up a proxy server to be able to receive WMS services from the
internet, you can add your proxy server in the options. Choose
and click on the Network tab.
There, you can add your proxy settings and enable them by setting  Use proxy for web access. Make sure that you select the correct
proxy type from the Proxy type
Use proxy for web access. Make sure that you select the correct
proxy type from the Proxy type  drop-down menu.
19.1.4. WMS/WMTS Layer laden
Once you have successfully filled in your parameters, you can use the Connect button to retrieve the capabilities of the selected server. This includes the image encoding, layers, layer styles and projections. Since this is a network operation, the speed of the response depends on the quality of your network connection to the WMS server. While downloading data from the WMS server, the download progress is visualized in the lower left corner of the main QGIS dialog.
Your screen should now look a bit like Abb. 19.3, which shows the response provided by a WMS server.
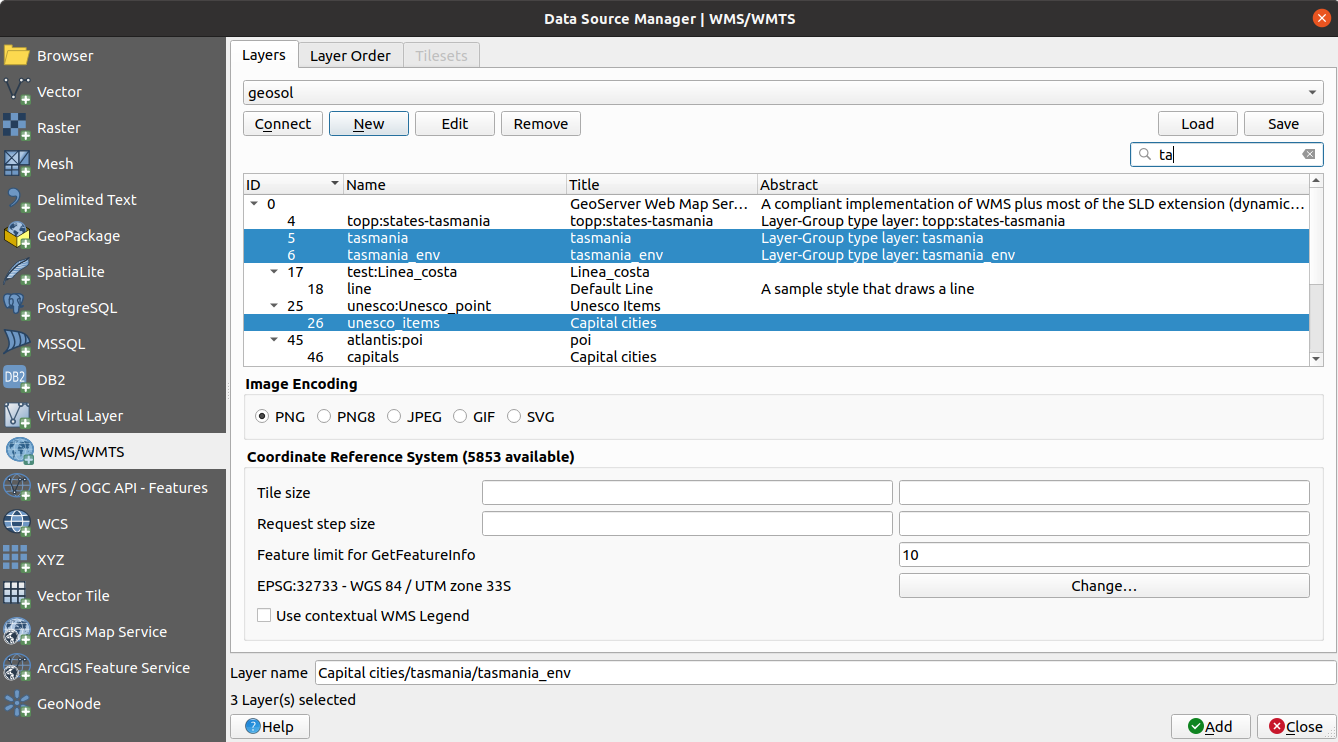
Abb. 19.3 Dialog for adding a WMS server, with filter on available layers
The upper part of the Layers tab of the dialog shows a tree structure that can include layer groups embedding layers with their associated image style(s) served by the server. Each item can be identified by:
an ID
a Name
a Title
and an Abstract.
The list can be filtered using the  widget in the top right corner.
Bildkodierung
Der Bildkodierung Bereich listet die Formate die sowohl vom Client als auch vom Server unterstützt werden auf. Wählen Sie eines abhängig von Ihren Anforderungen an die Bildqualität aus.
Tipp
Bildkodierung
In der Regel bieten WMS-Server JPEG oder PNG als Bildkodierung an. JPEG hat eine bildverschlechternde Kompression, während PNG zumeist die Qualität der ursprünglichen Rasterdaten widerspiegelt.
Verwenden Sie JPEG wenn Sie damit rechnen das die WMS Daten photographischen Charakter haben und/oder Sie ein Verlust an Bildqualität nicht stört. Dieser Kompromiss reduziert typischerweise die Datentransferbedingungen um das fünffache verglichen mit PNG.
Verwenden Sie PNG wenn Sie eine genaue Wiedergabe der Originaldaten erzielen wollen und die erhöhten Datentransferbedingungen Sie nicht stören.
Optionen
The Options area of the dialog provides means to configure the WMS requests. You can define:
Tile size if you want to set tile sizes (e.g., 256x256) to split up the WMS request into multiple requests.
The Request step size
The Feature limit for GetFeatureInfo defines the maximum number of GetFeatureInfo results from the server.
If you select a WMS from the list, a field with the default projection provided by the web server appears. Press the Change… button to replace the default projection of the WMS with another CRS supported by the WMS server.
Finally you can activate
Use contextual WMS Legend if the
WMS Server supports this feature. Then only the relevant legend for your current
map view extent will be shown and thus will not include legend items for items
you can’t see in the current map.
At the bottom of the dialog, a Layer name text field displays the selected item’s Title. You can change the name at your will. This name will appear in the Layers panel after you pressed the Add button and loaded the layer(s) in QGIS.
You can select several layers at once, but only one image style per layer. When several layers are selected, they will be combined at the WMS server and transmitted to QGIS in one go, as a single layer. The default name is a slash (/) separated list of their original title.
Layerreihenfolge
The Layer Order tab lists the selected layers available from the current connected WMS server.
WMS layers rendered by a server are overlaid in the order listed in the Layers tab, from top to bottom of the list. If you want to change the overlay order, you can use the Up and Down buttons of the Layer Order tab.
Transparenz
The Global transparency setting from the Layer Properties is hard coded to be always on, where available.
Tipp
Transparenz von WMS-Layern
Die WMS Bildtransparenz steht Ihnen abhänig von der Bildkodierung zur Verfügung: PNG und GIF unterstützen Transparenz währenddessen JPEG keine Untersützung bietet.
Koordinatenbezugsystem
Koordinatenbezugssystem (KBS) ist die Bezeichnung des OGC für eine Projektion in QGIS.
Jeder WMS Layer kann abhängig von den Fähigkeiten des WMS in mehreren KBS dargestellt werden.
To choose a CRS, select Change… and a dialog similar to the one shown in Abb. 10.3 will appear. The main difference with the WMS version of the dialog is that only those CRSs supported by the WMS server will be shown.
19.1.5. Tilesets
Wenn Sie WMTS (gecachte WMS) Dienste verwenden wie
https://opencache.statkart.no/gatekeeper/gk/gk.open_wmts?\
  service=WMTS&request=GetCapabilities
you are able to browse through the Tilesets tab given by the server.
Additional information like tile size, formats and supported CRS are listed in
this table. In combination with this feature, you can use the tile scale slider
by selecting ( or  ), then choosing Tile Scale Panel. This gives you the
available scales from the tile server with a nice slider docked in.
), then choosing Tile Scale Panel. This gives you the
available scales from the tile server with a nice slider docked in.
19.1.6. Das Objekte abfragen Werkzeug
Nachdem Sie einen Layer von einem WMS-Server geladen haben, können Sie die Layer mit dem Werkzeug  Objekte Abfragen abfragen, sofern der WMS-Server diese Funktion unterstützt. Ein Klick auf einen Pixel stellt dann eine Abfrage an den WMS-Server für diesen Pixel. Das Ergebnis wird in Textform geliefert. Die Formatierung hängt von dem jeweilig verwendeten WMS-Server ab.
Formatauswahl
Wenn durch den Server mehrere Formate unterstützt werden wird dem Objekte abfragen Dialog automatisch eine Kombobox mit den unterstützten Formaten hinzugefügt und das ausgewählte Format kann im Projekt für den Layer gespeichert werden.
GML Formatunterstützung
Das Objekte abfragen Werkzeug unterstützt WMS Server Response (GetFeatureInfo) im GML Format (es wird Feature in der QGIS GUI in diesem Zusammenhang genannt). Wenn das „Feature“ Format vom Server unterstützt wird und ausgewählt ist, sind die Ergebnisse des Objekte abfragen Werkzeugs Vektorobjekte, wie bei einem normalen Vektorlayer. Wenn ein einzelnes Objekt im Baum ausgewählt wird wird es in der Karte hervorgehoben und kann in die Zwischenablage kopiert werden und in einen anderen Vektorlayer eingefügt werden. Sehen Sie sich für die Unterstüzung von GetFeatureInfo im GML Format das Beispielsetup des UMN Mapservers unten an.
# in layer METADATA add which fields should be included and define geometry (example):

"gml_include_items"   "all"
"ows_geometries"      "mygeom"
"ows_mygeom_type"     "polygon"

# Then there are two possibilities/formats available, see a) and b):

# a) basic (output is generated by Mapserver and does not contain XSD)
# in WEB METADATA define formats (example):
"wms_getfeatureinfo_formatlist" "application/vnd.ogc.gml,text/html"

# b) using OGR (output is generated by OGR, it is send as multipart and contains XSD)
# in MAP define OUTPUTFORMAT (example):
OUTPUTFORMAT
    NAME "OGRGML"
    MIMETYPE "ogr/gml"
    DRIVER "OGR/GML"
    FORMATOPTION "FORM=multipart"
END

# in WEB METADATA define formats (example):
"wms_getfeatureinfo_formatlist" "OGRGML,text/html"
Eigenschaften
Nachdem Sie einen WMS Server hinzugefügt haben können Sie sich seine Eigenschaften mit einem Rechtsklick in der Legende und dem Auswählen von ansehen.
Reiter Metadaten
Der Reiter Metadaten im Kontextmenü zeigt eine Vielzahl von Informationen über den WMS-Server. Diese Infos sind dem Capabilities-Dokument des Servers entnommen. Viele Definitionen können reduziert werden indem man den WMS Standard liest (siehe OPEN-GEOSPATIAL-CONSORTIUM Literatur und Internetreferenzen), hier sind dazu einige praktische Definitionen:
Servereigenschaften
WMS Version– Die WMS-Version, die vom Server unterstützt wird.
Bildformate — Eine Liste der MIME-Typen mit denen der Server antworten kann. QGIS unterstützt jedes Format, welches die darunterliegende Bibliothek QT unterstützt, mindestens aber
image/pngundimage/jpeg.Abfrageformate — Eine Liste der MIME-Typen mit denen der Server auf Pixel-Abfragen antworten kann. Derzeit wird von QGIS nur der Typ
text-plainunterstützt.
Layereigenschaften
Ausgewählt — Gibt an, ob dieser Layer während des Hinzufügens des Server ausgewählt war.
Sichtbar — Gibt an, ob der Layer in der Legende angezeigt wird oder nicht. (noch nicht verwendet in der aktuellen Version von QGIS.)
Kann abfragen — Gibt an, ob der Layer auf Abfragen Ergebnisse zurückgibt.
Kann Transparenz — Gibt an, ob der Layer transparent gezeichnet werden kann. Diese QGIS Version verwendet ein hardcodiertes
Ja, sofern die Bildkodierung Transparenz bietetKann reingezoomt werden —Gibt an, ob dieser Layer gezoomt werden kann. Diese Version von QGIS verwendet standardmäßig
Ja. Daher kann es sein, dass einige Layer komisch aussehen, die diese Funktion nicht unterstützen.Kaskadierend — WMS-Server können als Proxy zwischen anderen WMS-Servern agieren, um Rasterdaten für einen Layer anzufordern. Dieser Eintrag gibt an, wieviele WMS-Server angefragt werden müssen, um die Daten zu bekommen.
Fixierte Höhe, Fixierte Breite —Gibt an, ob der Layer eine feste Pixeldimension hat. Diese Version von QGIS nimmt an, dass alle WMS-Layer diesen Wert nicht gesetzt haben. Daher kann es sein, dass einige Layer komisch aussehen, die diese Funktion nicht unterstützen.
WGS 84 Boundingbox —Gibt die Boundingbox eines Layers in WGS84-Koordinaten an. Einige WMS-Server setzen diese Werte nicht korrekt (z.B. stehen darin manchmal UTM-Koordinaten), sodass bei solchen Layern in QGIS der Eindruck entsteht, sehr weit herausgezoomt zu sein. Der Webmaster des WMS-Servers sollte dann auf dieses Problem aufmerksam gemacht werden. Das WMS XML-Element ist
LatLonBoundingBox,EX_GeographicBoundingBoxoder die CRS:84BoundingBox.Verfügbare Koordinatensysteme — Die Projektionen, in denen dieser Layer dargestellt werden kann. Diese sind dem Capabilities-Dokument des Servers entnommen.
Verfügbare Stile — Die Bildstile, in denen dieser Layer dargestellt werden kann.
19.1.7. Show WMS legend graphic in table of contents and layout
The QGIS WMS data provider is able to display a legend graphic in the table of contents‘ layer list and in the print layout. The WMS legend will be shown only if the WMS server has GetLegendGraphic capability and the layer has getCapability url specified, so you additionally have to select a styling for the layer.
Wenn eine legendGraphic verfügbar ist, wird diese unter dem Layer angezeigt. Sie ist klein und Sie müssen darauf klicken um Sie in Ihrer tatsächlichen Größe (gemäß den QgsLegendInterface Architekturlimitationen) zu öffnen. Das Klicken auf die Legende des Layers öffnet einen Rahmen mit einer Legende in voller Auflösung.
In the print layout, the legend will be integrated at it’s original (downloaded) dimension. Resolution of the legend graphic can be set in the item properties under to match your printing requirements.
Die Legende wird Kontextinformationen basiert auf dem aktuellen Maßstab darstellen. Die WMS Legende wird nur gezeigt wenn der WMS Server eine GetLegendGraphic Capability hat und für dem Layer eine getCapability URL angegeben wurde, also müssen Sie einen Stil auswählen.
19.1.8. Einschränkungen des WMS-Klienten
Nicht alle mögliche WMS Client Funktionalitäten sind in diese Version von QGIS| integriert worden. Einige der bemerkenswerteren Ausnahmen folgen noch.
WMS-Layereigenschaften ändern
Once you’ve completed the Add WMS layer procedure,
there is no way to change the settings. A work-around is to delete the layer
completely and start again.
WMS-Server, die eine Authentifizierung benötigen
Derzeit werden öffentlich zugängliche und gesicherte WMS Services unterstützt. Die gesicherten WMS Server können mit öffentlicher Authentifizierung angebunden werden. Sie können die (optionalen) Anmeldeinformationen hinzufügen wenn Sie einen WMS Server hinzufügen. Schlagen Sie unter Abschnitt WMS/WMTS Server auswählen Details nach.
Tipp
Zugriff auf abgesicherte OGC-Layer
If you need to access secured layers with secured methods other than basic authentication, you can use InteProxy as a transparent proxy, which does support several authentication methods. More information can be found in the InteProxy manual at https://inteproxy.wald.intevation.org.
Tipp
QGIS WMS Mapserver
Since Version 1.7.0, QGIS has its own implementation of a WMS 1.3.0 Mapserver. Read more about this in QGIS Server Anleitung/Handbuch.
19.2. WCS Client
 Ein Web Coverage Service (WCS) stellt eine Anbindung zu Rasterdaten in Formaten die nützlich für die client-seitige Darstellung, als Input für wissenschaftliche Modelle und für andere Clients zur Verfügung. Der WCS ist vergleichbar zu WFS und WMS. Als WMS und WFS Service Instanz erlaubt der WCS den Clients Teile von Serverinformationsbeständen basierend auf räumlichen Einschränkungen und Abfragekriterien auszuwählen.
QGIS hat einen nativen WCS Provider und unterstützt sowohl Version 1.0 und 1.1 (welche deutliche Unterschiede aufweisen), aktuell jedoch wird 1.0 vorgezogen da es mit 1.1 viele Probleme gibt (z.B. implementiert jeder Server es auf eine andere Art und Weise mit zahlreichen Besonderheiten).
Der native WCS Provider kümmert sich um alle Netzwerkanfragen und verwendet alle voreingestellten QGIS Netzwerkanfragen (insbesondere proxy). Es ist auch möglich einen Cache auszuwählen (‚Immer cachen‘, ‚Cache vorziehen‘, ‚Netzwerk vorziehen‘, ‚Immer Netzwerk‘) und der Provider unterstützt ebenfalls das Auswählen der Zeitposition wenn Temporal Domain vom Server angeboten wird.
Warnung
Entering username and password in the Authentication tab will keep unprotected credentials in the connection configuration. Those credentials will be visible if, for instance, you shared the project file with someone. Therefore, it’s advisable to save your credentials in a Authentication configuration instead (configurations tab). See Authentifizierungssystem for more details.
19.3. WFS und WFS-T Klient
In QGIS, a WFS layer behaves pretty much like any other vector layer. You can identify and select features, and view the attribute table. QGIS supports WFS 1.0.0, 1.1.0, 2.0 and WFS3 (OGC API - Features), including editing (through WFS-T).
In general, adding a WFS layer is very similar to the procedure used with WMS. There are no default servers defined, so you have to add your own. You can find WFS servers by using the MetaSearch plugin or your favourite web search engine. There are a number of lists with public URLs, some of them maintained and some not.
Einen WFS-Layer laden
As an example, we use the Gateway Geomatics WFS server and display a layer. https://demo.gatewaygeomatics.com/cgi-bin/wfs_gateway?REQUEST=GetCapabilities&VERSION=1.0.0&SERVICE=WFS
To be able to load a WFS Layer, first create a connection to the WFS server:
Open the Data Source Manager dialog by pressing the
Open Data Source Manager buttonEnable the
 WFS/OGC API-Features tab
Click on New… to open the Create a New WFS Connection dialog
Enter
Gateway Geomaticsas nameEnter the URL (see above)
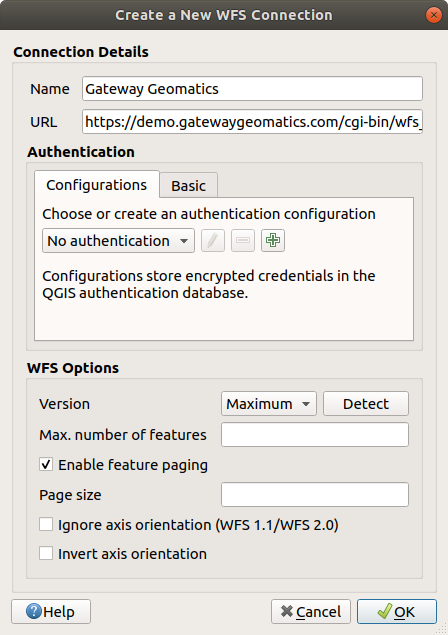
Abb. 19.4 Creating a connection to a WFS server
Bemerkung
In case of an OGC API - Features (WFS3), the URL to provide should be the landing page, ie the main page from which it is possible to navigate to all the available service endpoints.
In the WFS settings dialog, you can:
Indicate the WFS version of the server. If unknown, press the Detect button to automatically retrieve it.
Define the maximum number of features retrieved in a single GetFetFeature request. If empty, no limit is set.
Invert axis orientation.
And depending on the WFS version:
Force to Ignore axis orientation (WFS 1.1/WFS 2.0)
Enable feature paging and specify the maximum number of features to retrieve with Page size. If no limit is defined, then the server default is applied.
Warnung
Entering username and password in the Authentication tab will keep unprotected credentials in the connection configuration. Those credentials will be visible if, for instance, you shared the project file with someone. Therefore, it’s advisable to save your credentials in an Authentication configuration instead (Configurations tab). See Authentifizierungssystem for more details.
Press OK to create the connection.
Beachten Sie dass auch jede Proxyeinstellung die Sie in Ihren eingestellt haben berücksichtigt wird.
Now we are ready to load WFS layers from the above connection.
Choose ‚Gateway Geomatics‘ from the Server Connections
drop-down list.Click Connect
Select the Parks layer in the list
You can also choose whether to:
- Use title for layer name, showing the layer’s
title as defined on the server in the Layers panel instead of
its Name
- Only request features overlapping the view extent
- Change the layer’s CRS
or Build query to specify particular features to retrieve, by either using the corresponding button or double-clicking the target layer.
Click Add to add the layer to the map.
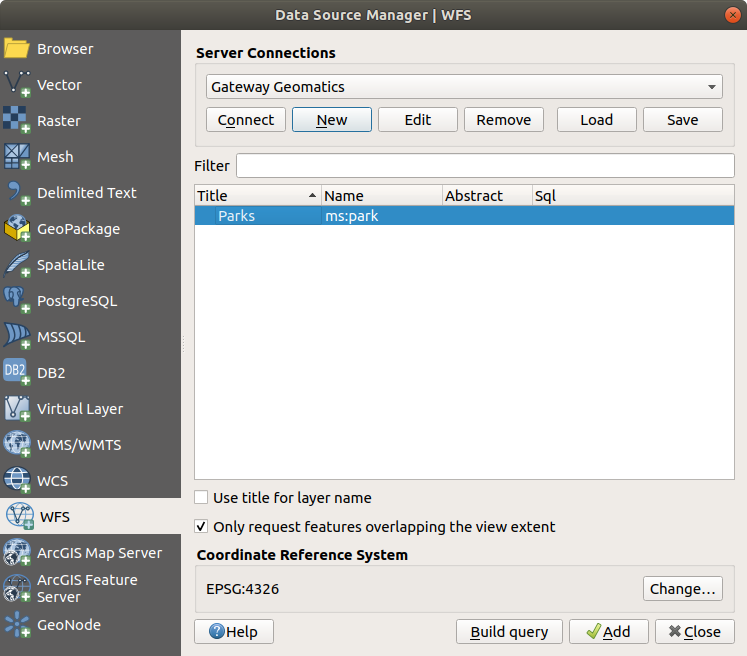
Abb. 19.5 Einen WFS Layer hinzufügen
You’ll notice the download progress is visualized in the lower left of the QGIS main window. Once the layer is loaded, you can identify and select a couple of features and view the attribute table.
Bemerkung
QGIS supports different versions of the WFS protocol, with background download and progressive rendering, on-disk caching of downloaded features and version autodetection.