9.1. Expressions
Based on layer data and prebuilt or user defined functions, Expressions offer a powerful way to manipulate attribute value, geometry and variables in order to dynamically change the geometry style, the content or position of the label, the value for diagram, the height of a layout item, select some features, create virtual field, …
Note
A list of the default functions and variables for writing expressions can be found at List of functions, with detailed information and examples.
9.1.1. The Expression string builder
Main dialog to build expressions, the Expression string builder is available from many parts in QGIS and, can particularly be accessed when:
clicking the
 button;
selecting features with the
 Select By Expression… tool;
editing attributes with e.g. the
 Field calculator tool;
manipulating symbology, label or layout item parameters with the
 Data defined override tool (see Data defined override setup);
building a geometry generator symbol layer;
doing some geoprocessing.
The Expression builder dialog offers access to the:
Expression tab which, thanks to a list of predefined functions, helps to write and check the expression to use;
Function Editor tab which helps to extend the list of functions by creating custom ones.
9.1.1.1. The Interface
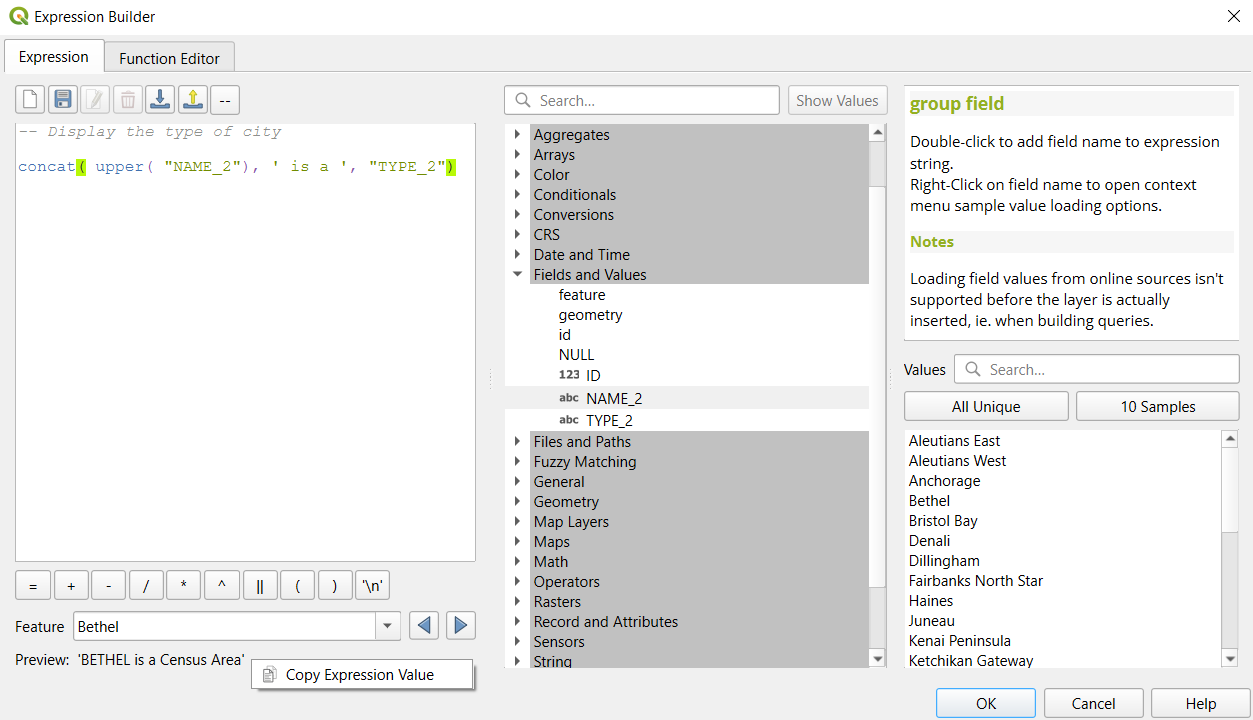
Fig. 9.1 The Expression tab
The Expression tab provides the main interface to write expressions using functions, layer fields and values. It contains the following widgets:
An expression editor area for typing or pasting expressions. Autocompletion is available to speed expression writing:
Corresponding variables, function names and field names to the input text are shown below: use the Up and Down arrows to browse the items and press Tab to insert in the expression or simply click on the wished item.
Function parameters are shown while filling them.
QGIS also checks the expression rightness and highlights all the errors using:
Underline: for unknown functions, wrong or invalid arguments;
Marker: for every other error (eg, missing parenthesis, unexpected character) at a single location.
Above the expression editor, a set of tools helps you:
 Clear the expression editor
Create and manage user expressions
Turn active line(s) in the expression editor into comments by pressing the
 Toggle Comment on Selected Lines button.
Pressing again will deactivate the comment.
Toggle Comment on Selected Lines button.
Pressing again will deactivate the comment.Tip
Document your expression with comments
When using complex expression, it is good practice to add text either as multiline or inline comments to help you remember:
Use
--to mark any text that follows on the same line as commentUse
/*to mark any text that follows as comment, until*/is reached. The comment can span multiple lines.
/*
Labels each region with its highest (in altitude) airport(s)
and altitude, eg 'AMBLER : 264m' for the 'Northwest Artic' region
*/
with_variable(
  'airport_alti', -- stores the highest altitude of the region
  aggregate(
    'airports',
    'max',
    "ELEV", -- the field containing the altitude
    -- and limit the airports to the region they are within
    filter := within( @geometry, geometry( @parent ) )
  ),
    aggregate( -- finds airports at the same altitude in the region
      'airports',
      'concatenate',
      "NAME",
      filter := within( @geometry, geometry( @parent ) )
        and "ELEV" = @airport_alti
    )
    || ' : ' || @airport_alti || 'm'
    -- using || allows regions without airports to be skipped
)
Under the expression editor, you find:
A set of basic operators to help you build the expression
An indication of the expected format of output when you are data-defining feature properties
A live Output preview of the expression (up to 60 characters), evaluated on the first feature of the Layer by default. To view output preview text exceeding 60 characters, you can hover your cursor over the text to display a tooltip pop-up containing the entire output preview. To copy the output preview text onto your clipboard, right-click on the output preview text and select
 Copy Expression Value.
You can browse and evaluate other features of the layer using the Feature combobox (the values are taken from the display name property of the layer).
In case of error, it indicates it and you can access the details with the provided hyperlink.
A function selector displays the list of functions, variables, fields… organized in groups. A search box is available to filter the list and quickly find a particular function or field. Double-clicking an item adds it to the expression editor.
A help panel displays help for each selected item in the function selector.
Tip
Press Ctrl+Click when hovering a function name in an expression to automatically display its help in the dialog.
A field’s values widget shown when a field is selected in the function selector helps to fetch features attributes:
Look for a particular field value
Display the list of All Unique or 10 Samples values. Also available from right-click.
When the field is mapped with another layer or a set of values, i.e. if the field widget is of RelationReference, ValueRelation or ValueMap type, it’s possible to list all the values of the mapped field (from the referenced layer, table or list). Moreover, you can filter this list to
 Only show values in use in the current field.
Double-clicking a field value in the widget adds it to the expression editor.
Tip
The right panel, showing functions help or field values, can be collapsed (invisible) in the dialog. Press the Show Values or Show Help button to get it back.
9.1.1.2. Writing an expression
QGIS expressions are used to select features or set values. Writing an expression in QGIS follows some rules:
The dialog defines the context: if you are used to SQL, you probably know queries of the type select features from layer where condition or update layer set field = new_value where condition. A QGIS expression also needs all these information but the tool you use to open the expression builder dialog provides parts of them. For example, giving a layer (
buildings) with a field (height):pressing the
Select by expression tool means that
you want to “select features from buildings”. The condition is the
only information you need to provide in the expression text widget,
e.g. type "height" > 20to select buildings that are higher than 20.with this selection made, pressing the
Field calculator
button and choosing “height” as Update existing field, you already
provide the command “update buildings set height = ??? where height > 20”.
The only remaining bits you have to provide in this case is the new value,
e.g. just enter 50in the expression editor textbox to set the height of the previously selected buildings.
Pay attention to quotes: single quotes return a literal, so a text placed between single quotes (
'145') is interpreted as a string. Double quotes will give you the value of that text so use them for fields ("myfield"). Fields can also be used without quotes (myfield). No quotes for numbers (3.16).Note
Functions normally take as argument a string for field name. Do:
attribute( @atlas_feature, 'height' ) -- returns the value stored in the "height" attribute of the current atlas feature
And not:
attribute( @atlas_feature, "height" ) -- fetches the value of the attribute named "height" (e.g. 100), and use that value as a field
                                      -- from which to return the atlas feature value. Probably wrong as a field named "100" may not exist.
Tip
Use named parameters to ease expression reading
Some functions require many parameters to be set. The expression engine supports the
use of named parameters. This means that instead of writing the cryptic expression
clamp( 1, 2, 9), you can use clamp( min:=1, value:=2, max:=9). This also allows
arguments to be switched, e.g. clamp( value:=2, max:=9, min:=1). Using named parameters
helps clarify what the arguments for an expression function refer to, which is helpful
when you are trying to interpret an expression later!
9.1.1.3. Some use cases of expressions
From the Field Calculator, calculate a “pop_density” field using the existing “total_pop” and “area_km2” fields:
"total_pop" / "area_km2"
Label or categorize features based on their area:
CASE WHEN $area > 10 000 THEN 'Larger' ELSE 'Smaller' END
Update the field “density_level” with categories according to the “pop_density” values:
CASE WHEN "pop_density" < 50 THEN 'Low population density'
     WHEN "pop_density" >= 50 and "pop_density" < 150 THEN 'Medium population density'
     WHEN "pop_density" >= 150 THEN 'High population density'
END
Apply a categorized style to all the features according to whether their average house price is smaller or higher than 10000€ per square metre:
"price_m2" > 10000
Using the “Select By Expression…” tool, select all the features representing areas of “High population density” and whose average house price is higher than 10000€ per square metre:
"density_level" = 'High population density' and "price_m2" > 10000
The previous expression could also be used to define which features to label or show on the map.
Select features that overlap a natural zone from the “lands” layer:
overlay_intersects( layer:='lands', filter:="zone_type"='Natural' )
Count for each feature the number of buildings they contain:
array_length( overlay_contains( layer:='buildings', expression:=@id ) )
Create a different symbol (type) for the layer, using the geometry generator:
point_on_surface( @geometry )
Given a point feature, generate a closed line (using
make_line) around its geometry:make_line( -- using an array of points placed around the original array_foreach( -- list of angles for placing the projected points (every 90°) array:=generate_series( 0, 360, 90 ), -- translate the point 20 units in the given direction (angle) expression:=project( @geometry, distance:=20, azimuth:=radians( @element ) ) ) )In a print layout label, display the name of the “airports” features that are within the layout “Map 1” item:
with_variable( 'extent',
               map_get( item_variables( 'Map 1' ), 'map_extent' ),
               aggregate( 'airports', 'concatenate', "NAME",
                          intersects( @geometry, @extent ), ' ,'
                        )
             )
9.1.1.4. Saving Expressions
Using the  Add current expression to user expressions button
above the expression editor frame, you can save important expressions you want
to have quick access to. These are available from the User expressions group
in the middle panel. They are saved under the user profile
(
Add current expression to user expressions button
above the expression editor frame, you can save important expressions you want
to have quick access to. These are available from the User expressions group
in the middle panel. They are saved under the user profile
(<userprofile>/QGIS/QGIS4.ini file) and available in all expression
dialogs inside all projects of the current user profile.
A set of tools available above the expression editor frame helps you manage the user expressions:
- Add the current expression to user expressions: store the
expression in the user profile. A label and a help text can be added for
easy identification.
 Edit selected expression from user expressions,
as well as their help and label
Edit selected expression from user expressions,
as well as their help and label Remove selected expression from user expressions
 Import user expressions from a
 .jsonfile into the active user profile folder Export user expressions as a
 .jsonfile; all the user expressions in the user profileQGIS4.inifile are shared
9.1.2. Function Editor
With the Function Editor tab, you are able to write your own functions in Python language. This provides a handy and comfortable way to address particular needs that would not be covered by the predefined functions. This also allows you to create and manage custom expressions for use in QGIS projects.
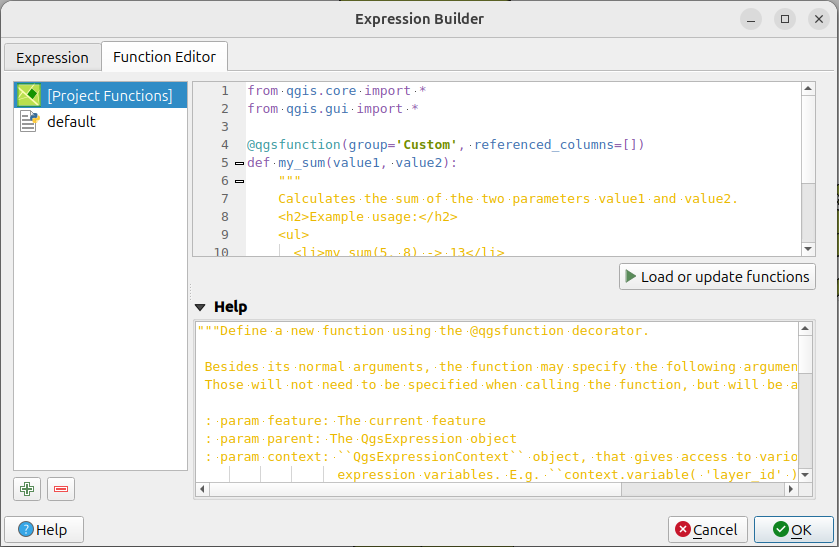
Fig. 9.2 The Function Editor tab
Note
File scripts are autosaved by default, however, project functions are stored within the project and require the project to be saved in order for changes to be preserved.
To create a new function:
Press the
 New File button.
Select where to store the new function. You can choose to save it either in a Function file or in Project functions.
If you select Function file, you need to enter a name for the Python
.pyfile, which is based on a QGIS template file and is stored in the/python/expressionsfolder under the active user profile directory, thus available for all projects you may open with that profile.Custom Python functions stored as Function files are auto loaded whenever you start a new project under the user profile. Be aware that for sharing such Python functions, you need to share the
.pyfile in the/python/expressionsfolder.If you select Project functions, the new function is stored in the project file and only available for that project.
Custom Python functions stored as Project functions can be easily shared by sharing the project file where they were saved. When opening a project with project functions, QGIS can load or ignore them depending on whether embedded Python code is enabled.
A new item is added in the left panel of the Function Editor tab.
The right panel displays the content of the file: a python script template.
Uncomment the code block and start editing it according to your needs. You can rely on code autocompletion, code formatting and typing helpers, as defined in Python settings. Online API documentation for Qt and PyQGIS objects is also accessible pressing the F1 key.
You will find in the Help widget general information for setting the @qgsfunction decorator.
Press the
 Load or update functions button.
The function you wrote is added to the functions tree in the Expression tab,
by default under the
Load or update functions button.
The function you wrote is added to the functions tree in the Expression tab,
by default under the Customgroup.Enjoy your new function.
If the function requires improvements, enable the Function Editor tab, do the changes and press again the
Load or update functions button
to make them available in the file, hence in any expression tab.
To delete a custom function:
Enable the Function Editor tab
Select the function in the list
Press the
 Remove selected function. The function is
removed from the list and, depending on the storage, the corresponding
Remove selected function. The function is
removed from the list and, depending on the storage, the corresponding .pyfile is deleted from the user profile folder, or the Python functions are removed from the project file.
Note
When a project file with Project functions is closed, the corresponding Project functions are unloaded and are no longer available in the QGIS session.
Example
Here’s a short example on how to create your own my_sum function that
will operate with two values.
from qgis.core import *
from qgis.gui import *

@qgsfunction(group='Custom', referenced_columns=[])
def my_sum(value1, value2):
    """
    Calculates the sum of the two parameters value1 and value2.
    <h2>Example usage:</h2>
    <ul>
      <li>my_sum(5, 8) -> 13</li>
      <li>my_sum("field1", "field2") -> 42</li>
    </ul>
    """
    return value1 + value2
The @qgsfunction decorator accepts the following arguments:
The
groupargument indicates the group in which the function should be listed in the Expression dialog.usesgeometry: Set this toTrueif the expression requires access to the features geometry. By defaultFalse.handlesnull: Set this toTrueif the expression has custom handling for NULL values. IfFalse(default), the result will always be NULL as soon as any parameter is NULL.referenced_columns: An array of attribute names that are required to run the function. Defaults to[QgsFeatureRequest.ALL_ATTRIBUTES]. Specifying a subset of fields or an empty list will result in a faster execution.params_as_list: Set this toTrueto pass the function parameters as a list. IfFalse(default), the function will receive the parameters as individual arguments.
The function itself takes any number and type of parameters you want to pass to your function. These should be set before the following optional arguments:
feature: the current featureparent: theQgsExpressionobjectcontext: If there is an argument calledcontextfound at the last position, this variable will contain aQgsExpressionContextobject, that gives access to various additional information like expression variables. E.g.context.variable( 'layer_id' )
If those arguments are present in the function signature, they will be automatically passed to the function, without the need to specify them in the expression.
The previous example function can then be used in expressions:
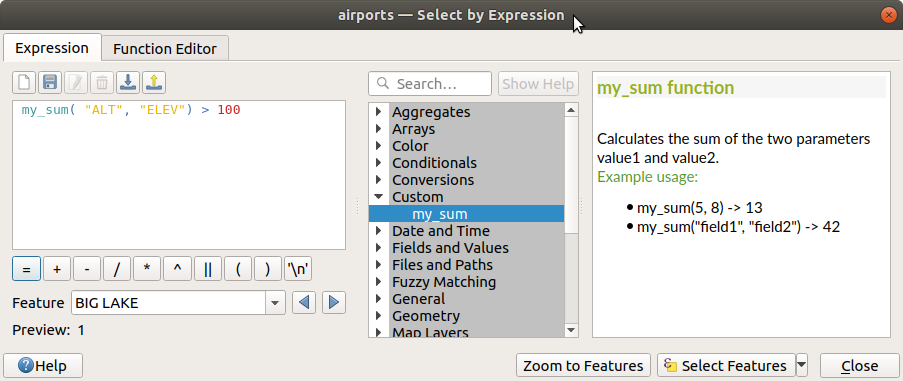
Fig. 9.3 Custom Function added to the Expression tab
Find more examples and additional arguments for custom functions at qgsfunction.
Further information about creating Python code can be found in the
PyQGIS Developer Cookbook.