Important
翻译是一项社区工作:ref:你可以加入<translation_guidelines>。此页面目前翻译进度为 75.70%。
10.3. 设置标注
Labels are textual information you can display on maps. They add details you could not necessarily represent using symbols, and may refer to vector features, raster cells, mesh elements, or simple annotations on the map... Two types of text-related items are available in QGIS:
文本格式: 定义文本的外观,包括 字体、大小、颜色 、 阴影 、 背景 、 描边 等等
它们可用于地图文本 (布局/地图标题、装饰、比例尺等) 的渲染,通常是通过 字体 控件进行操作。
要创建 文本格式 项,请执行以下操作:
Label Settings: extend the text format settings with properties related to the location or the interaction with other texts or features (callouts, placement, overlay, scale visibility, mask ...).
They are used to configure smart labelling for vector and mesh layers through the
 Labels tab of the vector or mesh Layer Properties
dialog or Layer Styling panel or using the Layer
Labeling Options button of the Label toolbar.
Labels tab of the vector or mesh Layer Properties
dialog or Layer Styling panel or using the Layer
Labeling Options button of the Label toolbar.要创建 标注设置 项,请执行以下操作:
打开
 样式管理器 对话框
激活 标注设置 选项卡
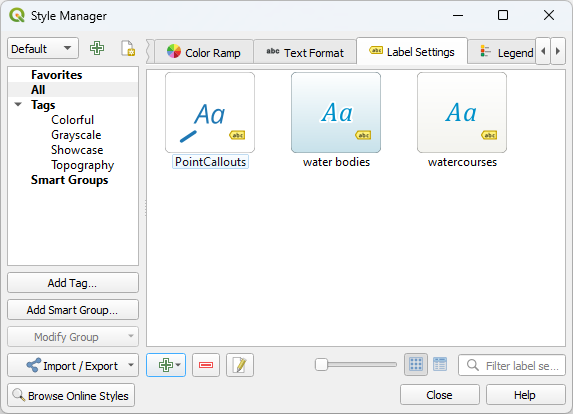
Fig. 10.26 样式管理器对话框中的标注设置
点击
 添加项 菜单,然后选择与要标注的要素的几何图形类型相对应的条目。
此时打开 标注设置 对话框,其中包含以下属性。通常,这些属性是 数据可定义 的。
10.3.1. 格式化标注文本
Whether you are configuring a Text Format or Label Settings item, and depending on the type of layer you are configuring, you will be given the following options:
属性选项卡 |
文本格式 |
标注设置 |
Vector or mesh layer |
raster layer |
|---|---|---|---|---|
文本 |
|
|
|
|
格式 |
|
|
|
|
描边 |
|
|
|
|
掩膜 |
|
|
||
背景 |
|
|
|
|
阴影 |
|
|
|
|
牵引线 |
|
|
||
位置 |
|
|
|
|
渲染 |
|
|
|
Attention
While for legibility, "feature" is the name used below to indicate the item being labeled, depending on the underlying layer type, it can be replaced by "pixel", "face" or "vertex".
10.3.1.1. 文本选项卡
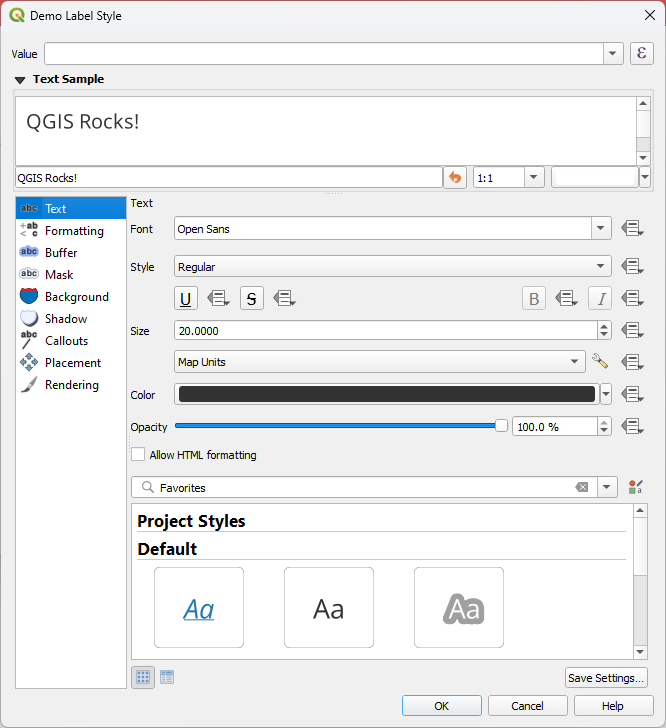
Fig. 10.27 标注设置 - 文本选项卡
在  文本 选项卡,可以设置:
字体: 显示操作系统已安装的字体
样式: 除了常见的字体样式外,还可以设置文本是否添加下划线或删除线
Size: 所有 支持的单位
颜色
不透明度
and Allow HTML Formatting enables the use of a subset of HTML tags and CSS rules to customize the label.
在选项卡的底部,预览控件显示了存储在 样式管理器数据库 中的兼容项的可滤过列表。这允许您根据现有文本格式或标注设置轻松进行配置,还可以将新项保存到样式数据库:点击 保存格式... 或 保存设置... 按钮,并提供名称和标签。
Note
配置 标注设置 项时,文本格式项也可在此控件中使用。选择一个可快速盖写当前标注的 文本属性 。同样,可以从那里创建/盖写文本格式。
Allow HTML Formatting
With Allow HTML Formatting enabled, you need to provide the HTML code in the Value field. Use whitespaces instead of tabs for any kind of indentation. The expression is parsed and any supported HTML tag overrides its corresponding setting in the labels properties. Because it is impossible to list and detail every HTML tag and CSS property that QGIS currently supports, we invite you to explore and test in your labels the ones supported by the underlying Qt library.
Examples of supported HTML tags:
Text formatting, such as italic or bold, e.g.:
<i>QGIS</i> <b>rocks!</b>
Superscript and subscript, where the text will be vertically super or sub aligned and automatically sized to 2/3 of the parent font size. You can also set a fixed font size for the superscript/subscript by including css rules, e.g.:
<sup style="font-size:33pt">my superscript text</sup>
Text horizontal alignment, using either HTML the
align="xxx"attribute orcentertag. For HTML5 compatibility, prefer using the CSS propertytext-align.Attention
Horizontal alignment can not be used for curved labels.
Structuring a block of text using header tags (such as
h1,h2, ...), or paragraphs (withp,div,br):<div class="myDiv"> <h2>QGIS always rocks!!</h2> <p align="center">Let's dive into details of its nice features.</p> </div>
Image insertion: any image format readable by QGIS can be used in HTML label content. It can be served from local file paths, HTTP links, or base64 embedded content, using the
src="xxx"attribute. Image sizes can be specified via thewidth="##"andheight="##"attributes, inpointsunit. If width or height is not specified it will automatically be calculated from the original image size. Images are placed inline only, not as floating images, and not on curved text labels.<img src="qgis.png" width=40 height=60>
Examples of supported CSS properties:
Font properties (
color,font-family,font-size,font-weight,font-style,word-spacing). Note thatword-spacingwill always use unit points.Text decorations such as underline, overline and line-through (
text-decoration)Text alignment (
vertical-align,text-align). Horizontal alignment can not be used for curved labels.Line height, in
pointsorpercentunit, e.g. "line-height: 40pt" or "line-height: 40%"Background properties such as
background-colorandbackground-image. They are supported for block type items (e.g.div) or inline items (e.g.span). For images, the CSS should be formatted asbackground-image: url(xx)and supports local file paths, HTTP links, or base64 embedded content.Attention
Backgrounds are not supported for curved text and are always rendered above any background shape for the label, and below drop shadows/buffers properties.
Margin properties, available for block type items only, such as
div,p,h1,... They can be specified in either the longhand or shorthand way, inpointsunit only. Negative values can be set for the bottom margin.<div class="myDiv"> <h2 style="margin-left: 5pt; margin-right: 10pt">QGIS still rocks...</h2> <p style="margin: 5pt 0pt -10pt 0pt">Thanks to you!!</p> </div>
CSS properties can be set on HTML tags with the style attribute.
The HTML tag span does not apply any formatting to text by itself
and is ideal if you just want to apply CSS styling.
A CSS property name and its value are separated by a colon (:).
Multiple CSS properties are separated by semicolon (;), e.g.:
<span style="text-decoration:underline;text-align:center;color:blue;word-spacing:20">I will be displayed as blue underlined and centered text with increased space between words</span>
下面是基于HTML的表达式和渲染的示例 (对同一标注应用不同的颜色和下划线):
format(
  '<span style="color:blue">%1</span> ( <span style="color:red"><u>%2 ft</u></span> )',
  title( lower( "Name" ) ),
  round($length)
)
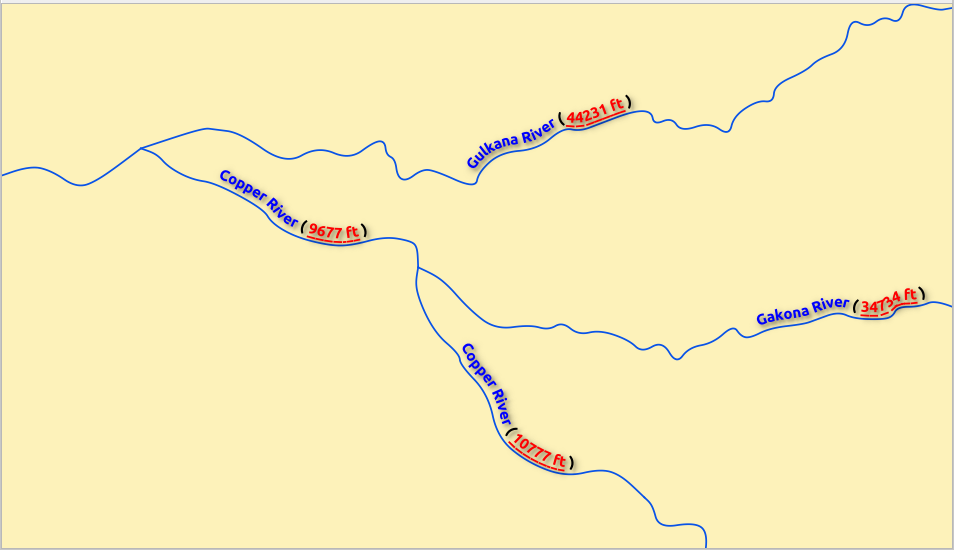
Fig. 10.28 启用HTML格式的标注
10.3.1.2. 格式选项卡
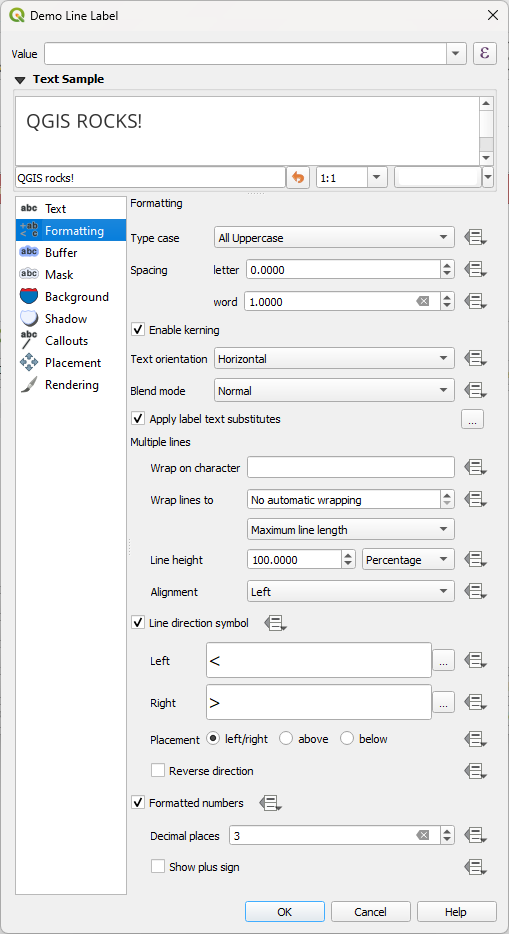
Fig. 10.29 标注设置 - 格式选项卡
在  格式 选项卡,您可以:
使用 类型大小写 选项可以更改文本的大小写样式。可以将文本渲染为:
未更改
全部大写
全部小写
Small Caps: renders lowercase characters as small caps.
All Small Caps: renders all characters as small caps regardless of their original case.
首字母大写: 将每个单词的首字母修改为大写。如果原文使用的是单类型大小写,则将其他字母改为小写;如果文本中是混合类型大小写,则其他字母保持不变。
强制首字母大写: 将每个单词的第一个字母改为大写,并使文本中的其他字母保持不变。
在 间距 中,更改单词之间和单个字母之间的间距。
With Tab distance you can adjust the replacement spacing for Tab characters in the label, in any supported unit. This allows e.g. to properly separate or vertically align elements of a layout legend text.
Pressing the
 Configure tab stops button on the right,
you can add a list of tab positions, instead of a single distance.
This allows e.g. the creation of table-like multiline labels,
where texts are split over different "columns" and lined up nicely,
based on the Tab characters.
Configure tab stops button on the right,
you can add a list of tab positions, instead of a single distance.
This allows e.g. the creation of table-like multiline labels,
where texts are split over different "columns" and lined up nicely,
based on the Tab characters.拉伸 比率:允许文本按因子水平拉伸或压缩。方便调整字体宽度,以便在标注中添加一些额外的文本。
文本字体的
 启用字距调整
设置 文本方向 ,可以是 水平 或 垂直 方向。设置标注时也可以 基于旋转 (例如,在 平行 放置模式下正确标注线要素)。
使用 混合模式 选项确定标注将如何与下方的地图要素混合 (更多信息请参阅 Blending Modes) 。
 应用标注文本替换 选项允许指定要替换要素标注中文本的文本列表 (例如,缩写的街道类型)。在地图上显示标注时使用替换文本。用户还可以导出和导入替换列表,便于重复使用和共享。
配置 多行:
使用 按该字符换行 选项设置一个将强制在文本中换行的字符
使用 换行到 选项设置自动换行的理想线大小。大小可以表示 最长线长度 或 最短线长度 。
决定 行高: 可以将值设置为 毫米 、 点 、 像素 、 百分比 或 英寸 。当行高设置为百分比时,它是该字体族的默认文本行距的百分比。通常是文本大小的 1.2 到 1.5 倍。
对齐 格式: 可用的标准值是 左对齐 、 右对齐 、 两端对齐 和 水平居中 。
设置点标注属性时,文字对齐方式也可以是 跟随标注位置 。在这种情况下,对齐将取决于标注相对于点的最终位置。例如,如果标注放置在点的左侧,标注是右对齐;而如果将其放置在右侧,则为左对齐。
Note
基于曲线的 标注位置 尚不支持 多行 格式设置,这些选项将无效。
对于线标注,可以包含 线方向符号 以帮助确定线方向,其中的符号用于标示 左 或 右 。当与 位置 选项卡中的 弯曲 或 平行 位置选项一起使用时,效果特别好。有些选项可以设置符号位置,也可以
反向 。使用
格式化数字 选项来格式化数字文本。您可以设置 小数位数 。默认情况下,将使用小数点后 3位。如果要为正数显示加号,请勾选 显示加号 复选框。
10.3.1.3. 描边选项卡
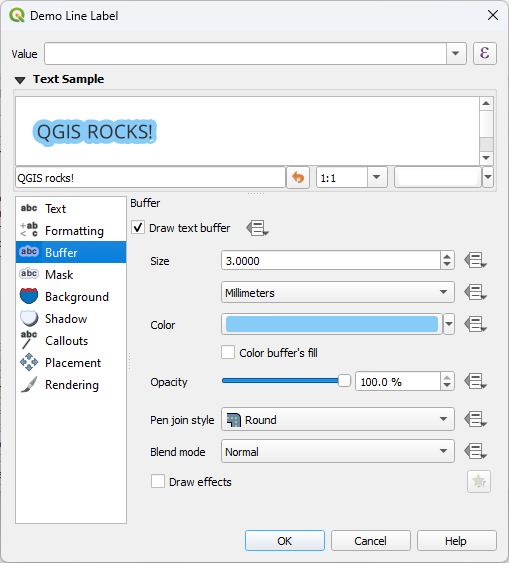
Fig. 10.30 标注设置 - 描边选项卡
要在标注周围创建描边,请激活  描边 选项卡中的 绘制文本描边 复选框。然后,您可以:
以任何 支持单位 设置描边的 大小
选择描边的 颜色
- 使用描边颜色填充文本颜色: 描边从标注轮廓展开,因此,如果该选项被激活,标注的内部将被填充。当使用部分透明标注或使用非正常混合模式时,将允许看到标注文本后面的填充。取消勾选该选项 (使用完全透明的标注时) 将允许创建轮廓文本标注。
定义描边 不透明度
应用 画笔连接样式: 可以是 圆角 、 尖角 或 斜角
使用 混合模式 选项确定标注的描边与下面地图组件将如何搭配 (更多信息,请参阅 Blending Modes) 。
为提高文本可读性,可勾选
绘制效果 以添加高级  绘图效果 ,例如外发光和模糊等。
10.3.1.4. 背景选项卡
 背景 选项卡允许配置位于每个标注下方的形状。若要添加背景,请激活 绘制背景 复选框,然后选择 形状 类型。可以是:
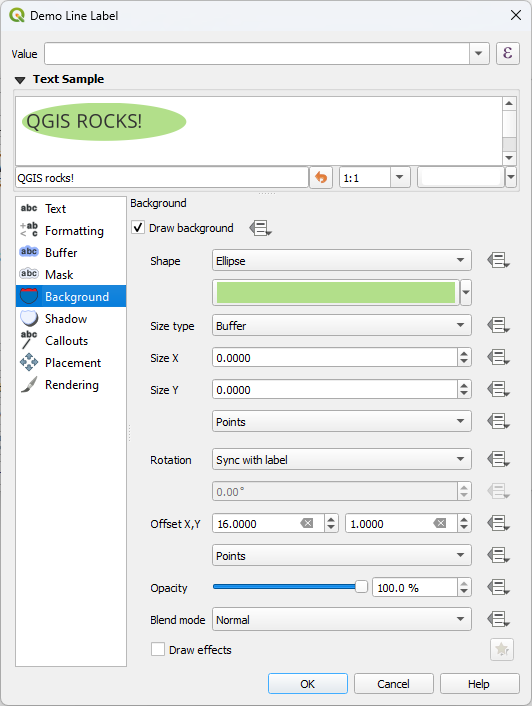
Fig. 10.31 标注设置 - 背景选项卡
根据所选形状,您需要配置以下某些属性:
框架的 大小类型 ,可以是:
固定: 对所有标注使用相同的尺寸,而不考虑文本的大小
或文本边界框上的 描边
框架在X和Y方向的 大小 ,可以使用任何 支持的单位
背景的 旋转角度 ,可以在 与标注同步 、 标注偏移 和 固定 之间选择。最后两个是以度为单位的角度。
偏移 X,Y 是在 X 和/或 Y 方向移动背景项
半径 X,Y 用于使背景形状的角转为圆角 (仅适用于矩形和正方形)
背景的 不透明度
混合模式 用于将背景与渲染中的其他项混合 (请参阅 Blending Modes) 。
对于SVG符号,可以使用其默认属性 (加载符号参数) 或设置自定义 填充颜色 、 描边颜色 和 描边宽度 。
- 绘制效果 添加高级 绘图效果 ,可提高文本可读性,例如外发光和模糊等。
10.3.1.5. 阴影选项卡
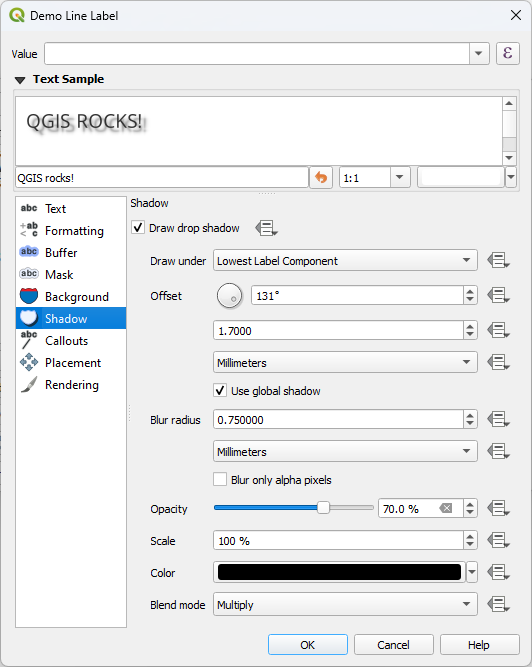
Fig. 10.32 标注设置 - 阴影选项卡
若要向文本添加阴影,请启用  阴影 选项卡,并激活 绘制阴影 。然后可以:
指出在 绘制于 用于生成阴影的项。可以是 最低标注构件 或特定构件,如 文本 本身、 描边 或 背景 。
Set the shadow's Offset from the item being shadowed, ie:
角度:顺时针方向,取决于基础项的方向
The distance of offset from the item being shadowed
偏移的单位
如果勾选
使用全局阴影 复选框,则角度的零点始终指向北,而不是依赖标注项的方向。使用 模糊半径 影响阴影的外观。数字越高,阴影越柔和。以您选择的单位为单位。
定义阴影的 不透明度
使用 比例 因子重缩放阴影的大小
选择阴影的 颜色
使用 混合模式 选项可以确定标注的阴影与其下面的地图构件如何混合 (更多信息,请参阅 Blending Modes) 。
10.3.2. 配置与标注的交互
除了上述文本格式设置外,还可以设置标注之间或与要素的交互方式。
10.3.2.1. 掩膜选项卡
The  Mask tab allows you to define a mask area around
the labels. This feature is very useful when you have overlapping symbols and
labels with similar colors, and you want to make the labels visible. A label mask
prevents specified features from drawing within the boundary set for the mask.
For example, you could set a label mask so that a specified layer does not draw
within 2mm of the label, but allow features from another layer to still show.
Label masks are similar to label buffers in that they allow control of the legibility
of labels that cover other features. The label buffer draws on top of any underlying
features, while the label mask selectively stops other layers from drawing.
Mask tab allows you to define a mask area around
the labels. This feature is very useful when you have overlapping symbols and
labels with similar colors, and you want to make the labels visible. A label mask
prevents specified features from drawing within the boundary set for the mask.
For example, you could set a label mask so that a specified layer does not draw
within 2mm of the label, but allow features from another layer to still show.
Label masks are similar to label buffers in that they allow control of the legibility
of labels that cover other features. The label buffer draws on top of any underlying
features, while the label mask selectively stops other layers from drawing.
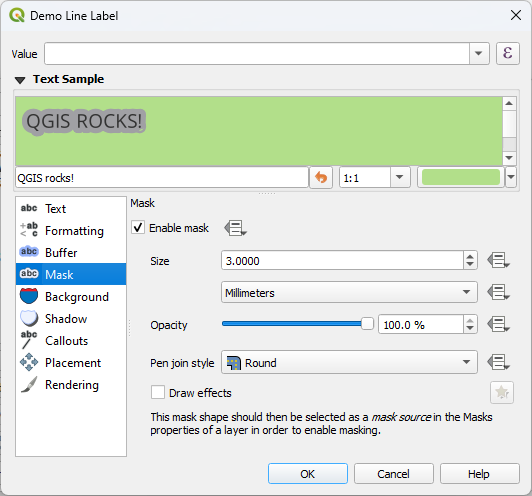
Fig. 10.33 标注设置 - 掩膜选项卡 (文本示例显示绿色背景,表示被排除的另一个图层)
要在标注上创建掩膜效果,请执行以下操作:
激活
选项卡中的 启用掩膜 复选框。然后可以设置:
在重叠图层属性
掩膜 选项卡中选择此掩膜形状作为掩膜源 (请参阅 Masks Properties) 。
10.3.2.2. 牵引线选项卡
在拥挤的地图放置标注时常见的做法是使用 牵引线 - 放置在其关联要素外部 (或从置换) 的标注,是由连接标注和要素的动态线标识组成。如果移动两个端点中的一个 (标注或要素),则会重新计算连接线的形状。
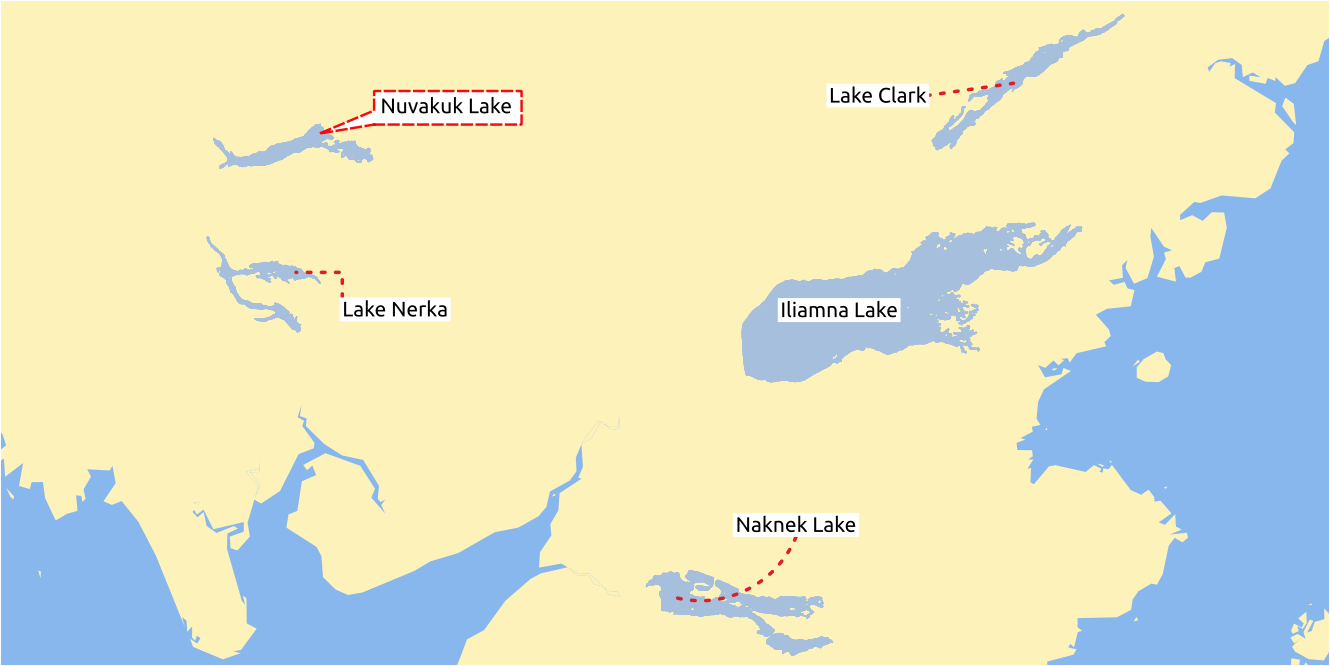
Fig. 10.34 各种牵引线设置的标注
若要向标注添加牵引线,请启用  牵引线 选项卡,并激活 绘制牵引线 。然后您可以:
选择连接的 样式 ,其中之一是:
简单线: 一条直线,最短的路径
曼哈顿样式: 90° 的虚线
曲线: 一条曲线
泡泡式标注: 围绕标注并指向要素的对话泡泡,可以有圆角。
Set the properties of the callout. The following table shows the different properties, with description and compatible connector style.
Table 10.5 Label callout properties Property
Style of callout
描述
Fill style
Balloons
A fill symbol with full display capabilities, including layer effects, data-defined settings, ... for drawing the balloon shape.
Corner radius
Corner radius of the speech bubble
Wedge width
Sets how large the bubble speech connection with feature's pointer should be
Margins
Margins around the label's text, in the unit of your choice
Line style
All but balloons
A line symbol with full display capabilities, including layer effects, data-defined settings, ... for drawing the connector line.
Curvature
Curved lines
The percentage of curvature of the connection line
Orientation
Orientation, starting from the label to the feature. It can be Clockwise, Counter-clockwise, or Automatic (determining an optimal orientation for each label).
Minimum length
All but balloons
Minimum length of the connector line
Draw lines to all feature parts
In case of a multi-part feature, indicates whether a connector line should be drawn from the label to each geometry part.
Label anchor point
Controls where the connector line should join to the label text. Available options:
最近点
质心
边缘固定位置 (左上角 、 顶部居中 、 右上角, 中间靠左 、 中间靠右 、 左下角 、 底部居中 和 右下角) 。
Offset from label area
Controls the distance from the label anchor point (where the callout line ends). This avoids drawing lines right up against the text.
Offset from feature
All
Controls the distance from the feature (or its anchor point if a polygon) where callout lines end. E.g., this avoids drawing lines right up against the edges of the features.
Feature anchor point
Where the connector line ends on the (polygon) feature. Available options:
难抵极点
外部点
表面上的点
质心
End point marker
Balloons
A marker symbol with full display capabilities including layer effects, data-defined, ... for rendering a marker symbol below the endpoint of the balloon callout.
Blend mode
All
Controls the blending of the callout.
在 数据定义位置 组中,可以控制牵引线 原点 (标注侧)和/或 终点 (要素侧)的坐标。也可以使用 标注工具栏 中的
 移动标注、图表或牵引线 工具手动控制牵引线。可以通过这种方式移动每条牵引线的起点和终点。当鼠标指针在附近时,节点应高亮显示。如果需要,可以在移动过程中按住 Shift 键。这将以两条牵引线点之间的角度增加 15 度的方式捕捉点。
10.3.2.3. 位置选项卡
Choose the  Placement tab for configuring label placement
and labeling priority. Note that the placement options differ according to the
type of vector or mesh layer, namely point, line or polygon, and are affected by
the global PAL setting.
Placement tab for configuring label placement
and labeling priority. Note that the placement options differ according to the
type of vector or mesh layer, namely point, line or polygon, and are affected by
the global PAL setting.
点图层的位置
可用的点标注位置模式有:
制图: 按照理想的制图位置规则,生成的点标注与点要素具有良好的视觉关系。标注可以放置在:
从点要素自身或从用于表示要素的符号的边界 (在 距离偏移自 中设置),使用 支持的单位 设置 距离 。后一个选项在符号大小不固定时特别有用,例如,如果是由数据定义的大小或在 类别 渲染器中使用不同符号时的设置。
within a Maximum Distance from the feature, which is an optional setting that allows you to control how far a label can be placed from the feature it's labeling. This works alongside the Distance setting to create a range for label placement, adding flexibility to position labels more effectively, especially on busy maps, ensuring they fit neatly around their corresponding features.
using the Prioritize Placement option, which decides what's more important when placing labels. There are two options:
Prefer closer labels: By default, labels are kept close to the feature.
Prefer position ordering: The label will try to stay in a specific position (like top left or top right), even if it's a bit farther away from the feature. The label only moves to other positions if there's no room within the maximum distance at your preferred position.
following a Position priority which dictates placement candidates for anchoring labels around and (centered) over the point feature, and the order in which the positions are tested. The default order, based on guidelines from Krygier and Wood (2011) and other cartographic textbooks, is as follows:
右上角
左上角
右下角
左下角
中间靠右
中间靠左
顶部, 稍右
底部, 稍左。
Using the
 Data-defined override button,
you can provide a comma separated list of placements in order of priority.
This also allows only certain placements to be used, for certain features only,
so e.g., for coastal features you can prevent labels being placed over the land.
Data-defined override button,
you can provide a comma separated list of placements in order of priority.
This also allows only certain placements to be used, for certain features only,
so e.g., for coastal features you can prevent labels being placed over the land.
Around Point: labels are placed in a circle around the feature with an equal radius set in Distance. Additionally you can set Maximum Distance from the feature, to control how far a label can be placed from the feature it's labeling. The placement priority is clockwise from the "top right". The position can be constrained using the data-defined Quadrant option.
从点偏移: 标注可以使用不同单位放置在距点要素的 偏移 X,Y 距离处,或者最好放置在要素上方。可以使用数据定义的 象限 来约束放置,也可以为标注指定 旋转角度 。
线图层的位置
线图层的标注模式包括:
平行: 绘制与表示要素的广义线平行的标注,优先放置在线的较直部分上。您可以定义:
允许的位置: 线上方 、 线中间 、 线下方 和 位置依赖于线朝向 (将标注放置在线的左侧或右侧)。可以同时选择多个选项,在此情况下,QGIS将寻找最佳标注位置。
距离: 标注和线之间的距离
弯曲: 沿线要素的曲率绘制标注。除了 平行 模式提供的参数外,还可以设置 弯曲字符之间的最大角度 (里面或外面)。
水平: 沿线要素的长度水平绘制标注。
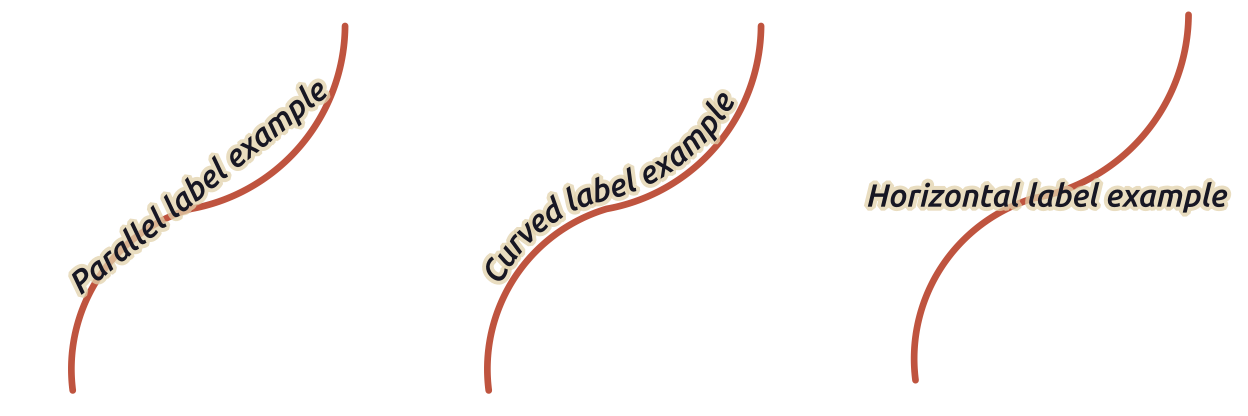
Fig. 10.35 线的标注放置示例
在放置模式的其他地方,可以设置:
重复标注 距离 在要素长度上显示重复标注 。距离可以是
毫米、点、像素、比例米、地图单位和英寸。标注溢出 距离 (不适用于水平模式): 指定标注可能经过线要素的终点 (或起点) 的最大允许距离。增加此值可以允许为较短线要素显示标注。
标注定位: 控制标注沿其所参照的线要素的位置。单击 设置 ... 并选择:
标注将靠近的沿线位置 (比值表示)。可以是数据定义的,值为:
 线中间
线中间 线开始端
线开始端 线末端
线末端或者
 自定义... 。
裁剪: 确定如何计算标注在线上的位置。默认只使用线的可见范围,但可以使用整个范围以获得更一致的结果。
文本锚点: 控制文本的哪一部分 (开头、中心或结尾) 与锚点对齐。使用 自动 锚点意味着:
对于定位在线起点附近 (0-25%) 的标注,锚位置将是标注文本的 开头
对于定位在线末端附近 (75-100%) 的标注,锚位置将是标注文本的 结尾
对于定位在线中心附近 (25-75%) 的标注,锚位置将是标注文本的 中心
放置行为: 使用 首选位置提示 仅将标注锚视为标注位置的提示。通过选择 精确 ,标注将精准地放置在标注锚上。
多边形图层的位置
可以选择以下模式之一来放置多边形的标注:
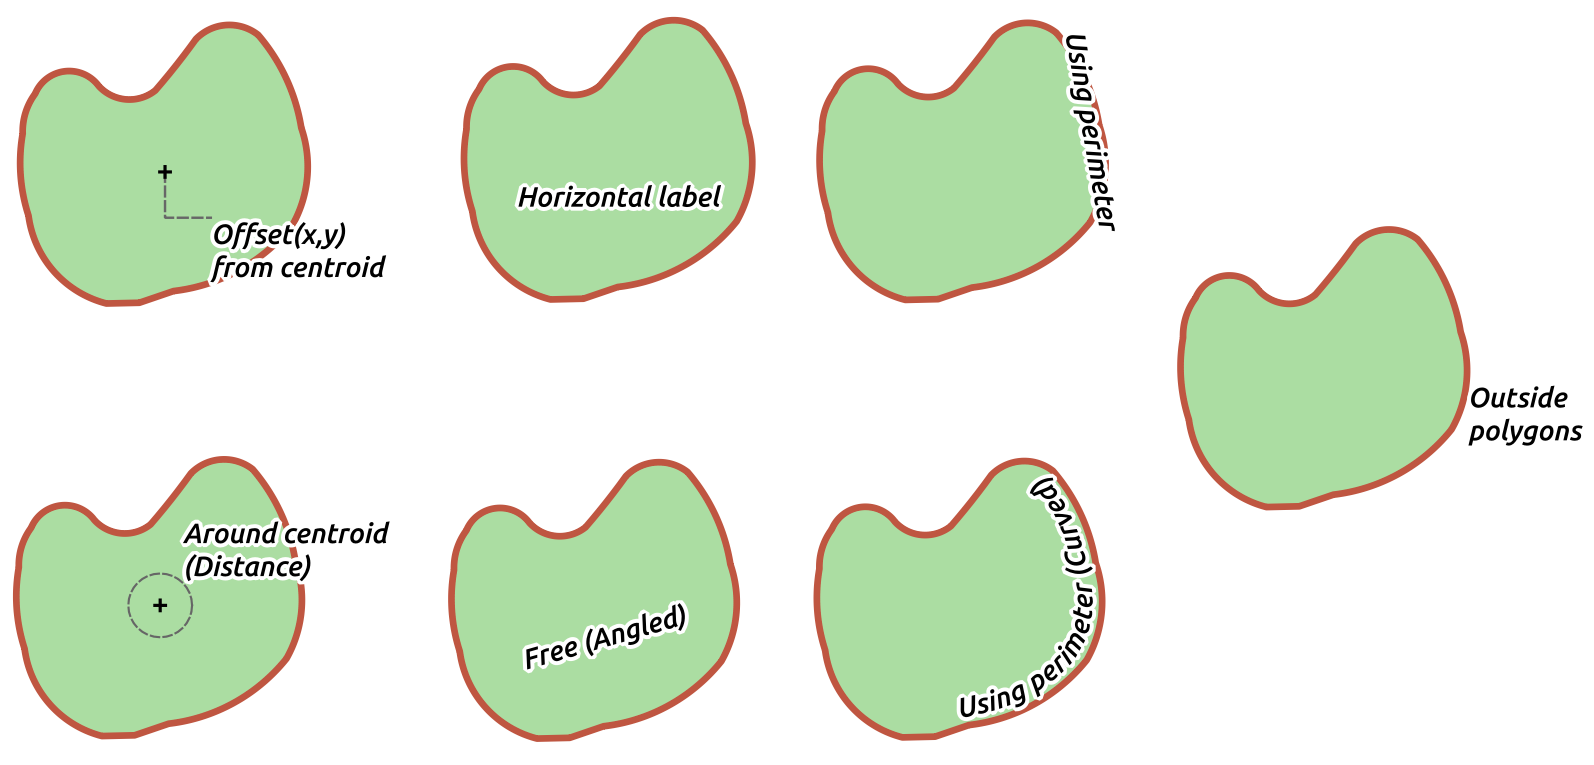
Fig. 10.36 多边形的标注放置示例
从质心偏移: 标注放置在要素质心上或与质心固定的 偏移 X,Y 距离 ( 支持单位) 。无论是否可见,参照质心可以根据地图画布中渲染的部分多边形 (可见多边形) 或 整个多边形 来确定。您还可以:
强制质心点位于其多边形内部
将标注放置在指定的象限内
指定旋转角度
当无法将标注放置在多边形内部时, 允许在多边形之外放置标注 。由于具有数据定义的属性,因此可以允许外部标注、阻止外部标注,或逐个要素强制外部标注。
质心周围: 将标注放置在质心周围的预设距离内,首选是直接放置在质心上。同样,可以定义质心是 可见多边形 还是 整个多边形 ,以及是否强制质心点位于多边形内部。
水平: 在多边形内部的最佳位置放置水平标注。首选位置是远离多边形的边缘。可以 允许在多边形之外放置标注 。
自由 (斜置): 将旋转后的标注放置在多边形内的最佳位置。旋转遵循多边形的方向,并且首选位置是远离多边形的边缘。可以 允许在多边形之外放置标注 。
使用边界线: 绘制与表示多边形边界线的广义线平行的标注,优先选择边界线较直的部分。您可以定义:
允许的位置: 线上方 、 线中间 、 线下方 和 位置依赖于线朝向 (将标注放置在多边形边界的左侧或右侧)。可以同时选择多个选项,在此情况下,QGIS将寻找最佳标注位置。
标注和多边形轮廓之间的 距离
重复标注 的 距离 可在周长范围内多次显示标注。
使用边界线 (弯曲): 根据多边形边界的曲率绘制标注。除了 使用边界线 模式中可用的参数外,还可以设置 弯曲字符多边形之间的最大角度 (里面或外面)。
多边形外侧: 始终以设置的 距离 将标注放置在多边形外部。
常规位置设置
某些标注位置的设置可用于所有图层几何图形类型:
Label Spacing
The Label Spacing option allows you to set the margin around the label,
preventing all other labels from being placed within that area.
You can dynamically control Margin around label using
the Data-defined override button.
Choose unit from the unit selector, and there you can also adjust scaling range.
Attention
This option is only available on QGIS installed with GEOS >= 3.10 (see menu).
Duplicate Labels
Use Avoid duplicate labels to improve label appearance in situations like road networks,
where features such as dual carriageways or service roads can result in many identical labels appearing close together.
When active, it prevents placing labels with the exact same text (case-sensitive)
closer than the minimum distance defined in the Settings... option.
The setting applies across layers, so duplicate text from any layer will be considered.
Attention
This option is only available on QGIS installed with GEOS >= 3.10 (see menu).
几何图形生成器
The Geometry Generator section allows a user to alter the underlying geometry used to place and render the label, by using expressions. This can be useful to perform displacement of the geometry dynamically or to convert it to another geometry (type).
要使用几何图形生成器:
勾选
几何图形生成器 选项输入生成要依赖的几何图形的表达式
如果必要的话,请选择表达式输出的几何图形类型:标注基于几何图形的设置 (如位置或渲染) 将更新,以匹配新的几何图形类型的功能。
一些使用案例:
使用保存在另一字段 "label_position" 中的几何图形
使用符号中 生成的几何图形 进行标注
使用 @map_scale 变量计算与缩放层级无关的距离/大小。
结合曲线放置模式,可以围绕点要素创建环形标注:
exterior_ring(make_circle($geometry, 20))
在线要素的起点和终点添加标注:
collect_geometries( start_point($geometry), end_point($geometry) )
依赖平滑的河流线获取更多标注放置的空间:
smooth( $geometry, iterations:=30, offset:=0.25, min_length:=10 )
由数据定义
数据定义 组可在逐个要素的基础上直接控制标注的位置。依赖于其属性或表达式来设置:
X 和 Y 坐标
以上设置的自定义位置上的文本对齐方式为:
水平: 可以是 左边 、 中间 或 右边
文本 垂直: 可以是 Bottom 、 Base 、 Half 、 Cap 或 Top
the text Rotation. Rotation is defined as clockwise angle with 0° pointing in the direction of East for
Horizontaloriented text and with 0° pointing in North direction forVerticaloriented text. Different units can be defined for the labeling rotation (e.g.degrees,minutes of arc,turns). QGIS prioritizes screen display rotation angles by default and always rotates text to be most readable on screen, so "upside-down" rotation angles are overridden while rendering. To change this behavior and force QGIS to render exact data-defined rotation angles there is an option in Rendering tab, under
Show upside-down labels.
Check the Preserve data rotation values entry if you want to keep
the rotation value in the associated field and apply it to the label, whether
the label is pinned or not. If unchecked, unpinning the label rotation is
reset and its value cleared from the attribute table.
Rendering tab, under
Show upside-down labels.
Check the Preserve data rotation values entry if you want to keep
the rotation value in the associated field and apply it to the label, whether
the label is pinned or not. If unchecked, unpinning the label rotation is
reset and its value cleared from the attribute table.Note
目前仅 质心周围 位置模式支持使用多边形要素的数据定义旋转。
优先级
在 优先级 部件,您可以定义每个标注的位置优先级等级,即如果同一位置有不同的候选图表或标注,则会显示优先级较高的项,而其他项可能会被忽略。
优先级等级还用于评估标注是否由于加权 障碍要素 较大而被省略。
障碍
在某些情况下 (例如,高密度标注、重叠要素等),标注的位置可能导致标注被放置在不相关的要素上。
障碍是QGIS避免放置其他要素标注或图表的要素。可以通过 障碍 部件进行控制:
激活
要素充当障碍 选项,以确定图层的要素应充当任何标注和图表 (包括同一图层中其他要素的项) 的障碍。您可以使用选项旁边的
数据定义重写 控件来选择要用作障碍的要素子集,而不是整个图层。使用 设置 按钮可以调整障碍的权重。
对于每个潜在的障碍要素,您可以指配 障碍权重: 任何位置优先级等级高于该值的 标注 或 图表 都可以放置。如果无法进行其他放置,将忽略级别较低的标注或图表。
此权重也可以由数据定义,因此在同一图层中,某些要素比其他要素更有可能被覆盖。
对于多边形图层,您可以选择要素的障碍类型:
越过要素内部: 避免在多边形内部放置标注 (最好将标注完全放置在多边形外部或只是略微位于多边形内部)
或 越过要素边界: 避免在多边形边界上放置标注 (最好在多边形外部或完全在多边形内部放置标注)。这对于要素覆盖整个区域的图层 (行政单位、分类覆盖范围等) 非常有用。在此情况下,无法避免在这些要素中放置标注,并且避免将标注放置在要素之间的边界上时看起来会更好。
10.3.2.4. 渲染选项卡
在 渲染 选项卡,可以调整何时渲染标注,及其与其他标注和要素的交互。
标注选项
在 标注选项 下:
您可以找到 基于比例 和 基于像素大小 的可见性设置。
标注 Z 索引 确定了标注的渲染顺序,以及与图层中其他要素标注的关系 (使用数据定义覆写表达式),就像与其他图层中的标注一样。具有较高Z索引的标注渲染在较低Z索引的 (来自任何图层) 标注之上。
此外,还对逻辑进行了调整,如果两个标注具有匹配的Z索引,则:
如果来自同一图层,则较小的标注将绘制在较大的标注之上
如果来自不同的图层,标注将按照与图层本身相同的顺序绘制 (即遵循地图图例中设置的顺序)。
Note
此设置不会使标注绘制在其他图层的要素之下,而只是控制在所有图层的要素之上绘制标注的顺序。
允许下级回退位置: 默认QGIS会根据您的设置,尝试以最佳位置渲染标注。如果没有其他选择,请勾选此模式允许要素回退到较次的位置选项,例如,当线太短而无法容纳弯曲的标注文本时,标注可能会水平放置在要素的中心点之上。
使用 显示标注 和 始终显示 中的数据定义表达式,可以微调应渲染的标注。
Allow to Show upside-down labels: alternatives are never, when rotation defined or always.
never - default setting, screen readability is prioritized,
when rotation defined - label rotation should be defined under
Placement tab,
within the Data Defined groupalways - upside-down labels are allowed
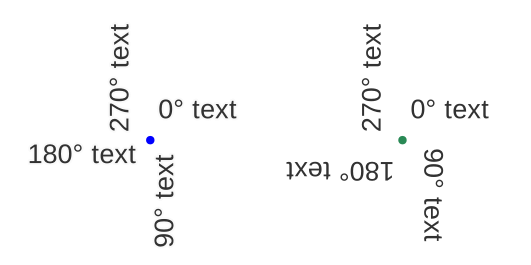
Fig. 10.37 Data defined label rotation with show upside-down labels option set to: "never" (left), "when rotation defined" (right)
使用 重叠标注 组可以控制图层中的要素是否允许重叠标注,以及如何处理这些标注:
绝不重叠: 绝不为图层放置重叠的标注,即使某些标注将会丢失。
如果需要允许重叠: 如果无法以其他方式放置标注,那么就绘制重叠标注。如有可能,此模式将导致标注移动到不太理想的位置,例如,标注将远离线或多边形的中心,这样做的目的是避免标注重叠。但是,如果没有其他理想的位置,那么就绘制重叠的标注。
允许重叠而不丢失: 标注是否与其他标注或障碍重叠并不重要,只要这样做就可以了,并且应该始终使用最佳位置 (例如,最中心的位置),即使处于较远的位置,从而完全避免重叠。
允许重叠标注和回退位置选项将确保图层中的所有要素都被标记... 不一定是最佳渲染!
要素选项
在 要素选项 下:
可以选择 标注多部件要素的每个部件 和 限制要标注的要素数量为 。
线和多边形图层都提供了使用 小于如下尺寸的要素禁止标注 的选项,目的是为要标注的要素设置最小尺寸。
对于多边形要素,还可以根据标注是否完全适合其要素,过滤显示的标注。
对于线要素,可以选择 合并相连的线以防止重复标注 ,并结合 位置 选项卡中的 距离 或 重复 选项来渲染非常优美的地图。