Ważne
Tłumaczenie jest wysiłkiem społeczności QGISa przyłącz się. Ta strona jest obecnie przetłumaczona w 53.26%.
24.1.21. Vector creation
24.1.21.1. Array of offset (parallel) lines
Creates copies of line features in a layer, by creating multiple offset versions of each feature. Each new version is incrementally offset by a specified distance.
Positive distance will offset lines to the left, and negative distances will offset them to the right.
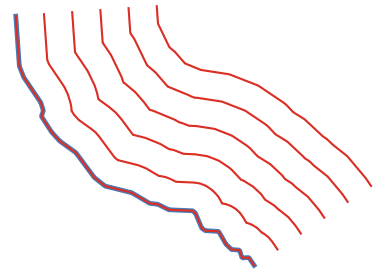
Rys. 24.45 In blue the source layer, in red the offset one
 Allows features in-place modification
of line features
Allows features in-place modification
of line features
Ostrzeżenie
This algorithm drops existing primary keys or FID values and regenerates them in output layers.
Zobacz także
Parametry
Parametry podstawowe
Etykieta |
Nazwa |
Typ |
Opis |
|---|---|---|---|
Warstwa wejściowa |
|
[vector: line] |
Input line vector layer to use for the offsets. |
Number of features to create |
|
[numeric: integer] Domyślnie: 10 |
Number of offset copies to generate for each feature |
Offset step distance |
|
[numeric: double] Domyślnie: 1.0 |
Distance between two consecutive offset copies |
Offset lines |
|
[vector: line] Default: |
Specify the output line layer with offset features. One of:
The file encoding can also be changed here. |

Parametry zaawansowane
Etykieta |
Nazwa |
Typ |
Opis |
|---|---|---|---|
Segmenty |
|
[numeric: double] Domyślnie: 8 |
Number of line segments to use to approximate a quarter circle when creating rounded offsets |
Join style |
|
[wyliczenie] Domyślnie: 0 |
Specify whether round, miter or beveled joins should be used when offsetting corners in a line. One of:

Rys. 24.46 Round, miter, and bevel join styles |
Miter limit |
|
[numeric: double] Domyślnie: 2.0 |
Sets the maximum distance from the offset geometry to use when creating a mitered join as a factor of the offset distance (only applicable for miter join styles). Minimum: 1.0 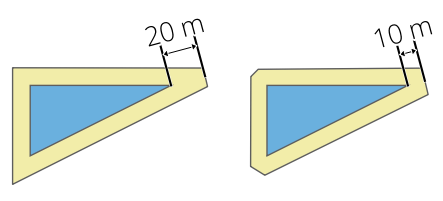
Rys. 24.47 A 10m buffer with a limit of 2 and a 10m buffer with a limit of 1 |
Wyniki
Etykieta |
Nazwa |
Typ |
Opis |
|---|---|---|---|
Offset lines |
|
[vector: line] |
Output line layer with the original and offset features.
Attributes will be copied to the corresponding outputs.
The following attributes related to the input parameters will be added:
|
Kod pythona
ID algorytmu: native:arrayoffsetlines
import processing
processing.run("algorithm_id", {parameter_dictionary})
The algorithm id is displayed when you hover over the algorithm in the Processing Toolbox. The parameter dictionary provides the parameter NAMEs and values. See Using processing algorithms from the console for details on how to run processing algorithms from the Python console.
24.1.21.2. Array of translated features
Creates copies of features in a layer by creating multiple translated versions of each. Each copy is incrementally displaced by a preset amount in the X, Y and/or Z axis.
M values present in the geometry can also be translated.
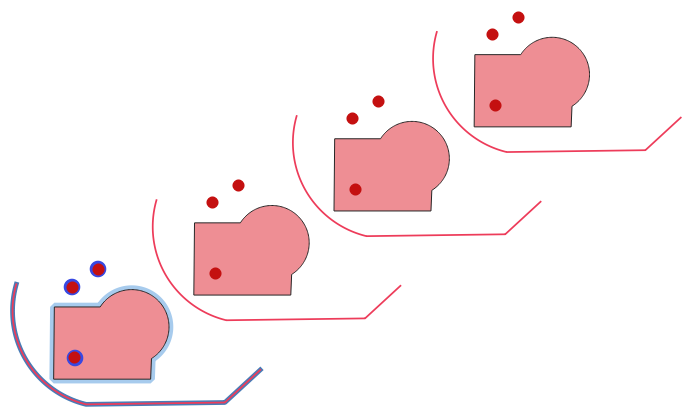
Rys. 24.48 Input layers in blue tones, output layers with translated features in red tones
Allows
features in-place modification
of point, line, and polygon features
Ostrzeżenie
This algorithm drops existing primary keys or FID values and regenerates them in output layers.
Zobacz także
Parametry
Etykieta |
Nazwa |
Typ |
Opis |
|---|---|---|---|
Warstwa wejściowa |
|
[vector: geometry] |
Input vector layer to translate |
Number of features to create |
|
[numeric: integer] Domyślnie: 10 |
Number of copies to generate for each feature |
Step distance (x-axis) |
|
[numeric: double] Domyślnie: 0.0 |
Displacement to apply on the X axis |
Step distance (y-axis) |
|
[numeric: double] Domyślnie: 0.0 |
Displacement to apply on the Y axis |
Step distance (z-axis) |
|
[numeric: double] Domyślnie: 0.0 |
Displacement to apply on the Z axis |
Step distance (m values) |
|
[numeric: double] Domyślnie: 0.0 |
Displacement to apply on M |
Przetłumaczone |
|
[same as input] Default: |
Output vector layer with translated (moved) copies of the features. The original features are also copied. One of:
The file encoding can also be changed here. |
Wyniki
Etykieta |
Nazwa |
Typ |
Opis |
|---|---|---|---|
Przetłumaczone |
|
[same as input] |
Output vector layer with translated (moved) copies of the features. The original features are also copied. |
Kod pythona
ID algorytmu: native:arraytranslatedfeatures
import processing
processing.run("algorithm_id", {parameter_dictionary})
The algorithm id is displayed when you hover over the algorithm in the Processing Toolbox. The parameter dictionary provides the parameter NAMEs and values. See Using processing algorithms from the console for details on how to run processing algorithms from the Python console.
24.1.21.3. Create grid
Creates a vector layer with a grid covering a given extent. Grid cells can have different shapes:
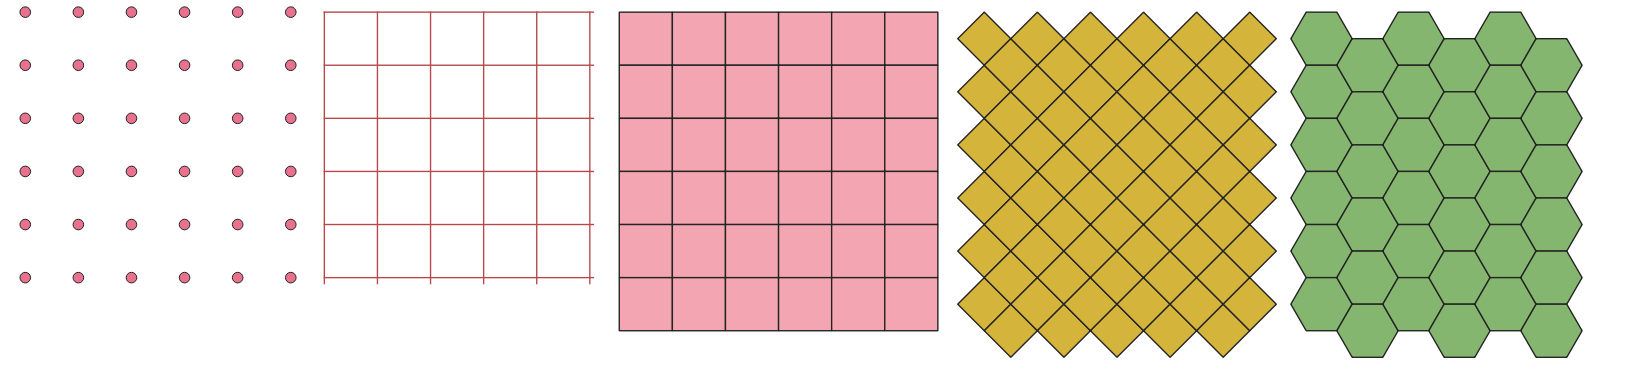
Rys. 24.49 Different grid cell shapes applied to the same extent, without overlaps
The size and/or placement of each element in the grid is defined using a horizontal and vertical spacing. The CRS of the output layer must be defined. The grid extent and the spacing values must be expressed in the coordinates and units of this CRS.
Default menu:
Parametry
Etykieta |
Nazwa |
Typ |
Opis |
|---|---|---|---|
Grid type |
|
[wyliczenie] Domyślnie: 0 |
Shape of the grid. One of:
|
Grid extent |
|
[zasięg] |
Extent of the grid Available methods are:
|
Horizontal spacing |
|
[numeric: double] Domyślnie: 1.0 |
Size of a grid cell on the X-axis |
Vertical spacing |
|
[numeric: double] Domyślnie: 1.0 |
Size of a grid cell on the Y-axis |
Horizontal overlay |
|
[numeric: double] Domyślnie: 0.0 |
Overlay distance between two consecutive grid cells on the X-axis |
Vertical overlay |
|
[numeric: double] Domyślnie: 0.0 |
Overlay distance between two consecutive grid cells on the Y-axis |
Grid CRS |
|
[układ współrzędnych] Default: Project CRS |
Coordinate reference system to apply to the grid |
Grid |
|
[vector: geometry] Default: |
Resulting vector grid layer. One of:
The file encoding can also be changed here. |
Wyniki
Etykieta |
Nazwa |
Typ |
Opis |
|---|---|---|---|
Grid |
|
[vector: geometry] |
Resulting vector grid layer. The output geometry type (point, line or polygon) depends on the Grid type. Features are created from top to bottom, left to right. The attribute table is filled with:
|
Kod pythona
ID algorytmu: native:creategrid
import processing
processing.run("algorithm_id", {parameter_dictionary})
The algorithm id is displayed when you hover over the algorithm in the Processing Toolbox. The parameter dictionary provides the parameter NAMEs and values. See Using processing algorithms from the console for details on how to run processing algorithms from the Python console.
24.1.21.4. Create points layer from table
Creates points layer from a table with columns that contain coordinates fields.
Besides X and Y coordinates you can also specify Z and M fields.
Ostrzeżenie
This algorithm drops existing primary keys or FID values and regenerates them in output layers.
Parametry
Etykieta |
Nazwa |
Typ |
Opis |
|---|---|---|---|
Warstwa wejściowa |
|
[vector: any] |
Input vector layer or a table. |
X field |
|
[tablefield: any] |
Field containing the X coordinate |
Y field |
|
[tablefield: any] |
Field containing the Y coordinate |
Z field Opcjonalne |
|
[tablefield: any] |
Field containing the Z coordinate |
M field Opcjonalne |
|
[tablefield: any] |
Field containing the M value |
Target CRS |
|
[układ współrzędnych] Domyślnie: |
Coordinate reference system to use for layer. The provided coordinates are assumed to be compliant. |
Points from table |
|
[vector: point] Default: |
Specify the resulting point layer. One of:
The file encoding can also be changed here. |
Wyniki
Etykieta |
Nazwa |
Typ |
Opis |
|---|---|---|---|
Points from table |
|
[vector: point] |
The resulting point layer |
Kod pythona
ID algorytmu: native:createpointslayerfromtable
import processing
processing.run("algorithm_id", {parameter_dictionary})
The algorithm id is displayed when you hover over the algorithm in the Processing Toolbox. The parameter dictionary provides the parameter NAMEs and values. See Using processing algorithms from the console for details on how to run processing algorithms from the Python console.
24.1.21.5. Generate points (pixel centroids) along line
Generates a point vector layer from an input raster and line layer.
The points correspond to the pixel centroids that intersect the line layer.
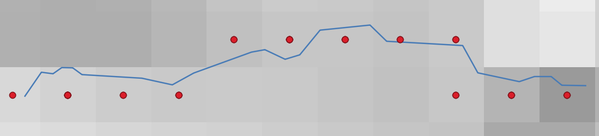
Rys. 24.50 Points of the pixel centroids
Parametry
Etykieta |
Nazwa |
Typ |
Opis |
|---|---|---|---|
Raster layer |
|
[raster] |
Input raster layer |
Vector layer |
|
[vector: line] |
Input line vector layer |
Points along line |
|
[vector: point] Default: |
Resulting point layer with pixel centroids. One of:
The file encoding can also be changed here. |
Wyniki
Etykieta |
Nazwa |
Typ |
Opis |
|---|---|---|---|
Points along line |
|
[vector: point] |
Resulting point layer with pixel centroids |
Kod pythona
ID algorytmu: qgis:generatepointspixelcentroidsalongline
import processing
processing.run("algorithm_id", {parameter_dictionary})
The algorithm id is displayed when you hover over the algorithm in the Processing Toolbox. The parameter dictionary provides the parameter NAMEs and values. See Using processing algorithms from the console for details on how to run processing algorithms from the Python console.
24.1.21.6. Generate points (pixel centroids) inside polygon
Generates a point vector layer from an input raster and polygon layer.
The points correspond to the pixel centroids that intersect the polygon layer.
Ostrzeżenie
This algorithm drops existing primary keys or FID values and regenerates them in output layers.
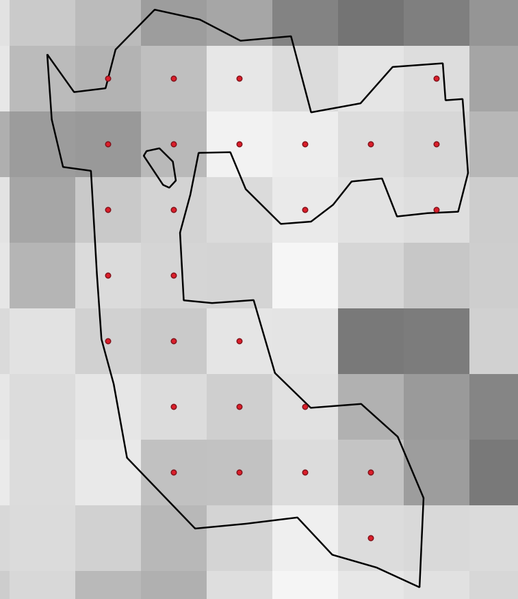
Rys. 24.51 Points of the pixel centroids
Parametry
Etykieta |
Nazwa |
Typ |
Opis |
|---|---|---|---|
Raster layer |
|
[raster] |
Input raster layer |
Vector layer |
|
[vector: polygon] |
Input polygon vector layer |
Points inside polygons |
|
[vector: point] Default: |
Resulting point layer of pixel centroids. One of:
The file encoding can also be changed here. |
Wyniki
Etykieta |
Nazwa |
Typ |
Opis |
|---|---|---|---|
Points inside polygons |
|
[vector: point] |
Resulting point layer of pixel centroids |
Kod pythona
ID algorytmu: native:generatepointspixelcentroidsinsidepolygons
import processing
processing.run("algorithm_id", {parameter_dictionary})
The algorithm id is displayed when you hover over the algorithm in the Processing Toolbox. The parameter dictionary provides the parameter NAMEs and values. See Using processing algorithms from the console for details on how to run processing algorithms from the Python console.
24.1.21.7. Import geotagged photos
Creates a point layer corresponding to the geotagged locations from JPEG or HEIC/HEIF images from a source folder.
The point layer will contain a single PointZ feature per input file from which the geotags could be read. Any altitude information from the geotags will be used to set the point’s Z value.
Besides longitude and latitude also altitude, direction and timestamp information, if present in the photo, will be added to the point as attributes.
Parametry
Etykieta |
Nazwa |
Typ |
Opis |
|---|---|---|---|
Input folder |
|
[folder] |
Path to the source folder containing the geotagged photos |
Scan recursively |
|
[wartość logiczna] Domyślnie: False |
If checked, the folder and its subfolders will be scanned |
Zdjęcia Opcjonalne |
|
[vector: point] Default: |
Specify the point vector layer for the geotagged photos. One of:
The file encoding can also be changed here. |
Invalid photos table Opcjonalne |
|
[vector: table] Default: |
Specify the table of unreadable or non-geotagged photos. One of:
The file encoding can also be changed here. |
Wyniki
Etykieta |
Nazwa |
Typ |
Opis |
|---|---|---|---|
Zdjęcia |
|
[vector: point] |
Point vector layer with geotagged photos. The form of the layer is automatically filled with paths and photo previews settings. |
Invalid photos table Opcjonalne |
|
[vector: table] |
Table of unreadable or non-geotagged photos can also be created. |
Kod pythona
ID algorytmu: native:importphotos
import processing
processing.run("algorithm_id", {parameter_dictionary})
The algorithm id is displayed when you hover over the algorithm in the Processing Toolbox. The parameter dictionary provides the parameter NAMEs and values. See Using processing algorithms from the console for details on how to run processing algorithms from the Python console.
24.1.21.8. Points to path
Converts a point layer to a line layer, by joining points in an order defined by an expression or a field in the input point layer.
Points can be grouped by a field or an expression to distinguish line features.
In addition to the line vector layer, a text file is output that describes the resulting line as a start point and a sequence of bearings / directions (relative to azimuth) and distances.
Informacja
This algorithm uses ellipsoid based measurements and respects the current ellipsoid settings.
Parametry
Etykieta |
Nazwa |
Typ |
Opis |
|---|---|---|---|
Input point layer |
|
[vector: point] |
Input point vector layer |
Create closed paths |
|
[wartość logiczna] Domyślnie: False |
If checked, the first and last points of the line will be connected and close the generated path |
Order expression Opcjonalne |
|
[wyrażenie] |
Field or expression providing the order to connect the points in the path.
If not set, the feature ID ( |
Sort text containing numbers naturally |
|
[wartość logiczna] Domyślnie: False |
If checked, naturally sorts the features based on the provided expression (i.e., «a9» < «a10»). |
Path group expression Opcjonalne |
|
[wyrażenie] |
Point features of the same value in the field or expression will be grouped in the same line. If not set, a single path is drawn with all the input points. |
Ścieżki |
|
[vector: line] Default: |
Specify the line vector layer of the path. One of:
The file encoding can also be changed here. |
Directory for text output Opcjonalne |
|
[folder] Default: |
Specify the directory that will contain the description files of points and paths. One of:
|
Wyniki
Etykieta |
Nazwa |
Typ |
Opis |
|---|---|---|---|
Ścieżki |
|
[vector: line] |
Line vector layer of the path |
Directory for text output |
|
[folder] |
Directory containing description files of points and paths |
Kod pythona
ID algorytmu: native:pointstopath
import processing
processing.run("algorithm_id", {parameter_dictionary})
The algorithm id is displayed when you hover over the algorithm in the Processing Toolbox. The parameter dictionary provides the parameter NAMEs and values. See Using processing algorithms from the console for details on how to run processing algorithms from the Python console.
24.1.21.9. Random points along line
Creates a new point layer, with points placed on the lines of another layer.
For each line in the input layer, a given number of points is added to the resulting layer. The procedure for adding a point is to:
randomly select a line feature from the input layer
if the feature is multi-part, randomly select a part of it
randomly select a segment of that line
randomly select a position on that segment.
The procedure means that curved parts of the lines (with relatively short segments) will get more points than straight parts (with relatively long segments), as demonstrated in the illustration below, where the output of the Random points along lines algorithm can be compared with the output of the Random points on lines algorithm (that produces points with an, on average, even distribution along the lines).

Rys. 24.52 Example algorithm output. Left: Random points along line, right: Random points on lines
A minimum distance can be specified, to avoid points being too close to each other.
Ostrzeżenie
This algorithm drops existing primary keys or FID values and regenerates them in output layers.
Zobacz także
Parametry
Etykieta |
Nazwa |
Typ |
Opis |
|---|---|---|---|
Input point layer |
|
[vector: line] |
Input line vector layer |
Number of points |
|
[numeric: integer] Domyślnie: 1 |
Number of points to create |
Minimum distance between points |
|
[numeric: double] Domyślnie: 0.0 |
The minimum distance between points |
Random points |
|
[vector: point] Default: |
The output random points. One of:
The file encoding can also be changed here. |
Wyniki
Etykieta |
Nazwa |
Typ |
Opis |
|---|---|---|---|
Random points |
|
[vector: point] |
The output random points layer. |
Kod pythona
ID algorytmu: qgis:qgisrandompointsalongline
import processing
processing.run("algorithm_id", {parameter_dictionary})
The algorithm id is displayed when you hover over the algorithm in the Processing Toolbox. The parameter dictionary provides the parameter NAMEs and values. See Using processing algorithms from the console for details on how to run processing algorithms from the Python console.
24.1.21.10. Random points in extent
Creates a new point layer with a given number of random points, all of them within a given extent.
A distance factor can be specified, to avoid points being too close to each other. If the minimum distance between points makes it impossible to create new points, either distance can be decreased or the maximum number of attempts may be increased.
Default menu:
Parametry
Parametry podstawowe
Etykieta |
Nazwa |
Typ |
Opis |
|---|---|---|---|
Input extent |
|
[zasięg] |
Map extent for the random points Available methods are:
|
Number of points |
|
[numeric: integer] Domyślnie: 1 |
Number of point to create |
Minimum distance between points |
|
[numeric: double] Domyślnie: 0.0 |
The minimum distance between points |
Target CRS |
|
[układ współrzędnych] Default: Project CRS |
CRS of the random points layer |
Random points |
|
[vector: point] Default: |
The output random points. One of:
The file encoding can also be changed here. |
Parametry zaawansowane
Etykieta |
Nazwa |
Typ |
Opis |
|---|---|---|---|
Maximum number of search attempts given the minimum distance |
|
[numeric: integer] Domyślnie: 200 |
Maximum number of attempts to place the points |
Wyniki
Etykieta |
Nazwa |
Typ |
Opis |
|---|---|---|---|
Random points |
|
[vector: point] |
The output random points layer. |
Kod pythona
ID algorytmu: native:randompointsinextent
import processing
processing.run("algorithm_id", {parameter_dictionary})
The algorithm id is displayed when you hover over the algorithm in the Processing Toolbox. The parameter dictionary provides the parameter NAMEs and values. See Using processing algorithms from the console for details on how to run processing algorithms from the Python console.
24.1.21.11. Random points in layer bounds
Creates a new point layer with a given number of random points, all of them within the extent of a given layer.
A minimum distance can be specified, to avoid points being too close to each other.
Default menu:
Ostrzeżenie
This algorithm drops existing primary keys or FID values and regenerates them in output layers.
Parametry
Etykieta |
Nazwa |
Typ |
Opis |
|---|---|---|---|
Warstwa wejściowa |
|
[vector: polygon] |
Input polygon layer defining the area |
Number of points |
|
[numeric: integer] Domyślnie: 1 |
Number of points to create |
Minimum distance between points |
|
[numeric: double] Domyślnie: 0.0 |
The minimum distance between points |
Random points |
|
[vector: point] Default: |
The output random points. One of:
The file encoding can also be changed here. |
Wyniki
Etykieta |
Nazwa |
Typ |
Opis |
|---|---|---|---|
Random points |
|
[vector: point] |
The output random points layer. |
Kod pythona
ID algorytmu: qgis:randompointsinlayerbounds
import processing
processing.run("algorithm_id", {parameter_dictionary})
The algorithm id is displayed when you hover over the algorithm in the Processing Toolbox. The parameter dictionary provides the parameter NAMEs and values. See Using processing algorithms from the console for details on how to run processing algorithms from the Python console.
24.1.21.12. Random points in polygons
Creates a point layer with points placed inside the polygons of another layer.
For each feature (polygon / multi-polygon) geometry in the input layer, the given number of points is added to the result layer.
Per feature and global minimum distances can be specified in order to avoid points being too close in the output point layer. If a minimum distance is specified, it may not be possible to generate the specified number of points for each feature. The total number of generated points and missed points are available as output from the algorithm.
The illustration below shows the effect of per feature and global minimum distances and zero/non-zero minimum distances (generated with the same seed, so at least the first point generated will be the same).

Rys. 24.53 Ten points per polygon feature, left: min. distances = 0, middle: min.distances = 1, right: min. distance = 1, global min. distance = 0
The maximum number of tries per point can be specified. This is only relevant for non-zero minimum distance.
A seed for the random number generator can be provided, making it possible to get identical random number sequences for different runs of the algorithm.
The attributes of the polygon feature on which a point was generated can be included (Include polygon attributes).
If you want approximately the same point density for all the features, you can data-define the number of points using the area of the polygon feature geometry.
Zobacz także
Parametry
Parametry podstawowe
Etykieta |
Nazwa |
Typ |
Opis |
|---|---|---|---|
Input polygon layer |
|
[vector: line] |
Input polygon vector layer |
Number of points for each feature |
|
[numeric: integer] Domyślnie: 1 |
Number of points to create |
Minimum distance between points Opcjonalne |
|
[numeric: double] Domyślnie: 0.0 |
The minimum distance between points within one polygon feature |
Random points in polygons |
|
[vector: point] Default: |
The output random points. One of:
The file encoding can also be changed here. |
Parametry zaawansowane
Etykieta |
Nazwa |
Typ |
Opis |
|---|---|---|---|
Global minimum distance between points Opcjonalne |
|
[numeric: double] Domyślnie: 0.0 |
The global minimum distance between points. Should be smaller than the Minimum distance between points (per feature) for that parameter to have an effect. |
Maximum number of search attempts (for Min. dist. > 0) Opcjonalne |
|
[numeric: integer] Domyślnie: 10 |
The maximum number of tries per point. Only relevant if the minimum distance between points is set (and greater than 0). |
Random seed Opcjonalne |
|
[numeric: integer] Domyślnie: Nie ustawiono |
The seed to use for the random number generator. |
Include polygon attributes |
|
[wartość logiczna] Domyślnie: True |
If set, a point will get the attributes from the line on which it is placed. |
Wyniki
Etykieta |
Nazwa |
Typ |
Opis |
|---|---|---|---|
Random points in polygons |
|
[vector: point] |
The output random points layer. |
Number of features with empty or no geometry |
|
[numeric: integer] |
|
Total number of points generated |
|
[numeric: integer] |
|
Number of missed points |
|
[numeric: integer] |
The number of points that could not be generated due to the minimum distance constraint. |
Number of features with missed points |
|
[numeric: integer] |
Not including features with empty or no geometry |
Kod pythona
ID algorytmu: native:randompointsinpolygons
import processing
processing.run("algorithm_id", {parameter_dictionary})
The algorithm id is displayed when you hover over the algorithm in the Processing Toolbox. The parameter dictionary provides the parameter NAMEs and values. See Using processing algorithms from the console for details on how to run processing algorithms from the Python console.
24.1.21.13. Random points inside polygons
Creates a new point layer with a given number of random points inside each polygon of the input polygon layer.
Two sampling strategies are available:
Points count: number of points for each feature
Points density: density of points for each feature
A minimum distance can be specified, to avoid points being too close to each other.
Default menu:
Ostrzeżenie
This algorithm drops existing primary keys or FID values and regenerates them in output layers.
Zobacz także
Parametry
Etykieta |
Nazwa |
Typ |
Opis |
|---|---|---|---|
Warstwa wejściowa |
|
[vector: polygon] |
Input polygon vector layer |
Sampling strategy |
|
[wyliczenie] Domyślnie: 0 |
Sampling strategy to use. One of:
|
Point count or density |
|
[numeric: double] Domyślnie: 1.0 |
The number or density of points, depending on the chosen Sampling strategy. |
Minimum distance between points |
|
[numeric: double] Domyślnie: 0.0 |
The minimum distance between points |
Random points |
|
[vector: point] Default: |
The output random points. One of:
The file encoding can also be changed here. |
Wyniki
Etykieta |
Nazwa |
Typ |
Opis |
|---|---|---|---|
Random points |
|
[vector: point] |
The output random points layer. |
Kod pythona
ID algorytmu: qgis:randompointsinsidepolygons
import processing
processing.run("algorithm_id", {parameter_dictionary})
The algorithm id is displayed when you hover over the algorithm in the Processing Toolbox. The parameter dictionary provides the parameter NAMEs and values. See Using processing algorithms from the console for details on how to run processing algorithms from the Python console.
24.1.21.14. Random points on lines
Creates a point layer with points placed on the lines of another layer.
For each feature (line / multi-line) geometry in the input layer, the given number of points is added to the result layer.
Per feature and global minimum distances can be specified in order to avoid points being too close in the output point layer. If a minimum distance is specified, it may not be possible to generate the specified number of points for each feature. The total number of generated points and missed points are available as output from the algorithm.
The illustration below shows the effect of per feature and global minimum distances and zero/non-zero minimum distances (generated with the same seed, so at least the first point generated will be the same).

Rys. 24.54 Five points per line feature, left: min. distances = 0, middle: min.distances != 0, right: min. distance != 0, global min. distance = 0
The maximum number of tries per point can be specified. This is only relevant for non-zero minimum distance.
A seed for the random number generator can be provided, making it possible to get identical random number sequences for different runs of the algorithm.
The attributes of the line feature on which a point was generated can be included (Include line attributes).
If you want approximately the same point density for all the line features, you can data-define the number of points using the length of the line feature geometry.
Zobacz także
Parametry
Parametry podstawowe
Etykieta |
Nazwa |
Typ |
Opis |
|---|---|---|---|
Input line layer |
|
[vector: line] |
Input line vector layer |
Number of points for each feature |
|
[numeric: integer] Domyślnie: 1 |
Number of points to create |
Minimum distance between points (per feature) Opcjonalne |
|
[numeric: double] Domyślnie: 0.0 |
The minimum distance between points within one line feature |
Random points on lines |
|
[vector: point] Default: |
The output random points. One of:
The file encoding can also be changed here. |
Parametry zaawansowane
Etykieta |
Nazwa |
Typ |
Opis |
|---|---|---|---|
Global minimum distance between points Opcjonalne |
|
[numeric: double] Domyślnie: 0.0 |
The global minimum distance between points. Should be smaller than the Minimum distance between points (per feature) for that parameter to have an effect. |
Maximum number of search attempts (for Min. dist. > 0) Opcjonalne |
|
[numeric: integer] Domyślnie: 10 |
The maximum number of tries per point. Only relevant if the minimum distance between points is set (and greater than 0). |
Random seed Opcjonalne |
|
[numeric: integer] Domyślnie: Nie ustawiono |
The seed to use for the random number generator. |
Include line attributes |
|
[wartość logiczna] Domyślnie: True |
If set, a point will get the attributes from the line on which it is placed. |
Wyniki
Etykieta |
Nazwa |
Typ |
Opis |
|---|---|---|---|
Random points on lines |
|
[vector: point] |
The output random points layer. |
Number of features with empty or no geometry |
|
[numeric: integer] |
|
Number of features with missed points |
|
[numeric: integer] |
Not including features with empty or no geometry |
Total number of points generated |
|
[numeric: integer] |
|
Number of missed points |
|
[numeric: integer] |
The number of points that could not be generated due to the minimum distance constraint. |
Kod pythona
ID algorytmu: native:randompointsonlines
import processing
processing.run("algorithm_id", {parameter_dictionary})
The algorithm id is displayed when you hover over the algorithm in the Processing Toolbox. The parameter dictionary provides the parameter NAMEs and values. See Using processing algorithms from the console for details on how to run processing algorithms from the Python console.
24.1.21.15. Raster pixels to points
Creates a vector layer of points corresponding to each pixel in a raster layer.
Converts a raster layer to a vector layer, by creating point features for each individual pixel’s center in the raster layer. Any NoData pixels are skipped in the output.
Parametry
Etykieta |
Nazwa |
Typ |
Opis |
|---|---|---|---|
Raster layer |
|
[raster] |
Input raster layer |
Band number |
|
[raster band] |
Raster band to extract data from |
Field name |
|
[ciąg tekstowy] Domyślnie: «VALUE» |
Name of the field to store the raster band value |
Vector points |
|
[vector: point] Default: |
Specify the resulting point layer of pixels centroids. One of:
The file encoding can also be changed here. |
Wyniki
Etykieta |
Nazwa |
Typ |
Opis |
|---|---|---|---|
Vector points |
|
[vector: point] |
Resulting point layer with pixels centroids |
Kod pythona
ID algorytmu: native:pixelstopoints
import processing
processing.run("algorithm_id", {parameter_dictionary})
The algorithm id is displayed when you hover over the algorithm in the Processing Toolbox. The parameter dictionary provides the parameter NAMEs and values. See Using processing algorithms from the console for details on how to run processing algorithms from the Python console.
24.1.21.16. Raster pixels to polygons
Creates a vector layer of polygons corresponding to each pixel in a raster layer.
Converts a raster layer to a vector layer, by creating polygon features for each individual pixel’s extent in the raster layer. Any NoData pixels are skipped in the output.
Parametry
Etykieta |
Nazwa |
Typ |
Opis |
|---|---|---|---|
Raster layer |
|
[raster] |
Input raster layer |
Band number |
|
[raster band] |
Raster band to extract data from |
Field name |
|
[ciąg tekstowy] Domyślnie: «VALUE» |
Name of the field to store the raster band value |
Vector polygons |
|
[vector: polygon] Default: |
Specify the resulting polygon layer of pixel extents. One of:
The file encoding can also be changed here. |
Wyniki
Etykieta |
Nazwa |
Typ |
Opis |
|---|---|---|---|
Vector polygons |
|
[vector: polygon] |
Resulting polygon layer of pixel extents |
Kod pythona
ID algorytmu: native:pixelstopolygons
import processing
processing.run("algorithm_id", {parameter_dictionary})
The algorithm id is displayed when you hover over the algorithm in the Processing Toolbox. The parameter dictionary provides the parameter NAMEs and values. See Using processing algorithms from the console for details on how to run processing algorithms from the Python console.
24.1.21.17. Regular points
Creates a new point layer with its points placed in a regular grid within a given extent.
The grid is specified either by the spacing between the points (same spacing for all dimensions) or by the number of points to generate. In the latter case, the spacing will be determined from the extent. In order to generate a full rectangular grid, at least the number of points specified by the user is generated for the latter case.
Random offsets to the point spacing can be applied, resulting in a non-regular point pattern.
Default menu:
Parametry
Etykieta |
Nazwa |
Typ |
Opis |
|---|---|---|---|
Input extent (xmin, xmax, ymin, ymax) |
|
[zasięg] |
Map extent for the random points Available methods are:
|
Point spacing/count |
|
[numeric: integer] Domyślnie: 100 |
Spacing between the points, or the number of points, depending
on whether |
Initial inset from corner (LH side) |
|
[numeric: double] Domyślnie: 0.0 |
Offsets the points relative to the upper left corner. The value is used for both the X and Y axis. |
Apply random offset to point spacing |
|
[wartość logiczna] Domyślnie: False |
If checked the points will have a random spacing |
Use point spacing |
|
[wartość logiczna] Domyślnie: True |
If unchecked the point spacing is not taken into account |
Output layer CRS |
|
[układ współrzędnych] Default: Project CRS |
CRS of the random points layer |
Regular points |
|
[vector: point] Default: |
Specify the output regular point layer. One of:
The file encoding can also be changed here. |
Wyniki
Etykieta |
Nazwa |
Typ |
Opis |
|---|---|---|---|
Regular points |
|
[vector: point] |
The output regular point layer. |
Kod pythona
ID algorytmu: qgis:regularpoints
import processing
processing.run("algorithm_id", {parameter_dictionary})
The algorithm id is displayed when you hover over the algorithm in the Processing Toolbox. The parameter dictionary provides the parameter NAMEs and values. See Using processing algorithms from the console for details on how to run processing algorithms from the Python console.