Layout Items Common Options
QGIS provides a large set of items to layout a map. They can be of map, legend, scale bar, picture, table, north arrow, image type… They however share some common options and behavior that are exposed below.
Creating a layout item
Items can be created using different tools, either from scratch or based on existing items.
To create a layout item from scratch:
Select the corresponding tool either from the menu or the Toolbox bar.
Then:
Click on the page and fill the size and placement information requested in the New Item Properties dialog that pops up (for details, see Position and Size);
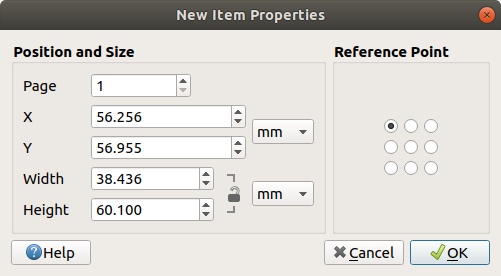
New Item properties dialog
Or click-and-drag to define the initial size and placement of the item. You can rely on grids and guides snapping for a better position.
Note
Because they can have particular shapes, drawing node or arrow items does not work with one-click nor click-and-drag methods; you need to click and place each node of the item. See The Node-Based Shape Items for more details.
You can also:
Select an existing item with the
 Select/Move item button from
the Toolbox toolbar
Select/Move item button from
the Toolbox toolbarUse the contextual menu or the menu tools to copy/cut the item and paste it at the mouse position as a new item.
You can also use the Paste in Place (Ctrl+Shift+V) command to duplicate an item from one page to another and place it in the new page at the same coordinates as the original.
Moreover, you can create items using a print layout template (for details, see The Layout Manager) through the command.
Tip
Add layout items using the file browser
From your file browser or using the Browser panel, drag-and-drop a
print layout template (.qpt file) onto a print layout dialog and QGIS
automatically adds all items from that template to the layout.
Interacting with layout items
Each item inside the print layout can be moved and resized to create a perfect
layout. For both operations the first step is to activate the
Select/Move item tool and click on the item.
You can select multiple items with the Select/Move item button:
click and drag over the items or hold the Shift button and click on each
of the items you want.
To deselect an item, click on it holding the Shift button.
Each time there’s a selection, count of selected items is displayed on the status bar. Inside the menu, you can find actions to select all the items, clear all selections, invert the current selection and more…
Moving and resizing items
Unless option is unchecked, a selected item will show squares on its boundaries ; moving one of them with the mouse will resize the item in the corresponding direction. While resizing, holding Shift will maintain the aspect ratio. Holding Alt will resize from the item center.
To move a layout item, select it with the mouse and move while holding the left button. If you need to constrain the movements to the horizontal or vertical axis, just hold the Shift button on the keyboard while moving the mouse. You can also move a selected item using the Arrow keys on the keyboard; if the movement is too slow, you can speed it up by holding Shift. If you need better precision, use the Position and size properties, or grid/guides snapping as explained above for item’s creation.
Resizing or moving several items at once is made the same way as for a single item. QGIS however provides some advanced tools to automatically resize a selection of items following different rules:
each item height matches the
 tallest or the
  shortest selected item;
each item width matches the
 widest or the
  narrowest selected item;
resizes items to
 squares: each item is enlarged to form a
square.
squares: each item is enlarged to form a
square.
Likewise, automated tools are available to organize multiple items position by distributing equidistantly:
edges (left, right, top or bottom) of items;
centers of items either horizontally or vertically.
Grouping items
Grouping items allows you to manipulate a set of items like a single one: you can easily resize, move, delete, copy the items as a whole.
To create a group of items, select more than one and press the  Group button on the menu or the
Actions toolbar or from the right-click menu. A row named
Group button on the menu or the
Actions toolbar or from the right-click menu. A row named Group
is added to the panel and can be locked or hidden like
any other Items panel’s object.
Grouped items are not individually selectable on the canvas; use the Items panel
for direct selection and access the item’s properties panel.
Locking items
Once you have found the correct position for an item, you can lock it by using
the  Lock selected items button in the
menu or the Actions toolbar or ticking the box next
to the item in the panel. Locked items are not
selectable on the canvas.
Lock selected items button in the
menu or the Actions toolbar or ticking the box next
to the item in the panel. Locked items are not
selectable on the canvas.
Locked items can be unlocked by selecting the item in the panel and unchecking the tickbox or you can use the icons on the toolbar.
Alignment
Raising or lowering the visual hierarchy for elements are inside the  Raise selected items pull-down menu. Choose an element on the print layout
canvas and select the matching functionality to raise or lower the selected
element compared to the other elements. This order is
shown in the panel. You can also raise or lower objects
in the panel by clicking and dragging an object’s label
in this list.
Raise selected items pull-down menu. Choose an element on the print layout
canvas and select the matching functionality to raise or lower the selected
element compared to the other elements. This order is
shown in the panel. You can also raise or lower objects
in the panel by clicking and dragging an object’s label
in this list.
Alignment helper lines in the print layout
There are several alignment options available within the  Align selected items pull-down menu (see figure_layout_common_align).
To use an alignment function, you first select the elements and then click on
one of the alignment icons:
Align selected items pull-down menu (see figure_layout_common_align).
To use an alignment function, you first select the elements and then click on
one of the alignment icons:
- Align Left or
 Align Right;
  Align Top or
  Align Bottom;
 Align Center horizontally or
  Align Center Vertical.
All selected elements will then be aligned to their common bounding box. When moving items on the layout canvas, alignment helper lines appear when borders, centers or corners are aligned.
Items Common Properties
Layout items have a set of common properties you will find at the bottom of the Item Properties panel: Position and size, Rotation, Frame, Background, Item ID, Variables and Rendering (See figure_layout_common).
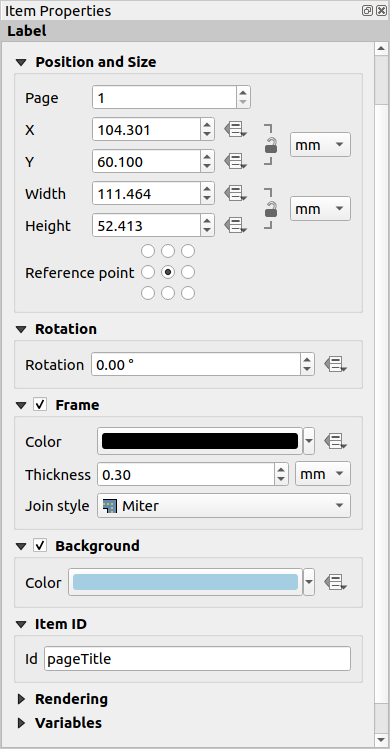
Common Item Properties groups
Note
The  Data defined override icon next to most of the
options means that you can associate that property with a layer, features
attributes, geometry or with any other layout item’s property, using
expressions or variables. For more information see Data defined override setup.
Data defined override icon next to most of the
options means that you can associate that property with a layer, features
attributes, geometry or with any other layout item’s property, using
expressions or variables. For more information see Data defined override setup.
The Position and size group lets you define the size and position of the frame which contains the item (see Position and Size for more information).
The Rotation sets the rotation of the element (in degrees).
The
 Frame shows or hides the frame around the item.
Use the Color, Thickness and Join
style widgets to adjust those properties.
Frame shows or hides the frame around the item.
Use the Color, Thickness and Join
style widgets to adjust those properties.Use the Background color menu for setting a background color. Click on the [Color…] button to display a dialog where you can pick a color or choose from a custom setting. Transparency can be adjusted through altering the alpha field settings.
Use the Item ID to create a relationship to other print layout items. This is used with QGIS server and other potential web clients. You can set an ID on an item (for example, a map or a label), and then the web client can send data to set a property (e.g., label text) for that specific item. The GetProjectSettings command will list the items and IDs which are available in a layout.
Rendering mode helps you set whether and how the item can be displayed: you can, for instance, apply blending mode, adjust the opacity of the item or Exclude item from exports.
Position and Size
Extending the features of the New Item Properties dialog with data-defined capabilities, this group allows you to place the items accurately.
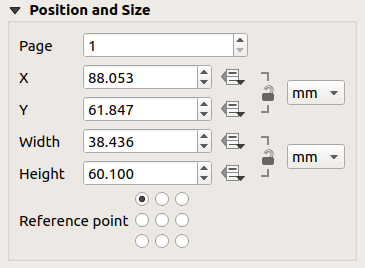
Position and size
the actual number of the page to place the item on;
the reference point of the item;
the X and Y coordinates of the Reference point of the item on the chosen page. The ratio between these values can be locked by clicking on the
 button. Changes made to a value using
the widget or the Select/Move item tool will
be reflected in both of them;
button. Changes made to a value using
the widget or the Select/Move item tool will
be reflected in both of them;the Width and Height of the item bounding box. As for coordinates, the ratio between width and height can be locked.
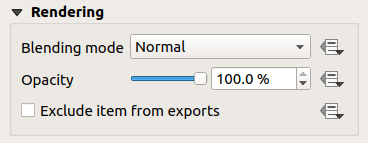
Rendering mode
QGIS allows advanced rendering for layout items just like vector and raster layers.
Rendering mode
Blending mode: With this tool you can achieve effects which would otherwise only be achieved using graphic rendering software. The pixels of your overlaying and underlaying items can be mixed according to the mode set (see Blending Modes for description of each effect).
Transparency
 : You can make the underlying item in the
layout visible with this tool.
Use the slider to adapt the visibility of your item to your needs.
You can also make a precise definition of the percentage of visibility in the
menu beside the slider.
: You can make the underlying item in the
layout visible with this tool.
Use the slider to adapt the visibility of your item to your needs.
You can also make a precise definition of the percentage of visibility in the
menu beside the slider.- Exclude item from exports: You can decide to make an
item invisible in all exports.
After activating this checkbox, the item will not be included in export to
PDF, print etc..
Variables
The Variables lists all the variables available at the layout item’s level (which includes all global, project and composition’s variables). Map items also include Map settings variables that provide easy access to values like the map’s scale, extent, and so on.
In Variables, it’s also possible to manage item-level variables.
Click the  button to add a new custom variable. Likewise, select any
custom item-level variable from the list and click the
button to add a new custom variable. Likewise, select any
custom item-level variable from the list and click the  button to
remove it.
button to
remove it.
More information on variables usage in the Storing values in Variables section.