Working with Projections
A Coordinate Reference System, or CRS, is a method of associating numerical coordinates with a position on the surface of the Earth. QGIS has support for approximately 7,000 standard CRSs, each with different use cases, pros and cons! Choosing an appropriate reference system for your QGIS projects and data can be a complex task, but fortunately QGIS helps guide you through this choice, and makes working with different CRSs as transparent and accurate as possible.
Overview of Projection Support
QGIS has support for approximately 7,000 known CRSs. These standard CRSs
are based on those defined by the European Petroleum Search Group (EPSG)
and the Institut Geographique National de France (IGNF), and are made
available in QGIS through the underlying “Proj” projection library. Commonly,
these standard projections are identified through use of an authority:code
combination, where the authority is an organisation name such as “EPSG” or
“IGNF”, and the code is a unique number associated with a specific CRS. For
instance, the common WGS 84 latitude/longitude CRS is known by the identifier
EPSG:4326, and the web mapping standard CRS is EPSG:3857.
Custom, user-created CRSs are stored in a user CRS database. See section Custom Coordinate Reference System for information on managing your custom coordinate reference systems.
Layer Coordinate Reference Systems
In order to correctly project data into a specific target CRS, either your data
must contain information about its coordinate reference system or you will need
to manually assign the correct CRS to the layer. For PostGIS layers, QGIS uses
the spatial reference identifier that was specified when that PostGIS layer was
created. For data supported by OGR or GDAL, QGIS relies on the presence of a
recognized means of specifying the CRS. For instance, for the Shapefile format
this is a file containing the Well-Known Text (WKT)
representation of the layer’s CRS. This projection file has the same base name as the
.shp file and a .prj extension. For example,
alaska.shp would have a corresponding projection file named
alaska.prj.
Whenever a layer is loaded into QGIS, QGIS attempts to automatically determine the correct CRS for that layer. In some cases this is not possible, e.g. when a layer has been provided without retaining this information. Whenever QGIS cannot automatically determine the correct CRS for a layer, it will prompt you to manually select the CRS. Selecting the correct choice is crucial, as a wrong choice will place your layer in the wrong position on the Earth’s surface! Sometimes, accompanying metadata will describe the correct CRS for a layer, in other cases you will need to contact the original author of the data to determine the correct CRS to use.
Project Coordinate Reference Systems
Every project in QGIS also has an associated Coordinate Reference System. The project CRS determines how data is projected from its underlying raw coordinates to the flat map rendered within your QGIS map canvas. Behind the scenes, QGIS transparently reprojects all layers contained within your project into the project’s CRS, so that they will all be rendered in the correct position with respect to each other!
It is important to make an appropriate choice of CRS for your QGIS projects. Choosing an inappropriate CRS can cause your maps to look distorted, and poorly reflect the real-world relative sizes and positions of features. Usually, while working in smaller geographic areas, there will be a number of standard CRSs used within a particular country or administrative area. It’s important to research which CRSs are appropriate or standard choices for the area you are mapping, and ensure that your QGIS project follows these standards.
The project CRS can be set through the CRS tab of the Project properties dialog (). It will also be shown in the lower-right of the QGIS status bar.
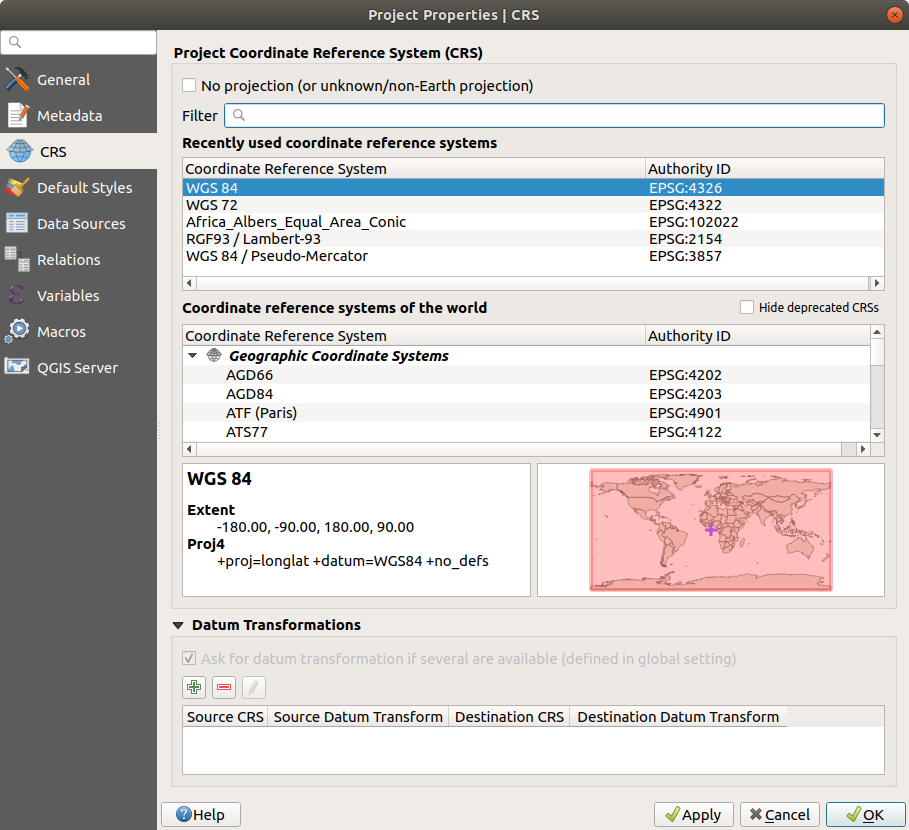
Project Properties Dialog
The CRS tab also has an optional setting for No projection. Checking this setting will disable ALL projection handling within the QGIS project, causing all layer and map coordinates to be treated as simple 2D Cartesian coordinates, with no relation to positions on the Earth’s surface.
Whenever you select a new CRS for your QGIS project, the measurement units will automatically be changed in the General tab of the Project properties dialog () to match the selected CRS. For instance, some CRSs define their coordinates in feet instead of meters, so setting your QGIS project to one of these CRSs will also set your project to measure using feet by default.
CRS Settings
By default, QGIS starts each new project using a global default projection. This
default CRS is EPSG:4326 (also known as “WGS 84”), and it is a global latitude/longitude based
reference system. This default CRS can be changed via the CRS for New Projects
setting in the CRS tab under  Options. There is an option to automatically set the project’s CRS
to match the CRS of the first layer loaded into a new project, or alternatively
you can select a different default CRS to use for all newly created projects.
This choice will be saved for use in subsequent QGIS sessions.
Options. There is an option to automatically set the project’s CRS
to match the CRS of the first layer loaded into a new project, or alternatively
you can select a different default CRS to use for all newly created projects.
This choice will be saved for use in subsequent QGIS sessions.

The CRS tab in the QGIS Options Dialog
When you use layers that do not have a CRS, you can define how QGIS
responds to these layers. This can be done globally in the
CRS tab under
Options.
The options shown in figure_projection_options are:
 Prompt for CRS
 Use project CRS
- Use a default CRS
If you want to define the Coordinate Reference System for a certain layer without CRS information, you can also do that in the Source tab of the raster and vector properties dialog (see Source Properties for rasters and Source Properties for vectors). If your layer already has a CRS defined, it will be displayed as shown in Source tab in vector Layer Properties dialog. Note that changing the CRS in this setting does not alter the underlying data source in any way, rather it just changes how QGIS interprets the raw coordinates from the layer in the current QGIS project only.
Tip
CRS in the Layers Panel
Right-clicking on a layer in the Layers Panel (section Layers Panel) provides two CRS shortcuts. Set layer CRS takes you directly to the Coordinate Reference System Selector dialog (see figure_projection_project). Set project CRS from Layer redefines the project CRS using the layer’s CRS.
On The Fly (OTF) CRS Transformation
QGIS supports “on the fly” CRS transformation for both raster and vector data. This means that regardless of the underlying CRS of particular map layers in your project, they will always be automatically transformed into the common CRS defined for your project.
Coordinate Reference System Selector
This dialog helps you assign a Coordinate Reference System to a project or a layer, provided a set of projection databases. Items in the dialog are:
Filter: If you know the EPSG code, the identifier, or the name for a Coordinate Reference System, you can use the search feature to find it. Enter the EPSG code, the identifier or the name.
Recently used coordinate reference systems: If you have certain CRSs that you frequently use in your everyday GIS work, these will be displayed in this list. Click on one of these items to select the associated CRS.
Coordinate reference systems of the world: This is a list of all CRSs supported by QGIS, including Geographic, Projected and Custom coordinate reference systems. To define a CRS, select it from the list by expanding the appropriate node and selecting the CRS. The active CRS is preselected.
PROJ text: This is the CRS string used by the PROJ projection engine. This text is read-only and provided for informational purposes.
The CRS selector also shows a rough preview of the geographic area for which a selected CRS is valid for use. Many CRSs are designed only for use in small geographic areas, and you should not use these outside of the area they were designed for. The preview map shades an approximate area of use whenever a CRS is selected from the list. In addition, this preview map also shows an indicator of the current main canvas map extent.
Custom Coordinate Reference System
If QGIS does not provide the coordinate reference system you need, you can
define a custom CRS. To define a CRS, select  Custom CRS… from the menu. Custom CRSs
are stored in your QGIS user database. In addition to your custom CRSs, this
database also contains your spatial bookmarks and other custom data.
Custom CRS… from the menu. Custom CRSs
are stored in your QGIS user database. In addition to your custom CRSs, this
database also contains your spatial bookmarks and other custom data.
Custom CRS Dialog
Defining a custom CRS in QGIS requires a good understanding of the PROJ projection library. To begin, refer to “Cartographic Projection Procedures for the UNIX Environment - A User’s Manual” by Gerald I. Evenden, U.S. Geological Survey Open-File Report 90-284, 1990 (available at https://pubs.usgs.gov/of/1990/of90-284/ofr90-284.pdf).
This manual describes the use of proj and related command line
utilities. The cartographic parameters used with proj are described in
the user manual and are the same as those used by QGIS.
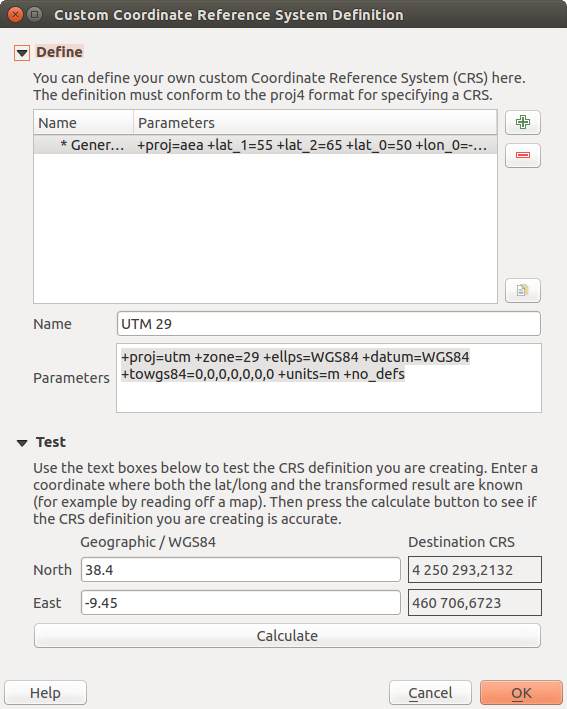
The Custom Coordinate Reference System Definition dialog requires only two parameters to define a user CRS:
A descriptive name
The cartographic parameters in PROJ format
To create a new CRS, click the  Add new CRS button and
enter a descriptive name and the CRS parameters.
Add new CRS button and
enter a descriptive name and the CRS parameters.
Note that the Parameters must begin with a +proj= block,
to represent the new coordinate reference system.
You can test your CRS parameters to see if they give sane results. To do this, enter known WGS 84 latitude and longitude values in North and East fields, respectively. Click on Calculate, and compare the results with the known values in your coordinate reference system.
Integrate an NTv2-transformation in QGIS
To integrate an NTv2 transformation file in QGIS you need one more step:
Place the NTv2 file (.gsb) in the CRS/Proj folder that QGIS uses (e.g.
C:\OSGeo4W64\share\projfor windows users)Add nadgrids (
+nadgrids=nameofthefile.gsb) to the Proj definition in the Parameters field of the Custom Coordinate Reference System Definition ().
Setting an NTv2 transformation
Datum Transformations
In QGIS, ‘on-the-fly’ CRS transformation is enabled by default, meaning that whenever you use layers with different coordinate systems QGIS transparently reprojects them to the project CRS. For some CRS, there are a number of possible transforms available to reproject to the project’s CRS! QGIS optionally allows you to define a particular transformation to use, otherwise QGIS uses a default one.
This customization is done in the
Options –> CRS tab menu under the Default datum
transformations group:
using
 Ask for datum transformation if several are
available: when more than one appropriate datum transformation exists for a
source/destination CRS combination, a dialog will automatically be opened
prompting users to choose which of these datum transformations to use for
the project;
Ask for datum transformation if several are
available: when more than one appropriate datum transformation exists for a
source/destination CRS combination, a dialog will automatically be opened
prompting users to choose which of these datum transformations to use for
the project;or predefining a list of the appropriate default transformations to use when loading layers to projects or reprojecting a layer.
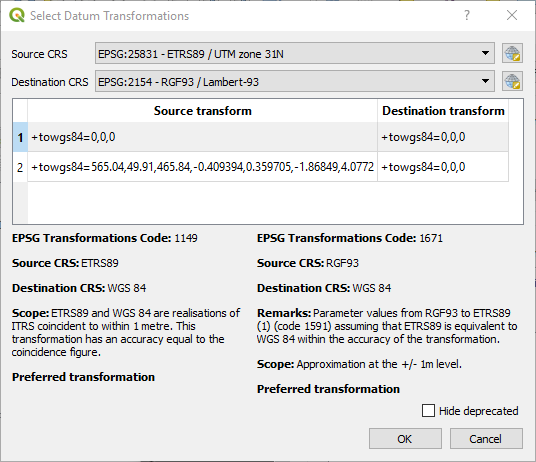
Use the
button to open the Select Datum Transformations
dialog. Then:Indicate the Source CRS of the layer, using the drop-down menu or the
 Select CRS widget.
Likewise, provide the Destination CRS.
Depending on the transform grid files (based on GDAL and PROJ version installed on your system), a list of available transformations from source to destination is built in the table. Clicking a row shows details on the settings applied (epsg code, accuracy of the transform, number of stations involved…).
You can choose to only display current valid transformations by checking the
Hide deprecated option.Find your preferred transformation, select it and click OK.
A new row is added to the table under with information about ‘Source CRS’ and ‘Destination CRS’ as well as ‘Source datum transform’ and ‘Destination datum transform’.
From now, QGIS automatically uses the selected datum transformation for further transformation between these two CRSs until you
 remove
it from the list or
remove
it from the list or  replace it with another one.
Selecting a preferred default datum transformation
Datum transformations set in the
Options –> CRS tab will be inherited by all new QGIS
projects created on the system. Additionally, a particular project
may have its own specific set of transformations specified via the
CRS tab of the Project properties dialog
(). These settings apply
to the current project only.