2.1. Lesson: インターフェイスのあらまし
インターフェイスの基本的な構造を形成するメニュー、ツールバー、地図キャンバスとレイヤーリストに慣れてもらえるよう、私たちは、QGISのユーザーインターフェイスを探ります。
このレッスンの目標: QGISのユーザーインターフェイスの基礎を理解する。
2.1.1.  Try Yourself: 基礎
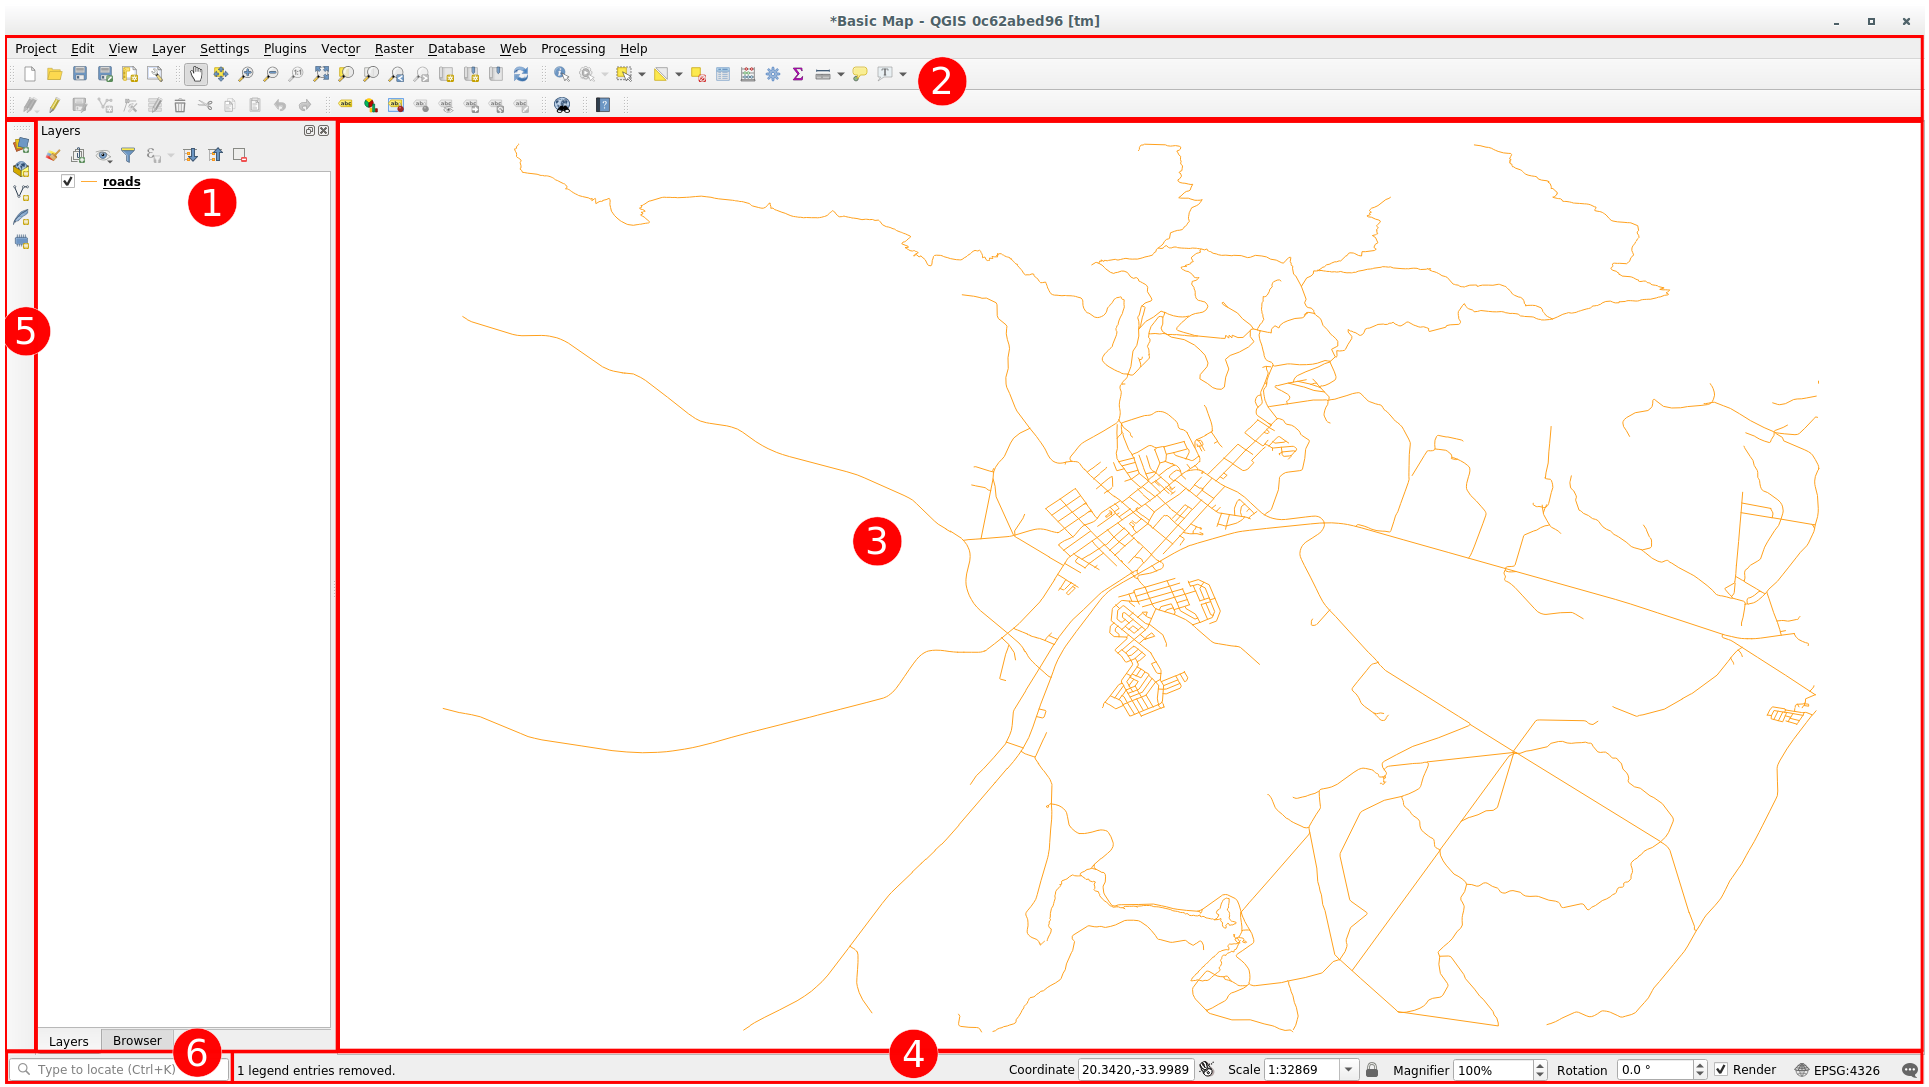
上の図で特定される要素は以下のとおりです:
レイヤーリスト/ブラウザパネル
ツールバー
地図キャンバス
ステータスバー
サイドツールバー
Locator bar
レイヤーリスト
レイヤーリストでは、いつでも、利用可能なすべてのレイヤーのリストを見ることができます。
(横にある矢印やプラス記号をクリックして)折りたたまれた項目を展開すると、レイヤーの現在の見た目について多くの情報を提供します。
Hovering over the layer will give you some basic information: layer name, type of geometry, coordinate reference system and the complete path of the location on your device.
レイヤーを右クリックすると、多くの追加オプションとメニューを提供します。あなたはやがて、それらのいくつかを使用するでしょうから、その周辺を見てみます!
注釈
ベクターレイヤーは、道路、樹木のような一般的に特定の種類のオブジェクトのデータの集合体です。ベクターレイヤーはポイント、ライン、ポリゴンのいずれかで構成されます。
ブラウザパネル
QGISブラウザはあなたのデータベースを簡単に案内するQGISのパネルです.共通のベクタファイル(例えばESRI ShapefileやMapInfoのファイル),データベース(例えばPostGIS,Oeacle,Spatialite,GeoPackage または MSSQL Spatial)とWMS/WFS接続にアクセスできます.またGRASS dataを見ることもできます.
If you have saved a project, the Browser Panel will also give you quick access to
all the layers stored in the same path of the project file under in the
 Project Home item.
Moreover, you can set one or more folder as Favorites: search under your path
and once you have found the folder, right click on it and click on Add as a
Favorite. You should then be able to see your folder in the  Favorites item.
ちなみに
It can happen that the folders added to Favorite item have a really
long name: don't worry right-click on the path and choose Rename Favorite...
to set another name.
ツールバー
Your most often used sets of tools can be turned into toolbars for basic access. For example, the File toolbar allows you to save, load, print, and start a new project. You can easily customize the interface to see only the tools you use most often, adding or removing toolbars as necessary via the menu.
すべてのツールは、ツールバーに表示されていない場合でも、メニューを通じてアクセスできるでしょう。たとえば、 ファイル ツールバー( 保存 ボタンが含まれています)を削除した場合でも、 プロジェクト メニューをクリックしてから 保存 をクリックすれば地図を保存できます。
地図キャンバス
ここは、地図自体が表示され、レイヤがロードされる場所です。地図キャンバスでは、表示されているレイヤを操作できます。ズームイン/ズームアウト、地図移動、地物の選択、および次のセクションで詳しく説明する他の多くの操作を行うことができます。
ステータスバー
Shows you information about the current map. Also allows you to adjust the map scale, the map rotation and see the mouse cursor's coordinates on the map.
The Side Toolbar
By default the Side toolbar contains the buttons to load the layer and all the buttons to create a new layer. But remember that you can move all the toolbars wherever it is more comfortable for you.
The Locator Bar
Within this bar you can access to almost all the objects of QGIS: layers, layer features, algorithms, spatial bookmarks, etc. Check all the different options in the ロケータ section of the QGIS User Manual.
ちなみに
With the shortcut Ctrl+K you can easily access the bar.
2.1.2. Try Yourself 1
上の図を参照することなく、ご自身の画面で上記の4つの要素を識別するようにしてください。それらの名前と機能を特定できるかどうか見てください。数日中にそれらを使用するにつれて、これらの要素に慣れてくるでしょう。
2.1.3. Try Yourself 2
画面上でこれらの各ツールを探してみてください。それらの目的は何ですか?


 Render
注釈
これらのツールのいずれかが画面に表示されていない場合は、現在隠されているいくつかのツールバーを有効にしてみてください。また、画面上に十分なスペースがない場合は、ツールバーがそのツールの一部を隠すことで短縮されることがあることに注意してください。そのように折りたたまれたツールバーでは右矢印ボタンをダブルクリックすると非表示のツールを表示できます。ツールの上でしばらくの間マウスを保持すると、何らかのツールの名前のツールチップを表示できます。
2.1.4. What's Next?
Now that you are familiar with the basics of the QGIS interface, in the next lesson we will see how to load some common data types.