Viktigt
Översättning är en gemenskapsinsats du kan gå med i. Den här sidan är för närvarande översatt till 38.64%.
25.2.1. DB Manager Plugin
The DB Manager Plugin is intended to be the main tool to integrate and
manage spatial database formats supported by QGIS (PostgreSQL, SpatiaLite,
GeoPackage, Oracle Spatial, Virtual layers) in one user interface.
The  DB Manager Plugin provides several features.
You can drag layers from the QGIS Browser into the DB Manager, and it
will import your layer into your spatial database.
You can drag and drop tables between spatial databases and they will
get imported.
DB Manager Plugin provides several features.
You can drag layers from the QGIS Browser into the DB Manager, and it
will import your layer into your spatial database.
You can drag and drop tables between spatial databases and they will
get imported.
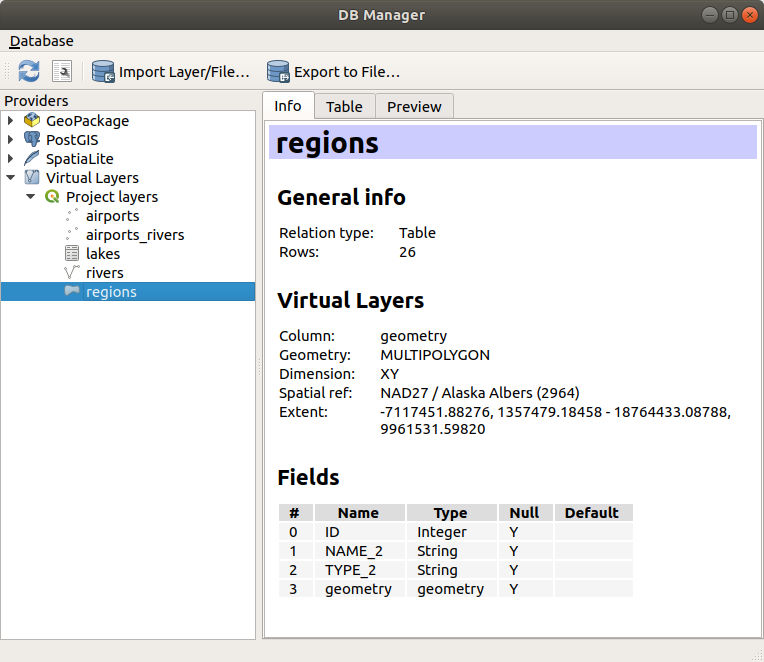
Fig. 25.4 Dialogrutan DB Manager
The menu allows you to connect to an existing database, to start the SQL window and to exit the DB Manager Plugin. Once you are connected to an existing database, the menus (relevant for DBMSs, such as PostgreSQL) and will appear.
Menyn innehåller verktyg för att skapa och ta bort (endast om de är tomma) scheman och, om topologi finns tillgänglig (t.ex. med PostGIS-topologi), för att starta en TopoViewer.
Med menyn kan du skapa och redigera tabeller samt ta bort tabeller och vyer. Det är också möjligt att tömma tabeller och att flytta tabeller mellan scheman. Du kan Köra Vacuum Analyze för den valda tabellen. Vacuum återtar utrymme och gör det tillgängligt för återanvändning, och analyze uppdaterar statistik som används för att avgöra det mest effektiva sättet att utföra en fråga. Change Logging… låter dig lägga till stöd för ändringsloggning i en tabell. Slutligen kan du använda Import Layer/File… och Export to File….
Observera
Med hjälp av DB Manager är det möjligt att lägga till kommentarer för tabeller och kolumner i en PostgreSQL-databas.
I fönstret Datakällor listas alla befintliga databaser som stöds av QGIS. Med ett dubbelklick kan du ansluta till databasen. Med höger musknapp kan du byta namn på och ta bort befintliga scheman och tabeller. Tabeller kan också läggas till i QGIS-rutan med hjälp av snabbmenyn.
Om du är ansluten till en databas finns det fyra flikar i fönstret huvud i DB Manager. Fliken Info innehåller information om tabellen och dess geometri, samt om befintliga fält, begränsningar och index. Här kan du skapa ett spatialt index på den valda tabellen. På fliken Table visas tabellen och på fliken Preview visas geometrierna som förhandsgranskning. När du öppnar ett SQL Window, kommer det att placeras i en ny flik.
25.2.1.1. Arbeta med SQL-fönstret
Du kan använda DB Manager för att köra SQL-frågor mot din spatiala databas. Frågor kan sparas och laddas, och där hjälper SQL Query Builder dig att formulera dina frågor. Du kan även visa spatiala utdata genom att markera Load as new layer och ange Column(s) with unique values (IDs), Geometry column och Layer name (prefix). Det är möjligt att markera en del av SQL för att bara köra den delen när man trycker på Ctrl+R eller klickar på Execute-knappen.
QGIS also adds support for the REGEXP function in some providers.
This allows users to use regular expressions in SQL filters or expressions, for example:
SELECT * FROM places WHERE name REGEXP '^A';
This returns all features where the name field starts with the letter A.
När du har kört din fråga kan du välja specifika celler i resultatuppsättningen. Använd kortkommandot Ctrl+C för att kopiera de markerade cellerna till urklipp. De kopierade uppgifterna är tillgängliga som en formaterad tabell. Detta gör att du kan klistra in data i andra program, t.ex. kalkylblad, där de visas som en tabell.
Knappen Query History lagrar de senaste 20 förfrågningarna för varje databas och leverantör.
Dubbelklicka på en post för att lägga till strängen i SQL-fönstret.
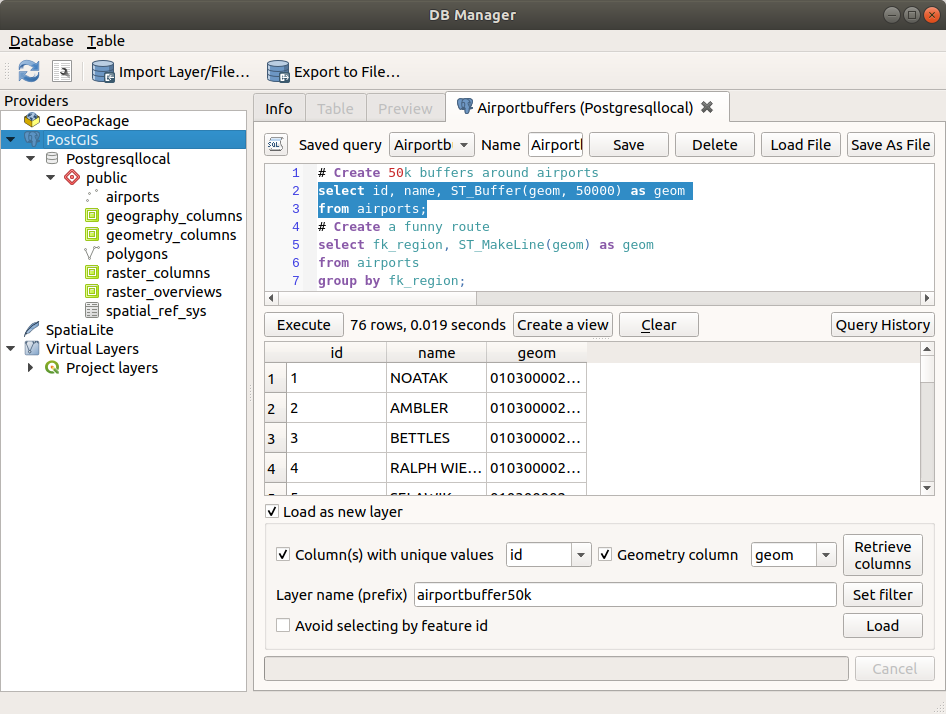
Fig. 25.5 Exekvera SQL-frågor i SQL-fönstret i DB Manager
Observera
SQL-fönstret kan också användas för att skapa virtuella lager. I så fall väljer du QGIS Layers under Virtual Layers innan du öppnar SQL-fönstret, istället för att välja en databas. Se Skapa virtuella lager för instruktioner om vilken SQL-syntax som ska användas.
25.2.1.2. Import Vector Layer
You can import layer or file into your database. Here are the parameters you can set for the import process:
Input: Select the layer or file to import. Using the dropdown menu, select from the list of loaded layers in QGIS or click on the … button to select a file from disk. Check the
 Import only selected features to import only the selected
features of the layer.
Import only selected features to import only the selected
features of the layer.Output table: Choose the Schema and provide a name for the new table.
Options: Here are some options for the import process:
- Primary key: Provide naming for the primary key field.
By default, it is named
id. - Geometry column: Provide naming for the geometry column.
By default, it is named
geom. - Source SRID: Define the SRID for the geometry column.
By default, it uses the layer’s CRS.
- Target SRID: Define the target SRID to reproject the geometries
during the import process. By default, it uses the layer’s CRS.
- Encoding: Define the encoding of the source data. By default, it uses
Automatic. It is QGIS’s automatic detection mode that attempts to guess the file’s character encoding based on available metadata or system locale. - Replace destination table (if exists): If a table with the same name already exists in the selected schema,
it will be replaced.
- Do not promote to multi-part: Geometries will be imported as single-part geometries.
- Convert field names to lower case: All field names will be converted to lower case.
- Create spatial index: A spatial index will be created on the geometry column after import.
- Comment: Add comments to table. Only available for PostgreSQL databases.

Fig. 25.6 Importing a vector layer into a spatial database using DB Manager
25.2.1.3. Export to Vector File
To export a table from your database to a vector file, select the desired Format and Save as location. Under Options, you can set the following parameters:
- Source SRID: Define the source SRID of the geometry column.
By default, it uses the layer’s CRS.
- Target SRID: Define the target SRID to reproject the geometries
during the export process. By default, it uses the layer’s CRS.
- Encoding: Define the encoding of the output data.
- Replace destination table (if exists): If a table with the same name already exists at the selected location,
it will be replaced.

Fig. 25.7 Exporting a table to a vector file using DB Manager