Importante
La traduzione è uno sforzo comunitario you can join. Questa pagina è attualmente tradotta al 100.00%.
25.2.1. Plugin DB Manager
Il plugin DB Manager è stato progettato per essere lo strumento principale per integrare e gestire i formati di database spaziali supportati da QGIS (PostgreSQL, SpatiaLite, GeoPackage, Oracle Spatial, livelli virtuali) in un’unica interfaccia utente. Il plugin  DB Manager offre diverse funzionalità. Puoi trascinare i layer dal Browser di QGIS nel DB Manager, che provvederà a importarli nel database spaziale. Puoi trascinare e rilasciare le tabelle tra i database spaziali e queste verranno importate.
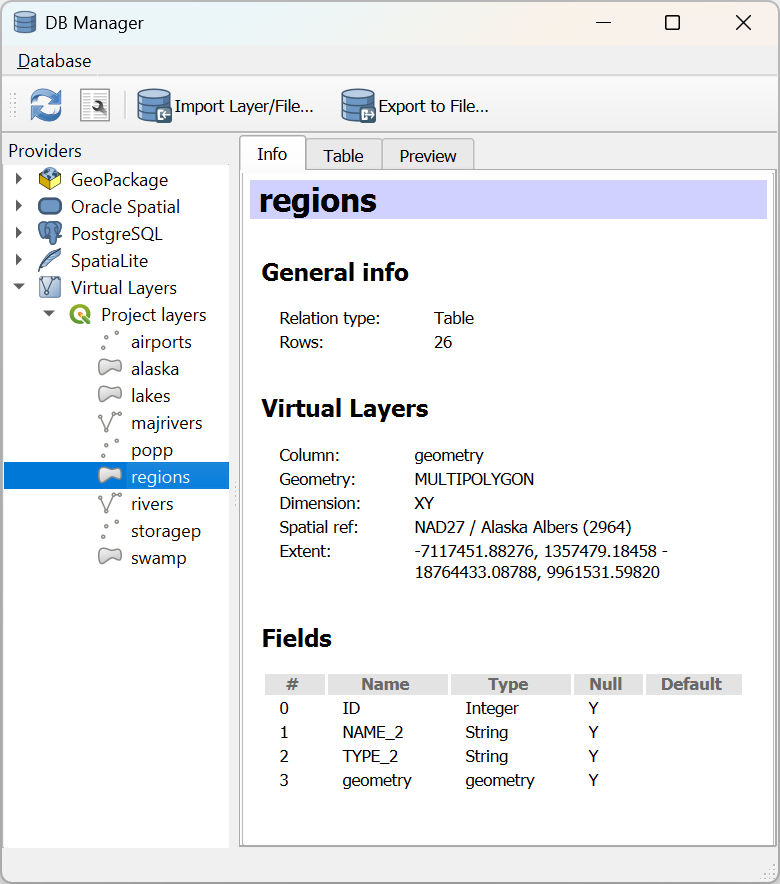
Fig. 25.4 La finestra di dialogo DB Manager
Il menu consente di connettersi a un database esistente, di aprire la finestra SQL e di uscire dal plugin DB Manager. Una volta stabilita la connessione a un database esistente, appariranno i menu (rilevante per i DBMS, come PostgreSQL) e .
Il menu include strumenti per creare e eliminare (solo se vuoti) schemi e, se la topologia è disponibile (ad esempio con PostGIS topology), per avviare un TopoViewer.
Il menu ti permette di creare e modificare tabelle e di cancellare tabelle e viste. È anche possibile svuotare tabelle e spostare tabelle tra schemi. Puoi Run Vacuum Analyze per la tabella selezionata. Vacuum recupera lo spazio e lo rende disponibile per il riutilizzo, e analyze aggiorna le statistiche che sono usate per determinare il modo più efficiente di eseguire una query. Change Logging… ti permette di aggiungere il supporto per la registrazione delle modifiche ad una tabella. Infine, puoi eseguire Importa Layer/File… e Esporta su File….
Nota
Usando il DB Manager è possibile aggiungere commenti per tabelle e colonne di un database PostgreSQL.
La finestra Sorgenti dati elenca tutti i database esistenti supportati da QGIS. Con un doppio clic, puoi connetterti al database. Con il tasto destro del mouse, puoi rinominare e cancellare schemi e tabelle esistenti. Le tabelle possono anche essere aggiunte a QGIS con il menu contestuale.
Se connesso a un database, la finestra principale del DB Manager offre quattro schede. La scheda Informazioni fornisce informazioni sulla tabella e la sua geometria, così come su campi, vincoli e indici esistenti. Permette di creare un indice spaziale sulla tabella selezionata. La scheda Tabella mostra la tabella, e la scheda Anteprima visualizza le geometrie come anteprima. Quando si apre una Finestra SQL, questa viene inserita in una nuova scheda.
25.2.1.1. Lavorare con la Finestra SQL
Puoi usare il DB Manager per eseguire query SQL sul tuo database spaziale. Le query possono essere salvate e caricate, e lì il Costruttore di interrogazioni SQL ti aiuterà a formulare le tue query. Puoi anche visualizzare l’output spaziale selezionando Carica come nuovo layer e specificando Colonna(e) con valori univoci (ID), Colonna geometria e Nome del layer (prefisso). È possibile evidenziare una parte dell’SQL per eseguire solo quella parte quando si preme Ctrl+R o si clicca il pulsante Esegui.
QGIS aggiunge inoltre il supporto per la funzione REGEXP in alcuni provider. Ciò consente agli utenti di utilizzare espressioni regolari nei filtri o nelle espressioni SQL, ad esempio:
SELECT * FROM places WHERE name REGEXP '^A';
Questo restituisce tutti gli elementi in cui il campo nome inizia con la lettera A.
Dopo aver eseguito la query, puoi selezionare celle specifiche nell’insieme dei risultati. Utilizza la scorciatoia Ctrl+C per copiare le celle selezionate negli appunti. I dati copiati sono disponibili come tabella formattata. In questo modopuoi incollare i dati in altre applicazioni, ad esempio in un foglio di calcolo, dove verranno visualizzati come tabella.
Il pulsante Storico delle Interrogazioni memorizza le ultime 20 interrogazioni di ogni database e provider.
Un doppio clic su una voce aggiunge la stringa alla finestra SQL.
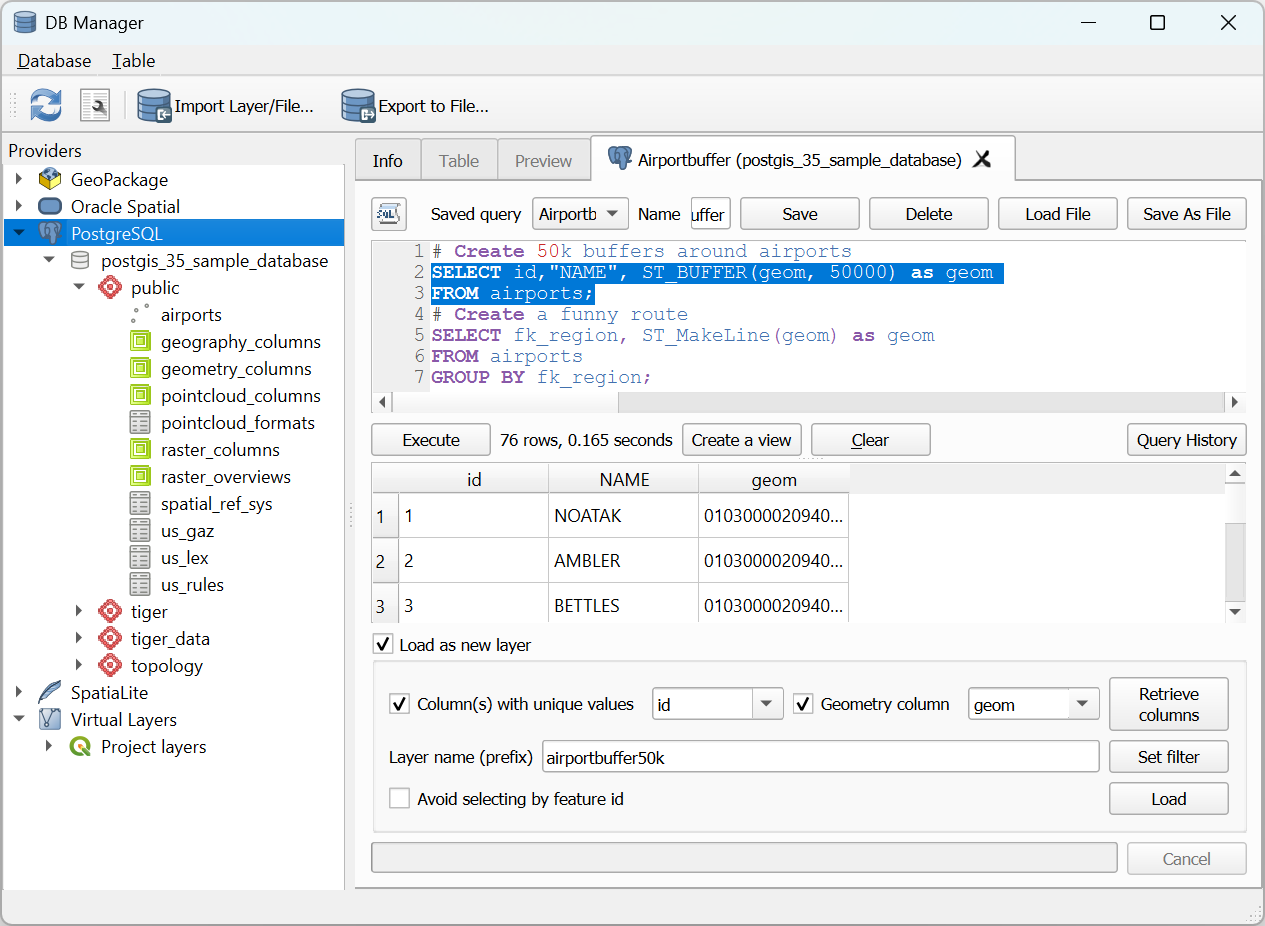
Fig. 25.5 Eseguire SQL nella finestra di dialogo SQL DB Manager
Nota
La finestra SQL può anche essere utilizzata per creare Layer Virtuali. In questo caso, invece di selezionare un database, seleziona QGIS Layer sotto Layer Virtuali prima di aprire la finestra SQL. Per istruzioni sulla sintassi SQL da utilizzare vedi Creazione di layer virtuali.
25.2.1.2. Importare Layer Vettoriali
Puoi importare un livello o un file nel tuo database. Ecco i parametri che puoi impostare per il processo di importazione:
Ingresso: Seleziona il layer o il file da importare. Utilizza il menu a tendina per selezionare un elemento dall’elenco dei layer caricati in QGIS oppure clicca sul pulsante … per selezionare un file dal disco. Spunta la
 Importa solo gli elementi selezionati per importare solo gli elementi selezionati del layer.
Tabella in uscita: Scegli lo Schema e inserisci un nome per la nuova tabella.
Opzioni: Di seguito sono riportate alcune opzioni relative al processo di importazione:
- Chiave primaria: Assegna un nome al campo della chiave primaria. Per impostazione predefinita, il nome è
id. - Colonna geometria: Assegna un nome alla colonna geometria. Per impostazione predefinita, il nome è
geom. - SR sorgente: Definisci l’SR per la colonna geometria. Per impostazione predefinita, viene utilizzato il SR del layer.
- SR di destinazione: Definisci l’SR di destinazione per la riproiezione delle geometrie durante il processo di importazione. Per impostazione predefinita, viene utilizzato il SR del layer.
- Codifica: Definisci la codifica dei dati di origine. Per impostazione predefinita, viene utilizzata l’opzione
Automatica. Si tratta della modalità di rilevamento automatico di QGIS che cerca di individuare la codifica dei caratteri del file in base ai metadati disponibili o alle impostazioni di lingua del sistema. - Sostituisci la tabella di destinazione (se esiste): Se nello schema selezionato esiste già una tabella con lo stesso nome, questa verrà sostituita.
- Non trasformare in parti multiple: Le geometrie verranno importate come geometrie a parte singola.
- Converti nome campo in minuscolo: Tutti i nomi dei campi verranno convertiti in minuscolo.
- Crea indice spaziale: Dopo l’importazione verrà creato un indice spaziale sulla colonna della geometria.
- Commento: Aggiungi commenti alla tabella. Disponibile solo per i database PostgreSQL.
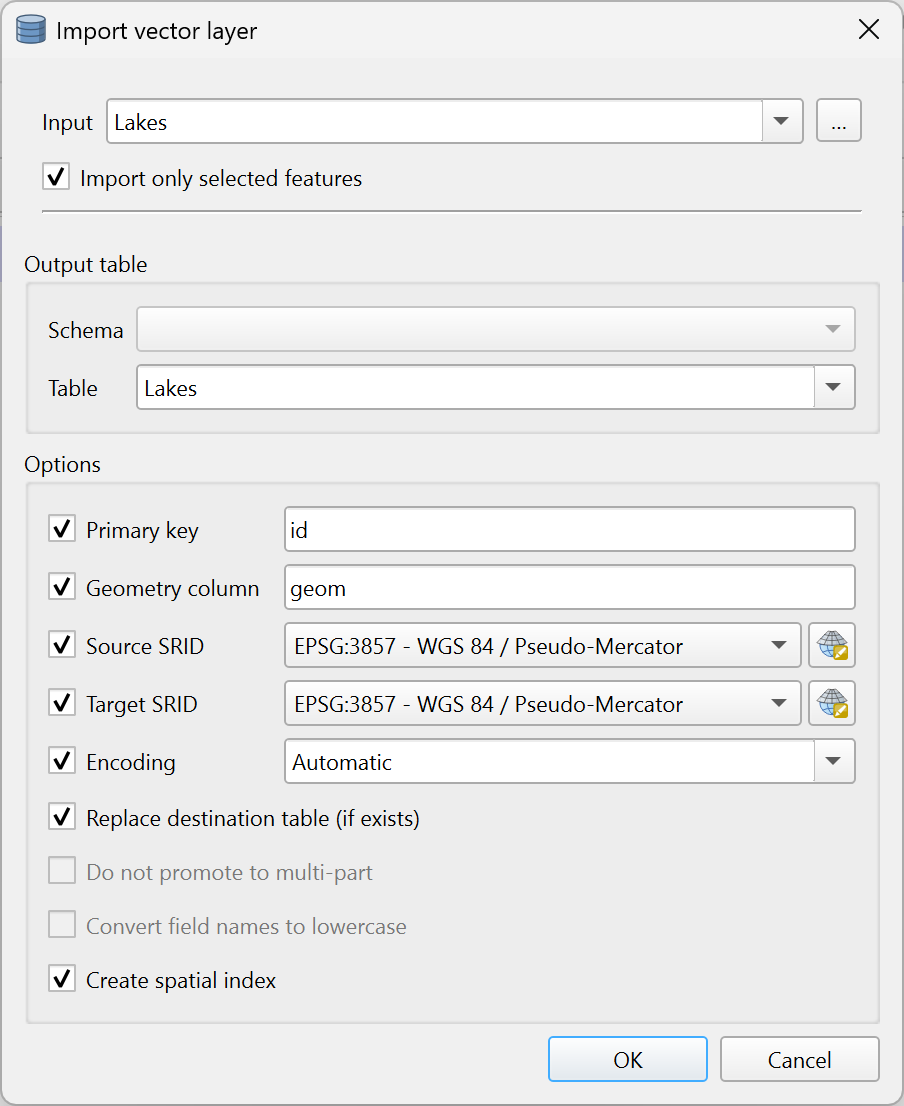
Fig. 25.6 Importazione di un layer vettoriale in un database spaziale tramite DB Manager
25.2.1.3. Esportare in File Vettoriale
Per esportare una tabella dal database in un file vettoriale, seleziona il Formato desiderato e la posizione in cui eseguire :Salva con nome. Nella sezione Opzioni, puoi impostare i seguenti parametri:
- SR sorgente: Definisci l’SR di origine della colonna della geometria. Per impostazione predefinita, viene utilizzato il SR del layer.
- SR di destinazione: Definisci l’SR di destinazione per la riproiezione delle geometrie durante il processo di esportazione. Per impostazione predefinita, viene utilizzato il SR del layer.
- Codifica: definisci la codifica dei dati in uscita.
- Sostituisci file di destinazione (se esiste): Se nella posizione selezionata esiste già una tabella con lo stesso nome, questa verrà sostituita.

Fig. 25.7 Esportazione di una tabella in un file vettoriale tramite DB Manager