Importante
La traduzione è uno sforzo comunitario you can join. Questa pagina è attualmente tradotta al 61.83%.
25.3. Console python di GIS
Come vedrai più avanti in questo capitolo, QGIS è stato progettato con un’architettura a plugin. I plugin possono essere scritti in Python, una lingua molto famosa nel mondo geospaziale.
QGIS ha un’API Python (vedi PyQGIS Developer Cookbook per alcuni esempi di codice) per permettere all’utente di interagire con i suoi oggetti (layer, elementi o interfacce). QGIS ha anche una console Python.
The QGIS Python Console is an interactive shell for Python command executions.
It also has a Python file editor that allows you to edit and save your Python scripts.
Both console and editor are based on PyQScintilla2 package.
To open the console go to (Ctrl+Alt+P) or
click on the  Python Console icon in the Plugins toolbar.
25.3.1. La Console Interattiva
La console è un interprete Python che consente di eseguire comandi Python. I moduli di QGIS (analysis, core, gui, server, processing, 3d) e Qt (QtCore, QtGui, QtNetwork, QtWidgets, QtXml) e i moduli math, os, re e sys di Python sono già importati e possono essere utilizzati direttamente.
La console interattiva è composta da una barra degli strumenti, un’area di input e una di output.
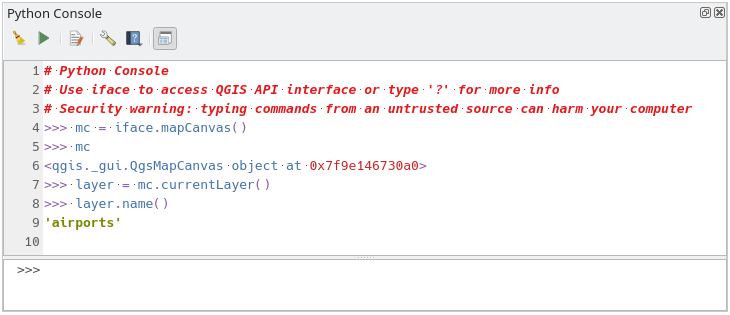
Fig. 25.17 La Console Python
25.3.1.1. Barra degli Strumenti
La barra degli strumenti comprende i seguenti strumenti:
 Pulisci Console per cancellare l’area di output;
 Esegui Comando disponibile nell’area di immissione: lo stesso che premere Enter;
 Mostra Editor: attiva la modalità L” Editor di Codice;
 Opzioni…: apre una finestra di dialogo per configurare console properties;
 Aiuto… fornisce un menu per accedere a diverse documentazioni:
Python Console Help (la pagina corrente)
 Aggancia Editor Codice per agganciare o sganciare il pannello nell’interfaccia QGIS
25.3.1.2. Area di immissione
Le caratteristiche principali dell’area di immissione della Console sono:
Completamento del codice, evidenziazione della sintassi e suggerimenti per le seguenti API:
Python
PyQGIS
PyQt5
QScintilla2
osgeo-gdal-ogr
osgeo-geos
Ctrl+Alt+Space per visualizzare l’elenco di completamento automatico se abilitato nel Impostazioni Python;
Eseguire frammenti di codice dall’area di input digitando e premendo Enter o Esegui Comando;
Eseguire frammenti di codice dall’area di output usando Enter Selected dal menu contestuale o premendo Ctrl+E;
Scorrere la cronologia dei comandi dall’area di input usando i tasti freccia Up e Down ed eseguire il comando che vuoi;
Ctrl+Shift+Space per visualizzare la cronologia dei comandi: facendo doppio clic su una riga il comando verrà eseguito. La finestra di dialogo Storico Comandi può anche essere richiamata dal menu contestuale dell’area di input;
Salva e cancella la cronologia dei comandi. La cronologia sarà salvata nel file
console_history.txtnella cartella attiva user profile;Digita i seguenti comandi speciali:
?per visualizzare una guida della Console Python._apiper aprire la documentazione QGIS C++ API o_api(object)per la documentazione di un oggetto specifico (nella documentazione di QGIS C++ API o Qt API)_pyqgisper aprire la documentazione di QGIS Python API oppure_pyqgis(object)per la documentazione di un oggetto specifico (nella documentazione di QGIS Python API o Qt API)_cookbookper aprire PyQGIS Cookbook.!seguito da un comando per eseguire comandi di shell dalla console Python. La console avvierà un sottoprocesso e inoltrerà il suo output all’Output della console Python. Mentre il sottoprocesso è in esecuzione, l’Input della console Python passa alla modalità STDIN e inoltra i caratteri inseriti al processo figlio. In questo modo è possibile inviare una conferma quando il programma figlio la richiede. Quando la console è in modalità STDIN, premendo Ctrl+C si arresta il sottoprocesso. È anche possibile trasferire il risultato di un comando a una variabile con la sintassivar = !cmd>>> !echo QGIS Rocks! QGIS Rocks >>> !gdalinfo --version GDAL 3.10.3, released 2025/04/01 >>> !pip install black # Install black python formatter using pip (if available) >>> sql_formats = !ogrinfo --formats | grep SQL >>> sql_formats ['SQLite -vector- (rw+v): SQLite / Spatialite', ' MSSQLSpatial -vector- (rw+): Microsoft SQL Server Spatial Database', ' PostgreSQL -vector- (rw+): PostgreSQL/PostGIS', ' MySQL -vector- (rw+): MySQL', ' PGDUMP -vector- (w+v): PostgreSQL SQL dump']
Suggerimento
Riutilizzare comandi effettuati dal pannello di output
Puoi eseguire frammenti di codice dal pannello di output selezionando del testo e premendo Ctrl+E. Non importa se il testo selezionato contiene il prompt dell’interprete (>>>, ...).
25.3.2. L” Editor di Codice
Use the Show Editor button in the Interactive Console to enable the editor widget.
It allows editing and saving Python scripts and offers advanced functionalities
to manage your code.
Depending on the enabled settings,
it provides various capabilities for easier code writing,
such as code completion, highlighting syntax and calltips for supported APIs.
Automatic indentation, parenthesis insertion, code commenting and syntax checking are also available.
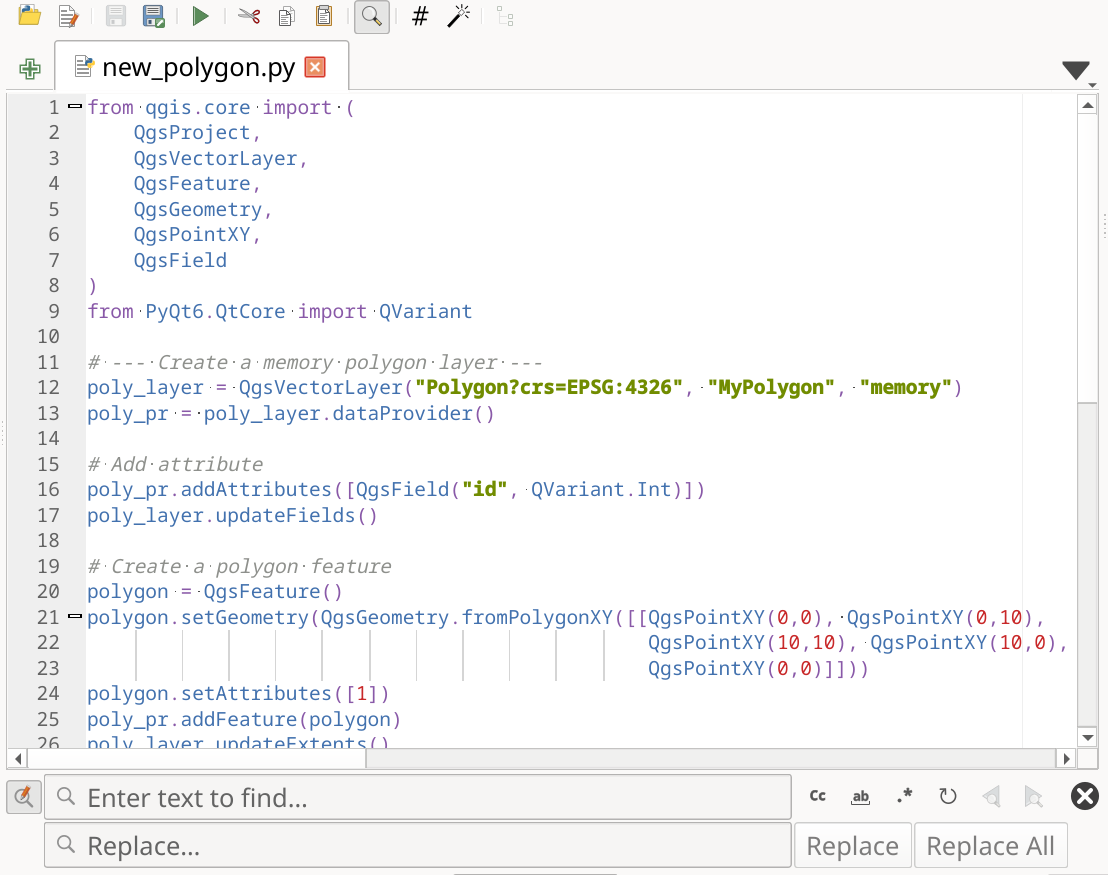
Fig. 25.18 L’editor Console Python
The code editor area allows to simultaneously work on different scripts, each in a specific tab.
Press  New editor to add a new tab.
You can run partially or totally a script from the Code Editor
and output the result in the Interactive Console output area.
New editor to add a new tab.
You can run partially or totally a script from the Code Editor
and output the result in the Interactive Console output area.
Suggerimento
Press Ctrl+Space to view the auto-completion list.
At the top of the dialog, a toolbar provides access to a few commands. Right-clicking the editor area provides some more options. All available tools are described in the following table.
Tool name |
Function |
Posizione |
|---|---|---|
|
Loads a Python file in the code editor dialog, as a new tab |
Barra degli Strumenti |
|
Opens a saved Python script in the default external program set for Python file editing |
|
|
Saves the current script |
|
|
Saves the current script as a new file |
|
|
Executes the whole script in the Interactive console
(this creates a byte-compiled file with the extension |
Toolbar & Contextual menu |
|
Attempts to display help on the selected string (class, method, object,…) in its corresponding API documentation |
Contextual menu |
|
Executes in the Interactive console the lines selected in the script |
Toolbar & Contextual menu |
|
Cuts selected text to the clipboard |
|
|
Copies selected text to the clipboard |
|
|
Pastes a cut or copied text |
|
|
Allows to search and replace a text in the script.
|
|
|
Comments out or uncomment selected lines, by adding or removing |
|
|
Allows to manually apply various formatting rules (sort imports, indentation, line length,…) to the code, following user-defined settings. This may require installation of additional Python modules. |
|
|
Shows and hides a dedicated browser with a tree structure for classes and functions available in the script. Click an item for a quick access to its definition. The tool requires an activation from the Python settings - Run and Debug. |
|
Hide editor |
Hides the Python code editor block.
To make it visible again, press |
Contextual menu |
|
Browses the code and reports syntax errors, such as missing parenthesis, colons, wrong indentation,… |
|
|
Undoes the latest action |
|
|
Reverts undone actions to a more recent |
|
Select all (Ctrl+A) |
Selects the whole script |
|
|
Shares the script as a Secret Gist or Public Gist on GitHub, provided a GitHub access token. |
|
|
Apre la finestra di dialogo Impostazioni Python dialog. |


