Viktigt
Översättning är en gemenskapsinsats du kan gå med i. Den här sidan är för närvarande översatt till 51.91%.
25.3. QGIS Python-konsol
Som du kommer att se senare i detta kapitel har QGIS utformats med en tilläggsarkitektur. Tillägg kan skrivas i Python, ett mycket känt språk i den geospatiala världen.
QGIS har ett Python API (se PyQGIS Developer Cookbook för några kodexempel) för att låta användaren interagera med dess objekt (lager, funktion eller gränssnitt). QGIS har också en Python-konsol.
The QGIS Python Console is an interactive shell for Python command executions.
It also has a Python file editor that allows you to edit and save your Python scripts.
Both console and editor are based on PyQScintilla2 package.
To open the console go to (Ctrl+Alt+P) or
click on the  Python Console icon in the Plugins toolbar.
25.3.1. Den interaktiva konsolen
Konsolen är en Python-tolk som gör att du kan köra Python-kommandon. Moduler från QGIS (analysis, core, gui, server, processing, 3d) och Qt (QtCore, QtGui, QtNetwork, QtWidgets, QtXml) samt Pythons moduler math, os, re och sys är redan importerade och kan användas direkt.
Den interaktiva konsolen består av ett verktygsfält, en inmatningsyta och en utmatningsyta.
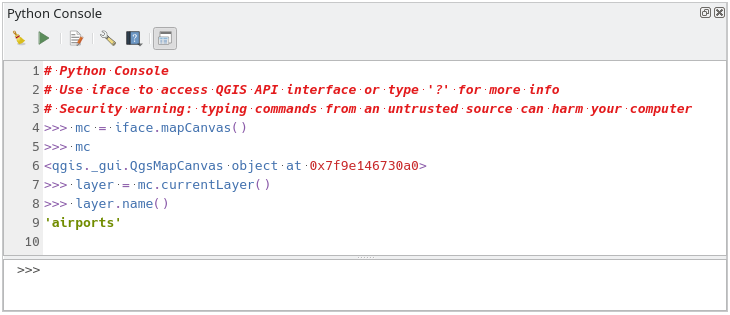
Fig. 25.17 Python-konsolen
25.3.1.1. Verktygsrad
I verktygsfältet finns följande verktyg:
 Clear Console för att rensa utmatningsområdet;
 Kör kommando tillgängligt i inmatningsområdet: samma sak som att trycka på Enter;
 Visa redigerare: växlar synlighet för Kodredigeraren;
 Alternativ…: öppnar en dialogruta för att konfigurera konsolegenskaper;
 Hjälp… innehåller en meny för att komma åt olika dokument:
Python Console Help (den aktuella sidan)
 Dock Code Editor för att docka eller undocka panelen i QGIS-gränssnittet
25.3.1.2. Inmatningsområde
De viktigaste funktionerna i konsolens inmatningsområde är
Kodkomplettering, syntaxmarkering och anropstips för följande API:er:
Python
PyQGIS
PyQt5
QScintilla2
osgeo-gdal-ogr
osgeo-geos
Ctrl+Alt+Space för att visa listan för automatisk komplettering om den är aktiverad i Python-inställningar;
Kör kodsnuttar från inmatningsområdet genom att skriva och trycka på Enter eller Run Command;
Exekvera kodavsnitt från utmatningsområdet med hjälp av Enter Selected från snabbmenyn eller genom att trycka på Ctrl+E;
Bläddra igenom kommandohistoriken från inmatningsområdet med hjälp av piltangenterna Upp och Ned och kör det kommando du vill ha;
Ctrl+Shift+Space för att visa kommandohistoriken: dubbelklicka på en rad för att utföra kommandot. Dialogrutan Kommandohistorik kan också nås från kontextmenyn i inmatningsområdet;
Spara och rensa kommandohistoriken. Historiken sparas i filen
console_history.txtunder den aktiva mappen användarprofil;Skriv in följande specialkommandon:
?för att visa en hjälp av Python-konsolen_apiför att öppna QGIS C++ API dokumentation eller_api(object)för en specifik objektdokumentation (i QGIS C++ API eller Qt API dokumentation)_pyqgisför att öppna QGIS Python API dokumentation eller_pyqgis(object)för en specifik objektdokumentation (i QGIS Python API eller Qt API dokumentation)_cookbookto open PyQGIS Cookbook.!följt av ett kommando för att köra Shell-kommandon från Python-konsolen. Konsolen startar en underprocess och vidarebefordrar dess utdata till Python Console Output. Medan subprocessen körs växlar Python Console Input till STDIN-läge och vidarebefordrar inmatade tecken till barnprocessen. Detta gör det möjligt att skicka en bekräftelse när barnprogrammet ber om det. När konsolen är i STDIN-läge kan man trycka på Ctrl+C för att döda underprocessen. Det är också möjligt att påverka resultatet av ett kommando till en variabel med syntaxenvar = !cmd>>> !echo QGIS Rocks! QGIS Rocks >>> !gdalinfo --version GDAL 3.10.3, released 2025/04/01 >>> !pip install black # Install black python formatter using pip (if available) >>> sql_formats = !ogrinfo --formats | grep SQL >>> sql_formats ['SQLite -vector- (rw+v): SQLite / Spatialite', ' MSSQLSpatial -vector- (rw+): Microsoft SQL Server Spatial Database', ' PostgreSQL -vector- (rw+): PostgreSQL/PostGIS', ' MySQL -vector- (rw+): MySQL', ' PGDUMP -vector- (w+v): PostgreSQL SQL dump']
Tips
Återanvända utförda kommandon från utmatningspanelen
Du kan köra kodsnuttar från utdatapanelen genom att markera text och trycka på Ctrl+E. Det spelar ingen roll om den markerade texten innehåller tolkens prompt (>>>, ...).
25.3.2. Kodredigeraren
Use the Show Editor button in the Interactive Console to enable the editor widget.
It allows editing and saving Python scripts and offers advanced functionalities
to manage your code.
Depending on the enabled settings,
it provides various capabilities for easier code writing,
such as code completion, highlighting syntax and calltips for supported APIs.
Automatic indentation, parenthesis insertion, code commenting and syntax checking are also available.
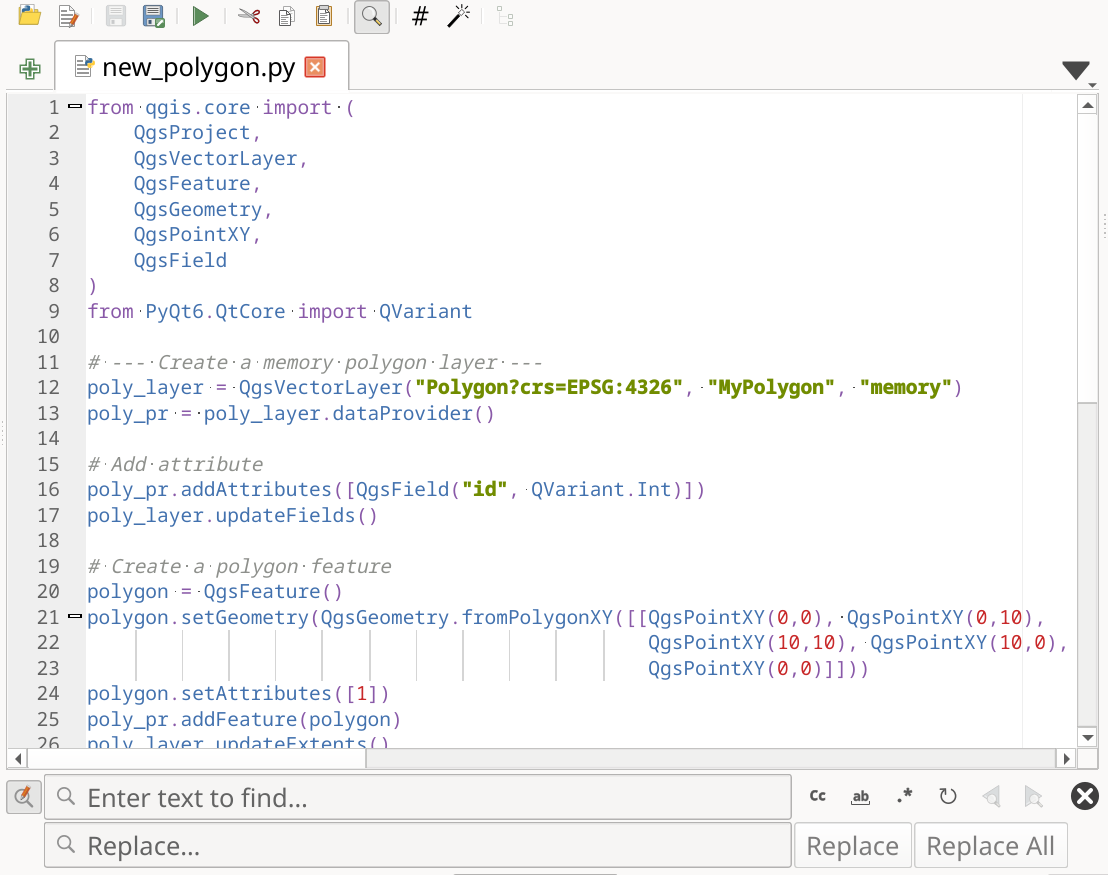
Fig. 25.18 Python Console-editorn
The code editor area allows to simultaneously work on different scripts, each in a specific tab.
Press  New editor to add a new tab.
You can run partially or totally a script from the Code Editor
and output the result in the Interactive Console output area.
New editor to add a new tab.
You can run partially or totally a script from the Code Editor
and output the result in the Interactive Console output area.
Tips
Press Ctrl+Space to view the auto-completion list.
At the top of the dialog, a toolbar provides access to a few commands. Right-clicking the editor area provides some more options. All available tools are described in the following table.
Tool name |
Function |
Plats |
|---|---|---|
|
Loads a Python file in the code editor dialog, as a new tab |
Verktygsrad |
|
Opens a saved Python script in the default external program set for Python file editing |
|
|
Saves the current script |
|
|
Saves the current script as a new file |
|
|
Executes the whole script in the Interactive console
(this creates a byte-compiled file with the extension |
Toolbar & Contextual menu |
|
Attempts to display help on the selected string (class, method, object,…) in its corresponding API documentation |
Contextual menu |
|
Executes in the Interactive console the lines selected in the script |
Toolbar & Contextual menu |
|
Cuts selected text to the clipboard |
|
|
Copies selected text to the clipboard |
|
|
Pastes a cut or copied text |
|
|
Allows to search and replace a text in the script.
|
|
|
Comments out or uncomment selected lines, by adding or removing |
|
|
Allows to manually apply various formatting rules (sort imports, indentation, line length,…) to the code, following user-defined settings. This may require installation of additional Python modules. |
|
|
Shows and hides a dedicated browser with a tree structure for classes and functions available in the script. Click an item for a quick access to its definition. The tool requires an activation from the Python settings - Run and Debug. |
|
Hide editor |
Hides the Python code editor block.
To make it visible again, press |
Contextual menu |
|
Browses the code and reports syntax errors, such as missing parenthesis, colons, wrong indentation,… |
|
|
Undoes the latest action |
|
|
Reverts undone actions to a more recent |
|
Select all (Ctrl+A) |
Selects the whole script |
|
|
Shares the script as a Secret Gist or Public Gist on GitHub, provided a GitHub access token. |
|
|
Opens the Python-inställningar dialog. |


