Важно
Перевод - это работа сообщества : ссылка:Вы можете присоединиться. Эта страница в настоящее время переводится |прогресс перевода|.
12.2. Working with the Attribute Table
The attribute table displays information on features of a selected layer. Each row in the table represents a feature (with or without geometry), and each column contains a particular piece of information about the feature. Features in the table can be searched, selected, moved or even edited.
12.2.1. Foreword: Spatial and non-spatial tables
QGIS allows you to load spatial and non-spatial layers. This currently includes tables supported by GDAL and delimited text, as well as the PostgreSQL, MS SQL Server, SpatiaLite and Oracle providers. All loaded layers are listed in the Layers panel. Whether a layer is spatially enabled or not determines whether you can interact with it on the map.
Non-spatial tables can be browsed and edited using the attribute table view. Furthermore, they can be used for field lookups. For example, you can use columns of a non-spatial table to define attribute values, or a range of values that are allowed, to be added to a specific vector layer during digitizing. Have a closer look at the edit widget in section Attributes Form Properties to find out more.
12.2.2. Introducing the attribute table interface
To open the attribute table for a vector layer, activate the layer by
clicking on it in the Layers Panel. Then, from the main
menu, choose  . It is also possible to right-click on the layer and choose
from the drop-down menu,
or to click on the Open Attribute Table button
in the Attributes toolbar.
If you prefer shortcuts, F6 will open the attribute table.
Shift+F6 will open the attribute table filtered to selected features and
Ctrl+F6 will open the attribute table filtered to visible features.
. It is also possible to right-click on the layer and choose
from the drop-down menu,
or to click on the Open Attribute Table button
in the Attributes toolbar.
If you prefer shortcuts, F6 will open the attribute table.
Shift+F6 will open the attribute table filtered to selected features and
Ctrl+F6 will open the attribute table filtered to visible features.
This will open a new window that displays the feature attributes for the layer (figure_attributes_table). According to the setting in menu, the attribute table will open in a docked window or a regular window. The total number of features in the layer and the number of currently selected/filtered features are shown in the attribute table title, as well as if the layer is spatially limited.
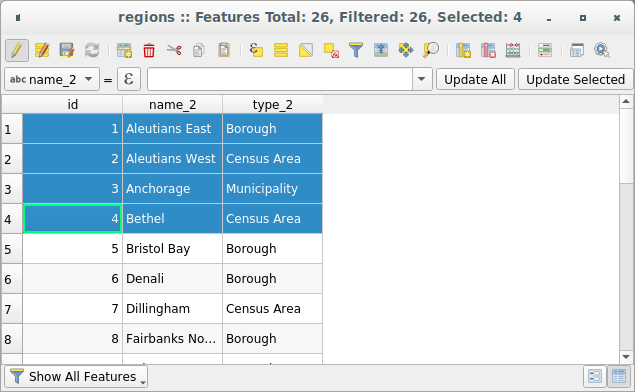
Рис. 12.73 Attribute Table for regions layer
The buttons at the top of the attribute table window provide the following functionality:
Иконка |
Ярлык |
Назначение |
Default Shortcut |
|---|---|---|---|
|
Toggle editing mode |
Enable editing functionalities |
Ctrl+E |
|
Toggle multi edit mode |
Update multiple fields of many features |
|
|
Save Edits |
Save current modifications |
|
|
Reload the table |
||
|
Add feature |
Add new geometryless feature |
|
|
Add feature via attribute table |
Inserts a new empty row in the attribute table to be filled in |
|
|
Add feature via attribute form |
Opens the feature attributes form for data entry |
|
|
Delete selected features |
Remove selected features from the layer |
|
|
Cut selected features to clipboard |
Ctrl+X |
|
|
Copy selected features to clipboard |
Ctrl+C |
|
|
Paste features from clipboard |
Insert new features from copied ones |
Ctrl+V |
|
Select features using an Expression |
||
|
Select All |
Select all features in the layer |
Ctrl+A |
|
Invert selection |
Invert the current selection in the layer |
Ctrl+R |
|
Deselect all |
Deselect all features in the current layer |
Ctrl+Shift+A |
|
Filter/Select features using form |
Ctrl+F |
|
|
Move selected to top |
Move selected rows to the top of the table |
|
|
Pan map to the selected rows |
Ctrl+P |
|
|
Zoom map to the selected rows |
Ctrl+J |
|
|
New field |
Add a new field to the data source |
Ctrl+W |
|
Delete field |
Remove a field from the data source |
|
|
Organize columns |
Show/hide fields from the attribute table |
|
|
Open field calculator |
Update field for many features in a row |
Ctrl+I |
|
Conditional formatting |
Enable table formatting |
|
|
Dock attribute table |
Allows to dock/undock the attribute table |
|
|
Actions |
Lists the actions related to the layer |


Внимание
Depending on the format of the data and the GDAL library built with your QGIS version, some tools may not be available.
Below these buttons is the Quick Field Calculation bar (enabled only in
edit mode), which allows to quickly apply
calculations to all or part of the features in the layer. This bar uses the same
expressions as the  Field
Calculator (see Editing attribute values).
Field
Calculator (see Editing attribute values).
12.2.2.1. Table view vs Form view
QGIS provides two view modes to easily manipulate data in the attribute table:
The
Table view, displays values of multiple features in a
tabular mode, each row representing a feature and each column a field.
A right-click on the column header allows you to configure the table
display while a right-click on a cell provides
interaction with the feature.The attribute table supports Shift+Mouse Wheel scrolling in table view mode to switch between vertical and horizontal scrolling movements. This can also be achieved replacing the mouse with the trackpad on macOS.
The
 Form view shows feature identifiers in a first panel and displays only the attributes of the clicked
identifier in the second one.
There is a pull-down menu at the top of the first panel where the «identifier»
can be updated using an attribute () or an Expression.
A menu allows you to sort the returned identifiers
By display name (ascending), By display name (descending)
or By custom expression.
The pull-down also includes the last 10 expressions for reuse.
Form view uses the layer fields configuration
(see Attributes Form Properties).
Form view shows feature identifiers in a first panel and displays only the attributes of the clicked
identifier in the second one.
There is a pull-down menu at the top of the first panel where the «identifier»
can be updated using an attribute () or an Expression.
A menu allows you to sort the returned identifiers
By display name (ascending), By display name (descending)
or By custom expression.
The pull-down also includes the last 10 expressions for reuse.
Form view uses the layer fields configuration
(see Attributes Form Properties).You can browse through the feature identifiers with the arrows on the bottom of the first panel. The features attributes update in the second panel as you go. It’s also possible to identify or move to the active feature in the map canvas with pushing down any of the button at the bottom:
 Highlight current feature if visible in the
map canvas
Highlight current feature if visible in the
map canvas Automatically pan to current feature
 Zoom to current feature
You can switch from one mode to the other by clicking the corresponding icon at the bottom right of the dialog.
You can also specify the Default view mode at the opening of the attribute table in menu. It can be „Remember last view“, „Table view“ or „Form view“.
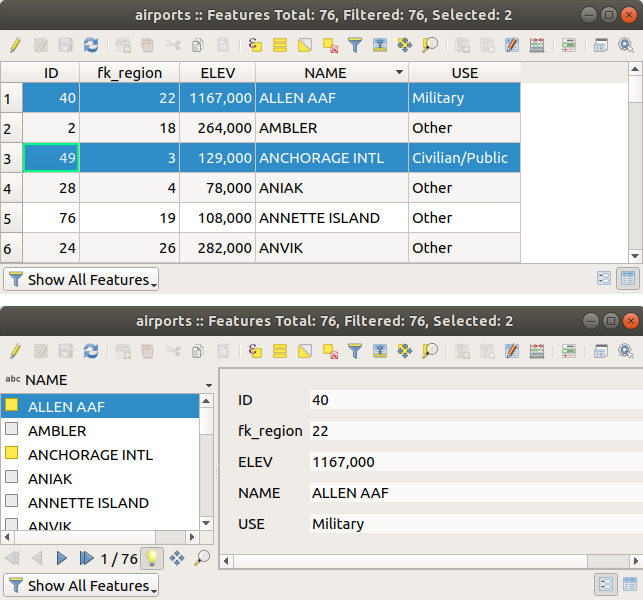
Рис. 12.74 Attribute table in table view (top) vs form view (bottom)
12.2.2.2. Configuring the columns
Right-click in a column header when in table view to have access to tools that help you control:
Resizing columns widths
Columns width can be set through a right-click on the column header and select either:
Set width… to enter the desired value. By default, the current value is displayed in the widget
Set all column widths… to the same value
Autosize to resize at the best fit the column.
Autosize all columns
A column size can also be changed by dragging the boundary on the right of its heading. The new size of the column is maintained for the layer, and restored at the next opening of the attribute table.
In the Data Source Settings, you can choose to
 Autosize all columns by default when opening attribute table,
which will make «Autosize All Columns» the default view every time attribute tables are opened in QGIS.
Autosize all columns by default when opening attribute table,
which will make «Autosize All Columns» the default view every time attribute tables are opened in QGIS.
Hiding and organizing columns and enabling actions
By right-clicking in a column header, you can choose to Hide column
from the attribute table (in «table view» mode).
For more advanced controls, press the  Organize columns…
button from the dialog toolbar or choose Organize columns…
in a column header contextual menu.
Organize columns…
button from the dialog toolbar or choose Organize columns…
in a column header contextual menu.
In the new dialog, you can:
check/uncheck columns you want to show or hide: a hidden column will disappear from every instance of the attribute table dialog until it is actively restored. It is also possible to:
choose Show All to display all the fields (columns) and actions in the table
choose Hide All to hide all the fields (columns) and actions in the table
use the Toggle selection to invert visibility of the current selection of columns. You can use keyboard combination for selecting multiple columns.
drag-and-drop items to reorder the columns in the attribute table. Note that this change is for the table rendering and does not alter the fields order in the layer datasource
add a new virtual Actions column that displays in each row a drop-down box or a button list of enabled actions. See Actions Properties for more information about actions.
Sorting rows
The rows can be sorted by any column, by clicking on the column header. A
small arrow indicates the sort order (downward pointing means descending
values from the top row down, upward pointing means ascending values from
the top row down).
You can also choose to sort the rows with the Sort… option of the
column header context menu and write an expression. E.g. to sort the rows
using multiple columns you can write concat(col0, col1).
In form view, features identifier can be sorted using the  Sort
by preview expression option.
Sort
by preview expression option.
Note that sorting the rows only affects the table rendering and does not alter the features order in the layer datasource.
Совет
Sorting based on columns of different types
Trying to sort an attribute table based on columns of string and numeric types
may lead to unexpected result because of the concat("USE", "ID") expression
returning string values (ie, 'Borough105' < 'Borough6').
You can workaround this by using eg concat("USE", lpad("ID", 3, 0)) which
returns 'Borough105' > 'Borough006'.
12.2.2.3. Formatting of table cells using conditions
Conditional formatting settings can be used to highlight in the attribute table features you may want to put a particular focus on, using custom conditions on feature’s:
geometry (e.g., identifying multi-parts features, small area ones or in a defined map extent…);
or field value (e.g., comparing values to a threshold, identifying empty cells, duplicates, …).
You can enable the conditional formatting panel clicking on
 Conditional formatting button at the top right
of the attributes window in table view (not triggered in form view).
Conditional formatting button at the top right
of the attributes window in table view (not triggered in form view).
The new panel allows user to add new rules to format rendering of
 Field or
  Full row.
Adding new rule opens a form to define:
Full row.
Adding new rule opens a form to define:
the name of the rule;
a condition using any of the expression builder functions;
the formatting: it can be chosen from a list of predefined formats or created based on properties like:
background and text colors;
use of icon;
bold, italic, underline, or strikeout;
font.
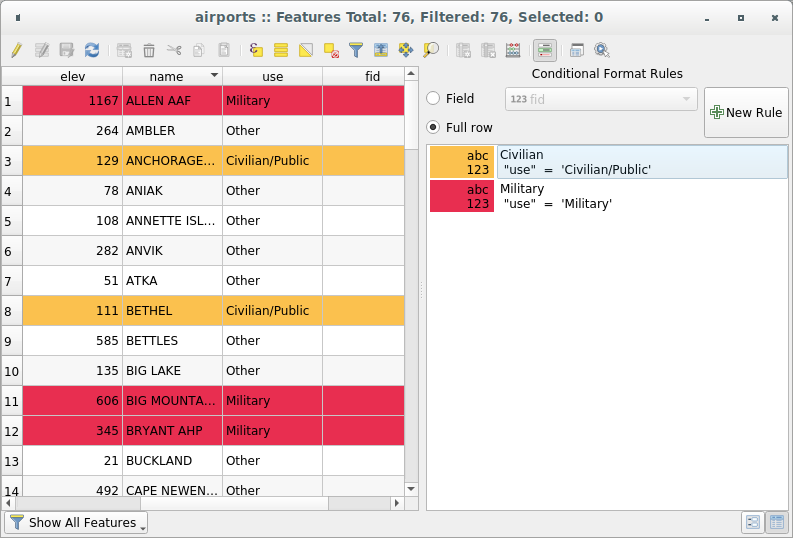
Рис. 12.75 Conditional Formatting of an attribute table
12.2.3. Interacting with features in an attribute table
12.2.3.1. Selecting features
In table view, each row in the attribute table displays the attributes of a unique feature in the layer. Selecting a row selects the feature and likewise, selecting a feature in the map canvas (in case of geometry enabled layer) selects the row in the attribute table. If the set of features selected in the map canvas (or attribute table) is changed, then the selection is also updated in the attribute table (or map canvas) accordingly.
Rows can be selected by clicking on the row number on the left side of the row. Multiple rows can be marked by holding the Ctrl key. A continuous selection can be made by holding the Shift key and clicking on several row headers on the left side of the rows. All rows between the current cursor position and the clicked row are selected. Moving the cursor position in the attribute table, by clicking a cell in the table, does not change the row selection. Changing the selection in the main canvas does not move the cursor position in the attribute table.
In form view of the attribute table, features are by default identified in the left panel by the value of their displayed field (see Display Properties). This identifier can be replaced using the drop-down list at the top of the panel, either by selecting an existing field or using a custom expression. You can also choose to sort the list of features from the drop-down menu.
Click a value in the left panel to display the feature’s attributes in the right one. To select a feature, you need to click inside the square symbol at the left of the identifier. By default, the symbol turns into yellow. Like in the table view, you can perform multiple feature selection using the keyboard combinations previously exposed.
Beyond selecting features with the mouse, you can perform automatic selection based on feature’s attribute using tools available in the attribute table toolbar, such as (see section Automatic selection and subsequent for more information and use case):
 Select By Expression…
 Select Features By Value…
 Deselect All Features from the Layer
 Select All Features
 Invert Feature Selection.
It is also possible to select features using forms.
12.2.3.2. Filtering features
Once you have selected features in the attribute table, you may want to display only these records in the table. This can be easily done using the Show Selected Features item from the drop-down list at the bottom left of the attribute table dialog. This list offers the following filters:
- Show All Features
 Show Selected Features - same as using
Open Attribute Table (Selected Features) from the Layer
menu or the Attributes Toolbar or pressing Shift+F6
Show Selected Features - same as using
Open Attribute Table (Selected Features) from the Layer
menu or the Attributes Toolbar or pressing Shift+F6 Show Features visible on map - same as using
Open Attribute Table (Visible Features) from the Layer
menu or the Attributes Toolbar or pressing Ctrl+F6
Show Features visible on map - same as using
Open Attribute Table (Visible Features) from the Layer
menu or the Attributes Toolbar or pressing Ctrl+F6 Show Features with Failing Constraints -
features will be filtered to only show the ones which have failing constraints.
Depending on whether the unmet constraint is hard or soft,
failing field values are displayed in respectively dark or light orange cells.
Show Features with Failing Constraints -
features will be filtered to only show the ones which have failing constraints.
Depending on whether the unmet constraint is hard or soft,
failing field values are displayed in respectively dark or light orange cells. Show Edited and New Features - same as using
Open Attribute Table (Edited and New Features) from the Layer
menu or the Attributes Toolbar
Show Edited and New Features - same as using
Open Attribute Table (Edited and New Features) from the Layer
menu or the Attributes ToolbarField Filter - allows the user to filter based on value of a field: choose a column from a list, type or select a value and press Enter to filter. Then, only the features matching
num_field = valueorstring_field ilike '%value%'expression are shown in the attribute table. You can check
Case sensitive to be less permissive with strings. Advanced filter (Expression) - Opens the expression builder
dialog. Within it, you can create complex expressions to match table rows.
For example, you can filter the table using more than one field.
When applied, the filter expression will show up at the bottom of the form.
Advanced filter (Expression) - Opens the expression builder
dialog. Within it, you can create complex expressions to match table rows.
For example, you can filter the table using more than one field.
When applied, the filter expression will show up at the bottom of the form. : a shortcut to saved
expressions frequently used for filtering your attribute table.
: a shortcut to saved
expressions frequently used for filtering your attribute table.
It is also possible to filter features using forms.
Примечание
Filtering records out of the attribute table does not filter features out of the layer; they are simply momentaneously hidden from the table and can be accessed from the map canvas or by removing the filter. For filters that do hide features from the layer, use the Query Builder.
Совет
Update datasource filtering with Show Features Visible on Map
When for performance reasons, features shown in attribute table are spatially limited to the canvas extent at its opening (see Data Source Options for a how-to), selecting Show Features Visible on Map on a new canvas extent updates the spatial restriction.
12.2.3.3. Storing filter expressions
Expressions you use for attribute table filtering can be saved for further calls.
When using Field Filter or Advanced Filter (expression)
entries, the expression used is displayed in a text widget in the bottom of the
attribute table dialog. Press the  Save expression with text as name next to the box to save the expression
in the project. Pressing the drop-down menu next to the button allows to save
the expression with a custom name (Save expression as…).
Once a saved expression is displayed, the
button is triggered and its drop-down menu allows you to Edit the
expression and name if any, or Delete stored expression.
Save expression with text as name next to the box to save the expression
in the project. Pressing the drop-down menu next to the button allows to save
the expression with a custom name (Save expression as…).
Once a saved expression is displayed, the
button is triggered and its drop-down menu allows you to Edit the
expression and name if any, or Delete stored expression.
Saved filter expressions are saved in the project and available through the Stored filter expressions menu of the attribute table. They are different from the user expressions, shared by all projects of the active user profile.
12.2.3.4. Filtering and selecting features using forms
Clicking the Filter/Select features using form or
pressing Ctrl+F will make the attribute table dialog switch to form view
and replace each widget with its search variant.
From this point onwards, this tool functionality is similar to the one described in Select Features By Value, where you can find descriptions of all operators and selecting modes.
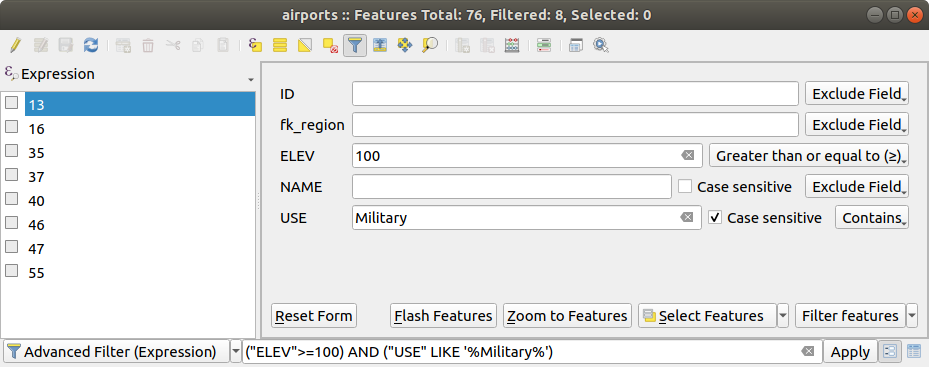
Рис. 12.76 Attribute table filtered by the filter form
When selecting / filtering features from the attribute table, there is a Filter features button that allows defining and refining filters. Its use triggers the Advanced filter (Expression) option and displays the corresponding filter expression in an editable text widget at the bottom of the form.
If there are already filtered features, you can refine the filter using the drop-down list next to the Filter features button. The options are:
Filter within («AND»)
Extend filter («OR»)
To clear the filter, either select the Show all features option from the bottom left pull-down menu, or clear the expression and click Apply or press Enter.
12.2.3.5. More actions on features
Users have several possibilities to manipulate feature in an attribute table. Right-click in a cell and you can:
Select all (Ctrl+A) the features;
Copy the content of a cell in the clipboard with Copy cell content;
Zoom to feature without having to select it beforehand;
Pan to feature without having to select it beforehand;
Flash feature, to highlight it in the map canvas;
Open form: it toggles attribute table into form view with a focus on the clicked feature.
Display a list of actions, previously enabled in the tab.
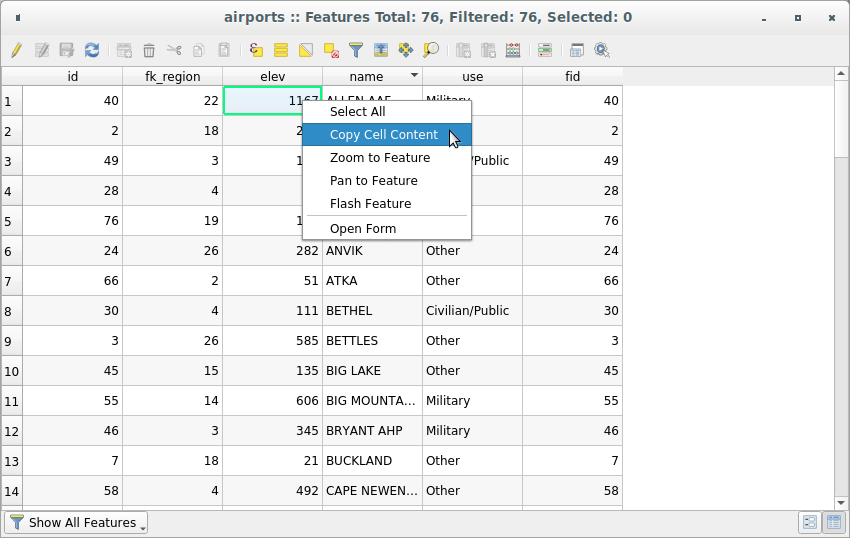
Рис. 12.77 Copy cell content button
If you want to use attribute data in external programs (such as Excel,
LibreOffice, or a custom web application), select one or more row(s) and
use the  Copy selected rows to clipboard button
or press Ctrl+C.
Moreover, in menu
you can define the format to paste to with the Copy features as option.
More details at Data Sources settings.
Copy selected rows to clipboard button
or press Ctrl+C.
Moreover, in menu
you can define the format to paste to with the Copy features as option.
More details at Data Sources settings.
12.2.4. Editing attribute values
In order to modify data in an attribute table, you should first toggle the layer into edit.
Press the  Toggle Editing button.
Depending on the layer geometry type and the clipboard state,
a few more tools are enabled in the attribute table top toolbar.
Toggle Editing button.
Depending on the layer geometry type and the clipboard state,
a few more tools are enabled in the attribute table top toolbar.
Editing attribute values can then be done by:
typing the new value directly in the cell, whether the attribute table is in table or form view. Changes are hence done cell by cell, feature by feature;
using the field calculator: update in a row a field that may already exist or to be created but for multiple features. It can be used to create virtual fields;
using the quick field calculation bar: same as above but for only existing field;
or using the multi edit mode: update in a row multiple fields for multiple features.
Putting the layer into edit mode will also allow you to
 Paste features from clipboard (Ctrl+V)
 Cut selected rows to clipboard (Ctrl+X)
or
Cut selected rows to clipboard (Ctrl+X)
or  Delete selected features.
More details at Вырезать, копировать и вставить объекты.
Delete selected features.
More details at Вырезать, копировать и вставить объекты.
12.2.4.1. Using the Field Calculator
The Field Calculator button in the attribute table
allows you to perform calculations on the basis of existing attribute values or
defined functions, for instance, to calculate length or area of geometry features.
The results can be used to update an existing field, or written
to a new field (that can be a virtual one).
The field calculator is available on any layer that supports edit. When you click on the field calculator icon the dialog opens (see Рис. 12.78). If the layer is not in edit mode, a warning is displayed and using the field calculator will cause the layer to be put in edit mode before the calculation is made.
Based on the Expression Builder dialog, the field calculator dialog offers a complete interface to define an expression and apply it to an existing or a newly created field. To use the field calculator dialog, you must select whether you want to:
apply calculation on the whole layer or on selected features only
create a new field for the calculation or update an existing one.
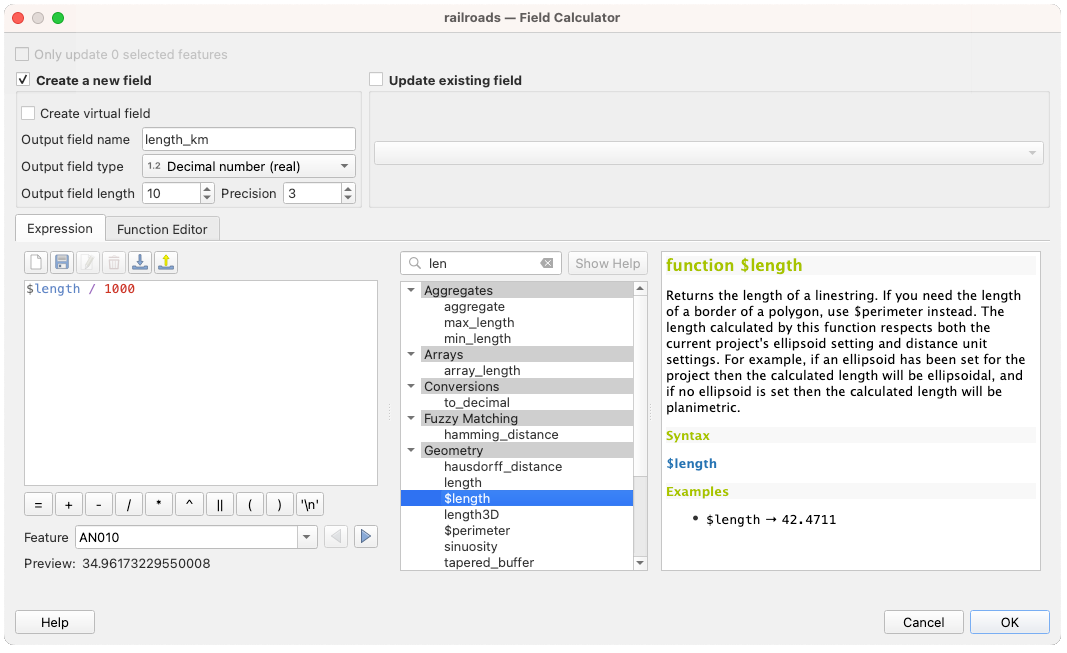
Рис. 12.78 Калькулятор полей
If you choose to add a new field, you need to enter a field name, a field type (integer, real, date or string) and if needed, the total field length and the field precision. For example, if you choose a field length of 10 and a field precision of 3, it means you have 7 digits before the dot, and 3 digits for the decimal part.
A short example illustrates how field calculator works when using the
Expression tab. We want to calculate the length in km of the
railroads layer from the QGIS sample dataset:
Load the shapefile
railroads.shpin QGIS and press
Open Attribute Table.Click on
Toggle editing mode and open the
Field Calculator dialog.Select the
Create a new field checkbox to save the
calculations into a new field.Set Output field name to
length_kmSelect
Decimal number (real)as Output field typeSet the Output field length to
10and the Precision to3Double click on
$lengthin the Geometry group to add the length of the geometry into the Field calculator expression box (you will begin to see a preview of the output, up to 60 characters, below the expression box updating in real-time as the expression is assembled).Complete the expression by typing
/ 1000in the Field calculator expression box and click OK.You can now find a new length_km field in the attribute table.
12.2.4.2. Creating a Virtual Field
A virtual field is a field based on an expression calculated on the fly, meaning
that its value is automatically updated as soon as an underlying parameter changes.
The expression applies to all the features in the layer and is set once;
you no longer need to recalculate the field each time underlying values change.
For example, you may want to use a virtual field if you need area to be evaluated
as you digitize features or to automatically calculate a duration between dates
that may change (e.g., using now() function).
Creating a virtual field is done through the Field calculator dialog
and follows the same procedure as for regular fields.
Simply remember to check the Create virtual field option
and use a field type compatible with the data your expression would generate.
Editing a virtual field is done through the  Fields tab
of the layer properties dialog (see Fields Properties).
The expression defining the field is exposed in the Comment column,
and pressing the
Fields tab
of the layer properties dialog (see Fields Properties).
The expression defining the field is exposed in the Comment column,
and pressing the  button next to it opens an expression editor window
for update.
button next to it opens an expression editor window
for update.
Примечание
Use of Virtual Fields
A field can be set virtual only at its creation.
Virtual fields are not permanent in the layer attributes, meaning that they’re only saved and available in the project file they’ve been created.
12.2.4.3. Using the Quick Field Calculation Bar
While Field calculator is always available, the quick field calculation bar on top of the attribute table is only visible if the layer is in edit mode. Thanks to the expression engine, it offers a quicker access to edit an already existing field:
Select the field to update in the drop-down list.
Fill the textbox with a value, an expression you directly write or build using the
expression button.Click on Update All, Update Selected or Update Filtered button according to your need.
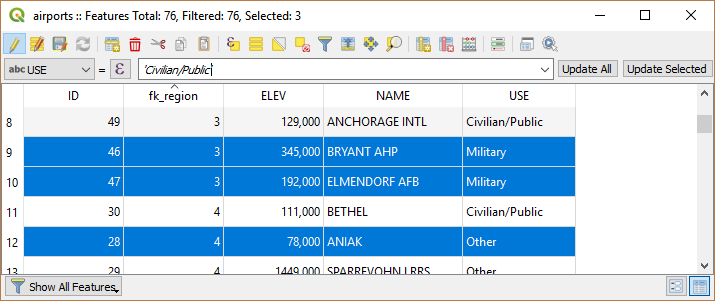
Рис. 12.79 Quick Field Calculation Bar
12.2.4.4. Editing multiple fields
Unlike the previous tools, multi edit mode allows multiple attributes of different features to be edited simultaneously. When the layer is toggled to edit, multi edit capabilities are accessible:
using the
 Toggle multi edit mode button from the toolbar
inside the attribute table dialog;
Toggle multi edit mode button from the toolbar
inside the attribute table dialog;or selecting
menu.
Примечание
Unlike the tool from the attribute table, hitting the option provides you with a modal dialog to fill attributes changes. Hence, features selection is required before execution.
In order to edit multiple fields in a row:
Select the features you want to edit.
From the attribute table toolbar, click the
button. This will
toggle the dialog to its form view. Feature selection could also be made
at this step.At the right side of the attribute table, fields (and values) of selected features are shown. New widgets appear next to each field allowing for display of the current multi edit state:
 The field contains different values for selected
features. It’s shown empty and each feature will keep its original value.
You can reset the value of the field from the drop-down list of the widget.
The field contains different values for selected
features. It’s shown empty and each feature will keep its original value.
You can reset the value of the field from the drop-down list of the widget. All selected features have the same value for this
field and the value displayed in the form will be kept.
All selected features have the same value for this
field and the value displayed in the form will be kept. The field has been edited and the entered value
will be applied to all the selected features. A message appears at the top
of the dialog, inviting you to either apply or reset your modification.
The field has been edited and the entered value
will be applied to all the selected features. A message appears at the top
of the dialog, inviting you to either apply or reset your modification.
Clicking any of these widgets allows you to either set the current value for the field or reset to original value, meaning that you can roll back changes on a field-by-field basis.
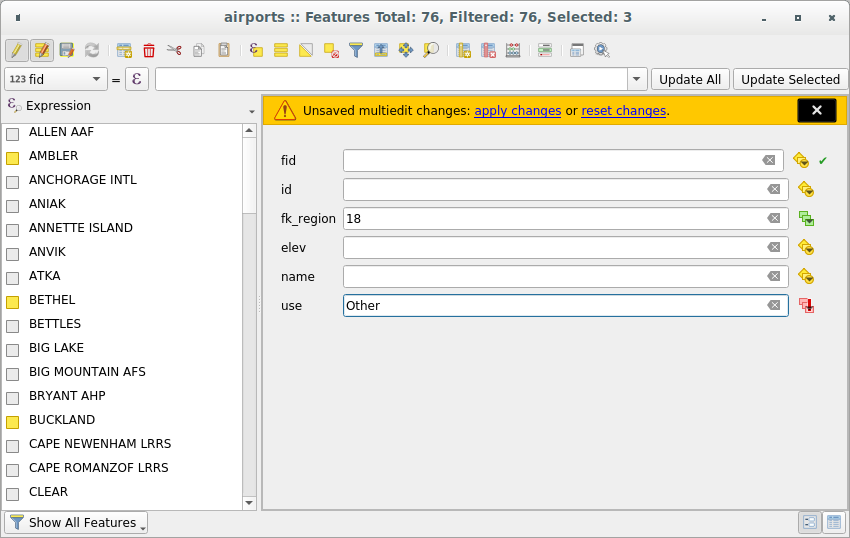
Рис. 12.80 Editing fields of multiple features
Make the changes to the fields you want.
Click on Apply changes in the upper message text or any other feature in the left panel.
Changes will apply to all selected features. If no feature is selected, the
whole table is updated with your changes. Modifications are made as a single
edit command. So pressing  Undo will rollback the attribute
changes for all selected features at once.
Undo will rollback the attribute
changes for all selected features at once.
Примечание
Multi edit mode is only available for auto generated and drag and drop forms (see Customizing a form for your data); it is not supported by custom ui forms.
12.2.5. Exploring features attributes through the Identify Tool
The  Identify features tool can be used to display all attributes
of a feature in the map canvas. It is a quick way to view and verify all data without
having to search for it in the attribute table.
Identify features tool can be used to display all attributes
of a feature in the map canvas. It is a quick way to view and verify all data without
having to search for it in the attribute table.
To use the Identify features tool for vector layers, follow these steps:
Select the vector layer in the Layers panel.
Click on the Identify features tool in the toolbar or press Ctrl+Shift+I.
Click on a feature in the map view.
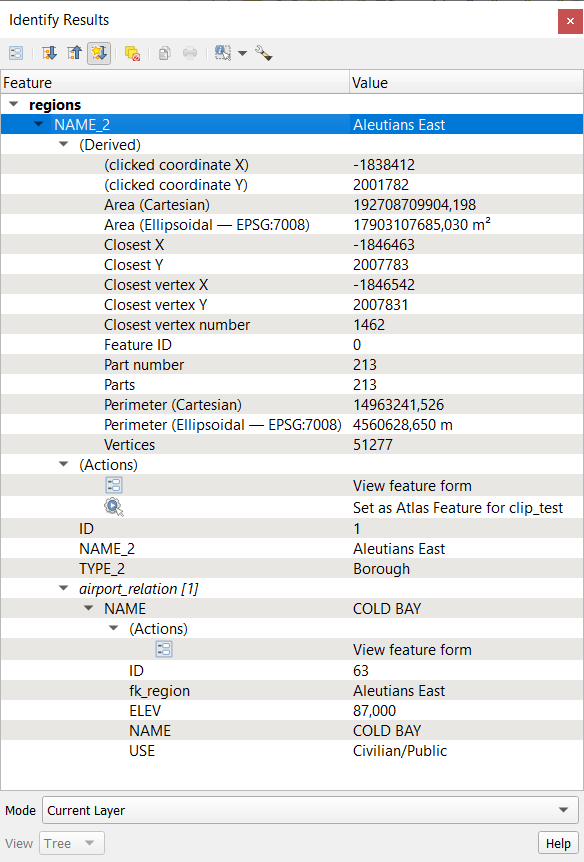
Рис. 12.81 Identify Results dialog
The Identify results panel will display different features information in a tree view. There are two columns in the panel: Feature and Value. The first item is the name of the layer and its children are its identified feature(s). Each feature is identified by the display name field along with its value. Other information about the feature follows:
Derived section - those are the information calculated or derived from other information in the layer. For example, the area of a polygon or the length of a line. General information that can be found in this section:
Depending on the geometry type, the cartesian measurements of length, perimeter or area in the layer’s CRS units. For 3D line vectors, the cartesian line length is available.
Depending on the geometry type and if an ellipsoid is set in the Project Properties dialog (), ellipsoidal values of length, perimeter, or area using the specified units.
The count of geometry parts in the feature and the number of the part clicked.
The count of vertices in the feature.
Coordinate information, using the project properties Coordinates display settings:
XandYcoordinate values of the clicked pointthe number of the closest vertex to the clicked point
XandYcoordinate values of the closest vertex (andZ/Mif applicable)if you click on a curved segment, the radius of that section is also displayed.
if both the vector layer and the project have vertical datums set and they differ, the
Zvalue will be displayed for both datums.
Actions: Actions can be added to the identify feature windows. The action is run by clicking on the action label. By default, only one action is added, namely
View feature formfor editing. You can define more actions in the layer’s properties dialog (see Actions Properties).Data attributes: This is the list of attribute fields and values for the feature that has been clicked.
Примечание
Links in the feature’s attributes are clickable from the Identify Results panel and will open in your default web browser.
When a vector layer has defined relations, the Identify Results panel can display both referenced and referencing related features. To view these relations, ensure that the Show relations option is enabled in the Identify Settings. Available information for each related feature include:
the name of the relation and the linked layer
the entry in the referenced or referencing field, identifying the feature
the activated actions
the list of attribute fields and values
You can expand related features to explore connected records through multiple levels, including many-to-many (n:m) and polymorphic relations. Only nodes you explicitly expand are loaded, preventing excessive nesting.
To focus on a specific related record, right-click it and choose Identify Feature. This re-centers the identify results on the selected feature, starting a new identification tree from it and effectively limiting the visible nesting depth. Features already shown in ancestor nodes are automatically omitted to avoid duplicates or circular relations.