중요
번역은 여러분이 참여할 수 있는 커뮤니티 활동입니다. 이 페이지는 현재 74.00% 번역되었습니다.
4. 탐색기 패널
QGIS 탐색기 패널은 QGIS 리소스를 탐색하고, 검색하고, 점검하고, 복사하고, 불러올 수 있는 훌륭한 도구입니다. QGIS가 어떻게 처리하는지 알고 있는 리소스만 탐색기에 표시됩니다.
탐색기 패널을 사용하면 탐색기 패널 에서 설명한대로 데이터를 찾고, 점검하고, 추가할 수 있습니다. 또한 탐색기 패널은 프로젝트 파일, 파이썬 스크립트, 공간 처리 스크립트, 공간 처리 모델 등과 같은 여러 QGIS 리소스의 드래그&드롭을 지원합니다.
파이썬 스크립트, 공간 처리 스크립트 및 모델은 각각 외부 편집기 및 모델 설계자(model designer)에서도 열고 편집할 수 있습니다.
You can drag and drop layers from the Layers panel to the Browser panel, for instance into a GeoPackage or a PostgreSQL database.
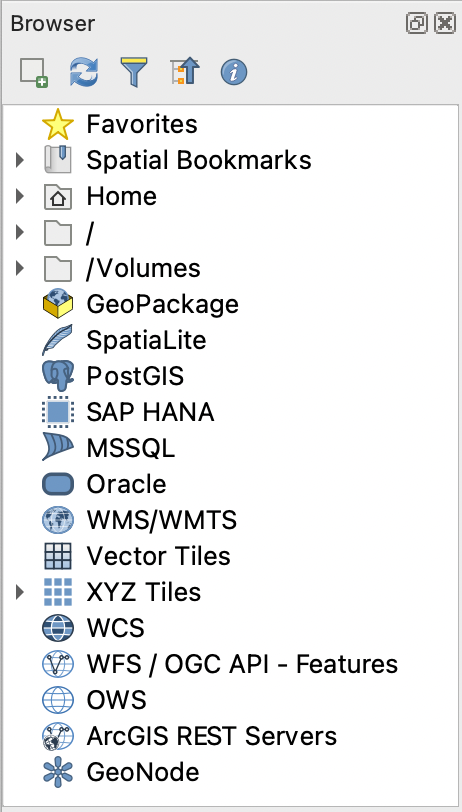
그림 4.1 탐색기 패널
탐색기 패널(그림 4.1)은 탐색기가 처리하는 리소스들을 체계화시키는 몇몇 고정된 최상위 수준 항목들을 가진, 확장 가능한 위계로 이루어져 있습니다. 노드 항목명 왼쪽에 있는  아이콘을 클릭하면 노드 항목을 펼칩니다.
  아이콘을 클릭하면 해당 분기(branch)를 접습니다.
  Collapse All 버튼을 누르면 모든 최상위 항목을 접습니다.
메뉴에서 리소스들을 비활성화시킬 수 있습니다. 예를 들어 사용자가 탐색기에서 파이썬 스크립트를 보지 않고자 하는 경우 메뉴 항목을 비활성화하면 되고, 탐색기에서 사용자 홈 폴더를 제거하고 싶다면 메뉴 항목을 비활성화하면 됩니다.
항목명 (위계에 있는 지엽(leaf) 항목과 노드 항목 둘 다) 기반 검색에 필터( Filter Browser)를 쓸 수 있습니다. 필터 텍스트란 옆에 있는
  Options 풀다운 메뉴를 사용하면:
Case Sensitive 대소문자를 구분하는 검색 기능을 켜고 끌 수 있습니다.
Filter pattern syntax 필터 패턴 문법을 다음 가운데 하나로 설정할 수 있습니다.
Normal
Wildcard(s)
Regular Expressions
 Enable/disable properties widget 버튼을 사용해서 일부 항목/리소스에 대한 유용한 정보를 표시하는 속성 위젯(Properties widget) 을 활성화/비활성화시킬 수 있습니다. 이 위젯을 활성화하면 탐색기 패널 하단에 그림 4.2 처럼 표시됩니다.
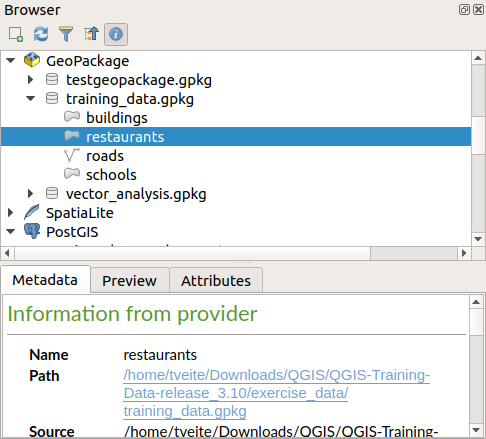
그림 4.2 속성 위젯
메뉴에서 Browser (2) 패널을 활성화하면 두번째 탐색기 패널을 열 수 있습니다. 탐색기 위계에서 서로 다른 분기들 깊숙히 위치한 리소스들 사이에 레이어를 복사하는 경우 두번째 탐색기 패널이 있으면 편리합니다.
4.1. 탐색기에서 열/실행할 수 있는 리소스들
탐색기 패널에서 많은 작업을 완수할 수 있습니다:
더블클릭, 맵 캔버스로 드래그, 또는 (레이어를 선택한 다음)
 Add Selected Layers 버튼을 클릭해서 사용자 맵에 벡터, 래스터 및 메시 레이어를 추가할 수 있습니다.
더블클릭 또는 맵 캔버스로 드래그해서 (공간 처리 알고리즘 포함) 파이썬 스크립트를 실행할 수 있습니다.
더블클릭 또는 맵 캔버스로 드래그해서 모델을 실행할 수 있습니다.
Extract Symbols… 컨텍스트 메뉴를 통해 QGIS 프로젝트 파일에서 심볼을 추출할 수 있습니다.
각 파일 유형의 (컨텍스트 메뉴의 Open <file type> Externally… 에서 설정하는) 기본 응용 프로그램으로 파일을 열 수 있습니다. 예를 들면 HTML 파일, 스프레드시트, 이미지, PDF, 텍스트 등등의 파일들 말이죠.
항목을 복사할 수 있습니다.
(여러 개의) 레이어들을 재명명 및 삭제할 수 있습니다. (컨텍스트 메뉴의 )
Show in Files 메뉴를 통해 파일 탐색창을 열어서 파일을 직접 선택할 수 있습니다.
리소스 전용 액션은 다음에 정리한 최상위 수준 항목 목록 아래 정렬된 서로 다른 리소스 그룹별로 목록화돼 있습니다.
4.2. 탐색기 패널 최상위 수준 항목들
4.2.1. 즐겨찾기
자주 사용하는 파일 시스템 위치를 즐겨찾기로 태그할 수 있습니다. 사용자가 태그한 위치가 여기 나타날 것입니다.
홈(Home) 에서 설명하는 작업들 이외에도, Rename Favorite… 및 Remove Favorite 컨텍스트 메뉴를 통해 즐겨찾기를 재명명하거나 제거할 수 있습니다.
4.2.2. 공간 북마크
This is where you will find your spatial bookmarks, divided into Project Bookmarks and User Bookmarks.
수준 |
Contextual menu |
|---|---|
Spatial Bookmarks |
New Spatial Bookmark… |
Show the Spatial Bookmark Manager |
|
Import Spatial Bookmarks… |
|
Export Spatial Bookmarks… |
|
Bookmark group (Project Bookmarks and User Bookmarks) |
New Spatial Bookmark… |
Import Spatial Bookmarks… |
|
Export Spatial Bookmarks… |
|
Individual bookmark |
Zoom to Bookmark |
Edit Spatial Bookmark… |
|
Delete Spatial Bookmark |
4.2.3. 프로젝트 홈
프로젝트 파일을 저장하면 사용할 수 있는 Project home 항목은 현재 프로젝트 안에서 쓰일 수도 있는 데이터 및 기타 내용(스크립트, 모델, 텍스트 등등)을 담고 있는 폴더입니다. 이 항목은 Browser 패널에 표시되어 사용자가 프로젝트의 데이터 및 기타 파일에 빠르게 접근할 수 있게 해줍니다.
프로젝트 홈 폴더의 기본 경로는 프로젝트 파일 폴더이지만, 옵션을 통해 또는 탐색기 패널의 Project Home 항목을 오른쪽 클릭해서 Set project home… 을 선택하면 변경할 수 있습니다. QGIS 프로젝트가 데이터셋과 함께 조직화된 ‘프로젝트’의 루트 폴더에 저장되어 있지 않은 경우 이 폴더를 사용자 지정하는 것이 특히 유용합니다.
4.2.4. 드라이브 및 파일 시스템
Browser 패널의 다음 항목은 사용 중인 OS에 따라 다르며, 해당 OS의 파일 시스템의 최상위 수준 항목과 관련되어 있습니다.
이 최상위 수준 항목이란 주로:
현재 사용자의 홈 폴더를 가리키는 Home 폴더
또는 유닉스 기반 기기의 경우 루트 / 폴더
그리고 로컬 또는 네트워크 연결 드라이브입니다. 이런 드라이브들은 OS에 따라 직접 목록화되거나 (예:
C:\,D:\) 또는/Volumes항목을 통해 목록화됩니다.
이런 폴더 또는 드라이브 각각의 컨텍스트 메뉴로부터 다음과 같은 작업을 할 수 있습니다:
폴더 및 드라이브의 내용을 새로고침할 수 있습니다.
: 새로운 하위 항목을 Directory, GeoPackage 또는 ESRI Shapefile 포맷 데이터셋으로 생성할 수 있습니다.
Hide from Browser: 홈 디렉터리를 숨길 수 있습니다.
Set color: 복잡한 폴더 구조를 빠르게 탐색할 수 있도록 폴더 아이콘 색상을 사용자 지정할 수 있습니다.
Scanning: 스캔 작업을 활성화할 수 있습니다.
 Monitor for changes: 특정 디렉터리를 모니터링하면서 자동 업데이트할지를 직접 조정할 수 있게 해줍니다. 이 설정은 선택한 디렉터리와 모든 하위 디렉터리에 적용됩니다. 즉 사용자가 아무 문제도 없다는 사실을 알고 있는 경우 네트워크 드라이브 모니터링을 직접 동의할 수도 있고, 또는 다른 이유로 모니터링을 원하지 않는 대용량 디렉터리의 모니터링을 동의하지 않을 수도 있습니다. 기본적으로 원격 또는 네트워크 드라이브를 자동 모니터링하지는 않습니다.
 Fast scan this directory: 선택한 디렉터리를 빠르게 스캔합니다.
Open Directory…: 사용자의 파일 관리자에서 디렉터리를 열 수 있습니다.
Open in Terminal…: 터미널 창에서 디렉터리를 열 수 있습니다.
속성을 검사하거나(Properties…), 디렉터리 속성을 관리할 수 있습니다(Directory Properties…).
4.2.5. Data type
Level and Context menu |
Types of layers |
|||
|---|---|---|---|---|
|
|
|
|
|
File |
||||
Delete File <dataset name> |
|
|
||
Show in Files |
|
|
|
|
|
|
|
|
|
File Properties… |
|
|
|
|
Open <file type> Externally… |
|
|||
Layer |
||||
Add Layer to Project |
|
|
|
|
|
|
|||
Layer Properties… |
|
|
|
|
Open with Data Source Manager… |
|
|
||
Execute SQL… |
|
|||


4.2.6. 데이터베이스 항목
사용자의 OS와 설치된 드라이버에 따라, QGIS에서 사용할 수 있는 서로 다른 데이터베이스 유형에 접근할 수 있을지도 모릅니다. 다음은 데이터셋 트리의 각 수준에서 사용할 수 있는 서로 다른 컨텍스트 메뉴 목록입니다.
Level and Context menu |
데이터베이스 유형 |
|||||
GeoPackage ([1]) |
SpatiaLite |
PostgreSQL |
SAP HANA |
MS SQL Server |
Oracle |
|
Top menu |
||||||
New Connection…: 기존 데이터베이스에 새 연결 생성 |
|
|
|
|
|
|
Create Database…: 새 데이터베이스 생성 |
|
|
||||
Create Database and Layer… |
|
|||||
Save Connections…: 연결의 상세 내용을 파일로 저장 |
|
|
|
|||
Load Connections…: 저장한 연결 파일을 불러오기 |
|
|
|
|||
Connection / Database |
||||||
Refresh: 연결을 새로고침 |
|
|
|
|
||
Edit Connection…: 연결 설정을 편집 |
|
|
|
|
||
Duplicate Connection |
|
|
|
|
||
Remove Connection… |
|
|
|
|
|
|
Import Vector Layer… |
|
|
|
|
|
|
: 새 필드 도메인을 범위로 설정 |
|
|||||
: 새 필드 도메인을 코딩된 값으로 설정 |
|
|||||
: 새 필드 도메인을 glob 함수로 설정 |
|
|||||
New Relationship… |
|
|||||
Delete <database_name>: 데이터베이스를 삭제 |
|
|
||||
Compact Database (VACUUM): 데이터베이스를 정리 |
|
|||||
New Schema…: 새 스키마를 생성 |
|
|
|
|||
New Table…: 새 테이블을 생성 |
|
|
|
|
||
Execute SQL…: SQL 쿼리를 실행 |
|
|
|
|
||
Schema |
||||||
Refresh: 스키마를 새로고침 |
|
|
|
|||
: 스키마 이름을 재명명 |
|
|
|
|||
: 스키마를 삭제 |
|
|
|
|||
New Table…: 새 테이블을 생성 |
|
|
||||
Execute SQL…: SQL 쿼리를 실행 |
|
|
||||
Table / Layer |
||||||
: 테이블 이름을 재명명 |
|
|
|
|||
: 테이블의 모든 행을 제거 |
|
|
||||
Execute SQL…: SQL 쿼리를 실행 |
|
|
|
|||
: 레이어를 파일로 내보내기 |
|
|
|
|
|
|
: 레이어 이름을 변경 |
|
|
|
|||
: 레이어를 삭제 |
|
|
|
|
|
|
: 선택한 레이어들을 삭제 |
|
|
|
|
|
|
: 프로젝트에 레이어를 추가 |
|
|
|
|
|
|
: 프로젝트에 선택한 레이어들을 추가 |
|
|
|
|
|
|
|
|
|||||
Layer Properties…: 레이어 속성 대화창 열기 |
|
|
|
|
|
|
File Properties…: 파일 속성 대화창 열기 |
|
|||||
Open with Data Source Manager |
|
|
||||
Fields |
||||||
Add New Field…: 새로운 필드를 추가 |
|
|
|
|
||
Field |
||||||
Set Field Domain: 필드 도메인을 설정 |
|
|||||
Rename Field ([2]) |
|
|
|
|||
Set Alias…: 별명을 설정 |
|
|||||
Set Comment…: 주석을 설정 |
|
|
||||
Delete Field…: 필드를 삭제 |
|
|
|
|
||


4.2.6.1. Importing vector layers into databases using Browser panel
QGIS allows you to import vector layers directly into a database from the Browser panel.
This provides a simple way to transfer datasets into supported database
formats without using  DB Manager (see 데이터베이스 관리자 플러그인).
You can start the import in two ways:
Drag and drop a single vector layer from the Browser panel or from the Project into a database connection or schema item.
Right-click on a database connection or schema item and choose Import Vector Layer… from the context menu.
참고
When multiple layers are dragged into a database, they are imported immediately without further options. All imports run in the background, so the QGIS interface remains responsive during the process.

그림 4.3 Import Vector Layer dialog
To add a layer using Import Vector Layer… follow these steps:
Add Source layer: the layer to import, chosen from the current QGIS project. To import only selected features of the source layer use the
Selected features only option.Set the Table name: the name of the destination table in the database. By default, it is taken from the source layer name but can be modified. You can also use the
Replace destination table (if exists)
to overwrite an existing table.Define the Output CRS: the coordinate reference system of the destination table. By default, it is the CRS of the source layer, but it can be changed using the CRS selector.
Configure the Attributes:
Source expression: expression used to populate the field. By default, this corresponds to the original source field.
Name: name of the field in the destination table.
Type: field data type (integer, text, real, etc.).
Length and Precision: length and precision of the field, where applicable.
Constraints: rules to enforce on the field values (e.g. NOT NULL, UNIQUE, DEFAULT). Support depends on the destination database.
Alias: an alternate display name for the field.
Comment: a description or note attached to the field.
You can use buttons on the right side to:
 Add new field to add a new field to the destination table.
 Delete selected field to remove a field from the destination table.
 Move selected field up or
  Move selected field down to reorder fields.
 Reset all fields to clear all fields and start from scratch.
 Convert All Fields To Lowercase or Convert All Fields To Uppercase,
to change the case of all field names.
Convert All Fields To Lowercase or Convert All Fields To Uppercase,
to change the case of all field names.
Optionally, apply a spatial filter with Filter by Extent. This restricts the import to features within a defined bounding box.
Optionally, apply an attribute filter with Feature filter. This allows you to use an expression to select which features are imported.
4.2.7. 타일 및 웹 서비스
Level and Context menu |
서비스 유형 |
||||
|---|---|---|---|---|---|
WMS / WMTS |
XYZ Tiles |
WCS |
WFS / OGC API - Features |
ArcGIS REST Servers |
|
Top menu |
|||||
New Connection…: 새 연결을 생성 |
|
|
|
|
|
Save Connections…: 연결의 상세 내용을 파일로 저장 |
|
|
|
|
|
Load Connections…: 저장한 연결 파일을 불러오기 |
|
|
|
|
|
Connection |
|||||
Refresh: 연결을 새로고침 |
|
|
|
|
|
Edit Connection…: 연결 설정을 편집 |
|
|
|
|
|
Duplicate Connection |
|
|
|
|
|
Remove Connection… |
|
|
|
|
|
View Service Info: 웹 브라우저에서 서비스 정보를 보기 |
|
||||
Table / Layer |
|||||
|
|
|
|
|
|
Add Layer to Project |
|
|
|
|
|
Add Filtered Layer to Project… |
|
||||
Layer Properties…: 레이어 속성 대화창 열기 |
|
|
|
|
|
View Service Info: 웹 브라우저에서 서비스 정보를 보기 |
|
||||


Level and Context menu |
서비스 유형 |
||||
|---|---|---|---|---|---|
벡터 타일 |
Scene |
Cloud |
SensorThings |
STAC |
|
Top menu |
|||||
New Connection…: 새 연결을 생성 |
|
|
|
|
|
New Generic Connection…: 새 일반 연결을 생성 |
|
||||
New ArcGIS Vector Tile Service Connection…: 새 ArcGIS 벡터 타일 서비스 연결을 생성 |
|
||||
Save Connections… details to a file |
|
|
|
|
|
Load Connections…: 저장한 연결 파일을 불러오기 |
|
|
|
|
|
Connection |
|||||
Edit Connection…: 연결 설정을 편집 |
|
|
|
|
|
Duplicate Connection |
|
|
|
|
|
Delete Connection… |
|
|
|
|
|
Refresh: 연결을 새로고침합니다. |
|
||||
Details… |
|
||||
Table / Layer |
|||||
|
|||||
Add Layer to Project |
|
|
|
||
Layer Properties…: 레이어 속성 대화창 열기 |
|
|
|
||
Refresh: 연결을 새로고침합니다. |
|
||||
Download assets… |
|
||||
Details… |
|
||||


4.2.8. Project and supported file types
File type |
컨텍스트 메뉴 |
|---|---|
QGIS Project file (.qgz, .qgs) |
|
(opens Style Manager to export symbols to XML, add to default style, or export as PNG/SVG) |
|
QGIS Layer Definition (.qlr) |
|
Processing Model (.model3) |
|
Print Composer Template (.qpt) |
|
Python script (.py) |
|