Wichtig
Übersetzen ist eine Gemeinschaftsleistung Sie können mitmachen. Diese Seite ist aktuell zu 95.00% übersetzt.
13.2. Rasteranalyse
13.2.1. Rasterrechner
Die Funktion im Menü ermöglicht es, Berechnungen auf der Basis von vorhandenen Rasterpixelwerten durchzuführen (siehe Abb. 13.33). Die Ergebnisse werden in einen neuen Layer in einem GDAL-unterstützten Format geschrieben.
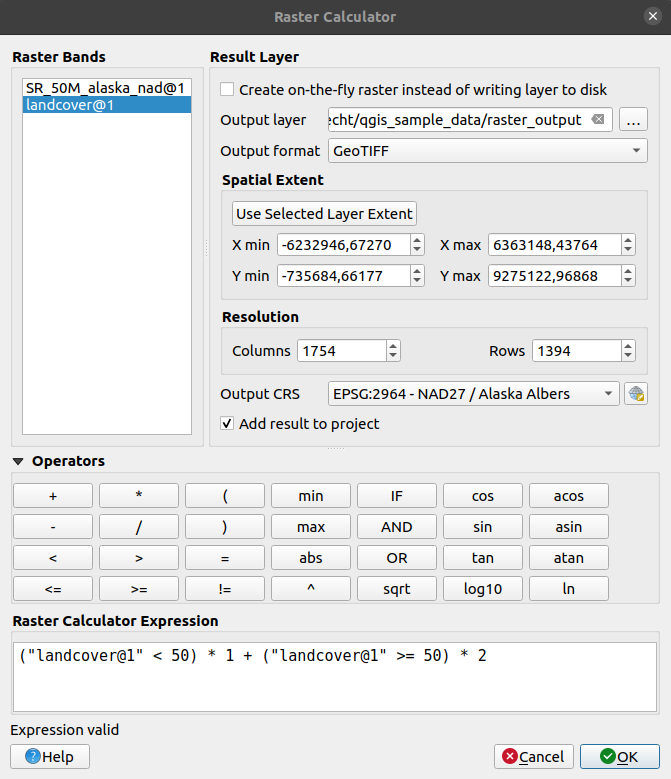
Abb. 13.33 Rasterrechner
Die Liste Rasterkanäle enthält alle geladenen Layer, die verwendet werden können. Um ein Raster zum Feld für den Rasterberechnungsausdruck hinzuzufügen, doppelklicken Sie auf seinen Namen in der Liste Felder. Sie können dann die Operatoren verwenden, um Berechnungsausdrücke zu konstruieren, oder Sie können sie einfach in das Feld eingeben.
Im Abschnitt Ergebnislayer müssen Sie einen Ausgabelayer definieren. Sie können:
 Temporärraster erstellen, statt auf der Festplatte zu speichern:
Ist diese Option nicht aktiviert, wird die Ausgabe als neue einfache Datei auf der Festplatte gespeichert. Ein Ausgabe-Layer mit Angabe des Pfads und ein Ausgabeformat sind erforderlich.
Wenn dieses Kontrollkästchen aktiviert ist, wird ein virtueller Layer erstellt, d. h. ein Rasterlayer, der durch seine URI definiert ist und dessen Pixel on-the-fly berechnet werden. Es handelt sich dabei nicht um eine neue Datei auf der Festplatte; der virtuelle Layer ist immer noch mit den in der Berechnung verwendeten Rastern verbunden, was bedeutet, dass ein Löschen oder Verschieben dieser Raster den Layer zerstören würde. Ein Layername kann angegeben werden, ansonsten wird der Berechnungsausdruck als solcher verwendet. Wird der virtuelle Layer aus dem Projekt entfernt, so wird er gelöscht, er kann aber auch über das Kontextmenü des Layers in einer Datei gespeichert werden.
Define the Spatial extent of the calculation using the extent selector widget.
Legen Sie die Auflösung des Layers anhand der Spalten- und Zeilennummer fest. Wenn der Input Layer eine andere Auflösung hat, werden die Werte mit dem Nearest Neighbor Algorithmus neu abgetastet.
Enable the
Create Options to define additional raster creation options.
These options let you control how the output file is structured and compressed,
including format, compression method, and other driver-specific settings.
See more at Raster driver options.Mit dem Kontrollkästchen
Ergebnis zum Projekt hinzufügen wird der Ergebnis-Layer automatisch zum Legendenbereich hinzugefügt und kann visualisiert werden. Bei virtuellen Rastern standardmäßig aktiviert.
Der Abschnitt Operatoren enthält alle verfügbaren Operatoren. Um einen Operator zum Ausdrucksfeld des Rasterrechners hinzuzufügen, klicken Sie auf die entsprechende Schaltfläche. Mathematische Berechnungen (+, -, *, … ) und trigonometrische Funktionen (sin, cos, tan, … ) sind verfügbar. Bedingte Ausdrücke (=, !=, <, >=, … ) geben entweder 0 für falsch oder 1 für wahr zurück und können daher mit anderen Operatoren und Funktionen verwendet werden.
Siehe auch
Algorithmen Raster calculator und Raster calculator (virtual)
13.2.1.1. Rasterrechnerausdruck
Der Dialog
Der Dialog Rasterrechnerausdruck bietet die Möglichkeit, Ausdrücke für Pixelberechnungen zwischen einer Reihe von Raster-Layern zu schreiben.
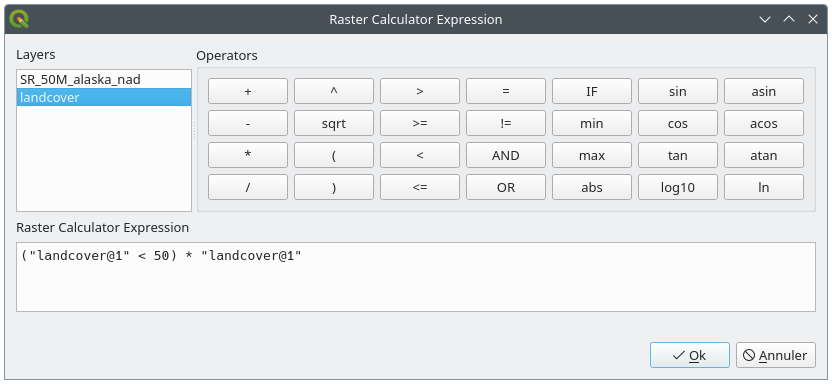
Abb. 13.34 Rasterrechnerausdruck
Layer: Zeigt die Liste aller in der Legende geladenen Raster Layer an. Diese können verwendet werden, um das Ausdrucksfeld zu füllen (Doppelklick zum Hinzufügen). Rasterlayer werden durch ihren Namen und die Nummer des Bandes bezeichnet:
layer_name@band_number. Zum Beispiel wird das erste Band eines Layers mit dem NamenDEMalsDEM@1bezeichnet.Operatoren: enthält eine Reihe von Berechnungsoperatoren für die Pixelmanipulation:
Arithmetisch:
+,-,*,`sqrt,abs,ln, …Trigonometrisch: sin,
cos,tan, …Vergleich:
=,!=,<,>=, …Logisch:
IF,AND,OR,(,)Statistisch:
min,max
Klicken Sie auf die entsprechende Schaltfläche, um dem Ausdrucksfeld des Rasterrechners einen Operator hinzuzufügen.
Rasterrechnerausdruck ist der Bereich, in dem der Ausdruck zusammengesetzt ist
Beispiele
Höhenwerte von Meter zu Fuß konvertieren
Für das Erstellen eines Rasterlayers in Fuß aus einem Rasterlayer in Metern müssen Sie den Konvertierungsfaktor von Metern zu Fuß benutzen: 3.28. Der Ausdruck lautet:
"elevation@1" * 3.28
Eine Maske verwenden
Wenn Sie Teile des Rasterlayers ausmaskieren wollen, weil Sie nur an Höhenwerten über 0 Metern interessiert sind, können Sie den folgenden Ausdruck zum Erstellen einer Maske und zum gleichzeitigen Anwenden auf den Rasterlayer verwenden.
("elevation@1" >= 0) * "elevation@1"
Mit anderen Worten, für jede Zelle größer oder gleich 0 wird der bedingte Ausdruck mit 1 ausgewertet, was den ursprünglichen Wert durch Multiplikation mit 1 beibehält, ansonsten wird der bedingte Ausdruck zu 0 ausgewertet, was den Rasterwert auf 0 setzt und die Maske im laufenden Betrieb erzeugt.
Ein Raster klassifizieren
Wenn Sie ein Raster klassifizieren wollen, sagen wir beispielsweise in zwei Höhenklassen, können Sie die folgenden Ausdrücke verwenden um ein Raster mit zwei Werten 1 und 2 in einem Schritt erstellen.
("elevation@1" < 50) * 1 + ("elevation@1" >= 50) * 2
In anderen Worten stelle den Wert für jede Zelle mit einem Wert kleiner 50 auf 1 ein. Für jede Zelle mit einem Wert größer als oder gleich 50 stelle den Wert 2 ein.
Oder Sie können den Operator IF verwenden.
if ( elevation@1 < 50 , 1 , 2 )