Importante
A tradução é um esforço comunitário você pode contribuir. Esta página está atualmente traduzida em 62.70%.
4. Orientações de Tradução
This manual is aiming to help the translator.
First, it explains how you can join the translation team.
Then the general process of how technically a translation is done is explained.
Later the translation is explained from an actual English .rst document that is translated to Dutch.
Finally a summary of rules of translation is given.
Nota
Although these guidelines focus on QGIS documentation, the methods and the rules described below are also applicable to QGIS applications.
4.1. Becoming a translator
The QGIS project is always looking for people who are willing to invest some more time translating QGIS into a foreign language - even perhaps to coordinate the translation effort.
We are trying to improve our project management process and spread the load more evenly between people who each have a specific area of responsibility, so any contribution you have to make will be greatly appreciated.
If you would like to nominate yourself as a coordinator for a new language please go ahead. If more than one person nominate themselves as coordinator for the same language, please contact each other and resolve how you will manage your efforts.
4.1.1. Transifex
The web-based translating platform Transifex is used for all QGIS translations: the desktop application itself (or GUI) and the documentation. So the first thing you need is an account to login and get started.
4.1.2. Join a Project
You can explore available projects we translate, identify their target languages with various statistics:
QGIS Desktop for all the pieces of text available in QGIS apps (QGIS Desktop and QGIS Server),
QGIS Documentation for the official LTR documentation
Click on the project you would like to help translate
Click on JOIN THIS PROJECT on the right side. You will be prompted to sign up.
Create your account or connect using a third-party platform account. Verify your account by the link in the email you will receive.
Login
You then get a popup to select which language you want to help translate to. Please, note that we try to make the process as simple as possible and only mention target languages, regardless of the country parameter (e.g.
French (fr)and NOTFrench (France) (fr_FR)). Only if there are notable differences in the languages (e.g. portuguese in Portugal vs Brazil) we may allow different versions.Search your target language, i.e the language you wish to help translate QGIS into, NOT necessarily all the languages you can speak:
If it is marked as
already addedthen select it and press Join Project.If it is not marked as already added, select it and press Request language. Keep in mind that translating an entire project will take days of work, if not weeks! Again, and sorry to repeat, it is not about selecting ALL the languages you can speak.
Now you will need to wait for the language coordinator or the project maintainers to process your request. You will be notified by email when your request has been accepted. If your request has no answer for about a week, please consider writing to your language coordinator in Transifex or the QGIS Translators mailing list.
You can also join any of the other QGIS projects and help everywhere too.
4.1.3. Transladar
Once your request is accepted, you are able to translate any text in the project(s) you’ve chosen. Simply click on your language, select the chapter you want to translate and click on Translate. Easy, right?
In order to help you make good translation, some instructions are provided below. We strongly recommend you to read them.
Dica
Quick access to translatable files in Transifex
If you find a wrong or missing translation in the current documentation,
you can use the Translate page link in the bottom left drop-down menu of the page
to reach it sources in Transifex and perform any update you wish to.
4.2. Processo de tradução
QGIS Documentation is written in English with .rst files.
In order to provide translations:
Um script de pré-compilação cria arquivos de tradução chamados arquivos
.popara o idioma inglês na pasta/QGIS-Documentation/locale/en.As frases nos arquivos: file: .po são enviadas para a plataforma web Transifex e disponibilizadas para tradutores que podem começar a traduzir do inglês para o seu idioma com o editor.
When a file is translated at 100%, the translated strings are automatically pulled back to the documentation repository, under
/QGIS-Documentation/locale/<language>.At the next build of the documentation (which occurs at least once a day – see time at the bottom of the page), a script reuses the sentences to create translated output.
For files not fully translated, a script pulls every two weeks translated strings from Transifex to Github and these are as well published at the next build.
Whenever an
.rstfile is updated, the English.pofile is updated and the changes are pushed to the corresponding file in Transifex. This means that when a new paragraph is added to an.rstdocument that was already translated, only the new/updated sentences are added to the translated.pofile and needs to be translated.
Nota
Translating QGIS Desktop specificities
The main difference with translating QGIS applications is that instead of .po files,
all the translatable strings in the .py, .cpp, .yaml files
that shape a particular version of the application are pushed to and pulled from Transifex
as a single .ts file (e.g. qgis-application/qgis_en.ts (branch release-3_30) ).
Translations are pulled to Github in development branch (daily),
and at release time (for every released versions).
Duas ferramentas diferentes são usadas atualmente para a tradução do QGIS:
The Transifex web platform, the easiest and recommended way to translate QGIS, transparently does the process described above and pulls all the translatable texts in one place for the translator. Just pick the files you want and translate. Translated files are stored in the platform until another release is pushed.
Qt Linguist, a Qt development tool, requires the translator to pull locally the
.po(or.ts) files from the source code, translate and then push back.
Note que em ambas as ferramentas que você escolher, as regras de tradução são as mesmas.
4.3. Traduzir um arquivo
Para explicar como as traduções funcionam, iremos usar o módulo do mapa de densidade como exemplo. Neste exemplo iremos traduzir de Inglês para Holândes, mas irá ser praticamente a mesma coisa para os outros documentos em todos os idiomas.
A fonte do documento pode ser encontrada aqui:
QGIS-Documentation/source/docs/user_manual/plugins/plugins_heatmap.rst
Portanto porque escolhi este documento?
It includes images, captions, headers, references and replacements.
Eu escrevi isto tão facilmente que é facil para mim traduzir ;-)
O processo de compilação criou o arquivo inglês .po, que pode ser encontrado aqui:
QGIS-Documentation/locale/en/LC_MESSAGES/docs/user_manual/plugins/plugins_heatmap.po
The equivalent Dutch .po file (basically a copy) can be found here:
QGIS-Documentation/locale/nl/LC_MESSAGES/docs/user_manual/plugins/plugins_heatmap.po
Junto com este arquivo, você verá um pequeno arquivo .mo que indica que ainda não tem nenhuma tradução.
4.3.1. Tradução no Transifex
Para traduzir usando Transifex, você precisa:
Uma vez que você faça parte de uma equipe de idiomas, clique no projeto correspondente (neste caso, `` Documentação do QGIS``). Uma lista de idiomas disponíveis com sua proporção de tradução é exibida.
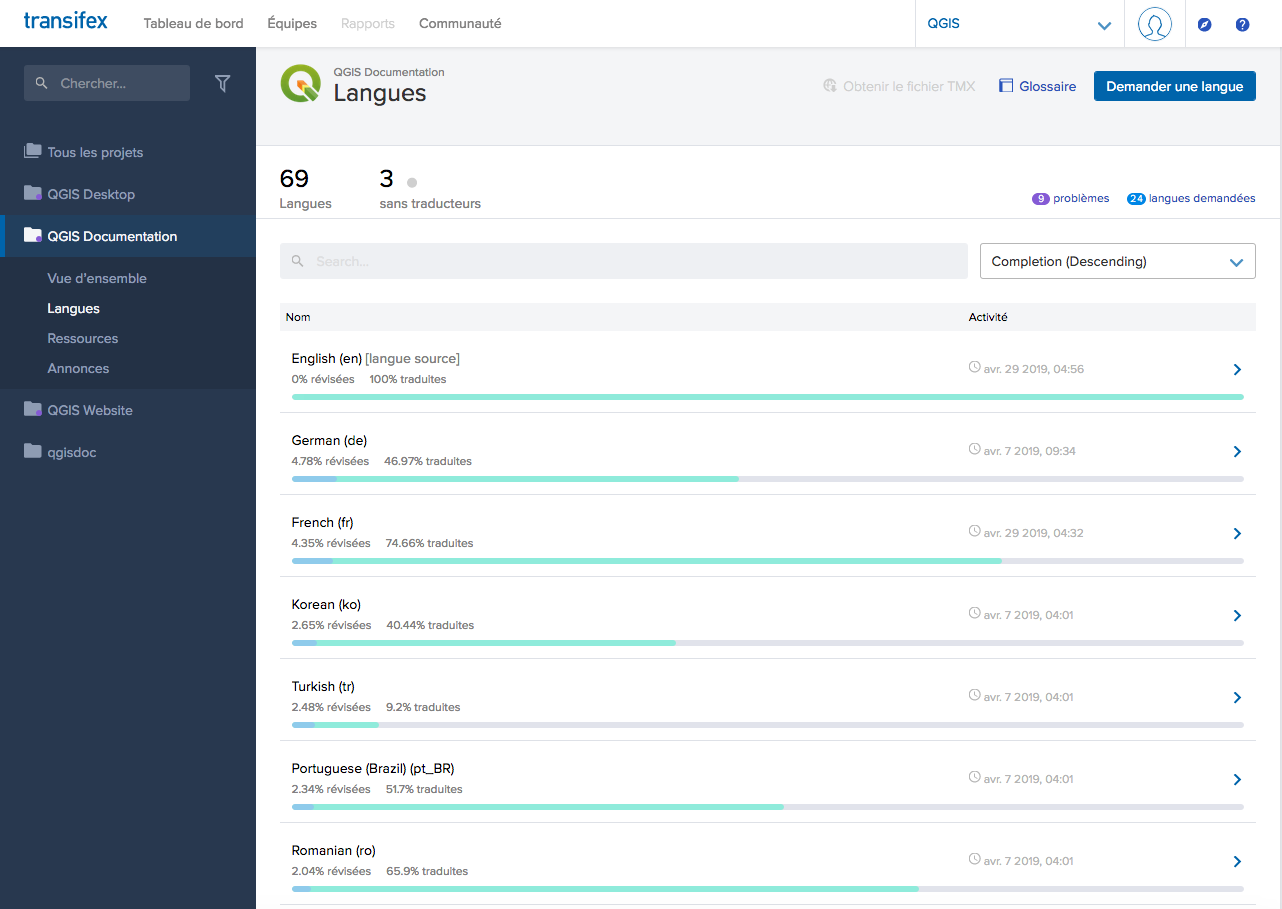
Fig. 4.22 Selecionar idioma para tradução no menu Transifex
Passe o mouse sobre o seu idioma e clique em:
: guilabel:View resources: arquivos traduzíveis
.pocom sua proporção de conversão, número de strings e mais alguns metadados agora são exibidos.ou: guilabel:Translate: abre a interface de tradução com todos os arquivos disponíveis
.po
Identifique o arquivo que você deseja traduzir (no nosso caso, estamos procurando o
docs_user-manual_plugins_plugins-heatmap, o arquivo de complemento do heatmap) ou qualquer arquivo inacabado e clique nele: as strings nos arquivos são carregadas e você pode usar a interface para filtrar, traduzir, sugerir tradução …Dica
Clicking the
Translate pagelink in the bottom left drop-down menu of a page brings you directly to its corresponding translation page in Transifex.Tudo o que você precisa fazer é selecionar cada texto e traduzir seguindo as guidelines.
Para informações futuras sobre o uso do Transifex Web Editor, veja https://help.transifex.com/en/articles/6318216-translating-with-the-web-editor.
4.3.2. Traduções no Qt Linguist
Com Qt Linguist, você precisa:
pegue manualmente o(s) arquivo(s)
.poou.ts. Isso pode ser feito baixando o(s) arquivo(s) da plataforma Transifex ou da pasta :arquivo:`locale/$language` do repositório de origem (no GitHub),proceed to the translation locally
fazer o upload dos arquivos modificados para suas fontes (Transifex ou GitHub).
Embora o download e o upload de arquivos traduzíveis possam ser feitos com o Transifex, não é recomendável usar esse processo. Como não há um sistema de versão no Transifex, o arquivo que você enviar simplesmente substituirá o existente e, potencialmente, substituirá qualquer modificação feita por outras pessoas na plataforma.
Quando você abrir o arquivo no Qt Linguist pela primeira vez, você verá a seguinte caixa de diálogo:
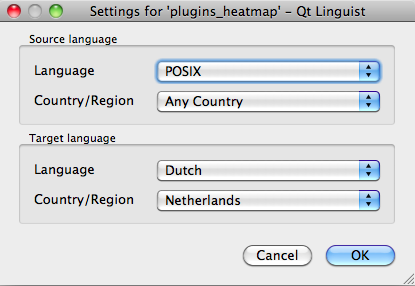
Fig. 4.23 Selecione o idioma para tradução no menu linguist
O idioma Destino deverá ser preenchido corretamente. O idioma de Origem pode ser deixado como o idioma POSIX e País/Região em Qualquer País.
Quando você pressiona o botão OK, o Qt Linguist é preenchido com frases e você pode começar a traduzir, veja Fig. 4.24.

Fig. 4.24 Tradução usando o menu linguist
No menu poderá ver os seguintes botões que devem ser usados.
 The Translation Done Next button, is the most important
button. If the item needs translation, you enter a translation in the text
field, then hit this button. If the item does not need translation just leave the
text field for translation empty and also hit this button which indicates the
item is done and you continue with the next item.
The Translation Done Next button, is the most important
button. If the item needs translation, you enter a translation in the text
field, then hit this button. If the item does not need translation just leave the
text field for translation empty and also hit this button which indicates the
item is done and you continue with the next item. O Botão Anterior, pode ser usado para ir para um anterior item de tradução.
 O Botão Seguinte, pode ser usado para ir para o próximo item de tradução.
 O Botão Seguinte A Fazer, salta a o primeiro item de tradução que necessita de tradução. É útil quando o documento original foi mudado e apenas algumas instruções novas/alteradas necessitam de ser traduzidas.
 O Botão Anterior A Fazer, faz uma procura para trás e salta para o primeiro item de tradução e vê se necessita de tradução.
Para mais informações sobre o uso do Qt Linguist, veja https://doc.qt.io/archives/qt-5.15/linguist-translators.html
Aviso
Se você deseja fazer o download do conteúdo a ser traduzido do repositório de origem, nunca faça isso no ramo `` master``. Para traduções, sempre existem ramificações de tradução disponíveis, uma vez que um documento é totalmente atualizado em inglês para uma determinada versão. Como exemplo, para traduzir o manual do QGIS 2.8, você deve usar a ramificação manual_en_v2.8.
4.3.3. Traduzir um manual
Agora iremos começar a traduzir o manual do plugin_heatmap!
Traduzir a maioria das frases deve ser simples. Durante esta sessão de tradução eu irei apontar quais partes (no arquivo rst) precisam de tradução especial.
Abaixo nós vemos uma frase interessante para traduzir:
The |heatmap| :sup:`Heatmap` plugin allows to create a heatmap from a
point vector map. A heatmap is a raster map showing the density or
magnitude of point related information. From the result "hotspots" can
easily be identified.
Esta instrução contem duas instruções rst:
|heatmap|as palavras entre|são substituições e estas nunca devem ser traduzidas! Isto será substituido pelo o ícone do módulo de densidade!:sup:`Heatmap`, a instrução` : sup: `é uma instrução de superposição e imprime o texto a seguir um pouco mais alto. Isso é usado para mostrar os textos pop-up que aparecem quando você passa o mouse sobre o item da barra de ferramentas e isso pode ser diferente quando é realmente traduzido no aplicativo QGIS. No caso holandês, não é!
Todos os outros textos nesta instrução podem ser traduzidos!
O próximo item para tradução contém a expressão :ref:, que é comumente utilizada para se referir a outra seção do manual! O texto que segue a expresão :ref: nunca deve ser mudado, pois é uma identificação única.
First this core plugin needs to be activated using the Plugin Manager
(see Section :ref:`load_core_plugin`). After activation the heatmap icon
|heatmap| can be found in the Raster Toolbar.
In this case load_core_plugin is a unique reference identifier placed before
an rst item that has a caption. The ref statement will be replaced with the text
of the header and turned into a hyperlink. When the header this reference is
referring to is translated, all references to this header will be automatically
translated as well.
O próximo item contem a etiqueta rst :menuselection: seguida de texto que está atualmente exibida num menu da aplicação QGIS, isto deve ser traduzido na aplicação e portando deverá ser alterado quando for o caso.
Select from menu :menuselection:`View --> Toolbars --> Raster` to activate
the Raster Toolbar when it is not yet activated.
O item “Ver –>” acima está atualmente traduzido para “Beeld –>” porque esta é a tradução usada para Holandês localizada na aplicação |qg|.
Um pouco mais à frente nós encontramos um item de tradução um pouco mais díficil:
The |heatmap| :sup:`Heatmap` tool button starts the Dialog of the Heatmap
plugin (see :numref:`figure_heatmap_settings`).
Contém uma referência a uma figura figure_heatmap_settings_, e como uma referência a uma seção, essa referência não deve ser alterada!! A definição de referência do documento rst não está incluída no arquivo .po e, então, não pode ser alterada. Isso significa que a referência às figuras não pode ser traduzida. Quando o HTML é criado, você verá figure_heatmap_settings. Quando um documento PDF é criado, figure_heatmap_settings_ é substituído por um número de figura.
O próximo item de tradução com atributos rst é o seguinte item:
**Input Point dialog**: Provides a selection of loaded point vector maps.
Não remova os asteriscos na linha acima. Ela irá mostrar o texto em negrito. O texto é geralmente um texto incluído no próprio menu e pode ser traduzido no aplicativo.
O seguinte item de tradução contém a etiqueta :guilabel: rst.
When the |checkbox| :guilabel:`Advanced` checkbox is checked it will
give access to additional advanced options.
O texto Advanced da tag quilabel pode ser traduzida no QIS Desktop e provavelmente precisa ser modificada!
O próximo item de tradução contém contém ``airports``. As aspas são utilizadas para dar uma nova fonte ao texto. Neste caso, é uma expressão literal e não necessita tradução.
For the following example, we will use the ``airports`` vector point
layer from the QGIS sample dataset (see :ref:`label_sampledata`).
Another excellent QGIS tutorial on making heatmaps can be found on
`https://www.qgistutorials.com
<https://www.qgistutorials.com/en/docs/creating_heatmaps.html>`_.
This item also includes a hyperlink with an url and an external presentation.
The url should of course be left intact, you are allowed to change the external
text https://www.qgistutorials.com which is visible by the reader. Never
remove the underscore at the end of the hyperlink which forms an essential
part of it!!
4.3.4. Sumário das Regras para a tradução
Não modifique textos entre dois
|, como em|bronze|,|checkbox|,|labels|,|selectString|,|addLayer|… Essas são etiquetas especiais utilizadas para substituir imagensNão altere as referências que começam com papéis como
:ref:,:file:,:numref:a menos que incluam um título. Nesse caso, você pode traduzir o título, mas manter o link inalterado (ou seja, o texto entre<e>)Dica
Quando um título é fornecido para referência, a Transifex pode exibir um número no texto original em inglês em substituição à parte do link. Clique no número no texto de origem para adicionar o link de referência ao lado do título que está sendo traduzido.
Não modifique as referências que terminam com underline, como em
figure_labels_1_Não modifique a url em um hiperlink, mas você pode modificar a descrição externa. Mantenha o underline ao final do hiperlink, sem espaço adicional (
>`_)Altere os textos que seguem as tags
:index:,:sup:,:guilabel:e:menuselection:. Confira como ela é traduzida no QGIS Desktop. Não altere a tag.Textos entre duplo asterisco e entre aspas geralmente indicam valores ou nomes de campos, as vezes necessitam tradução e as vezes não.
Esteja atento para usar os mesmos (e mesmo número) caracteres especiais do texto original, tais como
`,``,*,**,::. Isto contribui para a apresentação das informações fornecidas.Não inicie nem finalize um texto com caracteres especiais ou etiquetas com espaço.
Não finalize as frases traduzidas com um novo parágrafo, do contrário o texto não será traduzido durante a geração do html.
Atente-se às regras apresentadas a cima e o documento traduzido irá ficar muito bom!
Para qualquer dúvida, entre em contato com Equipe da comunidade QGIS ou Equipe de tradução QGIS.