11.2. 3D地图视图
3D visualization support is offered through the 3D map view. You can create, manage and open 3D map views via menu:
By clicking on
 you can create a new 3D map view.
A floating and dockable QGIS panel will appear (see 3D地图视图对话框).
It has the same extent and view as the 2D main map canvas
and provides a set of navigation tools to turn the view into 3D.
you can create a new 3D map view.
A floating and dockable QGIS panel will appear (see 3D地图视图对话框).
It has the same extent and view as the 2D main map canvas
and provides a set of navigation tools to turn the view into 3D.By clicking on you get in the 3D Map Views Manager. Here you get the ability to open, duplicate, remove and rename 3D map views.
If you created one or more 3D map views, you see them listed in . You can turn them on and off by clicking on. They will be saved by saving the project, even if they are turned off.
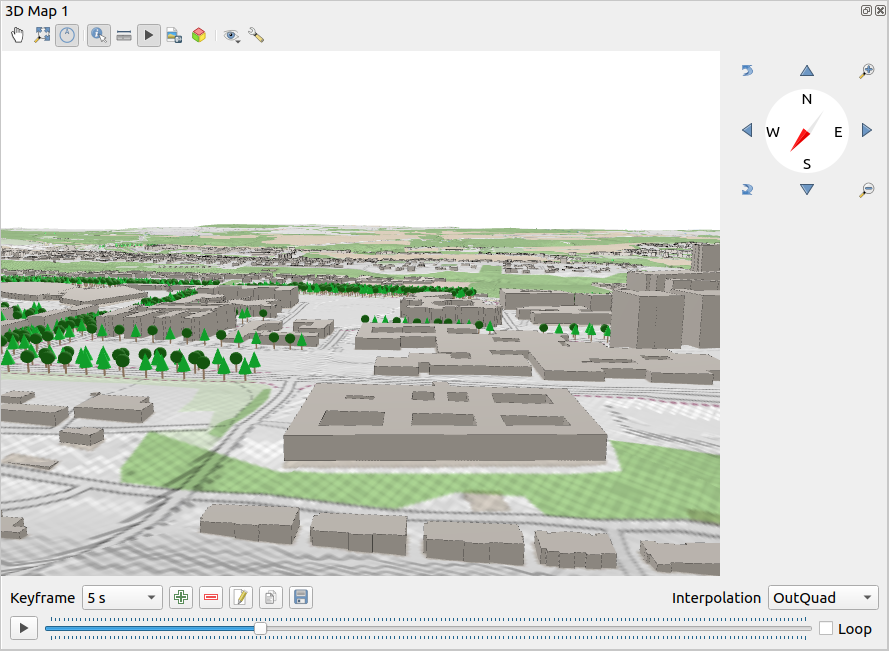
图 11.23 3D地图视图对话框
3D地图视图面板顶部提供了以下工具:
 Camera Control: moves the view, keeping the same angle
and direction of the camera
Camera Control: moves the view, keeping the same angle
and direction of the camera 全图显示: 将视图调整为整个图层的范围
 Toggle On-Screen Notification: shows/hides the
navigation widget (that is meant to ease controlling of the map view)
Toggle On-Screen Notification: shows/hides the
navigation widget (that is meant to ease controlling of the map view) 识别: 返回有关地形的单击点或单击3D要素的信息 -- 更多详细信息请访问 识别要素
 Measurement Line: measures the horizontal distance between points
 动画: 显示/隐藏 动画播放 控件
 Save as Image...: exports the current view to
an image file format
Save as Image...: exports the current view to
an image file format Export 3D Scene: exports the current view as a 3D scene
(
Export 3D Scene: exports the current view as a 3D scene
(.objfile), allowing post-processing in applications like Blender... The terrain and vector features are exported as 3D objects. The export settings, overriding the layers properties or map view configuration, include:场景名称 和目标 文件夹
地形分辨率
地形纹理分辨率
模型比例
 平滑边
平滑边- 导出法线
- 导出纹理
 设置视图主题: 允许您从预定义的 地图主题 中选择要在地图视图中显示的图层集。
The
 Options menu provides shortcuts to:
Add visual effects to the 3D rendering, such as showing shadows, eye dome lighting or ambient occlusion
Synchronize the views (2D map view follows 3D camera and/or 3D camera follows 2D Map view)
Show visible camera area in 2D map view
- Configure the 3D map view settings.
 Dock 3D Map View: switch from docked widget to top level window
11.2.1. 场景配置
The 3D map view opens with some default settings you can customize.
To do so, expand the Options menu at the top of
the 3D canvas panel and press the button
to open the 3D configuration window.
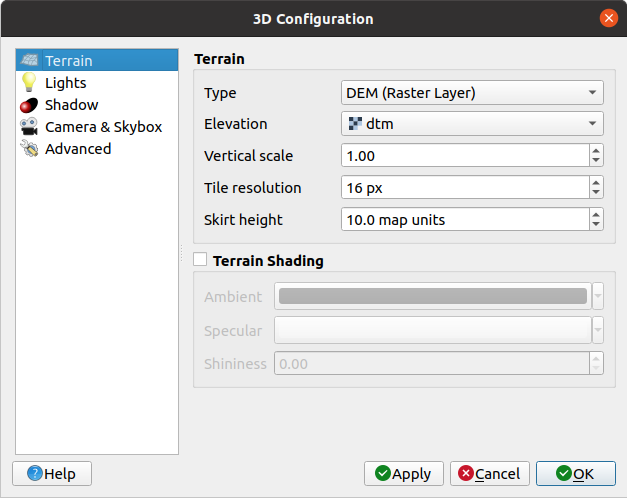
图 11.24 3D地图配置对话框
在3D配置窗口,有各种选项可微调3D场景:
11.2.1.1. 地形
地形: 在深入研究细节之前,值得注意的是,3D视图中的地形是由地形瓦片的层次结构表示,随着相机靠近地形,没有足够细节的现有瓦片将被具有更多细节的较小瓦片替换。每个瓦片都是源自高程栅格图层的网孔几何图形和2D地图图层的纹理。
高程地形 类型 可以是:
a 平坦地形
已加载的 DEM (栅格图层)
在线 服务,加载由Mapzen工具生成的 高程瓦片 -- 更多详细信息,请访问 https://registry.opendata.aws/terrain-tiles/
已加载的 网孔 数据集
高程: 用于生成地形的栅格或网孔图层。栅格图层必须包含表示高程的波段;对于网孔图层,将使用顶点的Z值。
垂直比例: 垂直轴的比例因子,增加比例会扩大地貌的高度。
瓦片分辨率: 每个瓦片要使用的地形栅格图层中的样本数。16px 的值意味着每个瓦片的几何图形将由 16x16 个高程样本组成。数字越大,生成的地形瓦片越详细,但渲染复杂度就越高。
裙板高度: 有时可能会在地形的瓦片之间看到小裂缝。提高该值将在地形瓦片周围添加垂直墙 ("裙板 - skirts"),以隐藏裂缝。
Offset: moves the terrain up or down, e.g. to adjust its elevation with respect to the ground level of other objects in the scene.
This can be useful when there is a discrepancy between the height of the terrain and the height of layers in your scene (e.g. point clouds which use a relative vertical height only). In this case adjusting the terrain elevation manually to coincide with the elevation of objects in your scene can improve the navigation experience.
When a mesh layer is used as terrain, you can configure the Triangles settings (wireframe display, smooth triangles, level of detail) and the Rendering colors settings (as a uniform color or color ramp based). More details in the Mesh layer 3D properties section.
 地形晕渲: 允许您选择地形的渲染方式:
禁用晕渲 - 地形颜色仅由地图纹理确定
启用晕渲 - 使用Phong的晕渲模型确定地形颜色,同时考虑地图纹理、地形法线矢量、场景灯光以及地形材质的 周围环境 和 镜面反射 颜色以及 光滑度
11.2.1.2. 灯光
在 灯光 选项卡中,按  菜单添加
菜单添加
最多八个 点光源: 向各个方向发光,就像一个填充区域的光球。离光源越近的对象越亮,而远离光源的对象就越暗。点光源具有设定的位置 (X, Y 和 Z)、颜色、强度 和 衰减 等属性
最多四个 平行光: :模拟从远离对象的巨型闪光灯中获得的照明,始终居中且永不熄灭 (例如太阳)。它在一个方向上发射平行光线,但光线延伸到无限远。平行光可以在给定 方位角、海拔、颜色 和 强度 的参数下进行旋转。
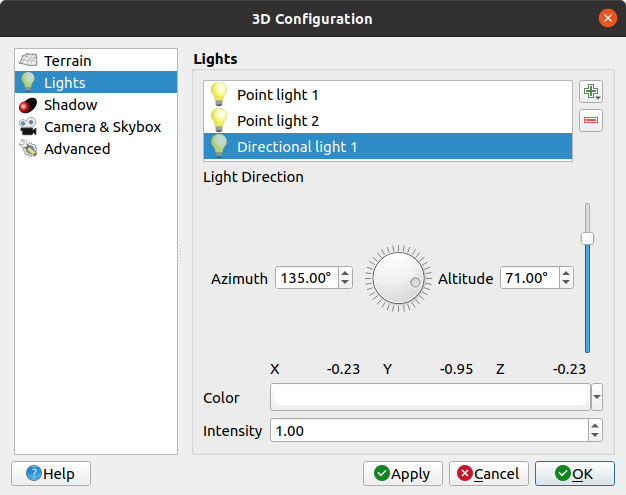
图 11.25 3D地图灯光配置对话框
11.2.1.3. 阴影
Check Show shadows to display shadows within your scene,
given:
平行光
阴影渲染最大距离: 避免渲染太远对象的阴影,尤其是当相机沿地平线仰视时
阴影偏移: 避免由于地图大小不同而导致某些区域比其他区域更暗的自阴影效果,越低越好
阴影地图分辨率: 使阴影看起来更清晰。如果分辨率参数太高,可能会导致性能下降。
11.2.1.4. 相机和天空盒
In this tab, you can control different parameters like camera, 3D axis, navigation synchronization and skybox.
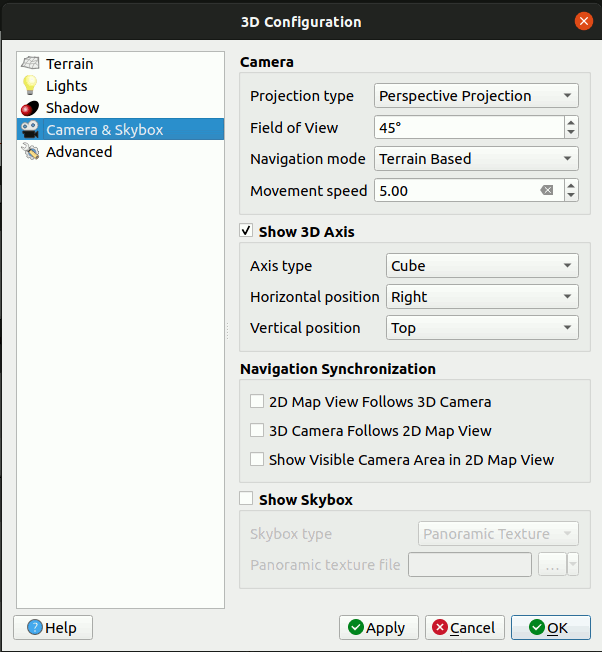
图 11.26 The 3D Map Camera Configuration dialog
The Camera parameter group overrides some default camera settings made in the dialog.
Check
Show 3D Axis to enable 3D axis tool. This parameter
group allows to set the axis type and its position.With the Coordinate Reference System type an orthogonal axis will be represented.
With the Cube type, a 3D cube will be represented. The cube faces can be used to change the camera view: for example, click on the north face to set the camera to see from the north.
小技巧
Right-click the 3D axis to quickly set its position and type, and the camera view.
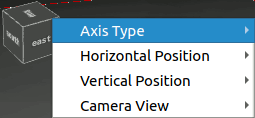
图 11.27 The 3D Axis context menu
The Navigation Synchronization parameter group adds options to synchronize 2D view with 3D camera position or 3D camera position with 2D view or bi directional synchronization. The last option displays the extent visible from the 3D camera over the 2D map view.
Check
Show skybox to enable skybox rendering
in the scene. The skybox type can be:全景纹理, 单个文件提供 360° 视野
不同表面, 包含场景的盒子的六个面各有一个纹理文件
Texture image files of the skybox can be files on the disk, remote URLs or embedded in the project (more details).
11.2.1.5. 高级
地图瓦片分辨率: 用作地形瓦片纹理的2D地图图像的宽度和高度。256px 意味着每个瓦片被渲染成 256x256 像素的图像。数字越大,生成的地形地形越详细,但渲染复杂度越高。
最大屏幕误差: 确定将地形瓦片与更详细的地形瓦片交换的阈值 (反之亦然) - 即3D视图使用更高质量瓦片的时间。数字越小,场景中的细节越多,但渲染复杂度越高。
最大地面误差: 地形瓦片的分辨率,在该分辨率下,将瓦片拆分为更详细的瓦片将停止 (分割它们不会引入任何额外的细节)。该值限制了瓦片层次结构的深度:值越低,层次结构越深,渲染复杂度越高。
缩放层级: 显示缩放层级的数量 (取决于地图瓦片分辨率和最大地面误差)。
- 显示标注: 打开或关闭地图标注
- 显示地图瓦片信息: 包括地形瓦片的边界和瓦片编号 (用于解决地形问题)
- 显示边界框: 显示地形瓦片的3D边界框 (用于解决地形问题)
- 显示相机视图中心
- Show camera's rotation center
- 显示光源: 显示光源原点处的球体,相对于场景内容更容易重新定位和放置光源
- Show frames per second (FPS)
- Show debug overlay: visual overlay which displays
some useful debugging and profiling information.
This allows in particular to quickly see the frame graph and the scene graph.
- Show Eye Dome Lighting (EDL):
a post processing effect which enhances depth perception.
Each pixel's depth (distance off the camera) is compared to its neighboring pixels' depth
and gets highlighted according to that depth difference, making the edges stand out.
Affects the whole scene and can be combined with Screen Space Ambient Occlusion.
Following parameters can be controlled:
Lighting strength: increases the contrast, allowing for better depth perception
Lighting distance: represents the distance of the used pixels off the center pixel and has the effect of making edges thicker.
Add screen-space
Ambient Occlusion (SSAO):
a post processing effect which also enhances depth perception
by applying a darker shading to areas which are less exposed to ambient lighting.
Affects the whole scene and can be combined with Eye dome Lighting.
Following parameters can be controlled:Radius: how far we will reach to calculate ambient occlusion
Intensity: how strong the effect should be (higher values make things darker)
Occlusion threshold: how many neighboring points need to be occluded for the effect to appear (lower values than 50% will make the output darker, but possibly providing greater range of occlusion)
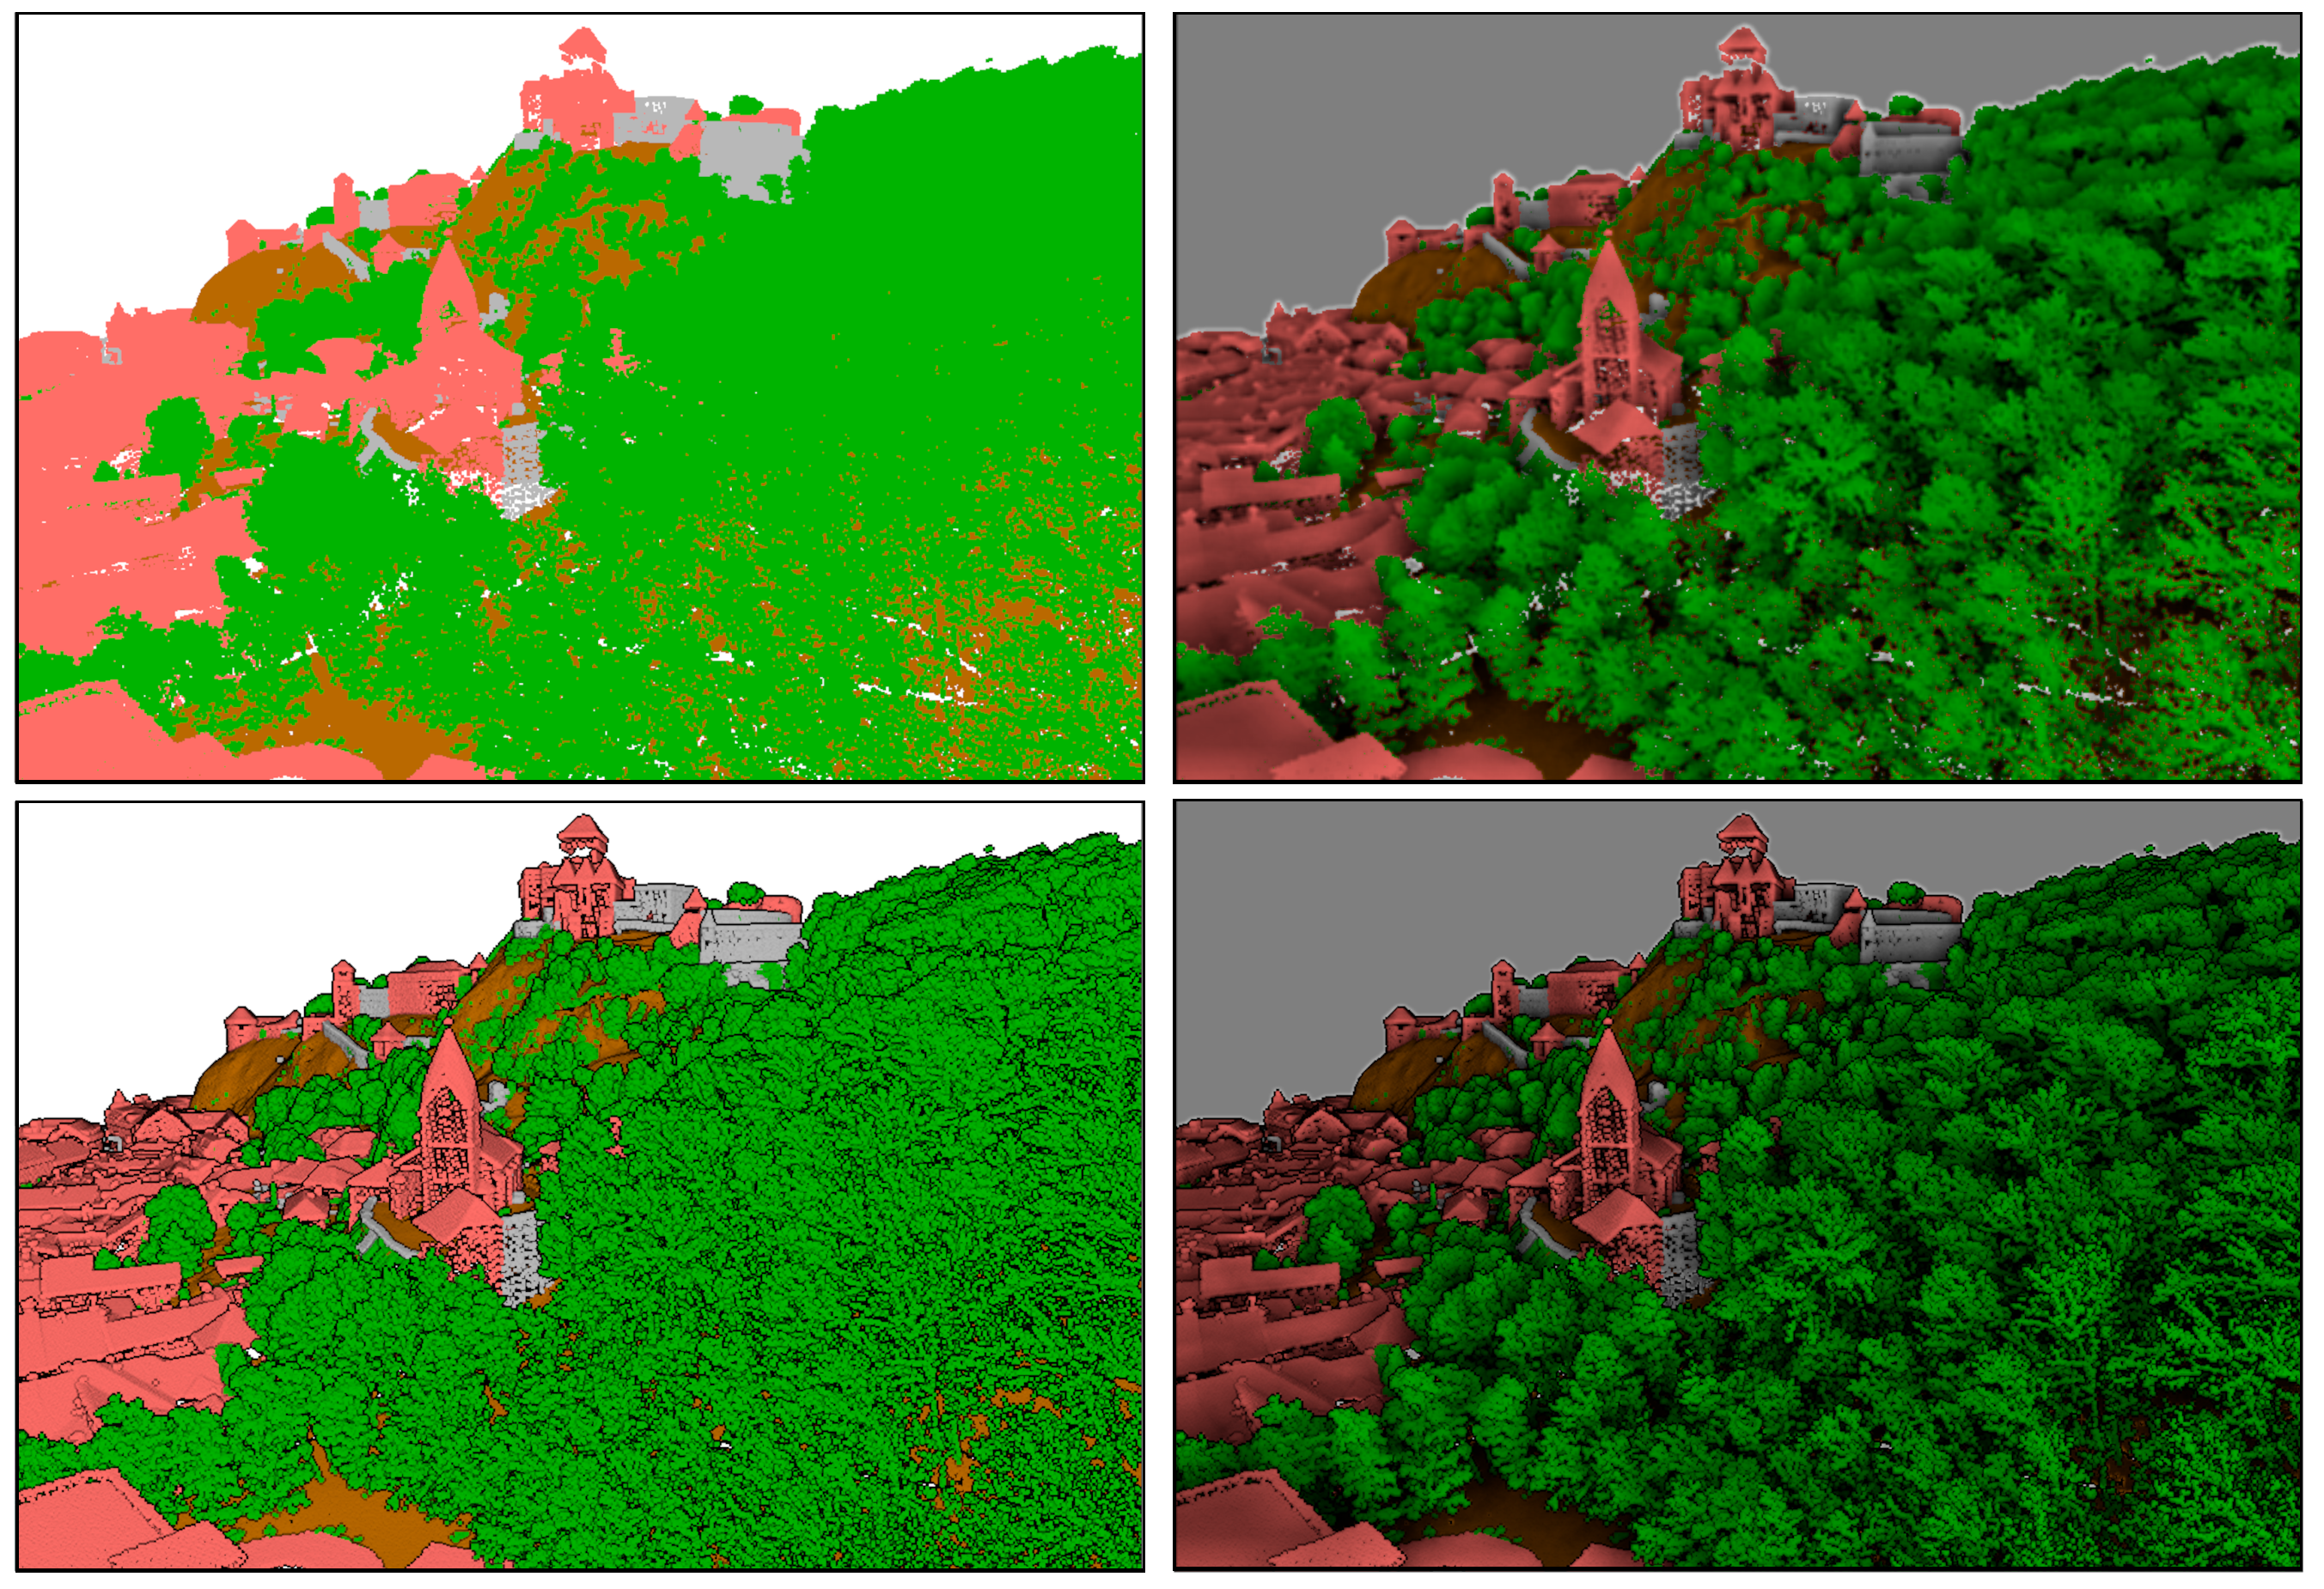
图 11.28 Rendering Point clouds in 3D map using Eye Dome Lighting (EDL) and/or Screen-Space Ambient Occlusion (SSAO)
From top, left to right: No effect -- SSAO only -- EDL only -- SSAO and EDL
- Debug Shadow Map: renders the scene as a red-black image
from the point of view of the light used for shadows (for troubleshooting).
The widget is set with a proportional Size to the 3D map view's,
and docked in a Corner.
- Debug Depth Map: renders the scene's depth map as an image
with nearer pixels being darker (for troubleshooting).
The widget is set with a proportional Size to the 3D map view's,
and docked in a Corner.
11.2.2. 导航选项
要在3D中浏览地图视图,请执行以下操作:
倾斜地形 (围绕穿过窗口中心的水平轴旋转地形)
按下
 向上倾斜 和
  向下倾斜 工具
按下 Shift 并使用向上/向下方向键
按住鼠标中键,向前/向后拖动鼠标
按住 Shift 并在按住鼠标左键的情况下向前/向后拖动鼠标
旋转地形 (围绕穿过窗口中心的垂直轴旋转地形)
将导航控件的罗盘转到观察方向
按住 Shift 并使用左/右键
按住鼠标中键,左右拖动鼠标
按住 Shift 并在按住鼠标左键的情况下左右拖动鼠标
更改相机位置 (和视图中心),在水平平面移动相机
按住鼠标左键拖动鼠标,并启用
相机视角控制按导航控件的方向箭头
使用上/下/左/右键分别向前、向后、向右和向左移动相机
更改相机高度:按 Page Up/Page Down 键
更改相机方向 (相机保持在其位置,但视图中心点移动)
按住 Ctrl 并使用方向键上下左右转动相机
按住 Ctrl 并在按住鼠标左键的情况下拖动鼠标
放大和缩小
按导航控件中相关的
 放大 和
放大 和  缩小 工具
缩小 工具滚动鼠标滚轮 (按住 Ctrl 键可获得更精细的缩放效果)
按住鼠标右键拖动鼠标进行放大 (向下拖动) 和缩小 (向上拖动)
要重置相机视图,请单击3D画布面板顶部的 全图显示 按钮。
11.2.3. 创建动画
动画基于一组关键帧 - 特定时间的相机位置。要创建动画,请执行以下操作:
切换
动画 工具,显示动画播放控件单击
添加关键帧 按钮并以秒为单位输入 关键帧时间,关键帧 组合框现在显示时间设置。使用导航工具,将相机移动到与当前关键帧时间相关联的位置。
重复前面的步骤,根据需要添加若干关键帧 (包括时间和位置)。
单击
按钮预览动画。QGIS将使用相机在设定时间的位置或旋转生成场景,并在这些关键帧之间进行插值。可以使用各种动画 插值 模式 (例如,linear、inQuad、outQuad、inCirc… -- 更多详细信息,请访问 https://doc.qt.io/qt-5/qeasingcurve.html#EasingFunction-typedef)。The animation can also be previewed by moving the time slider. Keeping the Loop box checked will repeatedly run the animation while clicking
stops a running animation.
单击  导出动画帧 将生成一系列表示场景的图像。除了文件名 模板 和 输出目录,还可以设置 帧率 数、输出宽度 和 输出高度。
11.2.4. 3D矢量图层
通过选中矢量图层属性的 3D视图 部分中的 启用3D渲染器,可以在3D地图视图中显示具有高程值的矢量图层。有许多选项可用于控制3D矢量图层的渲染。