16.2. Trabalhando com a tabela de atributos
A tabela de atributos exibe informações sobre as feições de uma camada selecionada. Cada linha da tabela representa uma feição (com ou sem geometria) e cada coluna contém uma informação específica sobre a feição. As feições da tabela podem ser pesquisadas, selecionadas, movidas ou mesmo editadas.
16.2.1. Prefácio: Tabelas espaciais e não espaciais
QGIS allows you to load spatial and non-spatial layers. This currently includes tables supported by GDAL and delimited text, as well as the PostgreSQL, MS SQL Server, SpatiaLite and Oracle providers. All loaded layers are listed in the Layers panel. Whether a layer is spatially enabled or not determines whether you can interact with it on the map.
As tabelas não espaciais podem ser navegadas e editadas usando a visualização da tabela de atributos. Além disso, eles podem ser usados para pesquisas de campo. Por exemplo, você pode usar colunas de uma tabela não espacial para definir valores de atributos ou um intervalo de valores permitidos para serem adicionados a uma camada vetorial específica durante a digitalização. Dê uma olhada no widget de edição na seção Propriedades do formulário de atributos para descobrir mais.
16.2.2. Apresentando a Interface da Tabela de Atributos
Para abrir a tabela de atributos para uma camada vetorial, ative a camada clicando nela Painel Camadas. Em seguida, no menu principal: seleção de menus: menu Camada, escolha  :menuselection: Abrir tabela de atributos. Também é possível clicar com o botão direito do mouse na camada e escolher no menu suspenso ou clique em :guilabel: botão Abrir tabela de atributos na barra de ferramentas Atributos. Se você preferir atalhos, F6 abrirá a tabela de atributos. Shift+F6 abrirá a tabela de atributos filtrada para os recursos selecionados e: kbd:Ctrl+F6 abrirá a tabela de atributos filtrados para os recursos visíveis.
Isso abrirá uma nova janela que exibe os atributos da feição para a camada (figure_attributes_table). De acordo com a configuração em :menuselection: menu Configurações –> Opções –> Fonte de dados, a tabela de atributos será aberta em uma janela encaixada ou em uma janela regular. O número total de feições na camada e o número de feições atualmente selecionados/filtrados são mostrados no título da tabela de atributos, bem como se a camada é espacialmente limitada.
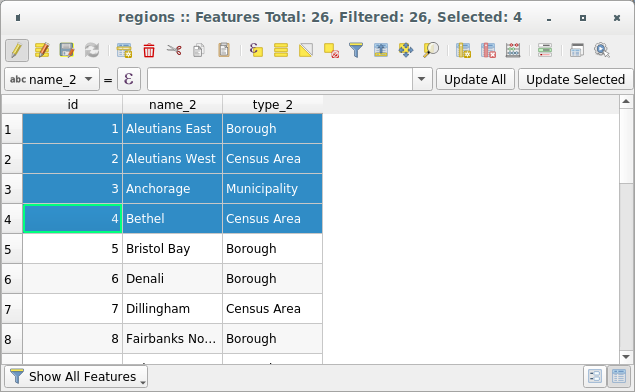
Fig. 16.67 Tabela de atributos para a camada de regiões
Os botões na parte superior da janela da tabela de atributos fornecem a seguinte funcionalidade:
Ícone |
Etiqueta |
Finalidade |
Atalho Padrão |
|---|---|---|---|
|
Alternar modo de edição |
Habilitar funcionalidades de edição |
Ctrl+E |
|
Alternar modo multi edição |
Atualize vários campos de várias feições |
|
|
Salvar Edições |
Salvar modificações atuais |
|
|
Recarregar a tabela |
||
|
Adicionar feição |
Adicionar nova feição sem geometria |
|
|
Excluir feições selecionadas |
Remover feições selecionadas para a camada |
|
|
Cortar feições selecionadas para área de transferência |
Ctrl+X |
|
|
Copiar feições selecionadas para a área de transferência |
Ctrl+C |
|
|
Colar feições da área de transferência |
Inserir novas feições das copiadas |
Ctrl+V |
|
Selecionar feições usando uma expressão |
||
|
Selecionar Todas |
Selecionar todas feições em uma camada |
Ctrl+A |
|
Seleção invertida |
Inverter a seleção atual na camada |
Ctrl+R |
|
Desselecionar todas |
Desselecionar todas as feições na camada atual |
Ctrl+Shift+A |
|
Filtrar/Selecionar feições usando formulário |
Ctrl+F |
|
|
Mover selecionadas para o topo |
Mover linhas selecionadas para o todo da tabela |
|
|
Mapa panorâmico para selecionar linhas |
Ctrl+P |
|
|
Aproximar mapa para selecionar linhas |
Ctrl+J |
|
|
Novo campo |
Adicionar um novo campo para uma fonte de dados |
Ctrl+W |
|
Excluir campo |
Remover um campo a partir da fonte de dados |
|
|
Organizar colunas |
Mostrar/ocultar campos da tabela de atributos |
|
|
Abrir calculadora de campo |
Atualização de campo para muitas feições em uma linha |
Ctrl+I |
|
Formatação condicional |
Ativar formatação de tabela |
|
|
Tabela de Atributos do Dock |
Permite encaixar/desencaixar a tabela de atributos |
|
|
Ações |
Listas de ações relatadas para uma camada |


Nota
Depending on the format of the data and the GDAL library built with your QGIS version, some tools may not be available.
Abaixo desses botões está a barra Cálculo de campo rápido (ativada apenas em modo de edição), que permite aplicar rapidamente cálculos a todos ou parte das feições da camada. Esta barra usa o mesmo: ref:expressões<vector_expressions>`como o |calcula campo| :sup:`Calculadora de campo (consulte: ref:` calcule_campos_valores`).
The attribute table support Shift+Mouse Wheel scrolling in attribute table to switch to a horizontal scrolling action instead of vertical.
16.2.2.1. Visualização da tabela versus visualização do formulário
O QGIS fornece dois modos de exibição para manipular facilmente os dados na tabela de atributos:
The
Table view, displays values of multiple features in a
tabular mode, each row representing a feature and each column a field.
A right-click on the column header allows you to configure the table
display while a right-click on a cell provides
interaction with the feature.The
 Form view shows feature identifiers in a first panel and displays only the attributes of the clicked
identifier in the second one.
There is a pull-down menu at the top of the first panel where the “identifier”
can be specified using an attribute (Column preview) or an
Expression.
The pull-down also includes the last 10 expressions for re-use.
Form view uses the layer fields configuration
(see Propriedades do formulário de atributos).
Form view shows feature identifiers in a first panel and displays only the attributes of the clicked
identifier in the second one.
There is a pull-down menu at the top of the first panel where the “identifier”
can be specified using an attribute (Column preview) or an
Expression.
The pull-down also includes the last 10 expressions for re-use.
Form view uses the layer fields configuration
(see Propriedades do formulário de atributos).Você pode navegar pelos identificadores de feições com as setas na parte inferior do primeiro painel. Os atributos de feições são atualizados no segundo painel conforme você avança. Também é possível identificar ou mover para a feição ativa o na tela do mapa pressionando qualquer botão na parte inferior:
 Highlight current feature if visible in the
map canvas
Highlight current feature if visible in the
map canvas Automatically pan to current feature
 Zoom para a feição atual
Você pode alternar de um modo para outro clicando no ícone correspondente no canto inferior direito da caixa de diálogo.
Você também pode especificar o modo :guilabel: Visualização padrão na abertura da tabela de atributos em :menuselection: menu Configurações -> Opções -> Fonte de Dados. Pode ser ‘Lembrar última visualização’, ‘Tabela’ ou ‘Formulário’.
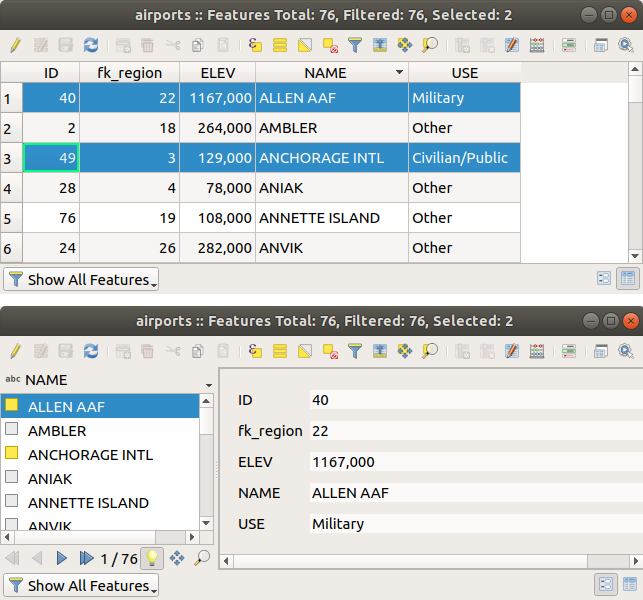
Fig. 16.68 Tabela de atributos na exibição de tabela (superior) vs exibição de formulário (inferior)
16.2.2.2. Configurando as colunas
Right-click in a column header when in table view to have access to tools that help you control:
Redimensionando larguras de colunas
A largura das colunas pode ser definida através de um clique com o botão direito do mouse no cabeçalho da coluna e selecione:
Defina a largura… para inserir o valor desejado. Por padrão, o valor atual é exibido no widget
Definir todas as larguras de coluna… para o mesmo valor
Autodimensionar para redimensionar da melhor forma possível a coluna.
Auto dimensionar todas as colunas
O tamanho de uma coluna também pode ser alterado arrastando o limite à direita de seu título. O novo tamanho da coluna é mantido para a camada e restaurado na próxima abertura da tabela de atributos.
Ocultando e organizando colunas e permitindo ações
By right-clicking in a column header, you can choose to Hide column
from the attribute table (in “table view” mode).
For more advanced controls, press the  Organize columns…
button from the dialog toolbar or choose Organize columns…
in a column header contextual menu.
In the new dialog, you can:
Organize columns…
button from the dialog toolbar or choose Organize columns…
in a column header contextual menu.
In the new dialog, you can:
marcar/desmarcar as colunas que deseja mostrar ou ocultar: uma coluna oculta desaparecerá de todas as instâncias da caixa de diálogo da tabela de atributos até que seja restaurada ativamente.
arraste e solte itens para reordenar as colunas na tabela de atributos. Observe que essa alteração é para a renderização da tabela e não altera a ordem dos campos na fonte de dados da camada
add a new virtual Actions column that displays in each row a drop-down box or a button list of enabled actions. See Propriedades de Ações for more information about actions.
Classificando colunas
The table can be sorted by any column, by clicking on the column header. A
small arrow indicates the sort order (downward pointing means descending
values from the top row down, upward pointing means ascending values from
the top row down).
You can also choose to sort the rows with the Sort… option of the
column header context menu and write an expression. E.g. to sort the rows
using multiple columns you can write concat(col0, col1).
Na exibição de formulário, o identificador de feições pode ser classificado usando o  :guilabel: opção Classificar por expressão de visualização.
Dica
Classificação com base em colunas de diferentes tipos
Tentar classificar uma tabela de atributos com base em colunas de tipos string e numéricos pode levar a resultados inesperados devido à expressão concat(("USE", "ID") retornando valores de string (ou seja,``’Borough105’ < ‘Borough6’). Você pode contornar isso usando, por exemplo, ``concat("USE", lpad("ID", 3, 0)), que retorna 'Borough105' > 'Borough006'.
16.2.2.3. Formatação de células da tabela usando condições
As configurações de formatação condicional podem ser usadas para realçar nas feições da tabela de atributos nos quais você deseja enfatizar, usando condições personalizadas nas feições:
geometria (por exemplo, identificando características de várias partes, áreas pequenas ou em uma extensão de mapa definida …);
ou valor do campo (por exemplo, comparando valores com um limite, identificando células vazias …).
Você pode ativar o painel de formatação condicional clicando em  no canto superior direito da janela de atributos na exibição de tabela (não disponível na exibição de formulário).
O novo painel permite que o usuário adicione novas regras para formatar a renderização de  Campo ou
  Linha completa. Adicionar nova regra abre um formulário para definir:
o nome da regra;
uma condição usando qualquer uma das funções construtor de expressões;
a formatação: pode ser escolhida de uma lista de formatos predefinidos ou criada com base em propriedades como:
cores de fundo e texto;
uso de ícone;
negrito, itálico, sublinhado ou strikeout;
fonte.
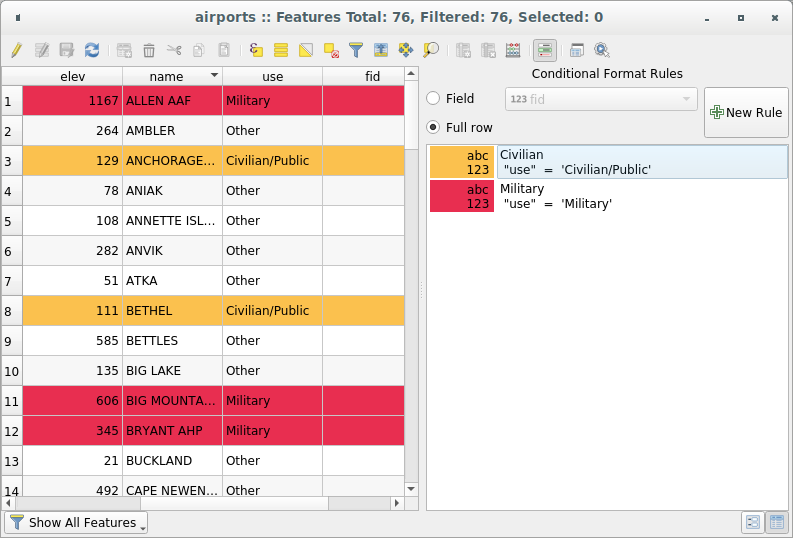
Fig. 16.69 Formatação condicional de uma tabela de atributo
16.2.3. Interagindo com feições em uma tabela de atributos
16.2.3.1. Selecionando características
Na exibição de tabela, cada linha da tabela de atributos exibe os atributos de um recurso exclusivo da camada. Selecionar uma linha seleciona o recurso e, da mesma forma, selecionar um recurso na tela do mapa (no caso de camada ativada para geometria) seleciona a linha na tabela de atributos. Se o conjunto de recursos selecionados na tela do mapa (ou tabela de atributos) for alterado, a seleção também será atualizada na tabela de atributos (ou tela do mapa) de acordo.
As linhas podem ser selecionadas clicando no número da linha no lado esquerdo da linha. Múltiplas linhas podem ser marcadas pressionando a tecla: kbd:Ctrl. Uma seleção contínua pode ser feita pressionando a tecla: kbd:Shift e clicando em vários cabeçalhos de linha no lado esquerdo das linhas. Todas as linhas entre a posição atual do cursor e a linha clicada são selecionadas. Mover a posição do cursor na tabela de atributos, clicando em uma célula na tabela, não altera a seleção de linha. Alterar a seleção na tela principal não move a posição do cursor na tabela de atributos.
Na exibição de formulário da tabela de atributos, as feições são identificados por padrão no painel esquerdo pelo valor do campo exibido (consulte: ref: maptips). Esse identificador pode ser substituído usando a lista suspensa na parte superior do painel, selecionando um campo existente ou usando uma expressão personalizada. Você também pode optar por classificar a lista de recursos no menu suspenso.
Clique em um valor no painel esquerdo para exibir os atributos da feição no caminho certo. Para selecionar uma feição, você precisa clicar dentro do símbolo quadrado à esquerda do identificador. Por padrão, o símbolo fica amarelo. Como na exibição de tabela, você pode executar várias seleções de recursos usando as combinações de teclado expostas anteriormente.
Além de selecionar feições com o mouse, você pode executar a seleção automática com base no atributo da feição, usando as ferramentas disponíveis na barra de ferramentas da tabela de atributos, como (consulte a seção: ref:automatic_selection e a seguir para obter mais informações e casos de uso):
 Selecione por expressão…
 Selecionar Feição pelo Valor…
 Desmarcar todas as feições da camada
 Selecionar Todas as Feições
 Inverter Feições Selecionadas.
Também é possível selecionar recursos usando o :ref: filter_select_form.
16.2.3.2. Filtragem de feições
Depois de selecionar as feições na tabela de atributos, você pode exibir apenas esses registros na tabela. Isso pode ser feito facilmente usando o item Mostrar feições selecionadas na lista suspensa no canto inferior esquerdo da caixa de diálogo da tabela de atributos. Esta lista oferece os seguintes filtros:
- Mostrar Todas as Feições
 Show Selected Features - same as using
Open Attribute Table (Selected Features) from the Layer
menu or the Attributes Toolbar or pressing Shift+F6
Show Selected Features - same as using
Open Attribute Table (Selected Features) from the Layer
menu or the Attributes Toolbar or pressing Shift+F6 Show Features visible on map - same as using
Open Attribute Table (Visible Features) from the Layer
menu or the Attributes Toolbar or pressing Ctrl+F6
Show Features visible on map - same as using
Open Attribute Table (Visible Features) from the Layer
menu or the Attributes Toolbar or pressing Ctrl+F6 Show Edited and New Features - same as using
Open Attribute Table (Edited and New Features) from the Layer
menu or the Attributes Toolbar
Show Edited and New Features - same as using
Open Attribute Table (Edited and New Features) from the Layer
menu or the Attributes ToolbarField Filter - allows the user to filter based on value of a field: choose a column from a list, type or select a value and press Enter to filter. Then, only the features matching
num_field = valueorstring_field ilike '%value%'expression are shown in the attribute table. You can check Case sensitive to be less permissive with strings.
Filtro avançado (Expressão) - Abre a caixa de diálogo Construtor de expressões. Dentro dele, você pode criar: ref: expressões complexas<vector_expressions> para corresponder às linhas da tabela. Por exemplo, você pode filtrar a tabela usando mais de um campo. Quando aplicada, a expressão do filtro será exibida na parte inferior do formulário.
: a shortcut to saved expressions frequently used for filtering your attribute table.
Também é possível: ref: filtrar recursos usando formulários <filter_select_form>.
Nota
A filtragem de registros da tabela de atributos não filtra feições da camada; eles são simplesmente ocultados momentaneamente da tabela e podem ser acessados na tela do mapa ou removendo o filtro. Para filtros que ocultam recursos da camada, use o Query Builder.
Dica
Atualize a filtragem da fonte de dados com Mostrar feições visíveis no mapa
Quando, por motivos de desempenho, os recursos mostrados na tabela de atributos são espacialmente limitados à extensão da tela em sua abertura (consulte: ref: Opções da fonte de dados<tip_table_filtering> para obter instruções), selecionando: guilabel: Mostrar feições visíveis no mapa em um nova extensão de tela atualiza a restrição espacial.
16.2.3.3. Armazenamento de expressões de filtro
Expressions you use for attribute table filtering can be saved for further calls.
When using Field Filter or Advanced Filter (expression)
entries, the expression used is displayed in a text widget in the bottom of the
attribute table dialog. Press the  Save expression with text as name next to the box to save the expression
in the project. Pressing the drop-down menu next to the button allows to save
the expression with a custom name (Save expression as…).
Once a saved expression is displayed, the
Save expression with text as name next to the box to save the expression
in the project. Pressing the drop-down menu next to the button allows to save
the expression with a custom name (Save expression as…).
Once a saved expression is displayed, the  button is triggered and its drop-down menu allows you to Edit the
expression and name if any, or Delete stored expression.
button is triggered and its drop-down menu allows you to Edit the
expression and name if any, or Delete stored expression.
Saved filter expressions are saved in the project and available through the Stored filter expressions menu of the attribute table. They are different from the user expressions, shared by all projects of the active user profile.
16.2.3.4. Filtrando e selecionando feições usando formulários
Clicando no  :sup: Filtre/selecione recursos usando o formulário ou pressione :kbd:Ctrl+F` fará com que a caixa de diálogo da tabela de atributos mude para a exibição do formulário e substitua cada widget por sua variante de pesquisa.
A partir deste ponto, a funcionalidade desta ferramenta é semelhante à descrita em: ref: select_by_value, onde é possível encontrar descrições de todos os operadores e selecionar modos.
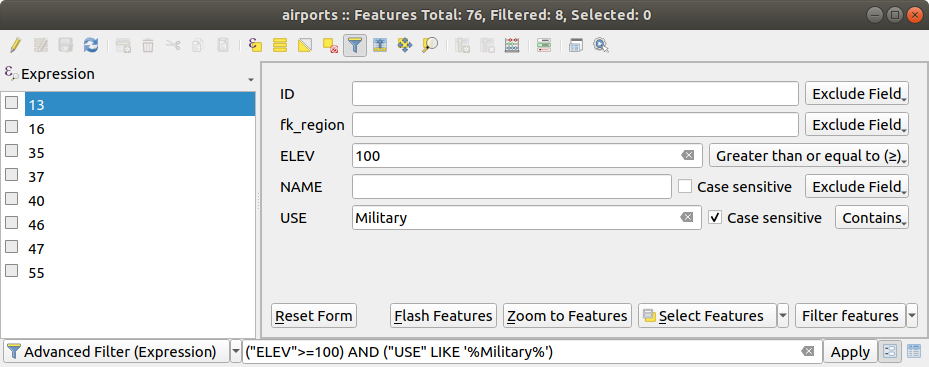
Fig. 16.70 Tabela de atributos filtrada pelo formulário de filtro
Ao selecionar / filtrar feições da tabela de atributos, existe um botão Filtro de feições que permite definir e refinar filtros. Seu uso aciona a opção: guilabel: Filtro avançado (Expressão) e exibe a expressão de filtro correspondente em um widget de texto editável na parte inferior do formulário.
Se já houver feições filtradas, você poderá refinar o filtro usando a lista suspensa ao lado do botão Filtro de feições. As opções são:
Filtrar dentro de (“AND”)
Estender filtro (“OR”)
Para limpar o filtro, selecione a opção Mostrar todas as feições no menu suspenso inferior esquerdo ou limpe a expressão e clique em Aplicar ou pressione Enter.
16.2.4. Usando ação em feições
Os usuários têm várias possibilidades de manipular feições com o menu contextual, como:
Selecionar todas (Ctrl+A) as feições;
Copie o conteúdo de uma célula na área de transferência com: guilabel:Copiar conteúdo da célula;
Aproximar na feição sem ter que selecioná-lo previamente;
Panorâmica da feição sem ter que selecioná-lo previamente;
Destacar feição, para destacá-la na tela do mapa;
Abrir formulário: alterna a tabela de atributos para a exibição de formulários, com foco na feição clicado.
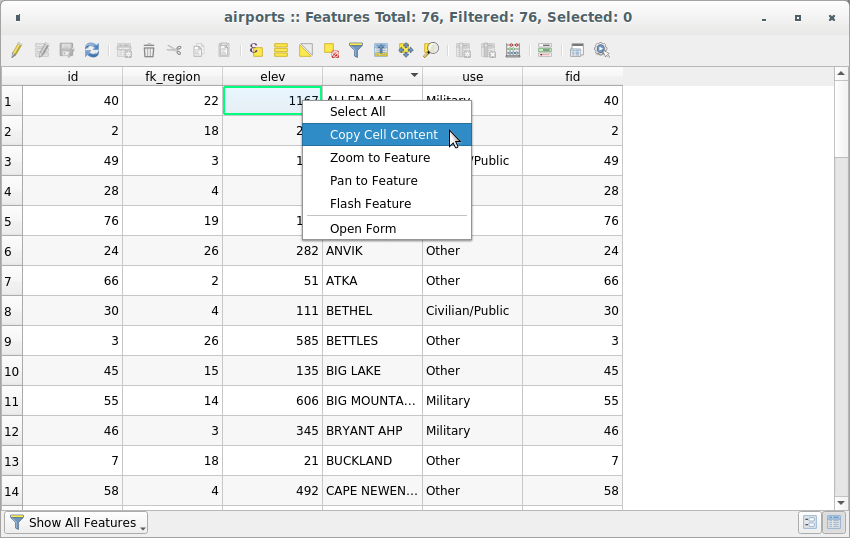
Fig. 16.71 Copiar botão de conteúdo da célula
Se você deseja usar dados de atributo em programas externos (como Excel, LibreOffice, QGIS ou um aplicativo Web personalizado), selecione uma ou mais linhas e use o  Copie as linhas selecionadas para a área de transferência ou pressione: kbd:Ctrl+C.
Em: menuselection: menu Configurações -> Opções -> Fonte de Dado, você pode definir o formato no qual colar Copiar feições como lista suspensa:
Texto simples, sem geometria,
Texto simples, geometria WKT,
GeoJSON
Você também pode exibir uma lista de ações neste menu contextual. Isso é ativado na guia . Veja Propriedades de Ações para mais informações sobre ações.
16.2.4.1. Salvando feições selecionadas como nova camada
The selected features can be saved as any OGR-supported vector format and
also transformed into another coordinate reference system (CRS). In the
contextual menu of the layer, from the Layers panel, click on
to define the name of
the output dataset, its format and CRS (see section Criando novas camadas a partir de uma camada existente). You’ll
notice that is checked.
It is also possible to specify GDAL creation options within the dialog.
16.2.5. Editando valores de atributo
A edição dos valores dos atributos pode ser feita por:
digitando o novo valor diretamente na célula, esteja a tabela de atributos na visualização de tabela ou formulário. As mudanças são feitas célula por célula, feição por feição;
using the field calculator: update in a row a field that may already exist or to be created but for multiple features. It can be used to create virtual fields;
using the quick field calculation bar: same as above but for only existing field;
or using the multi edit mode: update in a row multiple fields for multiple features.
16.2.5.1. Utilizando a Calculadora de Campo
The  Field Calculator button in the attribute table
allows you to perform calculations on the basis of existing attribute values or
defined functions, for instance, to calculate length or area of geometry
features. The results can be used to update an existing field, or written
to a new field (that can be a virtual one).
Field Calculator button in the attribute table
allows you to perform calculations on the basis of existing attribute values or
defined functions, for instance, to calculate length or area of geometry
features. The results can be used to update an existing field, or written
to a new field (that can be a virtual one).
The field calculator is available on any layer that supports edit. When you click on the field calculator icon the dialog opens (see Fig. 16.72). If the layer is not in edit mode, a warning is displayed and using the field calculator will cause the layer to be put in edit mode before the calculation is made.
Based on the Expression Builder dialog, the field calculator dialog offers a complete interface to define an expression and apply it to an existing or a newly created field. To use the field calculator dialog, you must select whether you want to:
aplicar o cálculo sobre toda a camada ou apenas sobre as características selecionadas
criar um novo campo para o cálculo ou atualizar um já existente.
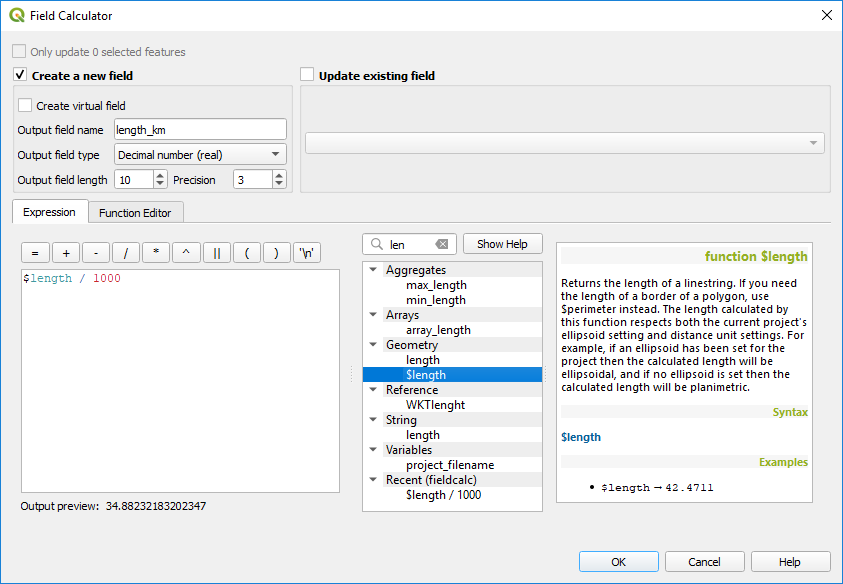
Fig. 16.72 Calculadora de campo
If you choose to add a new field, you need to enter a field name, a field type (integer, real, date or string) and if needed, the total field length and the field precision. For example, if you choose a field length of 10 and a field precision of 3, it means you have 7 digits before the dot, and 3 digits for the decimal part.
A short example illustrates how field calculator works when using the
Expression tab. We want to calculate the length in km of the
railroads layer from the QGIS sample dataset:
Load the shapefile
railroads.shpin QGIS and press
Open Attribute Table.Click on
 Toggle editing mode and open the
Field Calculator dialog.
Toggle editing mode and open the
Field Calculator dialog.Select the
Create a new field checkbox to save the
calculations into a new field.Set Output field name to
length_kmSelecione
Número decimal (real)como Tipo de campo de saída`.Set the Output field length to
10and the Precision to3Double click on
$lengthin the Geometry group to add the length of the geometry into the Field calculator expression box (you will begin to see a preview of the output, up to 60 characters, below the expression box updating in real-time as the expression is assembled).Complete the expression by typing
/ 1000in the Field calculator expression box and click OK.You can now find a new length_km field in the attribute table.
16.2.5.2. Criando um campo virtual
A virtual field is a field based on an expression calculated on the fly, meaning
that its value is automatically updated as soon as an underlying parameter
changes. The expression is set once; you no longer need to recalculate the field
each time underlying values change.
For example, you may want to use a virtual field if you need area to be evaluated
as you digitize features or to automatically calculate a duration between dates
that may change (e.g., using now() function).
Nota
Uso de campos virtuais
Os campos virtuais não são permanentes nos atributos da camada, o que significa que eles são salvos e disponibilizados apenas no arquivo de projeto em que foram criados.
Um campo pode ser definido como virtual somente em sua criação. Os campos virtuais são marcados com um fundo roxo na guia de campos da caixa de diálogo de propriedades da camada para distingui-los dos campos físicos regulares ou unidos. Sua expressão pode ser editada posteriormente pressionando o botão de expressão na coluna Comentário. Uma janela do editor de expressão será aberta para ajustar a expressão do campo virtual.
16.2.5.3. Usando a barra de cálculo rápido de campo
While Field calculator is always available, the quick field calculation bar on top of the attribute table is only visible if the layer is in edit mode. Thanks to the expression engine, it offers a quicker access to edit an already existing field:
Selecione o campo a ser atualizado na lista suspensa.
Fill the textbox with a value, an expression you directly write or build using the
 expression button.
Click on Update All, Update Selected or Update Filtered button according to your need.
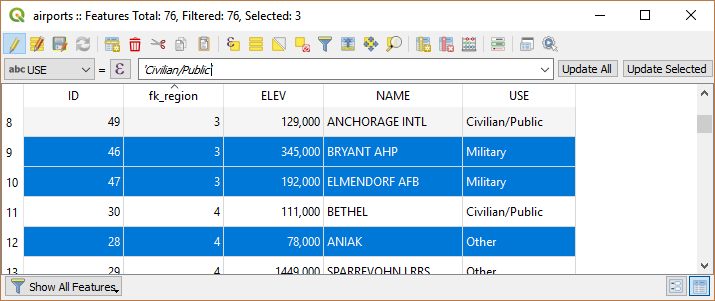
Fig. 16.73 Barra de cálculo rápido de campo
16.2.5.4. Editando vários campos
Ao contrário das ferramentas anteriores, o modo de edição múltipla permite que vários atributos de diferentes recursos sejam editados simultaneamente. Quando a camada é alternada para edição, os recursos de edição múltipla ficam acessíveis:
using the
 Toggle multi edit mode button from the toolbar
inside the attribute table dialog;
Toggle multi edit mode button from the toolbar
inside the attribute table dialog;or selecting
menu.
Nota
Unlike the tool from the attribute table, hitting the option provides you with a modal dialog to fill attributes changes. Hence, features selection is required before execution.
Para editar vários campos em uma linha:
Selecione as feições que você deseja editar.
From the attribute table toolbar, click the
button. This will
toggle the dialog to its form view. Feature selection could also be made
at this step.At the right side of the attribute table, fields (and values) of selected features are shown. New widgets appear next to each field allowing for display of the current multi edit state:
 The field contains different values for selected
features. It’s shown empty and each feature will keep its original value.
You can reset the value of the field from the drop-down list of the widget.
The field contains different values for selected
features. It’s shown empty and each feature will keep its original value.
You can reset the value of the field from the drop-down list of the widget. All selected features have the same value for this
field and the value displayed in the form will be kept.
All selected features have the same value for this
field and the value displayed in the form will be kept. The field has been edited and the entered value
will be applied to all the selected features. A message appears at the top
of the dialog, inviting you to either apply or reset your modification.
The field has been edited and the entered value
will be applied to all the selected features. A message appears at the top
of the dialog, inviting you to either apply or reset your modification.
Clicking any of these widgets allows you to either set the current value for the field or reset to original value, meaning that you can roll back changes on a field-by-field basis.
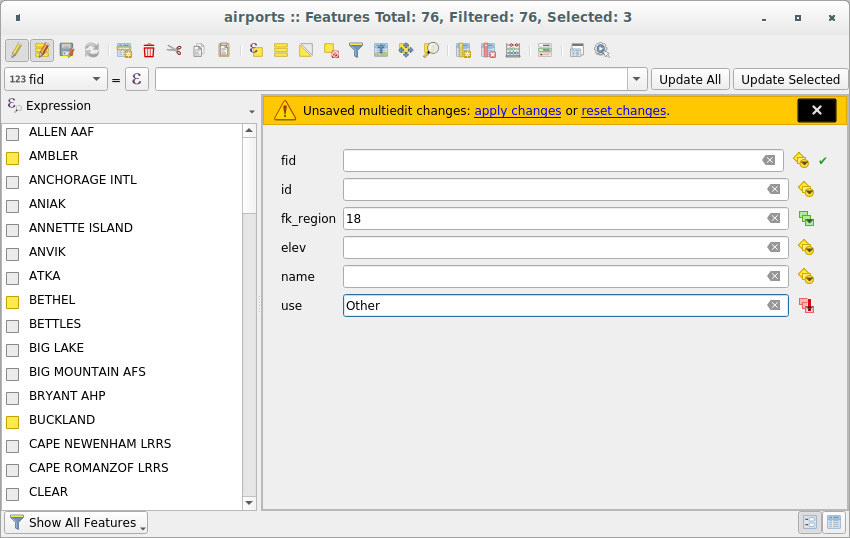
Fig. 16.74 Campos de edição de múltiplas feições
Faça as alterações nos campos desejados.
Clique em Aplicar alterações no texto da mensagem superior ou em qualquer outro recurso no painel esquerdo.
As alterações serão aplicadas a todos os recursos selecionados. Se nenhum recurso for selecionado, toda a tabela será atualizada com suas alterações. As modificações são feitas como um único comando de edição. Então, pressionando |desfazer| Desfazer reverterá as alterações de atributo para todos os recursos selecionados de uma só vez.
Nota
O modo de edição múltipla só está disponível para formulários gerados automaticamente e de arrastar e soltar (veja personalizar_formulário); ele não é suportado por formulários de interface do usuário personalizados.
16.2.6. Criando uma ou muitas para muitas relações
As relações são uma técnica muito utilizada em bancos de dados. O conceito é que feições (linhas) de diferentes camadas (tabelas) podem pertencer umas às outras.
16.2.6.1. Apresentando as relações 1-N
Como exemplo, você tem uma camada com todas as regiões do alasca (polígono) que fornece alguns atributos sobre seu nome e tipo de região e um id exclusivo (que atua como chave primária).
Em seguida, você obtém outra camada ou tabela de pontos com informações sobre aeroportos localizados nas regiões e também deseja acompanhá-los. Se você deseja adicioná-los à camada de regiões, você precisa criar uma relação de um para muitos usando chaves estrangeiras, pois existem vários aeroportos na maioria das regiões.
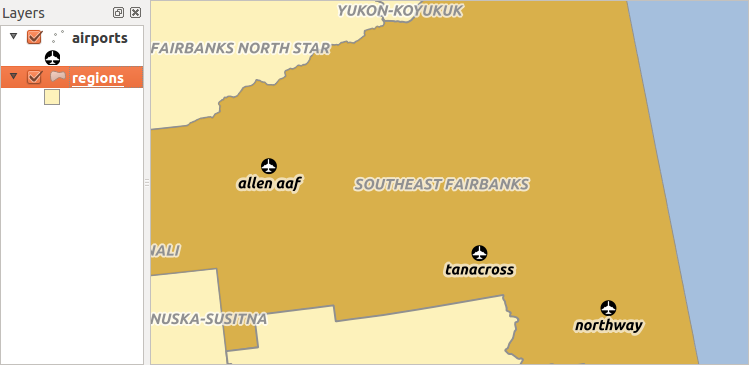
Fig. 16.75 Região do Alasca com aeroportos
Camadas em relações 1-N
O QGIS não faz diferença entre uma tabela e uma camada vetorial. Basicamente, uma camada vetorial é uma tabela com uma geometria. Assim, você pode adicionar sua tabela como uma camada vetorial. Para demonstrar a relação 1-n, você pode carregar o shapefile :Arquivo:`regiões` e o shapefile :Arquivo: aeroportos que tem um campo de chave estrangeira (região_fk) para as regiões da camada. Isso significa que cada aeroporto pertence a exatamente uma região, enquanto cada região pode ter qualquer número de aeroportos (uma relação típica de um para muitos).
Chaves estrangeiras em relações 1-N
In addition to the already existing attributes in the airports attribute table,
you’ll need another field fk_region which acts as a foreign key (if you have
a database, you will probably want to define a constraint on it).
Este campo região_fk sempre conterá um id de uma região. Pode ser visto como um ponteiro para a região a que pertence. E você pode criar um formulário de edição personalizado para edição e o QGIS cuida da configuração. Ele funciona com diferentes provedores (então você também pode usá-lo com arquivos shape e csv) e tudo o que você precisa fazer é informar ao QGIS as relações entre suas tabelas.
Definindo relações 1-N
The first thing we are going to do is to let QGIS know about the relations
between the layers. This is done in .
Open the Relations tab and click on  Add Relation.
Name is going to be used as a title. It should be a human readable string, describing, what the relation is used for. We will just call say airport_relation in this case.
Referenced Layer (Parent) also considered as parent layer, is the one with the primary key, pointed to, so here it is the
regionslayer. You need to define the primary key of the referenced layer, so it isID.Referencing Layer (Child) also considered as child layer, is the one with the foreign key field on it. In our case, this is the
airportslayer. For this layer you need to add a referencing field which points to the other layer, so this isfk_region.Nota
Sometimes, you need more than a single field to uniquely identify features in a layer. Creating a relation with such a layer requires a composite key, ie more than a single pair of matching fields. Use the
Add new field pair as part of a composite
foreign key button to add as many pairs as necessary.Id will be used for internal purposes and has to be unique. You may need it to build custom forms. If you leave it empty, one will be generated for you but you can assign one yourself to get one that is easier to handle
Relationship strength sets the strength of the relation between the parent and the child layer. The default Association type means that the parent layer is simply linked to the child one while the Composition type allows you to duplicate also the child features when duplicating the parent ones and on deleting a feature the children are deleted as well, resulting in cascade over all levels (means children of children of… are deleted as well).
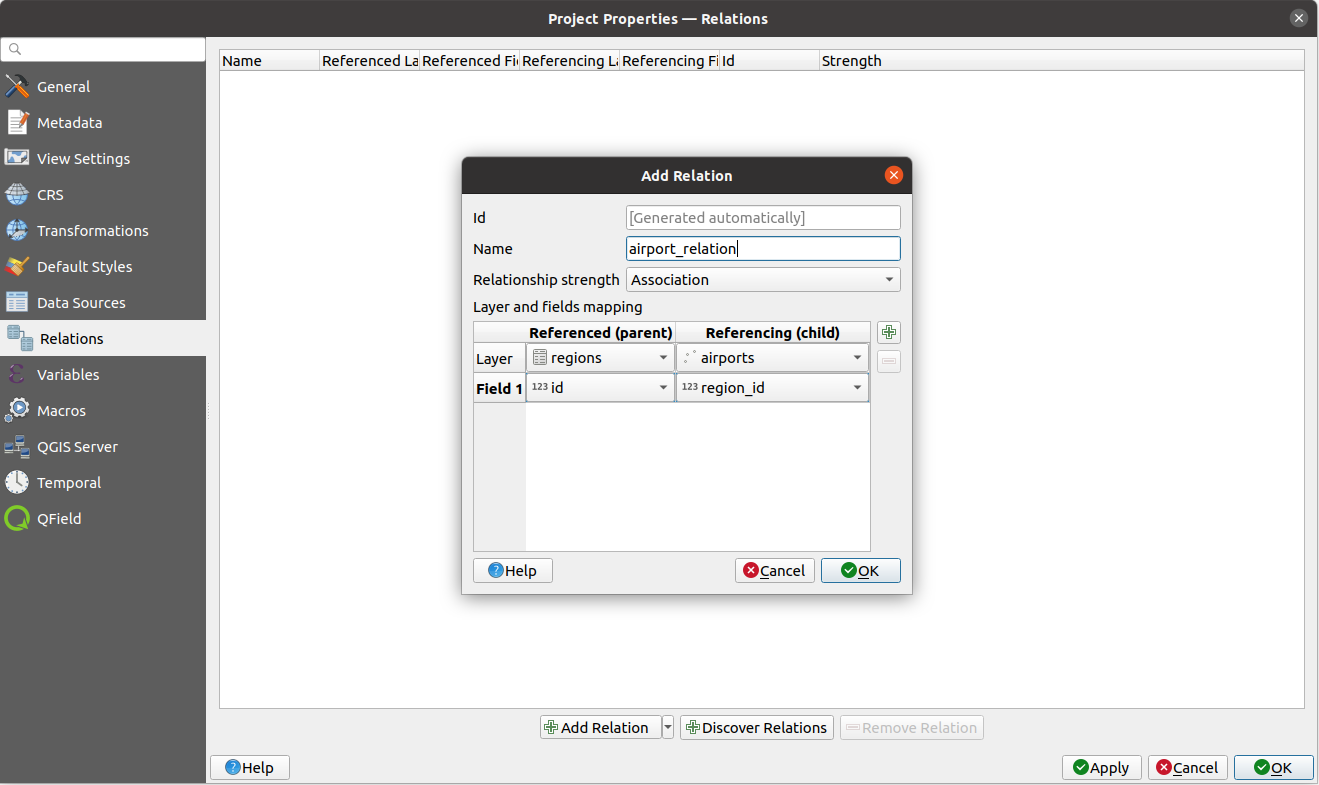
Fig. 16.76 Adicionando uma relação entre camadas de regiões e de aeroportos
From the Relations tab, you can also press the
Discover Relation button to fetch the relations available from
the providers of the loaded layers. This is possible for layers stored in
data providers like PostgreSQL or SpatiaLite.
Formulários para relações 1-N
Now that QGIS knows about the relation, it will be used to improve the forms it generates. As we did not change the default form method (autogenerated) it will just add a new widget in our form. So let’s select the layer region in the legend and use the identify tool. Depending on your settings, the form might open directly or you will have to choose to open it in the identification dialog under actions.
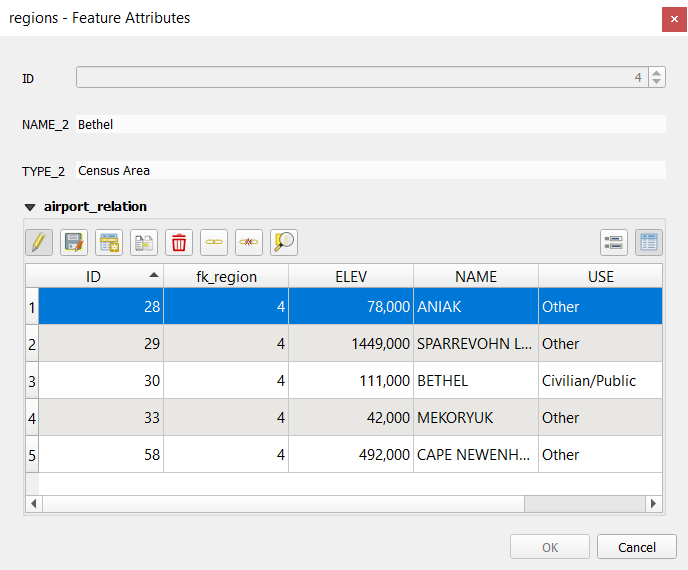
Fig. 16.77 Regiões de diálogo de identificação com relação a aeroportos
As you can see, the airports assigned to this particular region are all shown in a table. And there are also some buttons available. Let’s review them shortly:
The
button is for toggling the edit mode. Be aware that it
toggles the edit mode of the airport layer, although we are in the feature
form of a feature from the region layer. But the table is representing
features of the airport layer.O botão |Salvar Edições | é para salvar todas as edições na camada infantil (aeroporto).
The
 button lets you digitize the airport geometry in the map canvas and
assigns the new feature to the current region by default.
Note that the icon will change according to the geometry type.
button lets you digitize the airport geometry in the map canvas and
assigns the new feature to the current region by default.
Note that the icon will change according to the geometry type.The
 button adds a new record to the airport layer attribute table
and assigns the new feature to the current region by default. The geometry can
be drawn later with the Add part digitizing tool.
button adds a new record to the airport layer attribute table
and assigns the new feature to the current region by default. The geometry can
be drawn later with the Add part digitizing tool.The
 button allows you to copy and paste one or more child
features within the child layer. They can later be assigned to a different
parent feature or have their attributes modified.
button allows you to copy and paste one or more child
features within the child layer. They can later be assigned to a different
parent feature or have their attributes modified.The
 button deletes the selected airport(s) permanently.
The
 symbol opens a new dialog where you can select any existing
airport which will then be assigned to the current region. This may be handy
if you created the airport on the wrong region by accident.
symbol opens a new dialog where you can select any existing
airport which will then be assigned to the current region. This may be handy
if you created the airport on the wrong region by accident.The
 symbol unlinks the selected airport(s) from the current region,
leaving them unassigned (the foreign key is set to NULL) effectively.
symbol unlinks the selected airport(s) from the current region,
leaving them unassigned (the foreign key is set to NULL) effectively.With the
 button you can zoom the map to the selected child
features.
button you can zoom the map to the selected child
features.The two buttons
and to the right switch between the table
view and form view of the related child features.
Se você utilizar a função Design de arrastar e soltar’ para as regiões, você pode selecionar quais ferramentas estão disponíveis. Você pode até decidir se deseja abrir um novo formulário quando um novo recurso for adicionado utilizando a opção :guilabel:`Forçar a forma de ocultação no recurso adicionar. Esteja ciente de que esta opção implica que atributos não nulos devem ter um valor padrão válido para funcionar corretamente.
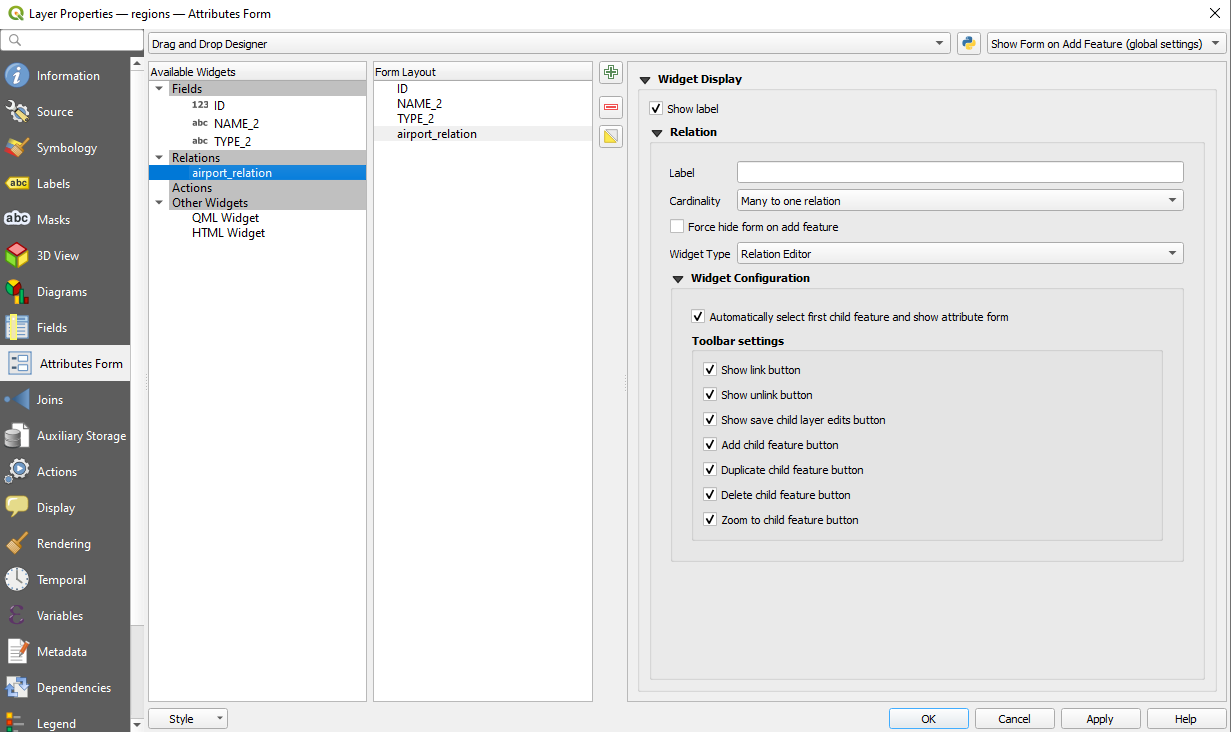
Fig. 16.78 Design de arrasta/solta para configuração de regiões - ferramentas de relação aeroportos
In the above example the referencing layer has geometries (so it isn’t just an alphanumeric table) so the above steps will create an entry in the layer attribute table that has no corresponding geometric feature. To add the geometry:
Choose
for the referencing layer.Select the record that has been added previously within the feature form of the referenced layer.
Use the
 Add Part digitizing tool to attach a geometry to the
selected attributes table record.
Add Part digitizing tool to attach a geometry to the
selected attributes table record.
If you work on the airport table, the widget Relation Reference is automatically
set up for the fk_region field (the one used to create the relation), see
Relation Reference widget.
In the airport form you will see the button at the right side of the
fk_region field: if you click on the button the form of the region layer will
be opened. This widget allows you to easily and quickly open the forms of the
linked parent features.
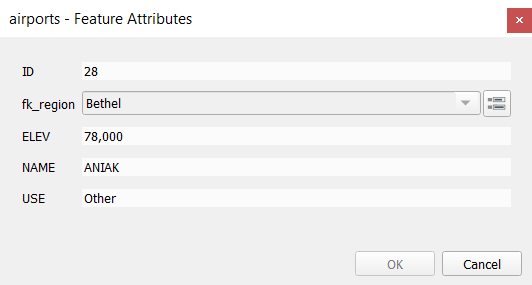
Fig. 16.79 Diálogo de identificação do aeroporto com relação às regiões
The Relation Reference widget has also an option to embed the form of the parent
layer within the child one. It is available in the
menu of the airport layer: select the fk_region field and check the
Show embedded form option.
Se você olhar para a caixa de diálogo de feições agora, você verá, que a forma da região está embutida dentro do formulário dos aeroportos e terá até mesmo uma caixa combinada, o que lhe permite atribuir o aeroporto atual a outra região.
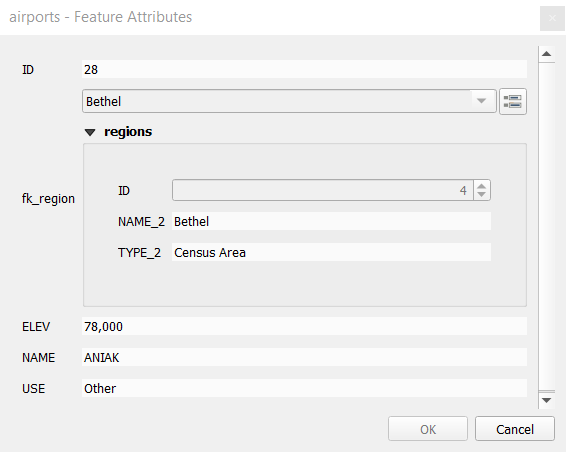
Moreover if you toggle the editing mode of the airport layer, the fk_region
field has also an autocompleter function: while typing you will see all the
values of the id field of the region layer.
Here it is possible to digitize a polygon for the region layer using the button
if you chose the option Allow adding new features in the
menu of the airport layer.
The child layer can also be used in the Selecionar Feições Por Valor tool in order to select features of the parent layer based on attributes of their children.
In Fig. 16.80, all the regions where the mean altitude of the airports is greater than 500 meters above sea level are selected.
Você verá que muitas funções de agregação diferentes estão disponíveis no formulário.
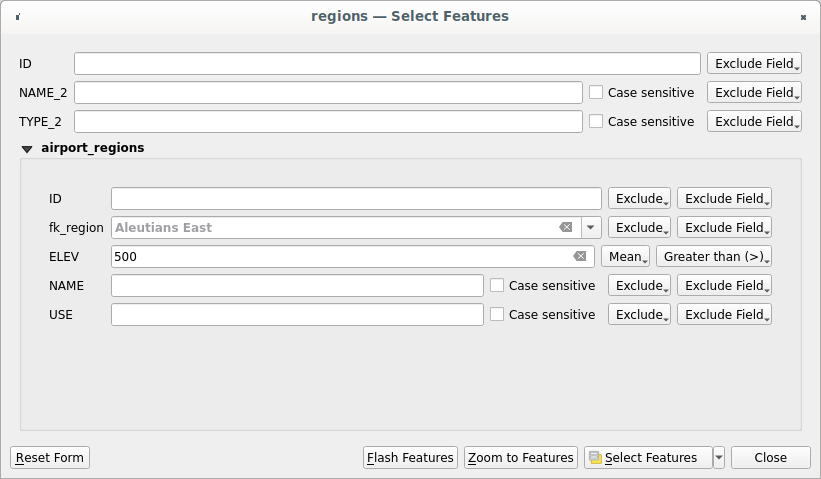
Fig. 16.80 Selecione as características dos pais com valores infantis
16.2.6.2. Introduzindo as relações entre muitos para muitos (N-M)
N-M relations are many-to-many relations between two tables. For instance, the
airports and airlines layers: an airport receives several airline
companies and an airline company flies to several airports.
This SQL code creates the three tables we need for an N-M relationship in
a PostgreSQL/PostGIS schema named locations. You can run the code using the
for PostGIS or external tools such as pgAdmin. The airports table stores the airports layer and the airlines
table stores the airlines layer. In both tables few fields are used for
clarity. The tricky part is the airports_airlines table. We need it to list all
airlines for all airports (or vice versa). This kind of table is known
as a pivot table. The constraints in this table force that an airport can be
associated with an airline only if both already exist in their layers.
CREATE SCHEMA locations;

CREATE TABLE locations.airports
(
   id serial NOT NULL,
   geom geometry(Point, 4326) NOT NULL,
   airport_name text NOT NULL,
   CONSTRAINT airports_pkey PRIMARY KEY (id)
);

CREATE INDEX airports_geom_idx ON locations.airports USING gist (geom);

CREATE TABLE locations.airlines
(
   id serial NOT NULL,
   geom geometry(Point, 4326) NOT NULL,
   airline_name text NOT NULL,
   CONSTRAINT airlines_pkey PRIMARY KEY (id)
);

CREATE INDEX airlines_geom_idx ON locations.airlines USING gist (geom);

CREATE TABLE locations.airports_airlines
(
   id serial NOT NULL,
   airport_fk integer NOT NULL,
   airline_fk integer NOT NULL,
   CONSTRAINT airports_airlines_pkey PRIMARY KEY (id),
   CONSTRAINT airports_airlines_airport_fk_fkey FOREIGN KEY (airport_fk)
      REFERENCES locations.airports (id)
      ON DELETE CASCADE
      ON UPDATE CASCADE
      DEFERRABLE INITIALLY DEFERRED,
   CONSTRAINT airports_airlines_airline_fk_fkey FOREIGN KEY (airline_fk)
      REFERENCES locations.airlines (id)
      ON DELETE CASCADE
      ON UPDATE CASCADE
      DEFERRABLE INITIALLY DEFERRED
 );
Ao invés do PostgreSQL, você também pode usar o GeoPackage. Neste caso, as três tabelas podem ser criadas manualmente utilizando o . No GeoPackage não há esquemas, portanto o prefixo localizações não é necessário.
Foreign key constraints in airports_airlines table can´t be created using
or
so they should be created using .
GeoPackage doesn’t support ADD CONSTRAINT statements so the airports_airlines
table should be created in two steps:
Configure a tabela somente com o campo “ID”, utilizando
Utilizando , digite e execute este código SQL:
ALTER TABLE airports_airlines
   ADD COLUMN airport_fk INTEGER
   REFERENCES airports (id)
   ON DELETE CASCADE
   ON UPDATE CASCADE
   DEFERRABLE INITIALLY DEFERRED;

ALTER TABLE airports_airlines
   ADD COLUMN airline_fk INTEGER
   REFERENCES airlines (id)
   ON DELETE CASCADE
   ON UPDATE CASCADE
   DEFERRABLE INITIALLY DEFERRED;
Então, no QGIS, você deve estabelecer duas: ref:uma-para-muitas relações <one_to_many_relation> como explicado acima:
uma relação entre a “tabela de linhas aéreas” e a tabela dinâmica;
e uma segunda entre a mesa “aeroportos” e a tabela dinâmica.
Uma maneira mais fácil de fazê-lo (somente para o PostgreSQL) é utilizar o :guilabel:`Relações de Descoberta’ em :menuselection:`Projeto –> Propriedades –> Relações’. QGIS lerá automaticamente todas as relações em seu banco de dados e você só terá que selecionar as duas que você precisa. Lembre-se de carregar primeiro as três tabelas do projeto QGIS.
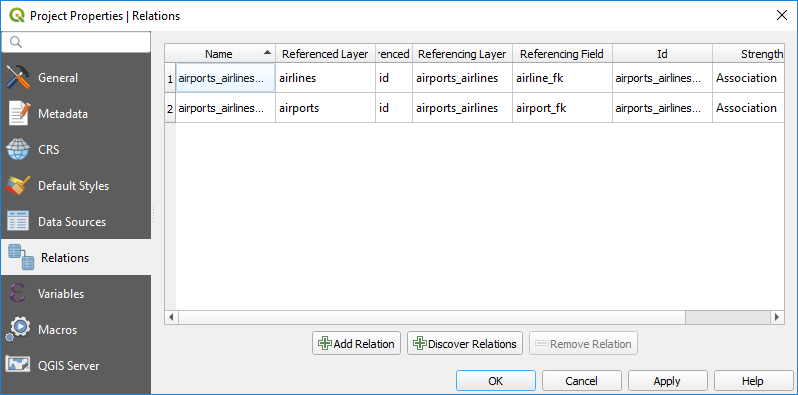
Fig. 16.81 Relações e auto-descobrimento
Caso você queira remover um “aeroporto” ou uma “linha aérea”, o QGIS não removerá o(s) registro(s) associado(s) na tabela “airports_airlines”. Esta tarefa será feita pelo banco de dados se especificarmos as restrições corretas na criação da tabela pivô, como no exemplo atual.
Nota
Combinação da relação N-M com grupo de transação automática
Você deve ativar o modo de transação em quando trabalhar em tal contexto. QGIS deve ser capaz de adicionar ou atualizar linha(s) em todas as tabelas (companhias aéreas, aeroportos e as tabelas pivot).
Finally we have to select the right cardinality in the
for the airports and
airlines layers. For the first one we should choose the airlines (id) option
and for the second one the airports (id) option.
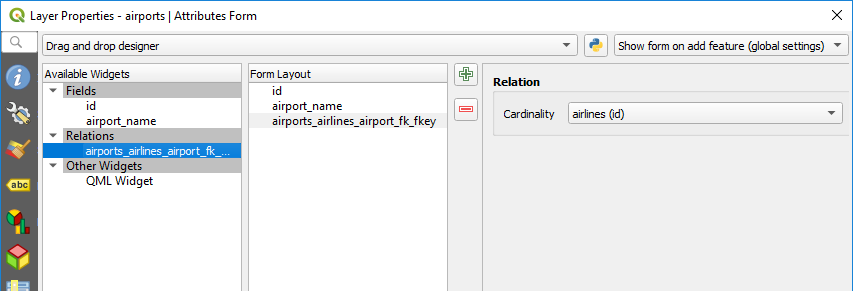
Fig. 16.82 Definir a cardinalidade da relação
Agora você pode associar um aeroporto com uma companhia aérea (ou uma companhia aérea com um aeroporto) utilizando Adicionar feição filha ou Link existente de feição filha nas subformulários. Um registro será automaticamente inserido na tabela aeroportos_companhiaAerea`.
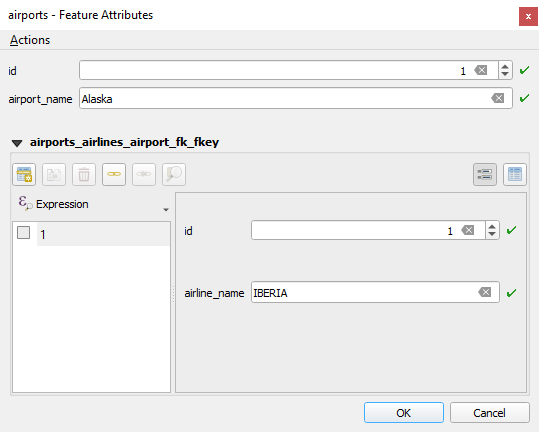
Fig. 16.83 Relação N-M entre aeroportos e companhias aéreas
Nota
Usando cardinalidade relação muitos para um
Sometimes hiding the pivot table in an N-M relationship is not desirable. Mainly because there are attributes in the relationship that can only have values when a relationship is established. If your tables are layers (have a geometry field) it could be interesting to activate the On map identification option () for the foreign key fields in the pivot table.
Nota
Chave primária da tabela dinâmica
Evite usar vários campos na chave primária em uma tabela pivô. QGIS assume uma única chave primária, portanto uma restrição como restrição airports_airlines_pkey chave primária (airport_fk, airline_fk) não funcionará.
16.2.6.3. Introduzindo relações polimórficas
Polymorphic relations are special case of 1-N relations, where a single referencing (document) layer contains
the features for multiple referenced layers. This differs from normal relations which require different
referencing layer for each referenced layer. A single referencing (document) layer is achieved by adding an adiditonal
layer_field column in the referencing (document) layer that stores information to identify the referenced layer. In
its most simple form, the referencing (document) layer will just insert the layer name of the referenced layer into
this field.
Para ser mais preciso, uma relação polimórfica é um conjunto de relações normais com a mesma camada de referência, mas com a camada referenciada dinamicamente definida. O ajuste polimórfico da camada é resolvido usando uma expressão que tem que combinar algumas propriedades da camada referenciada como o nome da tabela, id da camada, nome da camada.
Imagine we are going to the park and want to take pictures of different species of plants and animals
we see there. Each plant or animal has multiple pictures associated with it, so if we use the normal 1:N
relations to store pictures, we would need two separate tables, animal_images and plant_images.
This might not be a problem for 2 tables, but imagine if we want to take separate pictures for mushrooms, birds etc.
Polymorphic relations solve this problem as all the referencing features are stored in the same table documents.
For each feature the referenced layer is stored in the referenced_layer field and the referenced
feature id in the referenced_fk field.
Definindo relações polimórficas
First, let QGIS know about the polymorphic relations between the layers. This is
done in .
Open the Relations tab and click on the little down arrow next to the
Add Relation button, so you can select the Add Polymorphic Relation option
from the newly appeared dropdown.
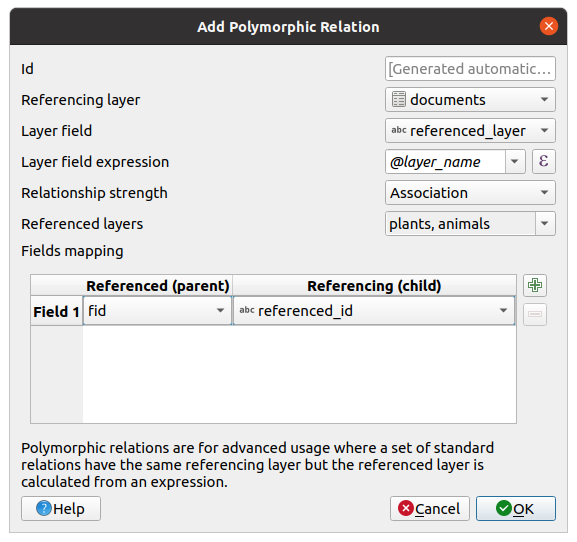
Fig. 16.84 Adicionando uma relação polimórfica utilizando “documentos” como camadas de referência e “animais” e “plantas” como camadas de referência.
Id will be used for internal purposes and has to be unique. You may need it to build custom forms. If you leave it empty, one will be generated for you but you can assign one yourself to get one that is easier to handle
Referencing Layer (Child) also considered as child layer, is the one with the foreign key field on it. In our case, this is the
documentslayer. For this layer you need to add a referencing field which points to the other layer, so this isreferenced_fk.Nota
Sometimes, you need more than a single field to uniquely identify features in a layer. Creating a relation with such a layer requires a composite key, ie more than a single pair of matching fields. Use the
Add new field pair as part of a composite
foreign key button to add as many pairs as necessary.Layer Field is the field in the referencing table that stores the result of the evaluated layer expression which is the referencing table that this feature belongs to. In our example, this would be the
referenced_layerfield.Layer expression evaluates to a unique identifier of the layer. This can be the layer name
@layer_name, the layer id@layer_id, the layer’s table namedecode_uri(@layer, 'table')or anything that can uniquely identifies a layer.Relationship strength sets the strength of the generated relations between the parent and the child layer. The default Association type means that the parent layer is simply linked to the child one while the Composition type allows you to duplicate also the child features when duplicating the parent ones and on deleting a feature the children are deleted as well, resulting in cascade over all levels (means children of children of… are deleted as well).
Referenced Layers also considered as parent layers, are those with the primary key, pointed to, so here they would be
plantsandanimalslayers. You need to define the primary key of the referenced layers from the dropdown, so it isfid. Note that the definition of a valid primary key requires all the referenced layers to have a field with that name. If there is no such field you cannot save a polymorphic relation.
Uma vez adicionada, a relação polimórfica pode ser editada através da entrada do menu Editar relação polimórfica.
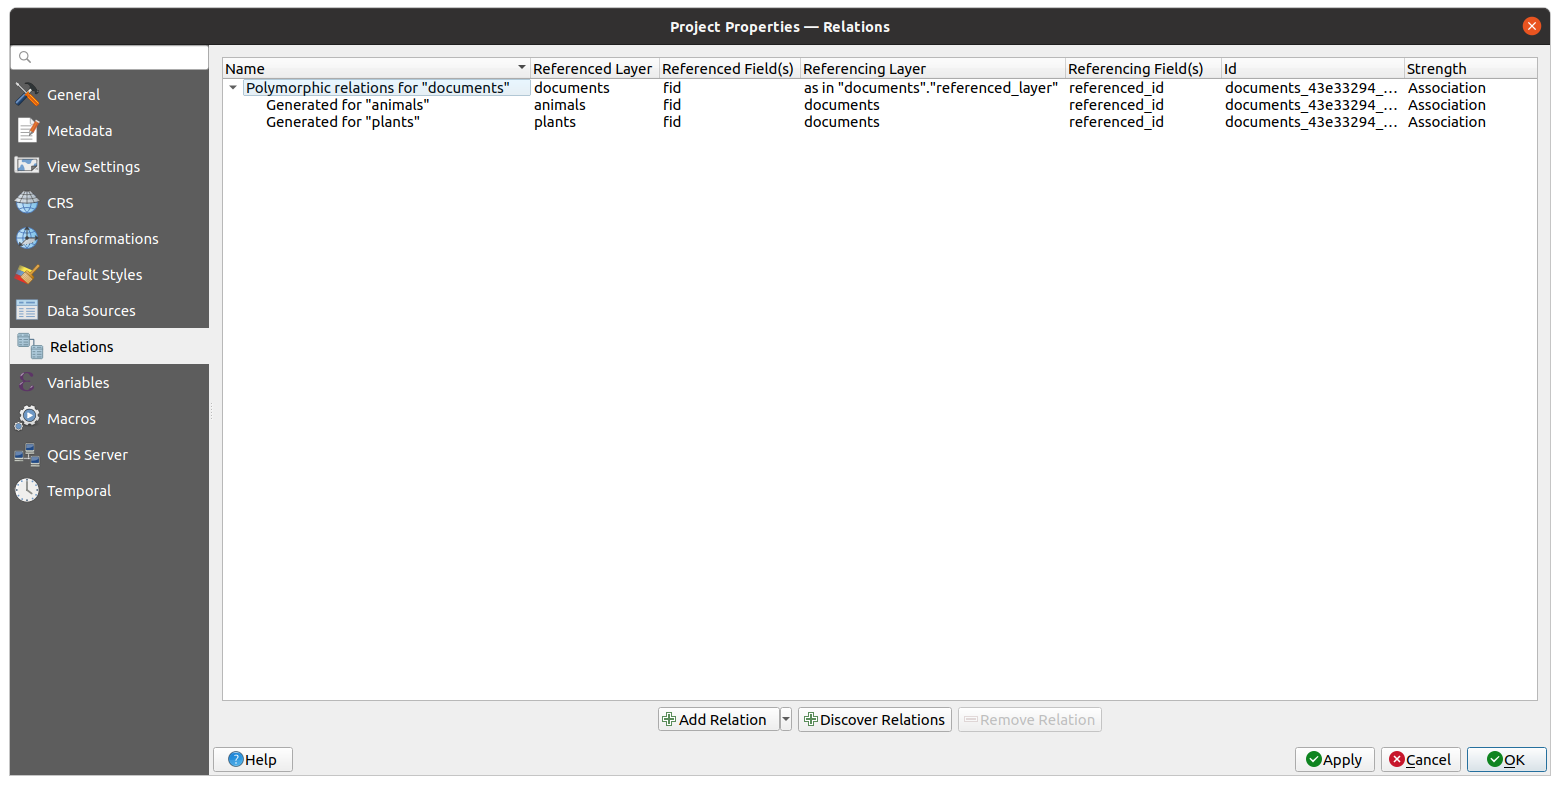
Fig. 16.85 Preview of the newly created polymorphic relation and it’s child relations for animals and plants.
O exemplo acima utiliza o seguinte esquema de banco de dados:
CREATE SCHEMA park;

CREATE TABLE park.animals
(
   fid serial NOT NULL,
   geom geometry(Point, 4326) NOT NULL,
   animal_species text NOT NULL,
   CONSTRAINT animals_pkey PRIMARY KEY (fid)
);

CREATE INDEX animals_geom_idx ON park.animals USING gist (geom);

CREATE TABLE park.plants
(
   fid serial NOT NULL,
   geom geometry(Point, 4326) NOT NULL,
   plant_species text NOT NULL,
   CONSTRAINT plants_pkey PRIMARY KEY (fid)
);

CREATE INDEX plants_geom_idx ON park.plants USING gist (geom);

CREATE TABLE park.documents
(
   fid serial NOT NULL,
   referenced_layer text NOT NULL,
   referenced_fk integer NOT NULL,
   image_filename text NOT NULL,
   CONSTRAINT documents_pkey PRIMARY KEY (fid)
);
16.2.7. Armazenamento e busca de um recurso externo
Um campo pode ter como alvo um recurso armazenado em um sistema de armazenamento externo. Os formulários de atributos podem ser configurados para que atuem como clientes de um sistema de armazenamento externo a fim de armazenar e buscar esses recursos, sob demanda dos usuários, diretamente dos formulários.
16.2.7.1. Configuração de um armazenamento externo
In order to setup an external storage, you have to first configure it from the vector attribute form properties and select the Attachment widget.
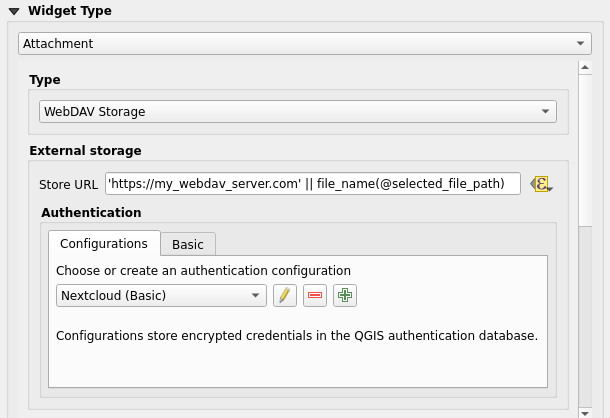
Fig. 16.86 Editing a WebDAV external storage for a given field
From the Attachment widget, you have to first select the Storage type:
Select Existing File: The target URL already exists. When you select a resource, no store operation is achieved, the attribute is simply updated with the URL.
Simple Copy: Stores a copy of the resource on a file disk destination (which could be a local or network shared file system) and the attribute is updated with the path to the copy.
WebDAV Storage: The resource is pushed to a HTTP server supporting the WebDAV protocol and the attribute is updated with its URL. Nextcloud, Pydio or other file hosting software support this protocol.
Then, you have to set up the Store URL parameter, which provides the URL to be used when a new resource needs to be stored. It’s possible to set up an expression using the data defined override widget in order to have specific values according to feature attributes.
The variable @selected_file_path could be used in that expression and represent the absolute file path of the user selected file (using the file selector or drag’n drop).
Nota
Using the WebDAV external storage, if the URL ends with a “/”, it is considered as a folder and the selected file name will be appended to get the final URL.
Se o sistema de armazenamento externo precisar, é possível configurar uma :ref:`autenticação <authentication>’.
16.2.7.2. Usando um armazenamento externo
Once configured, you can select a local file using the button … when editing a feature’s attribute. Depending on the configured storage type, the file will be stored on the external storage system (except if Select existing file has been selected) and the field will be updated with the new resource URL.
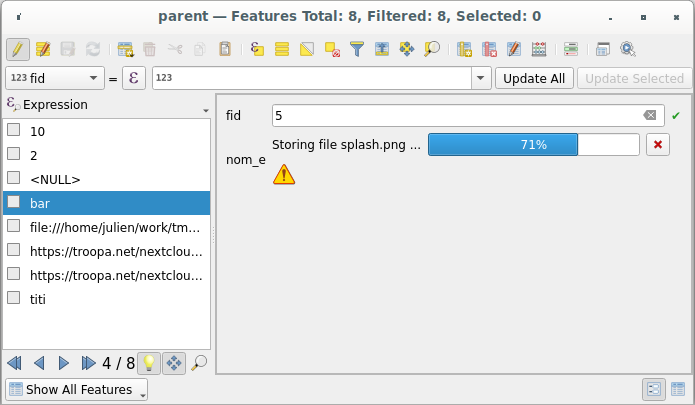
Fig. 16.87 Storing a file to a WebDAV external storage
Nota
O usuário também pode obter o mesmo resultado se arrastar e soltar um arquivo em todo o elemento de anexo.
Use the  Cancel button to abort the storing process.
It’s possible to configure a viewer using the Integrated document viewer
so the resource will be automatically fetched from the external storage system and
displayed directly below the URL.
The above
Cancel button to abort the storing process.
It’s possible to configure a viewer using the Integrated document viewer
so the resource will be automatically fetched from the external storage system and
displayed directly below the URL.
The above  icon indicates that the resource cannot be fetched
from the external storage system. In that case, more details might appear in the
O painel Registo de Mensagens.
icon indicates that the resource cannot be fetched
from the external storage system. In that case, more details might appear in the
O painel Registo de Mensagens.