14.2. Expressões
Based on layer data and prebuilt or user defined functions, Expressions offer a powerful way to manipulate attribute value, geometry and variables in order to dynamically change the geometry style, the content or position of the label, the value for diagram, the height of a layout item, select some features, create virtual field, …
Nota
A list of the default functions and variables for writing expressions can be found at Lista de funções, with detailed information and examples.
14.2.1. O Construtor de expressão string
A plataforma principal para construir expressões, o Expression string builder está disponível em muitas partes no QGIS e, pode ser acessado quando:
clicando no botão expressão;
ref:selecionando feições<sec_selection> com a ferramenta
 Selecionar por Expressão…;
editando atributos com a ferramenta
 Calculadora de Campo;
manipulação de parâmetros de simbologia, rótulo ou item de layout com a ferramenta
 Substituição de dados definida (veja Data defined override setup);
Construindo uma camada de símbolo de geradora de geometria ;
Realizando algum geoprocessamento.
A plataforma de Construção de Expressão oferece acesso a:
Aba de Expressão, a qual ajuda a escrever e verificar a expressão a ser usada, graças a uma lista predefinida de funções;
Aba de Editor de Função a qual ajuda a expandir a lista de funções por meio de criações customizadas de novas funções.
14.2.1.1. The Interface
The Expression tab provides the main interface to write expressions using functions, layer fields and values. It contains the following widgets:

Fig. 14.65 A guia Expressão
An expression editor area for typing or pasting expressions. Autocompletion is available to speed expression writing:
Variáveis correspondentes, nomes de funções e nomes de campos para o texto de entrada são mostrados abaixo: use as setas Up e Down para navegar pelos itens e pressione Tab para inserir na expressão ou basta clicar no item desejado.
Os parâmetros de função são mostrados ao preenchê-los.
O QGIS também verifica a correção da expressão e destaca todos os erros usando:
Sublinhado: para funções desconhecidas, argumentos errados ou inválidos;
Marcador: para todos os outros erros (por exemplo, parênteses ausentes, caracteres inesperados) em um único local.
Dica
Documente sua expressão com comentários
Ao usar expressões complexas, é uma boa prática adicionar texto como um comentário com várias linhas ou comentários embutidos para ajudá-lo a se lembrar.
/*
Labels each region with its highest (in altitude) airport(s)
and altitude, eg 'AMBLER : 264m' for the 'Northwest Artic' region
*/
with_variable(
  'airport_alti', -- stores the highest altitude of the region
  aggregate(
    'airports',
    'max',
    "ELEV", -- the field containing the altitude
    -- and limit the airports to the region they are within
    filter := within( $geometry, geometry( @parent ) )
  ),
    aggregate( -- finds airports at the same altitude in the region
      'airports',
      'concatenate',
      "NAME",
      filter := within( $geometry, geometry( @parent ) )
        and "ELEV" = @airport_alti
    )
    || ' : ' || @airport_alti || 'm'
    -- using || allows regions without airports to be skipped
)
Above the expression editor, a set of tools helps you:
 Clear the expression editor
create and manage user expressions
Under the expression editor, you find:
a set of basic operators to help you build the expression
an indication of the expected format of output when you are data-defining feature properties
a live Output preview of the expression, evaluated on the first feature of the Layer by default. You can browse and evaluate other features of the layer using the Feature combobox (the values are taken from the display name property of the layer).
In case of error, it indicates it and you can access the details with the provided hyperlink.
Um seletor de funções exibe a lista de funções, variáveis, campos … organizados em grupos. Está disponível uma caixa de pesquisa para filtrar a lista e encontrar rapidamente uma função ou campo específico. Clicar duas vezes em um item o adiciona ao editor de expressão.
Um painel de ajuda exibe ajuda para cada item selecionado no seletor de funções.
Dica
Pressione Ctrl+Click ao passar com o mouse sobre o nome de uma função em uma expressão para exibir automaticamente sua ajuda na caixa de diálogo.
A field’s values widget shown when a field is selected in the function selector helps to fetch features attributes:
Look for a particular field value
Display the list of All Unique or 10 Samples values. Also available from right-click.
When the field is mapped with another layer or a set of values, i.e. if the field widget is of RelationReference, ValueRelation or ValueMap type, it’s possible to list all the values of the mapped field (from the referenced layer, table or list). Moreover, you can filter this list to
 Only show values in use in the current field.
Double-clicking a field value in the widget adds it to the expression editor.
Dica
O painel direito, mostrando as funções de ajuda ou valores de campo, pode ser recolhido (invisível) na caixa de diálogo. Pressione o botão Mostrar valores ou Mostrar ajuda para recuperá-lo.
14.2.1.2. Writing an expression
QGIS expressions are used to select features or set values. Writing an expression in QGIS follows some rules:
The dialog defines the context: if you are used to SQL, you probably know queries of the type select features from layer where condition or update layer set field = new_value where condition. A QGIS expression also needs all these information but the tool you use to open the expression builder dialog provides parts of them. For example, giving a layer (building) with a field (height):
pressing the
Select by expression tool means that
you want to “select features from buildings”. The condition is the
only information you need to provide in the expression text widget,
e.g. type "height" > 20to select buildings that are higher than 20.with this selection made, pressing the
Field calculator
button and choosing “height” as Update existing field, you already
provide the command “update buildings set height = ??? where height > 20”.
The only remaining bits you have to provide in this case is the new value,
e.g. just enter 50to set the height of the previously selected buildings.
Pay attention to quotes: single quotes return a literal, so a text placed between single quotes (
'145') is interpreted as a string. Double quotes will give you the value of that text so use them for fields ("myfield"). Fields can also be used without quotes (myfield). No quotes for numbers (3.16).Nota
Functions normally take as argument a string for field name. Do:
attribute( @atlas_feature, 'height' ) -- returns the value stored in the "height" attribute of the current atlas feature
And not:
attribute( @atlas_feature, "height" ) -- fetches the value of the attribute named "height" (e.g. 100), and use that value as a field
                                      -- from which to return the atlas feature value. Probably wrong as a field named "100" may not exist.
Dica
Use named parameters to ease expression reading
Some functions require many parameters to be set. The expression engine supports the
use of named parameters. This means that instead of writing the cryptic expression
clamp( 1, 2, 9), you can use clamp( min:=1, value:=2, max:=9). This also allows
arguments to be switched, e.g. clamp( value:=2, max:=9, min:=1). Using named parameters
helps clarify what the arguments for an expression function refer to, which is helpful
when you are trying to interpret an expression later!
14.2.1.3. Some use cases of expressions
From the Field Calculator, calculate a “pop_density” field using the existing “total_pop” and “area_km2” fields:
"total_pop" / "area_km2"
Label or categorize features based on their area:
CASE WHEN $area > 10 000 THEN 'Larger' ELSE 'Smaller' END
Atualiza-se o campo sobre nível de densidade (“density_level”) com categorias de acordo com os valores da densidade (“pop_density”):
CASE WHEN "pop_density" < 50 THEN 'Low population density'
     WHEN "pop_density" >= 50 and "pop_density" < 150 THEN 'Medium population density'
     WHEN "pop_density" >= 150 THEN 'High population density'
END
Aplica-se um estilo categorizado para todas as feições de acordo com condição do valor médio da casa ser maior ou maior do que 10000€ por metro quadrado:
"price_m2" > 10000
Usando a ferramenta “Selecionar por Expressão…”, seleciona-se todas as feições representativas de áreas de “Alta densidade populacional” e as quais possuem valor médio da casa maior do que 10000€ por metro 2:
"density_level" = 'High population density' and "price_m2" > 10000
The previous expression could also be used to define which features to label or show on the map.
Create a different symbol (type) for the layer, using the geometry generator:
point_on_surface( $geometry )
Given a point feature, generate a closed line (using
make_line) around its geometry:make_line( -- using an array of points placed around the original array_foreach( -- list of angles for placing the projected points (every 90°) array:=generate_series( 0, 360, 90 ), -- translate the point 20 units in the given direction (angle) expression:=project( $geometry, distance:=20, azimuth:=radians( @element ) ) ) )In a print layout label, display the name of the “airports” features that are within the layout “Map 1” item:
with_variable( 'extent',
               map_get( item_variables( 'Map 1' ), 'map_extent' ),
               aggregate( 'airports', 'concatenate', "NAME",
                          intersects( $geometry, @extent ), ' ,'
                        )
             )
14.2.1.4. Saving Expressions
Using the  Add current expression to user expressions button
above the expression editor frame, you can save important expressions you want
to have quick access to. These are available from the User expressions group
in the middle panel.
They are saved under the user profile (
Add current expression to user expressions button
above the expression editor frame, you can save important expressions you want
to have quick access to. These are available from the User expressions group
in the middle panel.
They are saved under the user profile (<userprofile>/QGIS/QGIS3.ini
file) and available in all expression dialogs inside all projects of the
current user profile.
A set of tools available above the expression editor frame helps you manage the user expressions:
- Add the current expression to user expressions: store the
expression in the user profile. A label and a help text can be added for
easy identification.
 Edit selected expression from user expressions,
as well as their help and label
Edit selected expression from user expressions,
as well as their help and label Remove selected expression from user expressions
 Import user expressions from a
 .jsonfile into the active user profile folder Export user expressions as a
 .jsonfile; all the user expressions in the user profileQGIS3.inifile are shared
14.2.2. Editor de Funções
Com a guia Editor de Funções, você pode escrever suas próprias funções na linguagem Python. Isso fornece uma maneira prática e confortável de abordar necessidades específicas que não seriam cobertas pelas funções predefinidas.
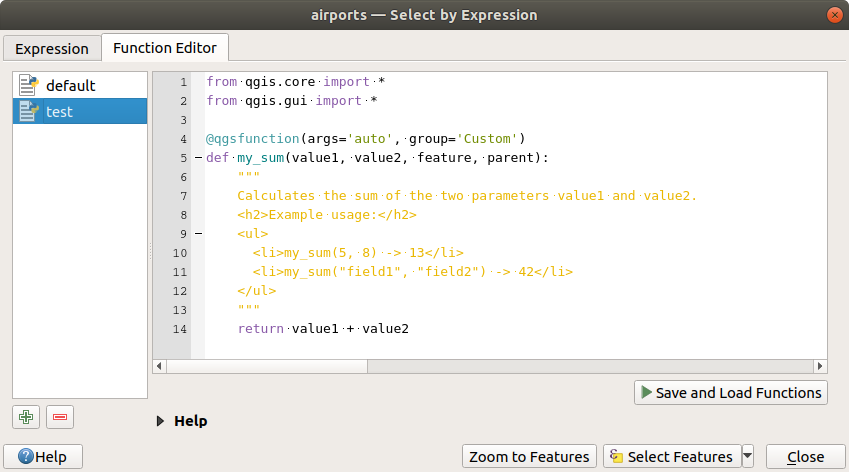
Fig. 14.66 A guia Editor de Funções
Para criar uma nova função:
Pressione o botão
 Novo Arquivo.
Digite um nome para usar no formulário que aparece e pressione OK.
Um novo item com o nome que você fornece é adicionado no painel esquerdo da guia Editor de Funções; este é um arquivo Python
.pybaseado no arquivo de modelo QGIS e armazenado na pasta/python/expressionsno diretório ativo user profile.O painel direito exibe o conteúdo do arquivo: um modelo de script python. Atualize o código e sua ajuda de acordo com suas necessidades.
Pressione o botão
 Salvar e Carregar Funções. A função que você escreveu é adicionada à árvore de funções na guia Expressão, por padrão, no grupo``Personalizada``.
Aproveite sua nova função.
Se a função precisar de melhorias, ative a guia Editor de Funções, faça as alterações e pressione novamente o botão
Salvar e Carregar Funções para disponibilizá-las no arquivo, e portanto, em qualquer guia de expressão.
As funções personalizadas do Python são armazenadas no diretório de perfil do usuário, o que significa que, a cada inicialização do QGIS, ele carrega automaticamente todas as funções definidas no perfil do usuário atual. Esteja ciente de que novas funções são salvas apenas na pasta /python/expression e não no arquivo do projeto. Se você compartilha um projeto que utiliza uma de suas funções personalizadas, também precisará compartilhar o arquivo .py na pasta /python/expression.
To delete a custom function:
Enable the Function Editor tab
Select the function in the list
Press the
 Remove selected function. The function is
removed from the list and the corresponding
Remove selected function. The function is
removed from the list and the corresponding .pyfile deleted from the user profile folder.
Example
Here’s a short example on how to create your own my_sum function that
will operate with two values.
from qgis.core import *
from qgis.gui import *

@qgsfunction(args='auto', group='Custom')
def my_sum(value1, value2, feature, parent):
    """
    Calculates the sum of the two parameters value1 and value2.
    <h2>Example usage:</h2>
    <ul>
      <li>my_sum(5, 8) -> 13</li>
      <li>my_sum("field1", "field2") -> 42</li>
    </ul>
    """
    return value1 + value2
When using the args='auto' function argument the number of function
arguments required will be calculated by the number of arguments the function
has been defined with in Python (minus 2 - feature, and parent).
The group='Custom' argument indicates the group in which the function
should be listed in the Expression dialog.
It is also possible to add keywords arguments like:
usesgeometry=Trueif the expression requires access to the features geometry. By defaultFalse.handlesnull=Trueif the expression has custom handling for NULL values. IfFalse(default), the result will always be NULL as soon as any parameter is NULL.referenced_columns=[list]: An array of attribute names that are required to the function. Defaults to[QgsFeatureRequest.ALL_ATTRIBUTES].
The previous example function can then be used in expressions:
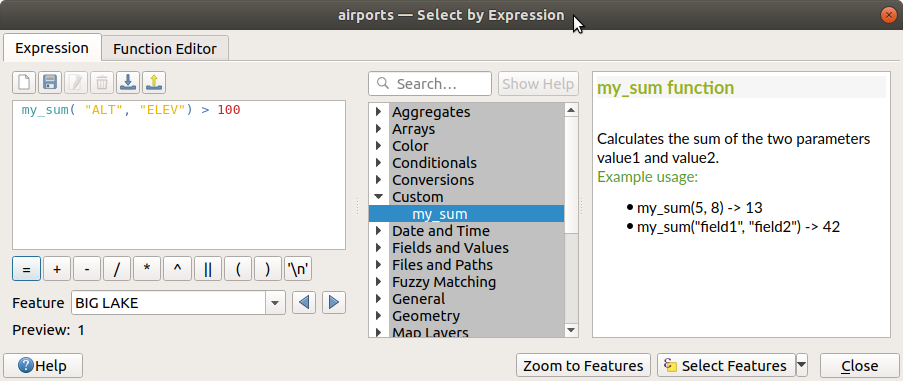
Fig. 14.67 Função Personalizada adicionada à guia Expressão
Informações adicionais sobre a criação de código Python podem ser encontradas em Passo-a-passo para desenvolvedor PyQGIS.