22. Integração com SIG GRASS
A integração do GRASS fornece acesso aos bancos de dados e funcionalidades do GRASS GIS (veja GRASS-PROJECT em Referências Bibliográficas e Web). A integração consiste em duas partes: provedor e complemento. O provedor permite navegar, gerenciar e visualizar camadas raster e vetor GRASS. O complemento pode ser usado para criar novos locations e mapasets GRASS, alterar a região GRASS, criar e editar camadas vetoriais e analisar dados GRASS 2-D e 3-D com mais de 400 módulos GRASS. Nesta seção, apresentaremos as funcionalidades do provedor e do complemento e forneceremos alguns exemplos de gerenciamento e trabalho com dados GRASS.
The provider supports GRASS version 6 and 7, the plugin supports GRASS 6 and 7 (starting from QGIS 2.12). QGIS distribution may contain provider/plugin for either GRASS 6 or GRASS 7 or for both versions at the same time (binaries have different file names). Only one version of the provider/plugin may be loaded on runtime however.
22.1. Demo dataset
As an example, we will use the QGIS Alaska dataset (see section Baixando dados de amostra).
It includes a small sample GRASS LOCATION with three vector layers and one
raster elevation map. Create a new folder called grassdata, download
the QGIS ‘Alaska’ dataset qgis_sample_data.zip from
https://qgis.org/downloads/data/ and unzip the file into grassdata.
More sample GRASS LOCATIONs are available at the GRASS website at
https://grass.osgeo.org/download/sample-data/.
22.2. Carregando camadas raster e vetorial GRASS
If the provider is loaded in QGIS, the location item with GRASS  icon is added in the browser tree under each folder item which contains GRASS location.
Go to the folder
 grassdata and expand location alaska and
mapset demo.
Você pode carregar as camadas raster e vetorial GRASS como qualquer outra camada do navegador, clicando duas vezes no item da camada ou arrastando e soltando na tela ou legenda do mapa.
Dica
Carregando dados GRASS
If you don’t see GRASS location item, verify in if GRASS vector provider is loaded.
22.3. Importing data into a GRASS LOCATION via drag and drop
This section gives an example of how to import raster and vector data into a GRASS mapset.
In QGIS browser navigate to the mapset you want to import data into.
In QGIS browser find a layer you want to import to GRASS, note that you can open another instance of the browser (Browser Panel (2)) if source data are too far from the mapset in the tree.
Drag a layer and drop it on the target mapset. The import may take some time for larger layers, you will see animated icon
 in front of new layer item
until the import finishes.
When raster data are in different CRS, they can be reprojected using an Approximate
(fast) or Exact (precise) transformation. If a link to the source raster
is created (using r.external), the source data are in the same CRS and the format
is known to GDAL, the source data CRS will be used. You can set these options in the
Browser tab in Opções do GRASS.
If a source raster has more bands, a new GRASS map is created for each layer with
.<band number> suffix and group of all maps with ![]() icon is created.
External rasters have a different icon
icon is created.
External rasters have a different icon ![]() .
.
22.4. Managing GRASS data in QGIS Browser
Copying maps: GRASS maps may be copied between mapsets within the same location using drag and drop.
Deleting maps: Right click on a GRASS map and select Delete from context menu.
Renaming maps: Right click on a GRASS map and select Rename from context menu.
22.5. Opções do GRASS
As opções do GRASS podem ser definidas na caixa de diálogo Opções do GRASS, que pode ser aberta clicando com o botão direito do mouse no local ou no item do conjunto de mapas no navegador e escolhendo :guilabel:`Opções do GRASS ‘.
22.6. Iniciando o complemento GRASS
To use GRASS functionalities in QGIS, you must select and load the GRASS plugin using the
Plugin Manager. To do this, go to the menu  , select
  GRASS and click
OK.
The following main features are provided with the GRASS menu () when you start the GRASS plugin:
22.7. Abrindo o mapset GRASS
A GRASS mapset must be opened to get access to GRASS Tools in the plugin (the tools are disabled if no mapset is open). You can open a mapset from the browser: right click on mapset item and then choose Open mapset from context menu.
22.8. Localização e MAPSET GRASS
GRASS data are stored in a directory referred to as GISDBASE. This directory, often
called grassdata, must be created before you start working with the GRASS
plugin in QGIS. Within this directory, the GRASS GIS data are organized by projects
stored in subdirectories called LOCATIONs. Each LOCATION is defined
by its coordinate system, map projection and geographical boundaries. Each
LOCATION can have several MAPSETs (subdirectories of the
LOCATION) that are used to subdivide the project into different topics or
subregions, or as workspaces for individual team members (see Neteler & Mitasova
2008 in Referências Bibliográficas e Web). In order to analyse vector and raster layers
with GRASS modules, you generally have to import them into a GRASS LOCATION.
(This is not strictly true – with the GRASS modules r.external and v.external
you can create read-only links to external GDAL/OGR-supported datasets without
importing them. This is not the usual way for beginners to work with GRASS, therefore
this functionality will not be described here.)
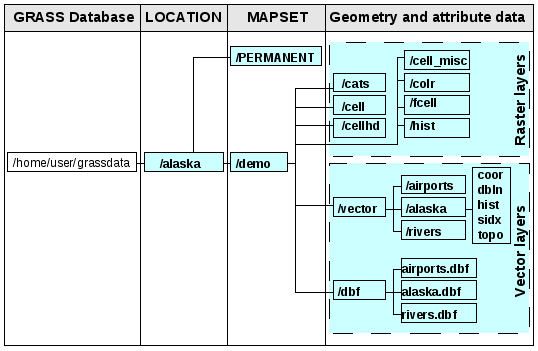
Fig. 22.1 Dados GRASS em LOCATION alaska
22.9. Importando dados para uma localização GRASS
See section Importing data into a GRASS LOCATION via drag and drop to find how data can be easily imported by dragging and dropping in the browser.
This section gives an example of how to import raster and vector data into the
‘alaska’ GRASS LOCATION provided by the QGIS ‘Alaska’ dataset in traditional
way, using standard GRASS modules.
Therefore, we use the landcover raster map landcover.img and the vector GML
file lakes.gml from the QGIS ‘Alaska’ dataset (see Baixando dados de amostra).
Inicie o QGIS e verifique se o complemento GRASS está carregado.
In the GRASS toolbar, click the
 Open MAPSET icon
to bring up the MAPSET wizard.
Open MAPSET icon
to bring up the MAPSET wizard.Select as GRASS database the folder
grassdatain the QGIS Alaska dataset, asLOCATION‘alaska’, asMAPSET‘demo’ and click OK.Now click the
 Open GRASS tools icon. The
GRASS Toolbox (see section Ferramentas GRASS) dialog appears.
Open GRASS tools icon. The
GRASS Toolbox (see section Ferramentas GRASS) dialog appears.Para importar o mapa raster: arquivo: landcover.img, clique no módulo: arquivo:` r.in.gdal` no: guilabel: guia módulos em árvore. Este módulo GRASS permite importar arquivos raster GDAL que suporta GRASS: arquivo: ‘local’. O módulo para: arquivo: aparece r.in.gdal.
Navegue até a pasta
rasterno conjunto de dados QGIS ‘Alaska’ e selecione o arquivolandcover.img.As raster output name, define
landcover_grassand click Run. In the Output tab, you see the currently running GRASS commandr.in.gdal -o input=/path/to/landcover.img output=landcover_grass.When it says Successfully finished, click View Output. The
landcover_grassraster layer is now imported into GRASS and will be visualized in the QGIS canvas.Para importar o arquivo vetorial GML: arquivo lakes.gml, clique no módulo: arquivo:` v.in.ogr` no: guilabel: módulos em árvores. Este módulo GRASS permite importar arquivos vetoriais OGR apoiados na GRASS: arquivo: local. A caixa de diálogo para o arquivo aparece v.in.ogr.
Browse to the folder
gmlin the QGIS ‘Alaska’ dataset and select the filelakes.gmlas OGR file.As vector output name, define
lakes_grassand click Run. You don’t have to care about the other options in this example. In the Output tab you see the currently running GRASS commandv.in.ogr -o dsn=/path/to/lakes.gml output=lakes\_grass.When it says Succesfully finished, click View Output. The
lakes_grassvector layer is now imported into GRASS and will be visualized in the QGIS canvas.
22.9.1. Criando uma nova Localização GRASS
As an example, here is the sample GRASS LOCATION alaska, which is
projected in the Albers Equal Area projection using feet as units.
This sample GRASS LOCATION alaska will be used for all examples and
exercises in the following GRASS-related sections. It is useful to download and
install the dataset on your computer (see Baixando dados de amostra).
Inicie o QGIS e verifique se o complemento GRASS está carregado.
Visualize o shapefile
alaska.shp(veja a seção Loading a layer from a file) do conjunto de dados do QGIS Alaska (veja Baixando dados de amostra).In the GRASS toolbar, click on the
 New mapset icon
to bring up the MAPSET wizard.
New mapset icon
to bring up the MAPSET wizard.Select an existing GRASS database (GISDBASE) folder
grassdata, or create one for the newLOCATIONusing a file manager on your computer. Then click Next.We can use this wizard to create a new
MAPSETwithin an existingLOCATION(see section Adicionando um novo MAPSET) or to create a newLOCATIONaltogether. Select Create new
location (see Fig. 22.2).
Create new
location (see Fig. 22.2).Digite um nome para
LOCATION– usamos ‘alaska’ - e clique em Próximo.Define the projection by clicking on the radio button
 Projection to enable the projection list.
We are using Albers Equal Area Alaska (feet) projection. Since we happen to know that it is represented by the EPSG ID 2964, we enter it in the search box. (Note: If you want to repeat this process for another
LOCATIONand projection and haven’t memorized the EPSG ID, click on the CRS Status icon in the lower right-hand corner of the status bar (see
section Trabalhando com Projeções)).
CRS Status icon in the lower right-hand corner of the status bar (see
section Trabalhando com Projeções)).Na Filtro, insira 2964 para selecionar a projeção.
Haz clic en Siguiente.
To define the default region, we have to enter the
LOCATIONbounds in the north, south, east, and west directions. Here, we simply click on the button Set Current QGIS Extent, to apply the extent of the loaded layeralaska.shpas the GRASS default region extent.Haz clic en Siguiente.
We also need to define a
MAPSETwithin our newLOCATION(this is necessary when creating a newLOCATION). You can name it whatever you like - we used ‘demo’. GRASS automatically creates a specialMAPSETcalledPERMANENT, designed to store the core data for the project, its default spatial extent and coordinate system definitions (see Neteler & Mitasova 2008 in Referências Bibliográficas e Web).Check out the summary to make sure it’s correct and click Finish.
O novo: arquivo ‘LOCALIZAÇÃO’: ‘Alaska’, e dois: arquivos: CONJUNTO DE MAPAS, demonstração e” permanente “, são criados. O conjunto de trabalho aberto no momento é ‘demonstração’, como você definiu.
Note que algumas das ferramentas na barra de ferramentas GRASS que foram desativadas estão agora habilitadas.
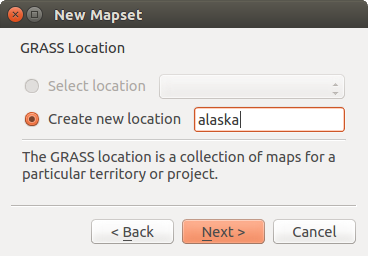
Fig. 22.2 Creating a new GRASS LOCATION or a new MAPSET in QGIS
If that seemed like a lot of steps, it’s really not all that bad and a very quick
way to create a LOCATION. The LOCATION ‘alaska’ is now ready for
data import (see section Importando dados para uma localização GRASS). You can also use the already-existing
vector and raster data in the sample GRASS LOCATION ‘alaska’,
included in the QGIS ‘Alaska’ dataset Baixando dados de amostra, and move on to
section O modelo de dados vetorial do GRASS.
22.9.2. Adicionando um novo MAPSET
A user has write access only to a GRASS MAPSET which he or she created. This
means that besides access to your own MAPSET, you can read maps in other users’
MAPSETs (and they can read yours), but you can modify or remove only the maps in
your own MAPSET.
Todos: arquivos: ‘CONJUNTO DE MAPAS’ inclui um arquivo ‘WIND’ que armazena as coordenadas dos valores e a resolução selecionada (ver Neteler & Mitasova de 2008, em: ref:` literatura web` e seção: ref: sec_regiao_grass) .
Inicie o QGIS e verifique se o complemento GRASS está carregado.
In the GRASS toolbar, click on the
 New mapset icon
to bring up the MAPSET wizard.
New mapset icon
to bring up the MAPSET wizard.Selecione a pasta do banco de dados GRASS (GISDBASE): arquivo grassdata com o arquivo:` local` ‘Alaska’, onde queremos adicionar mais um: arquivo: CONJUNTO DE MAPAS chamado ‘teste’.
Haz clic en Siguiente.
We can use this wizard to create a new
MAPSETwithin an existingLOCATIONor to create a newLOCATIONaltogether. Click on the radio button Select location
(see Fig. 22.2) and click Next.
Select location
(see Fig. 22.2) and click Next.Enter the name
testfor the newMAPSET. Below in the wizard, you see a list of existingMAPSETsand corresponding owners.Click Next, check out the summary to make sure it’s all correct and click Finish.
22.10. O modelo de dados vetorial do GRASS
It is important to understand the GRASS vector data model prior to digitizing. In general, GRASS uses a topological vector model. This means that areas are not represented as closed polygons, but by one or more boundaries. A boundary between two adjacent areas is digitized only once, and it is shared by both areas. Boundaries must be connected and closed without gaps. An area is identified (and labelled) by the centroid of the area.
Além de limites e centróides, um mapa vetor também pode conter pontos e linhas. Todos estes elementos de geometria podem ser misturados em um vetor e será representado em diferentes ‘camadas’ dentro de um GRASS vetor. Então, no GRASS, uma camada não é um vetor ou raster, mas um nível dentro de uma camada vetorial. Isso é importante para distinguir cuidadosamente. (Embora seja possível misturar elementos de geometria, é incomum e, mesmo no GRASS, utilizado somente em casos especiais, tais como rede de análise vetorial. Normalmente, você deve preferir armazenar diferentes elementos geométricos em diferentes camadas.)
É possível armazenar várias “camadas” em um conjunto de dados vetoriais. Por exemplo, campos, florestas e lagos pode ser armazenado em um vetor. Uma floresta adjacente e um lago podem compartilhar o mesmo limite, mas eles têm tabelas de atributos separados. Também é possível fixar atributos limites. Um exemplo pode ser o caso em que a fronteira entre um lago e uma floresta é um caminho, para que ele possa ter uma tabela de atributos diferentes.
A “camada” do recurso é definido pela “camada” dentro do GRASS. ‘Camada’ é o número que define, se houver mais do que uma camada interior do conjunto de dados (por exemplo, se a geometria for uma floresta ou lago). Por enquanto, ele pode ser apenas um número. No futuro, o GRASS também apoiará nomes como campos na interface do usuário.
Os atributos podem ser armazenados dentro do GRASS LOCATION como dBase, SQLite3 ou em tabelas externas de banco de dados, por exemplo, PostgreSQL, MySQL, Oracle, etc.
Atributos em tabelas de base de dados estão ligados a elementos geométricos usando um valor ‘categoria’.
‘Categoria’ (chave, ID) é um número inteiro ligado a geometrias primitivas, e que é usada como ligação a uma coluna chave na tabela de base de dados.
Dica
Aprendendo um Modelo Vetor GRASS
The best way to learn the GRASS vector model and its capabilities is to download one of the many GRASS tutorials where the vector model is described more deeply. See https://grass.osgeo.org/documentation/manuals/ for more information, books and tutorials in several languages.
22.11. Criando uma nova camada vetorial GRASS
To create a new GRASS vector layer, select one of following items from mapset context menu in the browser:
New Point Layer
New Line Layer
New Polygon Layer
and enter a name in the dialog. A new vector map will be created and layer will be added to canvas and editing started. Selecting type of the layer does not restrict geometry types which can be digitized in the vector map. In GRASS, it is possible to organize all sorts of geometry types (point, line and polygon) in one vector map. The type is only used to add the layer to the canvas, because QGIS requires a layer to have a specific type.
It is also possible to add layers to existing vector maps selecting one of the items described above from context menu of existing vector map.
In GRASS, it is possible to organize all sorts of geometry types (point, line and area) in one layer, because GRASS uses a topological vector model, so you don’t need to select the geometry type when creating a new GRASS vector. This is different from shapefile creation with QGIS, because shapefiles use the Simple Feature vector model (see section Creating new vector layers).
22.12. Digitalizando e editando uma camada vetorial GRASS
As camadas de vetor GRASS podem ser digitalizadas usando as ferramentas de digitalização QGIS padrão. No entanto, existem algumas particularidades que você deve conhecer devido a
GRASS topological model versus QGIS simple feature
complexity of GRASS model
multiple layers in single maps
multiple geometry types in single map
geometry sharing by multiple features from multiple layers
The particularities are discussed in the following sections.
Save, discard changes, undo, redo
Aviso
All the changes done during editing are immediately written to vector map and related attribute tables.
Changes are written after each operation, it is however, possible to do undo/redo or discard all changes when closing editing. If undo or discard changes is used, original state is rewritten in vector map and attribute tables.
There are two main reasons for this behaviour:
It is the nature of GRASS vectors coming from conviction that user wants to do what he is doing and it is better to have data saved when the work is suddenly interrupted (for example, blackout)
A necessidade de edição eficaz dos dados topológicos é uma informação visualizada sobre a correção topológica; essas informações só podem ser adquiridas no mapa vetorial GRASS se as alterações forem gravadas no mapa.
Barra de Ferramentas
The ‘Digitizing Toolbar’ has some specific tools when a GRASS layer is edited:
Ícone |
Ferramenta |
Propósito |
|---|---|---|
Novo Ponto |
Digitaliza novo ponto |
|
Nova Linha |
Digitaliza nova linha |
|
Nova Fronteira |
Digitize new boundary |
|
Novo Centróide |
Digitaliza novo centróide (etiqueta da área existente) |
|
New Closed Boundary |
Digitalizar novo limite fechado |
Table GRASS Digitizing: GRASS Digitizing Tools
Dica
Digitalizando polígonos no GRASS
If you want to create a polygon in GRASS, you first digitize the boundary of the polygon. Then you add a centroid (label point) into the closed boundary. The reason for this is that a topological vector model links the attribute information of a polygon always to the centroid and not to the boundary.
Category
Category, often called cat, is sort of ID. The name comes from times when GRASS vectors had only singly attribute “category”. Category is used as a link between geometry and attributes. A single geometry may have multiple categories and thus represent multiple features in different layers. Currently it is possible to assign only one category per layer using QGIS editing tools. New features have automatically assigned new unique category, except boundaries. Boundaries usually only form areas and do not represent linear features, it is however possible to define attributes for a boundary later, for example in different layer.
New categories are always created only in currently being edited layer.
It is not possible to assign more categories to geometry using QGIS editing, such data are properly represented as multiple features, and individual features, even from different layers, may be deleted.
Attributes
Attributes of currently edited layer can only be modified. If the vector map contains more layers, features of other layers will have all attributes set to ‘<not editable (layer #)>’ to warn you that such attribute is not editable. The reason is, that other layers may have and usually have different set of fields while QGIS only supports one fixed set of fields per layer.
If a geometry primitive does not have a category assigned, a new unique category is automatically assigned and new record in attribute table is created when an attribute of that geometry is changed.
Dica
If you want to do bulk update of attributes in table, for example using ‘Field Calculator’
(Using the Field Calculator), and there are features without category which you don’t want
to update (typically boundaries), you can filter them out by setting ‘Advanced Filter’ to cat is not null.
Editing style
The topological symbology is essential for effective editing of topological data. When editing starts, a specialized ‘GRASS Edit’ renderer is set on the layer automatically and original renderer is restored when editing is closed. The style may be customized in layer properties ‘Style’ tab. The style can also be stored in project file or in separate file as any other style. If you customize the style, do not change its name, because it is used to reset the style when editing is started again.
Dica
Do not save project file when the layer is edited, the layer would be stored with ‘Edit Style’ which has no meaning if layer is not edited.
The style is based on topological information which is temporarily added to attribute table as field ‘topo_symbol’. The field is automatically removed when editing is closed.
Dica
Não remova o campo ‘topo_symbol’ da tabela de atributos, isso tornaria os recursos invisíveis porque o renderizador é baseado nessa coluna.
Ajuste
To form an area, vertices of connected boundaries must have exactly the same coordinates. This can be achieved using snapping tool only if canvas and vector map have the same CRS. Otherwise, due conversion from map coordinates to canvas and back, the coordinate may become slightly different due to representation error and CRS transformations.
Dica
Use layer’s CRS also for canvas when editing.
Limitations
Simultaneous editing of multiple layers within the same vector at the same time is not supported. This is mainly due to the impossibility of handling multiple undo stacks for a single data source.

 On Linux and macOS only one GRASS layer can be edited at time. This is
due to a bug in GRASS which does not allow to close database drivers in random order.
This is being solved with GRASS developers.
Dica
GRASS Edita Permissões
Você deve ser o proprietário do GRASS: arquivo: ‘CONJUNTO DE MAPAS’ que deseja editar. É impossível editar camadas de dados em: arquivo: ‘CONJUNTO DE MAPAS’ que não é seu, mesmo que você tenha permissão de gravação.
22.13. A ferramenta região GRASS
A região (definição de uma janela de trabalho espacial) no GRASS é importante para trabalhar com camadas. Análise Vetorial é, por padrão, não se limitando a quaisquer definições de região definida. Mas todos os vetores recém-criados terá a extensão espacial e a resolução da região GRASS atualmente definido, independentemente da sua extensão e da resolução original. A região GRASS atual é armazenado no: arquivo: ‘$ LOCAL / $ mapset / WIND’, e define o norte, sul, leste e oeste como limites, o número de colunas e linhas, resolução espacial horizontal e vertical.
It is possible to switch on and off the visualization of the GRASS region in the QGIS
canvas using the  Display current GRASS region button.
The region can be modified in ‘Region’ tab in ‘GRASS Tolls’ dock widget. Type in the new region bounds and resolution, and click Apply. If you click on Select the extent by dragging on canvas you can select a new region interactively with your mouse on the QGIS canvas dragging a rectangle.
O módulo GRASS: arquivo: g.região fornece muito mais parâmetros para definir uma medida para a região e resolução adequados para sua análise. Você pode usar esses parâmetros com as Ferramentas GRASS, descrito na seção: ref: subseção_grass_ferramentas.
22.14. Ferramentas GRASS
The  Open GRASS Tools box provides GRASS module functionalities
to work with data inside a selected GRASS
 LOCATION and MAPSET.
To use the GRASS Toolbox you need to open a LOCATION and MAPSET
that you have write permission for (usually granted, if you created the MAPSET).
This is necessary, because new raster or vector layers created during analysis
need to be written to the currently selected LOCATION and MAPSET.
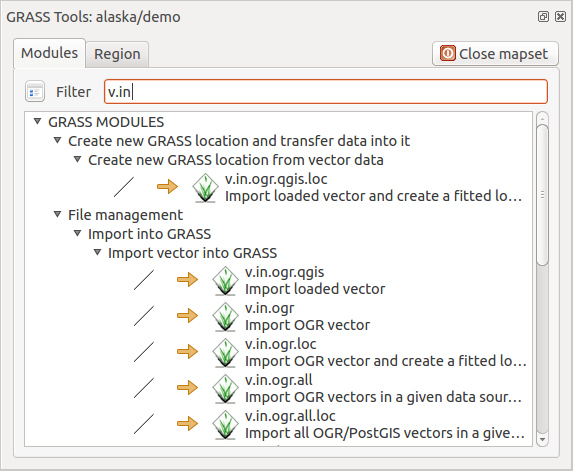
Fig. 22.3 GRASS Toolbox and Module Tree
22.14.1. Trabalhando com módulos GRASS
O comando GRASS dentro do GRASS Ferramentas fornece acesso a quase todos os módulos (mais de 300) grass em uma interface de linha de comando. Para oferecer um ambiente de trabalho mais amigável, cerca de 200 dos módulos GRASS disponíveis e funcionalidades também são fornecidos por gráficos dentro do plugin Ferramentas GRASS.
Uma lista completa dos módulos GRASS disponíveis na Caixa de Ferramentas gráficas na versão QGIS 3.16 está disponível no wiki do GRASS em https://grasswiki.osgeo.org/wiki/GRASS-QGIS_relevant_module_list.
Também é possível personalizar o conteúdo Ferramentas GRASS. Este procedimento é descrito na seção: ref: sec_customizacao_ferramentas.
As shown in Fig. 22.3, you can look for the appropriate GRASS module using the thematically grouped Modules Tree or the searchable Modules List tab.
Clicando em um ícone do módulo gráfico, uma nova aba será adicionada ao diálogo da caixa de ferramentas, oferecendo três novas sub-abas :guilabel: ‘Opções’, :guilabel:’Saída’ e :guilabel:’Manual’.
Opções
The Options tab provides a simplified module dialog where you can usually select a raster or vector layer visualized in the QGIS canvas and enter further module-specific parameters to run the module.
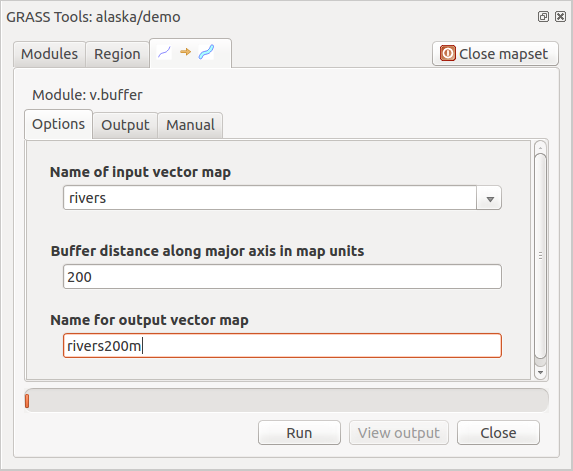
Fig. 22.4 Opções do módulo Caixa de Ferramentas GRASS
Os parâmetros do módulo fornecidos geralmente não estão completos para manter a caixa de diálogo simples. Se você deseja usar parâmetros e sinalizadores adicionais do módulo, é necessário iniciar o shell GRASS e executar o módulo na linha de comando.
Um novo recurso do QGIS 1.8 é o suporte ao botão Mostrar Opções Avançadas abaixo da caixa de diálogo do módulo simplificado na guia Opções. No momento, ele é adicionado apenas ao módulo v.in.ascii como exemplo de uso, mas provavelmente fará parte de mais ou de todos os módulos da Caixa de Ferramentas GRASS em versões futuras do QGIS. Isso permite que você use as opções completas do módulo GRASS sem a necessidade de alternar para o shell GRASS.
Saída
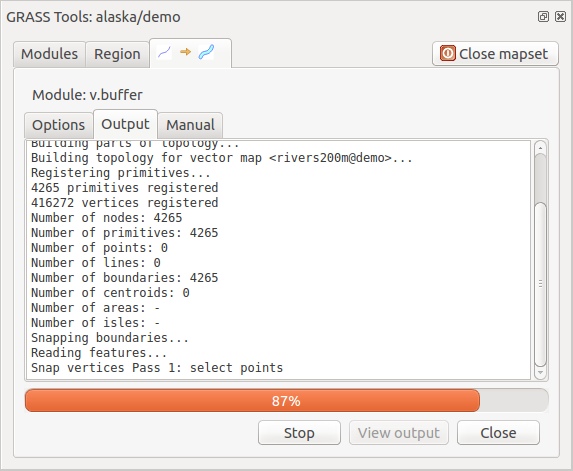
Fig. 22.5 GRASS Toolbox Module Output
The Output tab provides information about the output status of the
module. When you click the Run button, the module switches to the
Output tab and you see information about the analysis process. If
all works well, you will finally see a Successfully finished message.
Manual
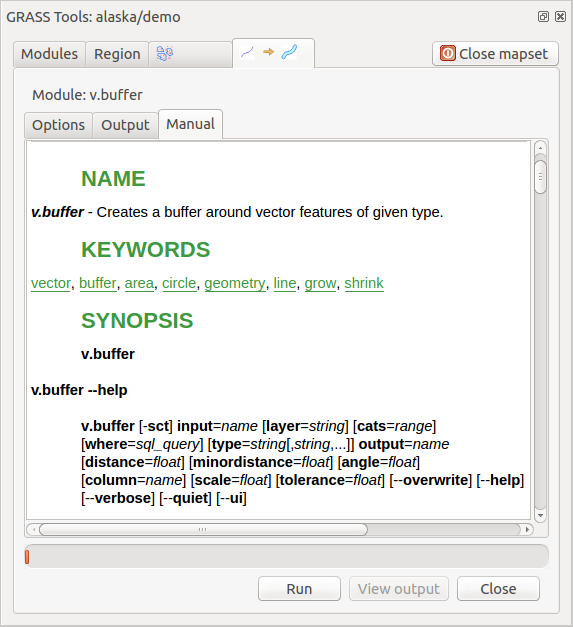
Fig. 22.6 GRASS Toolbox Module Manual
A: guilabel: ‘Manual’ mostra a página de ajuda em HTML do módulo grass. Você pode usá-lo para verificar outros parâmetros do módulo e sinalizadores ou para obter um conhecimento mais profundo sobre o objetivo do módulo. No final de cada página do manual, você vê outras ligações a: arquivo: ‘Ajuda’, o arquivo: ‘Temática’ e do: arquivo: ‘Completo’. Estas ligações fornecem a mesma informação que o módulo: arquivo: g.manual.
Dica
Mostra Resultados Imediatamente
Se você quiser exibir os resultados de cálculo imediatamente em sua tela do mapa, você pode usar o botão “Ver Saída” na parte inferior da aba módulo.
22.14.2. Exemplos de módulos GRASS
Os exemplos seguintes demonstrarão o poder de alguns dos módulos grama.
22.14.2.1. Criando linhas de contorno
O primeiro exemplo cria um mapa de contorno vetorial de elevação (DEM). Aqui, presume-se que você tem o Alasca: arquivo: ‘local’ configurado como explicado na seção: ref:` sec_import_loc_data
Primeiro, abra o local clicando no botão
 Abrir mapset e escolher a localização do Alasca.
Na lista de categorias de ferramentas, clique duas vezes no: menu: ‘Raster -> Gestão de Superfície -> Gerar linhas de contorno do vetor’.
Now a single click on the tool r.contour will open the tool dialog as explained above (see Trabalhando com módulos GRASS).
In the Name of input raster map enter
gtopo30.Type into the Increment between Contour levels
 the value 100. (This will create contour lines at intervals of 100 meters.)
Digite no :guilabel: Nome para a saída do vetor mapa o nome
ctour_100.Click Run to start the process. Wait for several moments until the message
Successfully finishedappears in the output window. Then click View Output and Close.
Como se trata de uma grande região, vai demorar um pouco para exibir. Depois de terminar a renderização, você pode abrir a janela de propriedades da camada para alterar a cor da linha para que os contornos apareçam claramente sobre o raster elevação, como em: ref: vector_properties_dialog.
Em seguida, amplie uma pequena área montanhosa no centro do Alasca. Aproxima-se, você vai notar que os contornos têm cantos afiados. GRASS oferece a ferramenta v.generalize para alterar ligeiramente mapas vetoriais, mantendo sua forma original. A ferramenta usa diversos algoritmos diferentes, com finalidades diferentes. Alguns dos algoritmos (ie, Douglas Peuker e redução da Vertex) simplificam a linha removendo alguns dos vértices. O vetor resultante irá carregar mais rápido. Este processo é útil quando você tem um vetor altamente detalhado, mas você está criando um mapa muito pequena em escala, de modo que o detalhe é desnecessário.
Dica
A ferramenta simplificar
Note que o QGIS possui uma que funciona exatamente como o algoritmo GRASS v.generalize Douglas-Peuker.
No entanto, o objetivo do exemplo é diferente. As linhas de contorno criado pelo “r.contour” têm ângulos agudos que devem ser suavizadas. Entre o algoritmo ** v.generalize ** , há Chaiken que faz exatamente isso (também ranhuras de Hermite). Esteja ciente de que estes algoritmos podem ** adicionar vértices** ao vetor, fazendo-a carregar ainda mais lentamente.
Abra o GRASS Ferramentas e clique duas vezes na categoria: menu: ‘Vetor -> Desenvolver mapa -> Geral’, em seguida, clique no módulo v.generalize para abrir a janela de opções.
Verifique se o vetor ‘ctour_100’ aparece como Nome do vetor de entrada.
From the list of algorithms, choose Chaiken’s. Leave all other options at their default, and scroll down to the last row to enter in the field Name for output vector map ‘ctour_100_smooth’, and click Run.
The process takes several moments. Once
Successfully finishedappears in the output windows, click View Output and then Close.É possível mudar a cor do vetor para apresentar claramente o fundo matricial e para contrastar com as linhas de contorno originais. Você notará que as novas linhas de contorno têm cantos mais suaves do que o original, enquanto permanecer fiel à forma geral de origem.
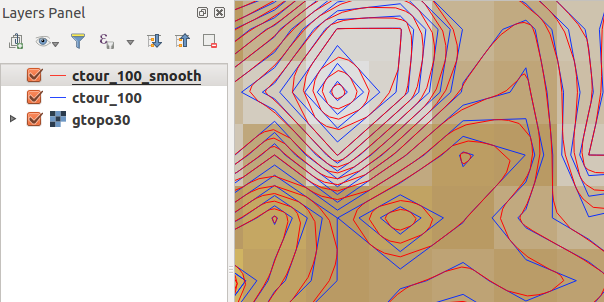
Fig. 22.7 Módulo GRASS v.generalize para suavizar um mapa vetorial
Dica
Outros usos para r.contour
O processo descrito acima pode ser utilizado em outras situações equivalentes. Se você tem um mapa de dados de precipitação, por exemplo, então o mesmo método será utilizado para criar um mapa de vetor de linhas (chuvas constantes).
22.14.2.2. Criando um efeito de sombreamento 3D
Vários métodos são usados para exibir as camadas de elevação e dar um efeito 3-D para mapas. O uso de curvas de nível, como mostrado acima, é um método popular, muitas vezes escolhido para produzir mapas topográficos. Outra forma de apresentar um efeito 3-D é de sombreamento. O efeito Sombra é criado a partir de um DEM (elevação) que calcula a inclinação e o aspecto de cada célula, em seguida, simula a posição do sol no céu dando um valor de reflexo para cada célula. Assim, você tem pistas virada para o sol; as encostas viradas longe do sol (na sombra) são escurecidas.
Comece este exemplo carregando o ‘raster de elevação gtopo30’. Inicie o GRASS Ferramentas, e sob a categoria Raster, clique duas vezes para abrir: menu: ‘Análise espacial -> Análise do Terreno’.
Então, clique r.shaded.relief para abrir o módulo.
Enter
gtopo30_shadefor the new hillshade raster, and click Run.Quando o processo termina, adicione o raster sombreado ao mapa. Você deve vê-lo exibido em escala de cinza.
Para visualizar tanto o sombreamento da colina e as cores do “gtopo30”, mova o mapa sombreado abaixo “mapa gtopo30” na tabela de conteúdo, em seguida, abra o: menu: ‘Propriedades de’ `”GTOPO30”, mude para o: guilabel: ‘transparência’: e defina seu nível de transparência a cerca de 25%.
Agora você deve ter a elevação gtopo30 com o seu mapa de cores e configuração de transparência apresentada acima o tons de cinza mapa sombreado. Para ver os efeitos visuais do sombreamento, desligue o mapa gtopo30_shade em seguida, ligue-o novamente.
Usando a linha de comando GRASS
The GRASS plugin in QGIS is designed for users who are new to GRASS and not familiar with all the modules and options. As such, some modules in the Toolbox do not show all the options available, and some modules do not appear at all. The GRASS shell (or console) gives the user access to those additional GRASS modules that do not appear in the Toolbox tree, and also to some additional options to the modules that are in the Toolbox with the simplest default parameters. This example demonstrates the use of an additional option in the r.shaded.relief module that was shown above.
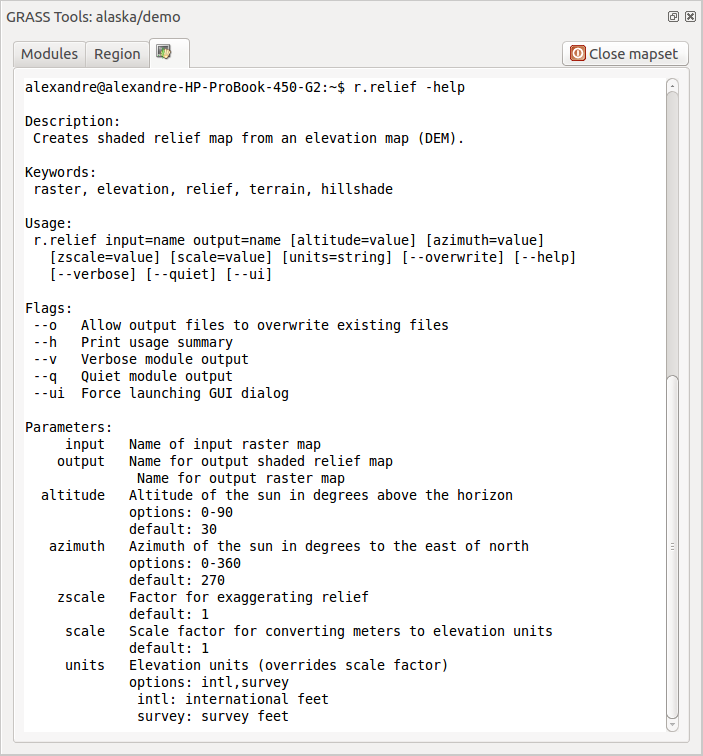
Fig. 22.8 The GRASS shell, r.shaded.relief module
O módulo ** r.shaded.relief ** pode ter um parâmetro “zmult”, que multiplica os valores de elevação em relação ao XY unidades de coordenadas de modo a que o efeito de sombreamento é ainda a mais usada.
Carregue o raster de elevação
gtopo30como acima, inicie a Caixa de Ferramentas GRASS e clique no shell GRASS. Na janela do shell, digite o comandor.shaded.relief map=gtopo30 shade=gtopo30_shade2 azimuth=315 zmult=3e pressione Enter.After the process finishes, shift to the Browse tab and double-click on the new
gtopo30_shade2raster to display it in QGIS.Como explicado acima, mova o raster com o relevo sombreado abaixo da tabela de conteúdo “raster gtopo30” em seguida, verifique a transparência da “camada gtopo30” colorida. Você deverá ver que o efeito 3-D se destaca mais fortemente em relação ao primeiro mapa com relevo sombreado.
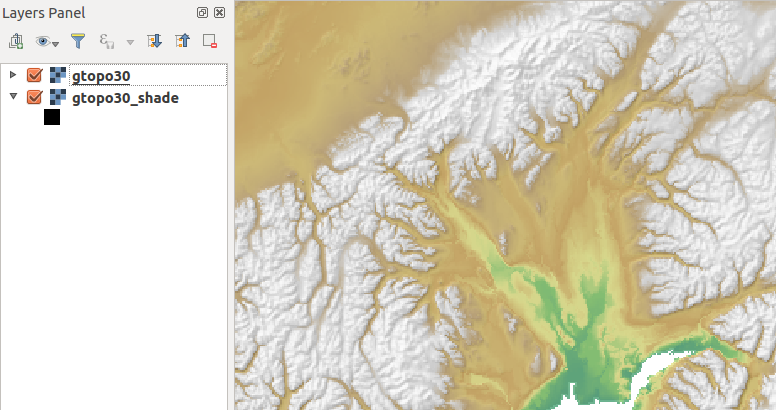
Fig. 22.9 Displaying shaded relief created with the GRASS module r.shaded.relief
22.14.2.3. Estatísticas Raster em um mapa vetor
O próximo exemplo mostra como um módulo GRASS pode agregar dados raster e adicionar colunas de estatísticas para cada polígono em um mapa vetor.
Again using the Alaska data, refer to Importando dados para uma localização GRASS to import the
shapefiles/trees.shpfile into GRASS.Agora, um passo intermediário é necessária: centroides deve ser adicionado ao mapa importando as árvores para torná-lo num vetor de área de grass completo (incluindo os limites e centróide).
Na caixa de ferramentas, escolha: menu: `Vetor -> Gerenciar recursos, e abra o módulo ** v.centroids **.
Digite como mapa vetor de saída ‘forest_areas’ e rode o módulo.
Now load the
forest_areasvector and display the types of forests - deciduous, evergreen, mixed - in different colors: In the layer Properties window, Symbology tab, choose from Legend type ‘Unique value’ and set the Classification field
to ‘VEGDESC’. (Refer to the explanation of the symbology tab in
Propriedades da simbologia of the vector section.)
‘Unique value’ and set the Classification field
to ‘VEGDESC’. (Refer to the explanation of the symbology tab in
Propriedades da simbologia of the vector section.)Em seguida, reabrir o GRASS Ferramentas no: menu: ‘Vetor -> Atualização do Vetor’ para outros mapas.
Clique no módulo v.rast.stats. Digite “gtopo30” e “forest_areas”.
Only one additional parameter is needed: Enter column prefix
elev, and click Run. This is a computationally heavy operation, which will run for a long time (probably up to two hours).Finalmente, abra o “areas_floresta” na tabela de atributos, e verifique que várias novas colunas foram adicionadas, incluindo ` elev_min``, `` elev_max``, `` elev_média``, etc, para cada polígono florestal.
22.14.3. Personalizando a caixa de ferramentas GRASS
Quase todos os módulos de GRASS podem ser adicionados a caixa de ferramentas. Uma interface XML é fornecido para analisar os arquivos mais simples que configuram a aparência e os parâmetros dos módulos dentro da caixa de ferramentas.
Um exemplo de arquivo XML para gerar o módulo v.buffer (v.buffer.qgm) se parece com isto:
<?xml version="1.0" encoding="UTF-8"?>
<!DOCTYPE qgisgrassmodule SYSTEM "http://mrcc.com/qgisgrassmodule.dtd">

<qgisgrassmodule label="Vector buffer" module="v.buffer">
        <option key="input" typeoption="type" layeroption="layer" />
        <option key="buffer"/>
        <option key="output" />
</qgisgrassmodule>
The parser reads this definition and creates a new tab inside the Toolbox when you select the module. A more detailed description for adding new modules, changing a module’s group, etc., can be found at https://qgis.org/en/site/getinvolved/development/addinggrasstools.html.


