Importante
La traduzione è uno sforzo comunitario you can join. Questa pagina è attualmente tradotta al 100.00%.
20.2. Tracciamento live GPS
QGIS ti può aiutare a realizzare una mappatura sul campo con un ricevitore GPS. Tale operazione di tracciamento in tempo reale viene eseguita utilizzando la GPS Toolbar. Prima di collegare QGIS e il ricevitore GPS può essere necessaria qualche device configuration.
20.2.1. Barra degli strumenti GPS
La Barra degli strumenti GPS fornisce gli strumenti principali per controllare una sessione di tracciamento dal vivo. Può essere attivata da . Segue lo stato del progetto, del GPS e della traccia GPS corrente e attiva le azioni solo quando hanno senso. Una volta che un dispositivo è stato rilevato da QGIS, sarà possibile interagire con esso:
 Connetti al GPS
 Disconnetti dal GPS
 Ricentra la mappa sulla posizione del GPS: la mappa si ricentra immediatamente sulla posizione GPS corrente, indipendentemente dal parametro automatic recentering parameter.
 Imposta il layer di destinazione per gli elementi digitalizzati con il GPS: Per impostazione predefinita, QGIS Segue il layer attivo per la digitalizzazione degli elementi, il che significa che gli strumenti di digitalizzazione GPS si adatteranno al layer selezionato nel pannello Layer e gli elementi creati saranno memorizzati di conseguenza. Sebbene ciò possa essere utile in alcuni contesti, implica anche un’attenta interazione con altri layer per evitare di memorizzare inavvertitamente elementi in layer indesiderati. Questa opzione consente di indicare esplicitamente un layer per la memorizzazione dei dati durante la sessione di tracciamento dal vivo e di cambiare a seconda delle esigenze. Anche gli strumenti esposti si adatteranno al tipo di layer selezionato.
Il layer di destinazione del GPS viene impostato automaticamente come modificabile durante la creazione di un elemento e l’utente viene avvisato di conseguenza.
azioni per la creazione di elementi:
 Aggiunge un vertice alla traccia GPS utilizzando la posizione del GPS corrente
 Crea un nuovo elemento puntuale nella posizione GPS corrente
 Crea un nuovo elemento lineare utilizzando la traccia GPS corrente.
 Crea un nuovo elemento poligonale utilizzando la traccia GPS corrente.
 Ripristina Traccia
 Mostra Pannello Informazioni GPS: apre il GPS Information panel
un pannello di visualizzazione per accedere rapidamente ad alcuni elementi informativi del GPS di cui potresti aver bisogno:
 Posizione
- Altitudine (geoide)
- Mostra Altitudine (ellssoide WGS 84)
- Velocità
- Direzione
- Lunghezza totale della traccia
- Distanza dall’inizio delle traccia
Il pulsante
 Impostazioni apre un menu a discesa con le impostazioni comuni che si prevede di modificare a metà sessione:
- Mostra Simbolo di Posizione
- Mostra linea di Orientamento
- Ruota la Mappa nella stessa Direzione del GPS
Opzioni per controllare il ricentraggio della mappa:
 Ricentra sempre la mappa quando la posizione GPS è spostata dal centro della mappa di una certa distanza (in rapporto all’estensione della mappa).
 Ricentra la mappa quando si esce dall’estensione
- Non ricentrare
- Aggiunge automaticamente Vertici alla traccia ogni volta che si ricevono nuove posizioni dal dispositivo GPS.
- Salva automaticamente gli elementi aggiunti: gli elementi creati dalle posizioni GPS vengono immediatamente inseriti nei layer di destinazione (saltando il consueto buffer di modifica dei layer).
Destinazione Time Stamp per regolare il campo di memorizzazione della data e dell’ora.
- Accesso a GeoPackage/SpatiaLite…: Quando viene attivato, all’utente verrà richiesto di selezionare un file GeoPackage/SpatiaLite esistente o di inserire un nuovo nome di file. Nel file verrà creata una tabella
gps_pointsegps_trackscon una struttura predefinita.Tutti i messaggi GPS in arrivo vengono registrati nel layer
gps_points, insieme alle informazioni su velocità, direzione, altitudine e accuratezza del GPS.Quando il GPS viene disconnesso (o QGIS viene chiuso), l’intera traccia GPS registrata viene aggiunta alla tabella
gps_tracks(insieme ad alcune informazioni calcolate come la lunghezza della traccia, l’ora di inizio e di fine). - Registra esiti NMEA…: consente di registrare tutte le stringhe NMEA grezze dal dispositivo in un file di testo.
- Impostazioni GPS… per accedere alla finestra di dialogo del GPS global options
Suggerimento
Informazioni in tempo reale sulla barra di stato della posizione
Quando un dispositivo GPS è collegato e l’utente sposta il cursore sull’area di disegno della mappa, una barra di stato attiva visualizza la distanza e la direzione dal cursore alla posizione GPS. Le impostazioni di distanza e rilevamento del progetto vengono rispettate in questa visualizzazione. Su un dispositivo touch screen, toccare e nere premuto per attivare la barra dei messaggi di stato in tempo reale.
20.2.2. Pannello Informazioni GPS
Per un monitoraggio completo di un rilevamento GPS in tempo reale in QGIS, potrebbe essere necessario attivare il Pannello informazioni sul GPS ( o premere Ctrl+0).
Nell’angolo in alto a destra del Pannello informazioni sul GPS, premi Connetti per avviare la connessione tra QGIS e un ricevitore GPS collegato, oppure Disconnetti.
In alto a sinistra del pannello sono accessibili i seguenti pulsanti:
- Posizione: dettagli in tempo reale sulla posizione GPS e i sensori
 Segnale: potenza del segnale delle connessioni satellitari
- Impostazioni: menu a tendina per live tracking options che potresti aver bisogno di modificare durante una sessione
20.2.2.1. Posizione e attributi aggiuntivi
Nella scheda Posizione, se il GPS riceve segnali dai satelliti, vedrai visualizzata la posizione in latitudine, longitudine e altitudine insieme ad altri attributi.
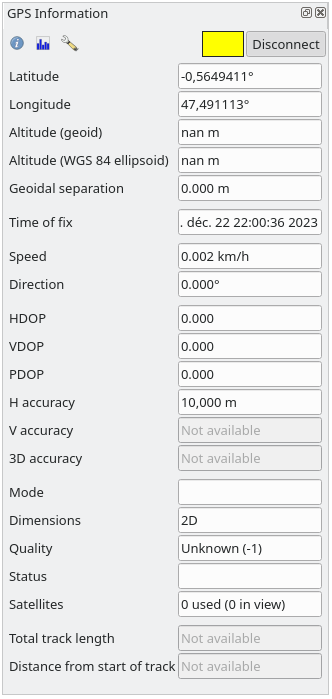
Fig. 20.3 Tracciamento della posizione GPS e attributi aggiuntivi
Latitudine
Longitudine
Altitudine (geoide): Altitudine/elevazione al di sopra o al di sotto del livello medio del mare.
Mostra Altitudine (ellissoide WGS 84): Altitudine/elevazione al di sopra o al di sotto dell’ellissoide terrestre WGS-84.
Separazione geoidale: Differenza tra l’ellissoide terrestre WGS-84 e il livello medio del mare (geoide),
-significa che il livello medio del mare è inferiore all’ellissoide.Orario del fix
Velocità: Velocità al suolo
Direzione: Orientamento misurato in gradi in senso orario dal nord vero alla direzione di marcia.
HDOP: Diluizione orizzontale della precisione
VDOP: Diluizione verticale della precisione
PDOP: Diluizione della precisione
Accuratezza H: Accuratezza orizzontale in metri
Accuratezza V: Accuratezza verticale in metri
Accuratezza 3D: Radice quadrata media (RMS) 3D in metri
Modo: Modalità 2D/3D di configurazione del ricevitore GPS, può essere
automaticaomanuale.Dimensioni: Formato del fix della posizione, può essere
2D,3DoNo fix.Qualità: Indicatore di qualità del posizionamento
Stato: Stato del fix della posizione, può essere
ValidooInvalido.Satelliti: Numero di satelliti utilizzati per ottenere il fix
Lunghezza totale della traccia: Distanza totale della traccia GPS corrente
Distanza dall’inizio della traccia: Distanza tra il primo vertice della traccia GPS corrente e l’ultimo vertice.
20.2.2.2. Segnale
Con la scheda Segnale, puoi vedere l’intensità del segnale dei satelliti da cui si stai ricevendo il segnale.
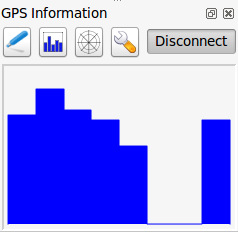
Fig. 20.4 Potenza del segnale GPS
20.2.3. Connessione di un GPS Bluetooth GPS per tracciamento live
Con QGIS puoi collegare un GPS Bluetooth per la raccolta di dati. Per eseguire questa operazione è necessario che il GPS sia dotato di Bluetooth e che il tuo computer abbia il Bluetooth.
Per prima cosa devi fare in modo che il tuo dispositivo GPS sia riconosciuto e associato al computer. Accendi il GPS, vai sull’icona Bluetooth nell’area di notifica e cerca per Nuovo Dispositivo.
Sul lato destro della maschera di selezione dei dispositivi assicurati che tutti i dispositivi siano selezionati in modo che probabilmente la tua unità GPS appaia tra quelle disponibili. Nella fase successiva dovrebbe essere disponibile un servizio di connessione seriale, selezionarlo e fai clic sul pulsante Configura.
Ricorda il numero della porta COM assegnata alla connessione GPS risultante dalle proprietà Bluetooth.
Dopo che il GPS è stato riconosciuto, esegui l’accoppiamento per la connessione. Di solito il codice di autorizzazione è 0000.
Ora apri il pannello Informazioni sul GPS e passa alla schermata opzioni GPS. Seleziona la porta COM assegnata alla connessione GPS e fai clic sul pulsante Connetti. Dopo un po” di tempo dovrebbe apparire un cursore che indica la tua posizione.
Se QGIS non è in grado di ricevere dati GPS, devi riavviare il dispositivo GPS, attendere 5-10 secondi e tentare nuovamente di collegarti. Solitamente questa soluzione funziona. Se ricevi ancora un errore di connessione accertati di non avere un altro ricevitore Bluetooth vicino a te, accoppiato con la stessa unità GPS.
20.2.4. Esempi di connessione di dispositivi GPS in QGIS
20.2.4.1. Usare GPSMAP 60cs
MS Windows
Il modo più semplice per farlo funzionare è usare un middleware (freeware, non open) chiamato GPSGate.
Avvia il programma, fai una scansione dei dispositivi GPS (funziona sia con quelli USB che con quelli BT) e poi in QGIS:
In , rileva il dispositivo collegato. Puoi utilizzare la modalità
Individuazione automatica.Premi Connetti nel pannello Informazioni sul GPS.
Ubuntu/Mint GNU/Linux
Per quanto riguarda Windows, il modo più semplice è utilizzare un server, in questo caso GPSD, quindi
Installa il programma
sudo apt install gpsd
Quindi carica il modulo del kernel
garmin_gpssudo modprobe garmin_gps
Quindi collega l’unità e verifica con
dmesgil dispositivo effettivamente utilizzato dall’unità, ad esempio/dev/ttyUSB0.Ora puoi lanciare gpsd
gpsd /dev/ttyUSB0
E infine connettiti con lo strumento di tracciamento live di QGIS.
20.2.4.2. Usare BTGP-38KM datalogger (solo Bluetooth)
Usare GPSD (in ambiente Linux) o GPSGate (in ambiente Windows) è semplice.
20.2.4.3. Usare BlueMax GPS-4044 datalogger (sia BT che USB)
MS Windows
Il tracciamento in tempo reale funziona sia in modalità USB che BT, utilizzando GPSGate o anche senza, basta usare la modalità Individuazione automatica, o puntare lo strumento sulla porta giusta.
Ubuntu/Mint GNU/Linux
Per USB
Il live tracking funziona anche con GPSD
gpsd /dev/ttyACM3
o senza di esso, connettendo lo strumento live tracking di QGIS direttamente al device (vedi esempio al seguente link /dev/ttyACM3).
Per Bluetooth
Il live tracking funziona anche con GPSD
gpsd /dev/rfcomm0
o senza di esso, connettendo lo strumento live tracking di QGIS direttamente al device (vedi esempio al seguente link /dev/rfcomm0).