` `
属性テーブルで作業する
The attribute table displays information on features of a selected layer. Each row in the table represents a feature (with or without geometry), and each column contains a particular piece of information about the feature. Features in the table can be searched, selected, moved or even edited.
Foreword: Spatial and non-spatial tables
QGIS allows you to load spatial and non-spatial layers. This currently includes tables supported by OGR and delimited text, as well as the PostgreSQL, MSSQL, SpatiaLite, DB2 and Oracle provider. All loaded layers are listed in the Layers Panel. Whether a layer is spatially enabled or not determines whether you can interact with it on the map.
Non-spatial tables can be browsed and edited using the attribute table view. Furthermore, they can be used for field lookups. For example, you can use columns of a non-spatial table to define attribute values, or a range of values that are allowed, to be added to a specific vector layer during digitizing. Have a closer look at the edit widget in section Fields Properties to find out more.
Introducing the attribute table interface
To open the attribute table for a vector layer, activate the layer by
clicking on it in the レイヤーパネル. Then, from the main
Layer menu, choose  Open Attribute
Table. It is also possible to right-click on the layer and choose
 Open Attribute Table from the drop-down menu,
or to click on the
  Open Attribute Table button
in the Attributes toolbar.
This will open a new window that displays the feature attributes for the layer (figure_attributes_table). According to the setting in Settings ‣ Options ‣ Data sources menu, the attribute table will open in a docked window or a regular window. The total number of features in the layer and the number of currently selected/filtered features are shown in the attribute table title, as well as if the layer is spatially limited.
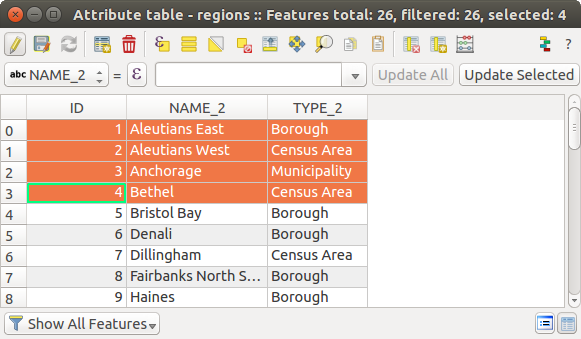
地域レイヤーに対する属性テーブル
属性テーブルウィンドウの上部にあるボタンは、次の機能を提供します。
表の項目1:使用可能なツール
ノート
QGISバージョンで構築されたデータおよびOGRライブラリのフォーマットによっては、一部のツールが利用できない場合があります。
これらのボタンの下には、クイックフィールド計算バー( 編集モード でのみ有効)があり、レイヤー内の地物のすべてまたは一部に計算を迅速に適用できます。このバーは  フィールド計算機 として、同じ 式 を使用します( 属性値を編集する 参照)。
ちなみに
Skip WKT geometry
If you want to use attribute data in external programs (such as Excel), use the
 Copy selected rows to clipboard button.
You can copy the information without vector geometries if you deactivate the
 Copy geometry in WKT representation from attribute table
option in Settings ‣ Options ‣ Data Sources menu.
テーブルビュー対フォームビュー
QGISは簡単属性テーブル内のデータを操作するために2つの表示モードが用意されています。
- the
 Table view, displaying values of multiple features in a
tabular mode, each row representing a feature and each column a field;
 - and the
 Form view which shows identifiers of features in a first
panel and displays only the attributes of the clicked identifier in the second
one. Form view uses the layer fields configuration
(see Fields Properties).
You can switch from one mode to the other by clicking the convenient icon at the bottom right of the dialog.
設定 ‣ オプション ‣ データソース メニューで、属性テーブルのオープン時に デフォルトビュー モードを指定することもできます。 「最後のビューを保存する」、「テーブルビュー」または「フォームビュー」にすることができます。
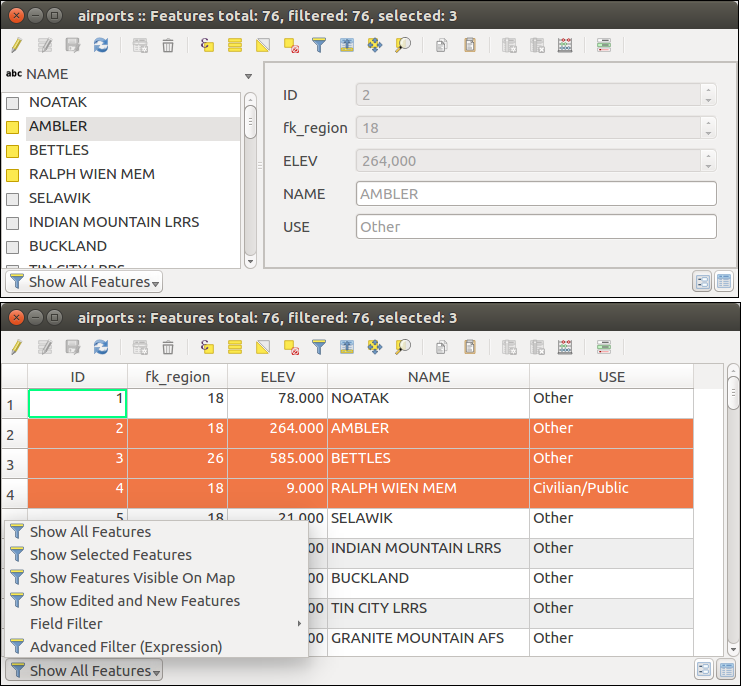
テーブルビューVSフォームビュー(上面)に属性テーブル(下)
Configuring the columns
テーブルビューにいるときに列見出しを右クリックすると、属性テーブルで何がどのように表示できるかを設定するのに役立つツールにアクセスできます。
Hiding and organizing columns and enabling actions
列見出しを右クリックすると、それを属性テーブルから隠すことを選択できます。列の非表示を解除または列の順序を変更し、一度に複数の列の動作を変更するには、 列を整理... を選択します。新しいダイアログでは以下のことができます:
表示または非表示にする/チェックを外し列をチェック
属性テーブル内の列の順序を変更するには、ドラッグアンドドロップアイテム。この変更は、表のレンダリングのためのものであり、レイヤのデータソースのフィールドの順序を変更しないことに注意してください
各行の行ごとのアクションのドロップダウンボックスやボタン、リストを表示し、 アクション 列、以下を参照してください。アクションの詳細については アクションのプロパティ 新しい仮想を有効にします。
Resizing columns widths
列の幅を右クリックして列ヘッダーにいずれかを選択して設定できます:
幅を設定... 希望の値を入力します。デフォルトでは、現在の値がウィジェットに表示されます
自動サイズ では列に合わせて最高の状態でリサイズします。
また、列見出しの右側の境界をドラッグして変更できます。新しい列サイズは、レイヤーに維持され、次の開始時に属性テーブルに復元されます。
Sorting columns
テーブルは、列見出しをクリックすることにより、任意の列でソートできます。小さな矢印は、ソート順は、(下向きダウン一番上の行からの値を降順手段、上向きでは、先頭行から下上昇値を意味する)を示しています。列見出しのコンテキストメニューの sort オプションと式を記述、またして行をソートするように選択できます、例えば、複数の列を使用して行を並べ替えるには、 concat(col0, col1) と書くことができます。
フォームビューでは、地物識別子は  プレビュー式で並べ替える オプションを使用してソートできます。
ちなみに
Sorting based on columns of different types
Trying to sort an attribute table based on columns of string and numeric types may lead to unexpected result because of the concat("USE", "ID") expression returning string values (ie, 'Borough105' < 'Borough6'). You can workaround this by using eg concat("USE", lpad("ID", 3, 0)) which returns 'Borough105' > 'Borough006'.
Formatting of table cells using conditions
Conditional formatting settings can be used to highlight in the attribute table features you may want to put a particular focus on, using custom conditions on feature’s:
ジオメトリ(例えば、マルチパートの地物を、小面積の地物を、または定義された地図範囲内で、...、識別する)。
- or field value (e.g., comparing values to a threshold, identifying empty cells...)
 をクリックする条件付き書式パネルを有効にできます(フォームビューでは使用できません)テーブルビューの属性ウィンドウの右上にあります。
新しいパネルによって、ユーザーは  フィールド または
  行全体 のフォーマットレンダリングに新しい規則を追加できます。新しい規則を追加するには、定義するために、フォームを開きます。
規則の名前;
式ビルダー 関数のいずれかを使用する条件;
書式設定:事前定義された書式のリストから選択するか、以下のようなプロパティに基づいて作成できます。
背景とテキストの色。
アイコンの使用;
太字、斜体、下線、または取り消し線;
フォント。
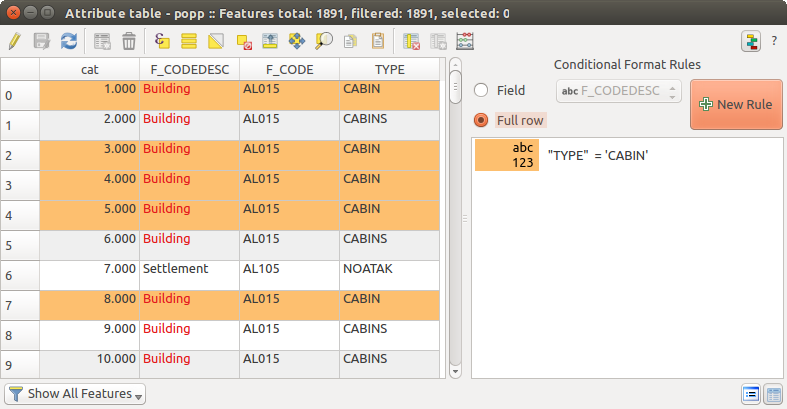
属性テーブルの条件付き書式
属性テーブルで地物とやりとりする
地物を選択する
テーブルビューでは、属性テーブルの各行は、レイヤー中のユニークな地物の属性が表示されます。行を選択する地物を選択し、同様に、(ジオメトリ有効レイヤーの場合)地図キャンバスに地物を選択すると、属性テーブル内の行を選択します。地図キャンバス(または属性テーブル)で選択された地物のセットが変更された場合、選択は、それに応じて属性テーブル(又は地図キャンバス)で更新されます。
行は、行の左側にある行番号をクリックすると選択できます。 Ctrl キーを押していることによって 複数の行 をマークできます。 Shift キー保持と行の左側にいくつかの行ヘッダーをクリックすることによって 連続選択 を行うことができます。現在のカーソル位置とクリック行との間のすべての行が選択されます。属性テーブル内のカーソル位置を移動する、テーブル内のセルをクリックして、行選択を変更しません。メインキャンバスでの選択を変更すると、属性テーブルのカーソル位置を移動しません。
属性テーブルのフォームビューでは、地物が( 画面のプロパティ 参照)、その表示されたフィールドの値によって左側のパネルで特定され、デフォルトです。この識別子は、既存のフィールドを選択するか、カスタム式を使用するか、パネルの上部にあるドロップダウンリストを使用して交換できます。また、ドロップダウンメニューから地物のリストをソートすることもできます。
右のいずれかで地物の属性を表示するには、左のパネルで値をクリックします。地物を選択するには、識別子の左に正方形のシンボルの内側をクリックする必要があります。デフォルトでは、シンボルが黄色に変わります。テーブルビューのように、以前に公開キーボードの組み合わせを使用して、複数の地物選択を行うことができます。
マウスで地物を選択する以外に、このようななどの属性テーブルのツールバーで利用可能なツールを使用して、フィーチャの属性に基づいて自動選択を行うことができます(より多くの情報とユースケースについてはセクション 自動選択 および次のセクションを参照):
Filtering and selecting features using forms を使って地物を選択することもできます。
地物をフィルタする
属性テーブルで地物を選択したら、テーブルにこれらのレコードのみを表示できます。これは、属性テーブル]ダイアログボックスの左下にあるドロップダウンリストから 選択した地物を表示 項目を使用して簡単に行うことができます。このリストは、次のフィルタを提供しています:
すべての地物を表示
選択地物を表示
地図上で見える地物を表示
新規または編集された地物を表示
フィールドフィルタ - ユーザーがフィールドの値に基づいてフィルタリングできるようにする:リストから列を選択し、値を入力し、フィルタリングするためにを押す Enter を押す。次に、一致する地物のみが属性テーブルに表示されます。
- Advanced filter (Expression) - Opens the expression builder dialog. Within it, you can create complex expressions to match table rows. For example, you can filter the table using more that one field. See 式 for more information.
Filtering and selecting features using forms を使用して地物をフィルタすることも可能です。
ノート
レイヤーのうちの地物をフィルタしていない属性テーブルからレコードをフィルタします。それらは単に瞬間的にmomentaneouslyテーブルから隠されており、地図キャンバスから、またはフィルタを除去することによってアクセスできます。レイヤーから非表示地物を行うフィルタでは、 クエリビルダー 使用。
ちなみに
地図上で見える地物を表示 で 更新データソースのフィルタリング
性能上の理由から、属性表に示される地物は、オープン時にキャンバスの範囲に空間的に制限されています(方法については データソースオプション 参照)。新しいキャンバス範囲で 地図に表示される地物を表示する と空間制限を更新します。
Filtering and selecting features using forms
 フォームを使用して地物をフィルタ/選択 をクリックするか Ctrl + F を押すと、属性テーブルダイアログがフォームビューに切り替わり、すべてのウィジェットが検索バリアントに置き換えられます。
この点以降、このツールの機能は、 値で地物を選択する で説明されているものと似ています。ここでは、すべての演算子の説明とモードの選択があります。
さらに、属性テーブルの場合には、 地物をフィルタ ボタンがあります。これは、選択する代わりに地物をフィルタリングします(ユーザのために高度なフィルタ(式)を作成することによって)。
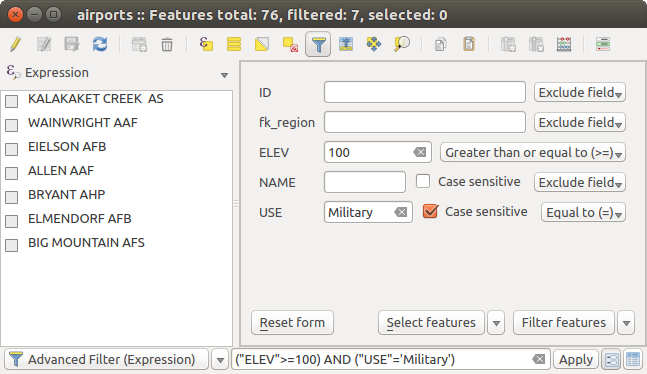
フィルタフォームでフィルタされた属性テーブル
すでにフィルタされた地物がある場合は、 地物をフィルタ ボタンの隣にあるドロップダウンリストを使用してフィルタを絞り込むことができます。オプションは次のとおりです。
フィルタの絞り込み (“AND”)
フィルタを拡げる (“OR”)
To clear the filter, either select Show all features option mentioned in 地物をフィルタする, or click the clear the expression and click [Apply].
Using action on features
ユーザーはコンテキストメニューで地物を操作するためのいくつかの可能性を持っています、以下のように:
- Select all (Ctrl+A) the features
- Copy the content of a cell in the clipboard with Copy cell content.
- Zoom to feature without having to select it beforehand
- Open form. It toggles attribute table into form view with a focus on the clicked feature
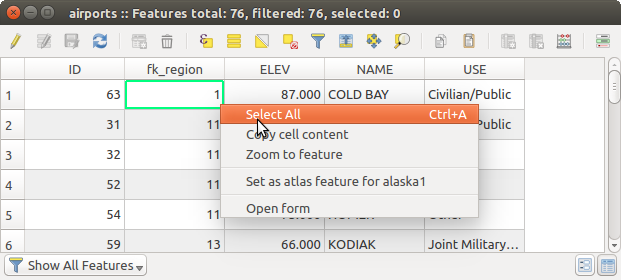
[セルの内容をコピー]ボタン
外部プログラム(Excel、LibreOffice、QGIS、カスタムWebアプリケーションなど)で属性データを使用する場合は、1つまたは複数の行を選択し、  選択した行をクリップボードにコピーする ボタンを押すか、 Ctrl+C を押します。
設定 ‣ オプション ‣ データソース メニューで貼り付ける形式を定義できます 形式を選択して地物をコピー ドロップダウンリスト:
プレーンテキスト、ジオメトリなし、
プレーンテキスト、WKTジオメトリ、
- GeoJSON
このコンテキストメニューでアクションのリストを表示することもできます。これは レイヤープロパティ ‣ アクション タブで有効になります。アクションの詳細については アクションのプロパティ を参照。
Saving selected features as new layer
The selected features can be saved as any OGR-supported vector format and
also transformed into another coordinate reference system (CRS). In the
contextual menu of the layer, from the Layers Panel, click on
Save as to define the name of the output file, its format
and CRS (see section Creating new layers from an existing layer). To save the selection ensure
that the  Save only selected features is selected.
It is also possible to specify OGR creation options within the dialog.
属性値を編集する
属性値を編集することによって行うことができます。
セルに直接新しい値を入力するかどうか、属性テーブルがテーブルビューであるかフォームビューであるかによって異なります。したがって、変更はセルごとに、地物ごとに行われます。
- using the field calculator: update in a row a field that may already exist or to be created but for multiple features; it can be used to create virtual fields.
- using the quick field calculation bar: same as above but for only existing field
または 複数編集 モードを使用:複数の地物の複数のフィールドを連続して更新します。
Using the Field Calculator
The  Field Calculator button in the attribute table
allows you to perform calculations on the basis of existing attribute values or
defined functions, for instance, to calculate length or area of geometry
features. The results can be written to a new attribute field, a virtual field,
or they can be used to update values in an existing field.
フィールド計算機 は、編集をサポートするすべてのレイヤーで利用可能です。フィールド計算機アイコンをクリックするとダイアログが表示されます( figure_field_calculator を参照)。レイヤーが編集モードでない場合は、警告が表示され、フィールド計算機を使用すると、計算が行われる前にレイヤーが編集モードに置かれることになります。
Based on the Expression Builder dialog, the field calculator dialog offers a complete interface to define an expression and apply it to an existing or a newly created field. To use the field calculator dialog, you first must select whether you want to only update selected features, create a new attribute field where the results of the calculation will be added or update an existing field.
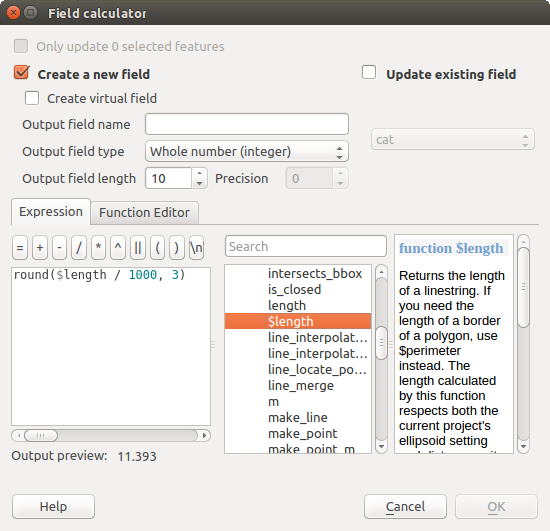
フィールド演算
If you choose to add a new field, you need to enter a field name, a field type (integer, real, date or string) and if needed, the total field length and the field precision. For example, if you choose a field length of 10 and a field precision of 3, it means you have 6 digits before the dot, then the dot and another 3 digits for the precision.
短い例で、 式 タブを使用している場合、フィールドの計算がどのように機能するかを示しています。QGISサンプルデータセットから railroads レイヤーのキロメートルの長さを計算したいです:
出力フィールド名として length を追加し、出力フィールドタイプを real 、フィールド長を 10、精度を 3に指定します。
今、関数 $length をダブルクリックし、 ジオメトリ グループフィールドの計算式ボックスにそれを追加します。
- Complete the expression by typing / 1000 in the Field calculator expression box and click [Ok].
ここで、属性テーブル内の新しいフィールド length を見つけることができます。
Creating a Virtual Field
A virtual field is a field based on an expression calculated on the fly, meaning that its value is automatically updated as soon as the underlying parameter changes. The expression is set once; you no longer need to recalculate the field each time underlying values change. For example, you may want to use a virtual field if you need area to be evaluated as you digitize features or to automatically calculate a duration between dates that may change (e.g., using now() function).
ノート
仮想フィールドの使用
仮想フィールドはレイヤーの属性で永続的ではありません、つまりそれらはそれらが作成されてきたプロジェクトファイルで保存され利用可能であるだけということを意味します。
フィールドは作成時に仮想設定できるのみで、使用する式は後から変更できません:それにはそのフィールドを削除して再作成する必要があります。
Using the Quick Field Calculation Bar
While Field calculator is always available, the quick field calculation bar on top of the attribute table is only visible if the layer is in edit mode. Thanks to the expression engine, it offers a quicker access to edit an already existing field.
In quick field calculation bar, you simply need to:
Editing multiple fields
これまでのツールとは異なり、複数編集モードでは、異なる地物の複数の属性を同時に編集できます。編集のためにレイヤーを切り替えると、複数編集機能にアクセスできます。
行の複数のフィールドを編集するには:
select the features you want to edit;
from the attribute table toolbar, click the
 button. This will
toggle the dialog to its form view. Feature selection could also be made
at this step;
button. This will
toggle the dialog to its form view. Feature selection could also be made
at this step;at the right side of the attribute table, fields (and values) of selected features are shown. New widgets appear next to each field allowing for display of the current multi edit state:
 the field contains different values for selected
features. It’s shown empty and each feature will keep its original value.
You can reset the value of the field from the drop-down list of the widget.
 all selected features have the same value for this
field and the value displayed in the form will be kept.
 the field has been edited and the entered value
will be applied to all the selected features. A message appears at the top
of the dialog, inviting you to either apply or reset your modification.
これらのウィジェットのいずれかをクリックすると、フィールドの現在の値を設定するか、元の値にリセットできます。つまり、フィールド単位で変更をロールバックできます。
make the changes to the fields you want and click on Apply changes in the upper message text or any other feature in the left panel.
すべての選択された地物 に変更が適用されます。地物が選択されていない場合、テーブル全体が変更内容で更新されます。変更は単一の編集コマンドとして行われます。したがって、 取り消し を押すと、選択したすべての地物の属性変更を一度にロールバックします。
ノート
属性テーブルのツールとは異なり、 編集 ‣ 選択した地物の属性を変更 オプションでは、属性の変更を記入するためのモーダルダイアログが出ます。したがって、実行前に地物の選択が必要です。
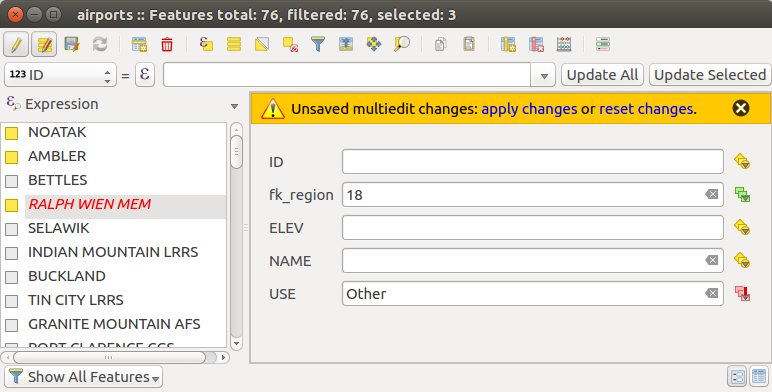
複数の地物の編集フィールド
ノート
複数編集モードは、自動生成かつドラッグ&ドロップのフォームでのみ利用可能です( Customize a form for your data 参照)。それは、カスタムUIフォームではサポートされていません。
1対多または多対多の関係を作成する
関係とは、データベースでよく使用される技術です。その概念は、異なるレイヤー(テーブル)の地物(行)はお互いに属することができるというものです。
Introducing 1-N relations
例として、アラスカのすべての地域(ポリゴン)を有するレイヤーがあり、その名前と領域タイプと固有のID(主キーとして機能する)についていくつかの属性を持っているとします。
それから、地域に位置し、またこれらのトラックを保持したい空港についての情報を有する別のポイントレイヤーまたはテーブルを取得します。領域レイヤーにそれらを追加したい場合、ほとんどの地域には空港が複数あるため、外部キーを使用して1対多関係を作成する必要があります。
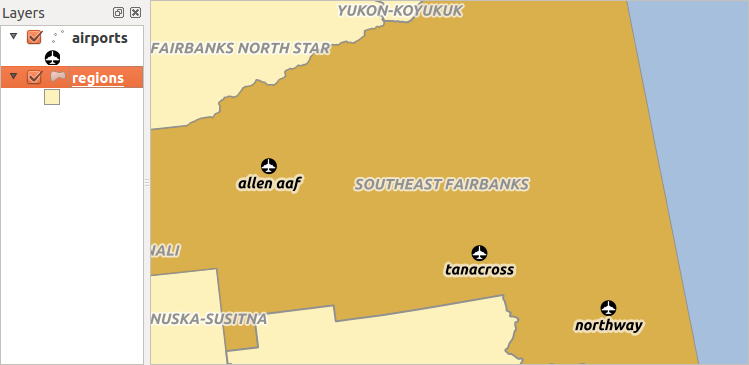
空港とアラスカ地域
Layers in 1-N relations
QGISではテーブルとベクターレイヤーの間に違いはありません。基本的に、ベクターレイヤーはジオメトリを持つテーブルです。テーブルをベクターレイヤーとして追加できます。 1対n関係を示すために、 regions シェープファイルと airports シェープファイルを読み込みます。シェープファイルには、レイヤー領域に外部キーフィールド( fk_region )があります。つまり、各空港はそれぞれただ1つの地域に属し、各地域は空港をいくつでも持つことができます(典型的な1対多関係)。
Foreign keys in 1-N relations
空港属性テーブル中の既存の属性に加えて、外部キーとして動作する別のフィールドfk_regionが必要でしょう(データベースを持っている場合はおそらくそれに制約を定義することになるでしょう)。
このフィールドfk_regionには常に地域のIDが含まれているでしょう。それは、それが属する地域へのポインタのように見ることができます。そして、編集のためのカスタム編集フォームを設計でき、QGISではその設定についての処理をします。それはさまざまなプロバイダーで動作し(だからそれはシェープやCSVファイルで使用できます)、しなければならないのはQGISにテーブル間の関係を伝えることだけです。
Defining 1-N relations (Relation Manager)
The first thing we are going to do is to let QGIS know about the relations between the layers. This is done in Project ‣ Project Properties.... Open the Relations tab and click on [Add Relation].
- name is going to be used as a title. It should be a human readable string, describing, what the relation is used for. We will just call say Airports in this case.
- referencing layer also considered as child layer, is the one with the foreign key field on it. In our case, this is the airports layer
- referencing field will say, which field points to the other layer so this is fk_region in this case
- referenced layer also considered as parent layer, is the one with the primary key, pointed to, so here it is the regions layer
- referenced field is the primary key of the referenced layer so it is ID
- id will be used for internal purposes and has to be unique. You may need it to build custom forms. If you leave it empty, one will be generated for you but you can assign one yourself to get one that is easier to handle.
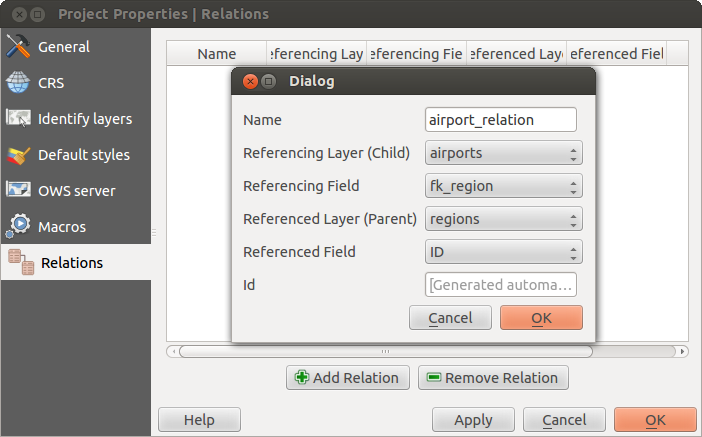
関係マネージャ
Forms for 1-N relations
今QGISが関係について知っていること、生成フォームを改善するために使用されます。我々は(自動生成)デフォルトのフォームのメソッドを変更していないとして、それは私たちの形で新しいウィジェットを追加します。それでは、凡例にレイヤー領域を選択してみましょうと、特定のツールを使用します。設定に応じて、フォームが直接開くこともありますし、アクションの下で識別ダイアログでそれを選択して開く必要があることもあります。
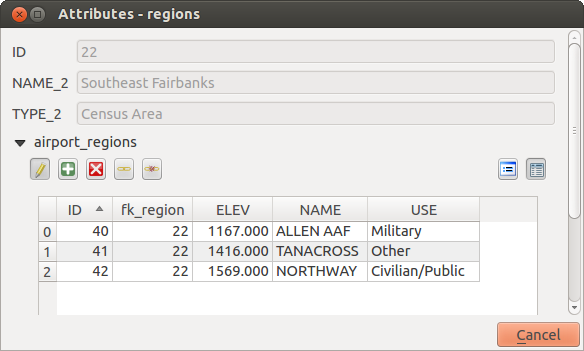
空港への関係を持つ識別]ダイアログ領域
As you can see, the airports assigned to this particular region are all shown in a table. And there are also some buttons available. Let’s review them shortly
 ボタンは編集モードを切り替えるためのものです。私たちは地域レイヤーから地物の地物の形であるが、それは空港レイヤーの編集モードを切り替えていることに注意してください。しかしこの表は、空港レイヤーの地物を表しています。
- The
 button will add a new feature to the airport layer. And it will
assign the new airport to the current region by default.
 - The
 button will delete the selected airport permanently.
  記号では、現在の領域に割り当てられる、既存の空港を選択できる新しいダイアログが開きます。たまたま間違った領域の上に空港を作成してしまった場合、これは便利かもしれません。
 シンボルは、効果的に(外部キーがNULLに設定されている)、未割り当て、それらを残し、現在の領域から選択された空港のリンクを解除します。
- The two buttons to the right switch between table view and form view where the later let’s you view all the airports in their respective form.
If you work on the airport table, a new widget type is available which lets you embed the feature form of the referenced region on the feature form of the airports. It can be used when you open the layer properties of the airports table, switch to the Fields menu and change the widget type of the foreign key field ‘fk_region’ to Relation Reference.
今地物ダイアログを見れば、地域のフォームが空港のフォーム内に埋め込まれても、別の領域に、現在の空港を割り当てることができますコンボボックスを、持っていること、わかります。
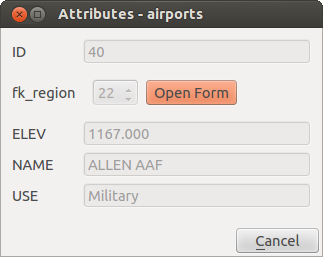
地域との関係で識別]ダイアログ空港
Introducing many-to-many (N-M) relations
N-M relations are many-to-many relation between two tables. For instance, the airports and airlines layers: an airport receives several airline companies and an airline company flies to several airports.
In such case, we need a pivot table to list all airlines for all airports. In QGIS, you should setup two one-to-many relations as explained above:
airlines テーブルとピボットテーブルの間の関係。
そして airports テーブルとピボットテーブルとの間の第2の関係。
When we add a new child (i.e. a company to an airport), QGIS will add a new row in the pivot table and in the airlines table. If we link a company to an airport, QGIS will only add a row in the pivot table.
In case you want to remove a link, an airline or an airport, QGIS won’t remove the row in the pivot table. The database administrator should add a ON DELETE CASCADE instruction in the foreign key constraint:
ALTER TABLE location.airlines
ADD CONSTRAINT location_airlines_airports_id_fkey
   FOREIGN KEY (id)
      REFERENCES location.airports(id)
         ON DELETE CASCADE;
ノート
Combining N-M relation with automatic transaction group
このようなコンテキストで作業する場合は、 プロジェクトのプロパティ ‣ データソース‣ でトランザクションモードを有効にする必要があります。 QGISは、すべてのテーブル(航空会社、空港、ピボットテーブル)の行を追加または更新できる必要があります。
Finally, adding such relations in a form is done in the same way that for a one-to-many relation. The Relations panel in the Fields properties of the vector layer will let the user add the relation in the form. It will appear as a Many to many relation.


