` `
QGISの設定
QGIS is highly configurable through the Settings menu. Choose between Options, Project Properties and Customization.
ノート
QGIS follows desktop guidelines for the location of options and project properties item. Consequently related to the OS you are using, location of some of items described below could be in the Project or the Settings menu.
オプション
 QGISのいくつかの基本オプションは、オプション ダイアログを使用して選択できます。メニューオプション 設定 ‣ オプション を選択してください。必要に応じてオプションを変更できます。 QGISを有効にするには、QGISを再起動する必要があります。
オプションをカスタマイズできるタブについては、以下で説明します。
一般設定
アプリケーション
- Select the Style (QGIS restart required)
 and choose
between ‘Oxygen’, ‘Windows’, ‘Motif’, ‘CDE’, ‘Plastique’ and ‘Cleanlooks’.
and choose
between ‘Oxygen’, ‘Windows’, ‘Motif’, ‘CDE’, ‘Plastique’ and ‘Cleanlooks’. - Define the Icon theme . It can be ‘default’ or ‘Night Mapping’.
- Define the Icon size .
- Define the Font and its Size. The font can be
 Qt default or a user-defined one.
 - Change the Timeout for timed messages or dialogs .
 Hide splash screen at startup
- Show tips at startup
- Check QGIS version at startup to keep you informed
if a newer version is released
- QGIS-styled group boxes
- Use native color chooser dialogs (see カラーセレクタ)
- Use live-updating color chooser dialogs (see カラーセレクタ)
- Canvas rotation support (restart required)
プロジェクトファイル
- Open project on launch (choose between ‘New’,
‘Most recent’, ‘Welcome Page’, and ‘Specific’). When choosing ‘Specific’ use
the
 to define the project to use by default. The ‘Welcome Page’
displays a list of recent projects with screenshot.
to define the project to use by default. The ‘Welcome Page’
displays a list of recent projects with screenshot. - 既定のプロジェクトから新プロジェクトを作成する 。 現在のプロジェクトを既定プロジェクトとして指定する または 既定を解除 ボタンをクリックすることができます。またユーザーが作成したプロジェクトテンプレートをファイルやディレクトリを指定するとブラウズすることができます。 プロジェクト ‣ テンプレートをもとに新規作成 というエントリでそれができます。プロジェクトテンプレートを保存したい場合は最初に 既定のプロジェクトから新プロジェクトを作成する をアクティブにしてプロジェクトテンプレートフォルダーにプロジェクトを保存してください。
- Prompt to save project and data source changes when
required
- レイヤーが削除される場合に確認のプロンプト
- Warn when opening a project file saved with an older
version of QGIS
マクロを有効
。このオプションは、プロジェクトのイベントのアクションを実行するために書かれているマクロを処理するために作成されました。「常に(推奨されません)」「このセッションにのみ」、「尋ねる」、「決して」の中で選択できます。
システム設定
SVGパス
スケーラブルベクターグラフィック(SVG)シンボルを検索するパス を追加または削除します。これらのSVGファイルは、地物をシンボル化するか、地図の構成を飾るために使用できます。
プラグインパス
Add or Remove Path(s) to search for additional C++ plugin libraries
QSettings
何か カスタマイズ をする場合に ユーザーインターフェイスをデフォルト設定へとリセット (再起動が必要) するのに役立ちます
環境
現在システム環境変数を表示でき、その多くは グループ 環境で構成できます( figure_environment_variables を参照)。これは、GUIアプリケーションは、必ずしもユーザーのシェル環境を継承していない、Macなどのプラットフォームに便利です。処理ツールボックス(例えば、SAGA、GRASS)によって制御される外部ツールセットの環境変数を設定したり表示するにも、ソースコードの特定のセクションのためのデバッグ出力をオンにするにも便利です。
- Use custom variables (restart required - include separators).
You can [Add] and [Remove] variables. Already-defined environment
variables are displayed in Current environment variables, and it’s
possible to filter them by activating
Show only QGIS-specific variables.
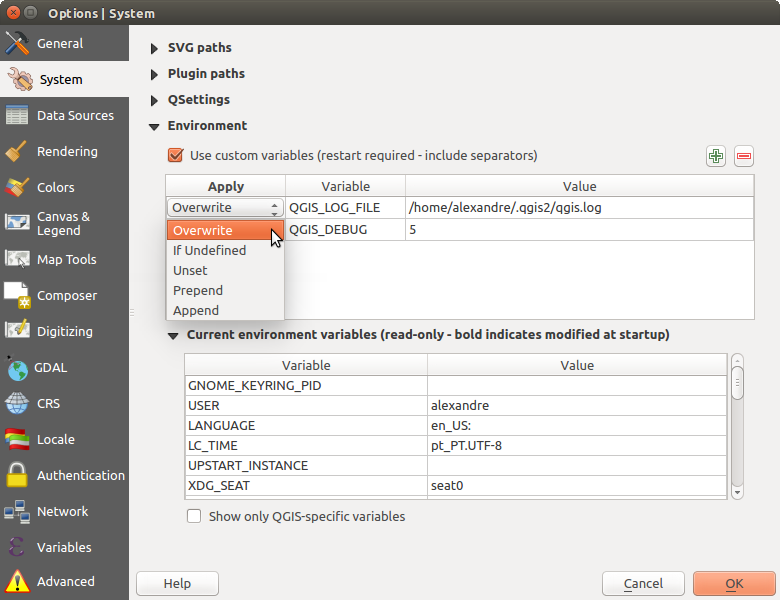
QGISでのシステム環境変数
データソース設定
地物属性とテーブル
- ドックウィンドウで属性テーブルを開く
形式を選択して地物をコピー 他のアプリケーションで地物を貼り付けるときに、「プレーンテキスト、ジオメトリなし」、「プレーンテキスト、WKTジオメトリ」、または「GeoJSON」。
属性テーブルの動作
:開口部の属性テーブルのフィルタを設定します。 「すべての地物を表示」、「選択した地物を表示」、「地図上に表示される地物を表示」の3つの可能性があります。デフォルトビュー :毎回のオープン時の属性テーブルのビューモードを定義します。「最後のビューを保存する」、「テーブルビュー」、または「フォームビュー」にすることができます。
属性テーブルの行キャッシュ
 。この行キャッシュでは、属性テーブルでの作業は速くなるように、最後にロードされた属性をN行分を保存することが可能となります。このキャッシュは属性テーブルを閉じるときに削除されます。
NULL値の表現 。ここでは、NULL値を含むデータフィールドの値を定義できます。
ちなみに
ビッグデータ属性テーブルを開くのを改善する
大量のレコードを含むレイヤーを操作する場合、ダイアログがレイヤー内のすべての行を要求するため、属性テーブルを開くのが遅くなることがあります。 属性テーブルの振る舞い を 地図に表示された地物を表示 に設定すると、QGISはテーブルを開くときに現在の地図キャンバス内にある地物だけを要求します。
この属性テーブルインスタンスのデータは、開いたキャンバスの範囲に常に関連付けられます。つまり、そのテーブル内の すべての地物を表示 を選択すると新しい地物は表示されません。ただし、キャンバス範囲を変更して、属性表の Show Visible On Map オプションを選択すると、表示されている地物のセットを更新できます。
データソースの操作
ブラウザdock中で有効な項目をスキャン
。「拡張子をチェック」と「ファイル内容をチェック」のどちらかを選択できます。- Scan for contents of compressed files (.zip) in browser dock
. ‘No’, ‘Basic scan’ and ‘Full scan’ are possible.
開くときにラスタサブレイヤーのプロンプト 。いくつかのラスター・サポート・サブレイヤーは—それらはGDALでサブデータセットと呼ばれます。多くのnetCDF変数がある場合などは— netCDFファイルで、GDALはサブデータセットとして、すべての変数を見ています。オプションは、サブレイヤーでファイルを開いたときのサブレイヤーに対処する方法を制御できます。次の選択肢があります。
‘常に’:毎回確認 (サブレイヤーが存在する場合)
‘必要な場合’:バンドがなくサブレイヤーをもつかを尋ねます
‘利用しない’:確認せず何もロードしません
‘‘すべてをロード’:確認せず,すべてのサブレイヤーをロードします
- シェープファイルのコード化宣言を無視 。シェープファイルは、情報をコード化している場合、これはQGISによって無視されます。
- ダブルクリックでPostGISレイヤーを追加し拡張モードで選択
- ダブルクリックでOracleレイヤーを追加し拡張モードで選択する
- 可能な場合はサーバー側で式を実行
隠しブラウザのパス
This widget lists all the folder you chose to hide from the Browser panel. Removing a folder from the list will make it available in the Browser panel.
レンダリング設定
[プロジェクトのプロパティ]ダイアログの[レンダリング]タブ
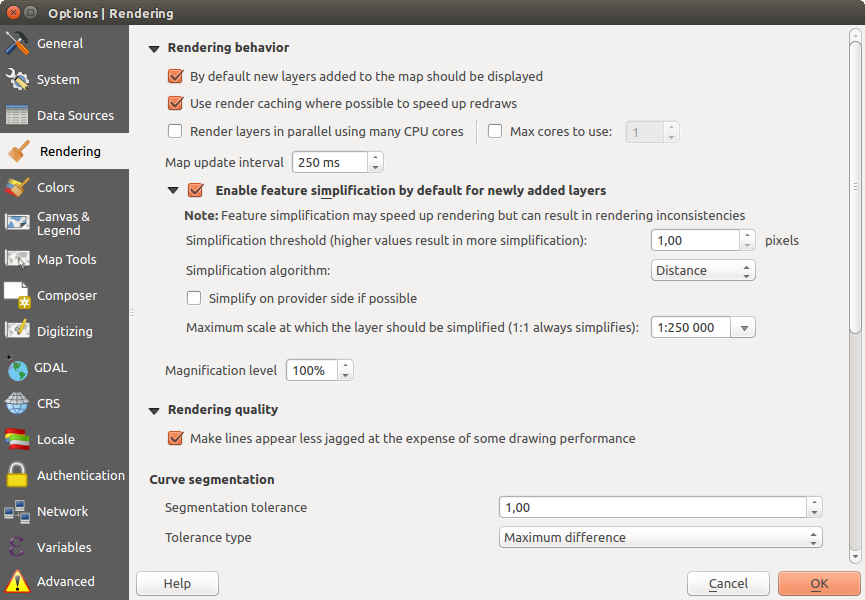
レンダリング動作
- By default new layers added to the map should be displayed
- 再描画の速度を上げられる場合はレンダリングのキャッシュを利用
- 多くのCPUコアを使用して並行でレイヤーをレンダリングする
- 使用する最大コア
地図更新時間間隔(デフォルトは250 ms)
- 新しく追加されたレイヤーにデフォルトで地物の簡素化を有効にする
単純化の閾値
単純化アルゴリズム :このオプションは、地物のローカルで「その場で」簡略化を実行し、ジオメトリレンダリングを高速化します。データプロバイダーからフェッチされたジオメトリは変更されません。これは、地物ジオメトリ(領域の計算など)を使用する式を持つ場合に重要です。これらの計算は、単純化されたジオメトリではなく元のジオメトリに対して実行されます。この目的のために、QGISは3つのアルゴリズムを提供します:「距離」(デフォルト)、「SnapToGrid」および「Visvalingam」。
- 可能であればプロバイダー側で簡素化 :プロバイダー(PostGIS、Oracle ...)によってジオメトリが単純化され、ローカル側の単純化とは異なり、ジオメトリベースの計算が影響を受ける可能性があります
レイヤーを単純化する最大縮尺
 Magnification level (see the magnifier)
ノート
グローバル設定に加えて、 レイヤーのプロパティ ‣ レンダリング メニューから特定のレイヤーについて地物単純化を設定できます。
描画品質
- 線のぎざぎざを目立たなくします(描画パフォーマンスが低下します)
曲線の分割
セグメント描画許容誤差:この設定は、円弧の描画方法を制御します。 より小さい 最大角度(2つの連続した頂点と曲線の中心の間の角度)または最大の差(地図単位での2つの頂点のセグメントと曲線との間の距離)、 より直線的な線 セグメントがレンダリング中に使用されます。
Tolerance type: it can be ‘Maximum angle’ or ‘Maximum distance’
ラスター
RGB バンド選択 で、赤、緑、青のバンドの数を定義できます。
コントラスト強調
- Single band gray . A single band gray can have
‘No stretch’, ‘Stretch to MinMax’, ‘Stretch and Clip to MinMax’ and also
‘Clip to MinMax’.
- Multi band color (byte/band) . Options are ‘No stretch’,
‘Stretch to MinMax’, ‘Stretch and Clip to MinMax’ and ‘Clip to MinMax’.
- Multi band color (>byte/band) . Options are ‘No stretch’,
‘Stretch to MinMax’, ‘Stretch and Clip to MinMax’ and ‘Clip to MinMax’.
- Limits (minimum/maximum) . Options are
‘Cumulative pixel count cut’, ‘Minimum/Maximum’, ‘Mean +/- standard deviation’.
累積ピクセル数のカット制限
標準偏差の乗数
デバッグ
- Map canvas refresh
色の設定
This menu allows you to add some custom color that you can find in each color dialog window of the renderers. You will see a set of predefined colors in the tab: you can delete or edit all of them. Moreover you can add the color you want and perform some copy and paste operations. Finally you can export the color set as a gpl file or import them.
キャンバスと凡例設定
Default map appearance (overridden by project properties)
- Define a Selection color and a Background color.
Layer legend
凡例のダブルクリックアクション
ダブルクリックで[レイヤープロパティを開く]、[属性テーブルを開く]、[レイヤースタイリングドックを開く]のいずれかを行うことができます。- The following Legend item styles are possible:
- Capitalise layer names
- Bold layer names
- Bold group names
- Display classification attribute names
- Create raster icons (may be slow)
- you can also set the WMS getLegendGraphic Resolution
地図ツールの設定
このタブは 識別ツール の動作に関するいくつかのオプションを提供しています 。
- Search radius for identifying and displaying map tips is a tolerance distance within which the identify tool will depict results as long as you click within this tolerance.
ハイライト色 識別される地物がどの色で強調されることになるかを選択できます。
バッファ は、特定のハイライトの概要からレンダリングされるバッファ距離を決定します。
最小幅 強調表示されるオブジェクトの輪郭がどれだけの厚さであるべきかを決定。
計測ツール
計測ツールの ラバーバンド色 を定義します。
小数位 を定義
- ベース単位を維持 は、大きい数を自動的に変換しません(例えば、メートルをキロメートルに)
好みの距離単位
(「メートル」、「キロメートル」、「フィート」、「ヤード」、「マイル」、「海里」、「度」や「地図単位」)- Preferred area units (‘Square meters’, ‘Square
kilometers’, ‘Square feet’, ‘Square yards’, ‘Square miles’, ‘Hectares’,
‘Acres’, ‘Square nautical miles’, ‘Square degrees” or ‘Map Units’)
好みの角度単位
(‘度’, ‘ラジアン’, ‘Gon/gradians’, ‘Minutes of arc’, ‘Seconds of arc’ or ‘Turns/revolutions’)
パンとズーム
ズームツールまたはホイールマウスの ズーム倍率 を定義
定義済み縮尺
ここでは、あらかじめ定義された縮尺のリストを見つけます。  と
と  ボタンで個人的な縮尺を追加または削除できます。また、 .XML ファイルへ/から縮尺を読み込みまたは書き出しできます。まだ変更を削除し、定義済みリストにリセットする可能性を持っていることに注意してください。
Composer Settings
コンポジションデフォルト
You can define the Default font used within the print composer.
グリッドの外観
グリッドのスタイル
(‘Solid’, ‘Dots’, ‘Crosses’)を定義します。グリッド色 を定義します
グリッドとガイドデフォルト
グリッド間隔
を定義- Define the Grid offset for x and y
スナップ許容誤差
を定義
Composer Paths
- Define Path(s) to search for extra print templates: a list of folders with custom composer templates to use while creating new one.
デジタイズの設定
このタブは、 ベクターレイヤーを編集する (属性とジオメトリ)ときに一般的な設定を行うのに役立ちます。
地物の作成
- Suppress attribute form pop-up after feature creation
- Reuse last entered attribute values
ジオメトリを検証 。多くのノードを持つ複雑なラインとポリゴンを編集すると、非常に遅いレンダリングをもたらす可能性があります。QGISでのデフォルトの検証手順は多くの時間を取ることがありうるからです。レンダリングを速くするために、(GEOS 3.3から始まる)GEOSジオメトリ検証を選択するか、またはそれをオフにすることが可能です。GEOSジオメトリの検証がはるかに高速ですが、欠点は、最初のジオメトリの問題が報告されるということです。
ラバーバンド
- Define Rubberband Line width, Line color and Fill color
- Don’t update rubberband during node editing
スナップ
- Open snapping options in a dock window (QGIS restart required)
- Define Default snap mode (‘To vertex’, ‘To segment’,
‘To vertex and segment’, ‘Off’)
デフォルトスナップ許容値 を地図の単位またはピクセルで指定します
頂点編集用の検索半径 を地図単位またはピクセルで指定して下さい
頂点マーカー
- 選択された地物のみマーカーを表示する
マーカースタイル
頂点を定義します(「クロス」(デフォルト)、「半透明の円」または「なし」)頂点の マーカーの大きさ を指定して下さい
カーブオフセットツール
次の3つのオプションは 高度なデジタイジング 中の  オフセット曲線 ツールを参照してください。各種設定を通じ、オフセット線の形状に影響を与えることが可能です。これらのオプションはGEOS 3.3から始まり可能です。
継ぎ目スタイル :「ラウンド」「マイター」「べベル」
Quadrantセグメント
継ぎ目制限
GDAL 設定
GDALはラスターファイルのためのデータ交換ライブラリです。このタブでは、次のことができます。 作成オプションを編集 してラスター形式の ピラミッドオプションを編集 。複数のGDALドライバが利用可能である。いくつかのケースでは、複数のGDALドライバが利用可能になるとドライバは、ラスター形式のために使用されるべきGDAL定義できます。
CRS 設定
Default CRS for new projects
 Don’t enable ‘on the fly’ reprojection
- Automatically enable ‘on the fly’ reprojection if
layers have different CRS
- Enable ‘on the fly’ reprojection by default
- Select a CRS and Always start new projects with this CRS
新しいレイヤーの投影座標系
このエリアでは、新しいレイヤーが作成された場合、またはCRSのないレイヤーが読み込まれた場合に実行するアクションを定義できます。
- CRSのプロンプト
- 利用プロジェクトCRS
- Use default CRS
デフォルトデータム変換
- Ask for datum transformation when no default is defined
With the ‘on-the-fly’ CRS transformation enabled and the above option checked, adding layers of different CRS opens the Select datum transformations dialog. This offers you to select the most appropriate transformation settings. Validating this dialog with the ‘Remember selection’ option checked populates the table under CRS ‣ Default datum transformations with information about ‘Source CRS’ and ‘Destination CRS’ as well as ‘Source datum transform’ and ‘Destination datum transform’. From now, QGIS automatically uses the selected datum transformation for further transformation between these two CRSs until you
remove it from the list.You can use the
button to add a datum transformation if you know
its parameters (source and destination ellipsoids and the numbers from the
transformation table). You then need to manually enter each setting.
ノート
For more information on how QGIS handles layers projection, please read the dedicated section at 投影法の利用方法.
Locale Settings
- Override system locale and Locale to use instead
- Information about active system locale
Network Tab
一般情報
WMS 検索アドレス を定義して下さい、デフォルトは http://geopole.org/wms/search?search=\%1\&type=rss です
ネットワークリクエストの時間切れ(ms) を定義して下さい - デフォルトは 60000 です
WMS 機能に対する デフォルトの有効期限 (時間) を定義して下さい- デフォルトは 24です
WMSC/WMTS タイルのデフォルトの有効期限(時間) を定義して下さい- デフォルトは 24です
タイルまたは地物リクエストエラーの場合の最大試行回数 を指定します
User-Agent の指定
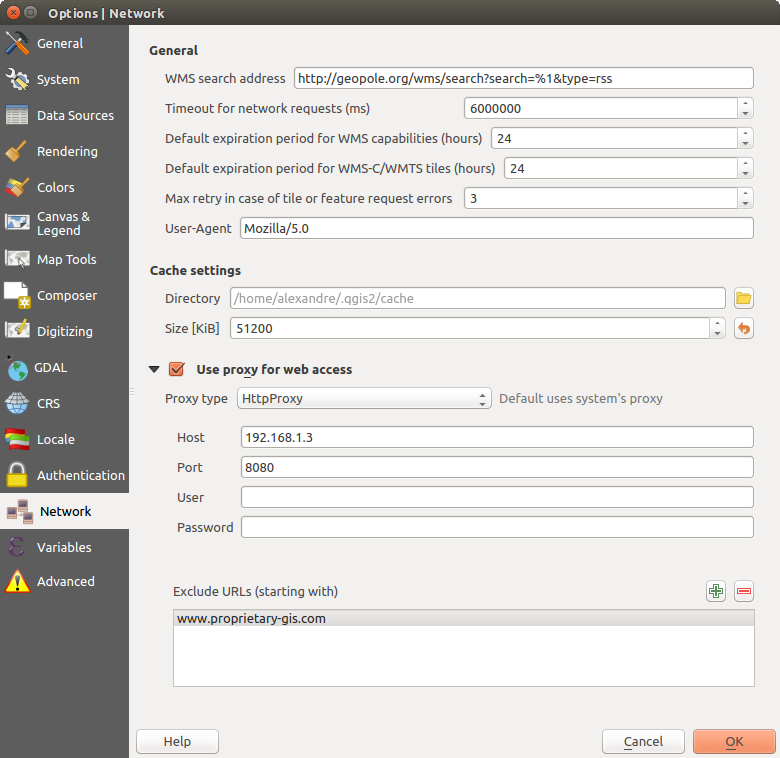
QGISでのプロキシ設定
キャッシュ設定
Define the Directory and a Size for the cache.
- Use proxy for web access and define ‘Host’, ‘Port’, ‘User’,
and ‘Password’.
- Set the Proxy type according to your needs.
- Default Proxy: Proxy is determined based on the application proxy set using
Socks5Proxy: あらゆる種類の接続に対応した一般的なプロキシ. TCP, UDP, ポートへのバインディング (入力コネクション) と認証をサポートします.
HttpProxy: “CONNECT” コマンドを実装しています, 外向きの TCP コネクションのみサポートしています; 認証をサポートしています.
HttpCachingProxy: 通常のHTTPコマンドを使って実装され、HTTPリクエストのコンテキストでのみ役に立ちます。
FtpCachingProxy:FTPプロキシを使用して実装、それだけでFTP要求のコンテキストで便利です。
プロキシ設定の下のテキストボックスに除外するいくつかのURLを追加できます( Figure_Network_Tab 参照).
If you need more detailed information about the different proxy settings, please refer to the manual of the underlying QT library documentation at http://doc.qt.io/qt-4.8/qnetworkproxy.html#ProxyType-enum
ちなみに
プロキシの利用
プロキシを使用すると、時にはトリッキーなことができます。それらが自分の場合に成功するかどうか確認するため、上記のプロキシタイプで「試行錯誤」しながら進むのが便利です。
変数設定
変数 タブには、グローバルレベルで利用可能なすべての変数がリストされています。
ここではグローバルレベルの変数の管理もできます。 ボタンをクリックして、新しいカスタムグローバルレベル変数を追加します。同様に、リストからカスタムグローバルレベル変数を選択し、 ボタンを押して削除します。
Variables セクションの変数の詳細。
高度な設定
OSに応じて、QGISに関連するすべての設定(UI、ツール、データプロバイダー、デフォルト値、プラグインオプション...)が保存されます:
 テキストファイル中で: $HOME/.config/QGIS/QGIS2.conf
 プロパティリストのファイル中: $HOME/Library/Preferences/org.qgis.qgis.plist
 HKEY\CURRENT_USER\Software\QGIS\qgis 下のレジストリで
詳細設定エディタ 高度な タブが1つの場所で提供しています、関係なく、OSを介して、これらの設定を管理することを意味します。注意することを約束した後、ウィジェットは直接編集でき、すべてのQGISの設定、の木で埋められます。
警告
[詳細設定]タブの設定を盲目的に使用しない
このダイアログボックス内の項目を変更しているときは、変更は自動的に適用されていることを考え、注意してください。知識なしにした変更はさまざまな方法でQGISのインストールを破ることがあります。
プロジェクトのプロパティ
In the properties window for the project under Project ‣
Project Properties (or  Settings ‣ Project Properties),
you can set project-specific options.
Settings ‣ Project Properties),
you can set project-specific options.
The project-specific options overwrite their equivalent in the options described above.
In the General tab, the general settings let you:
プロジェクトファイルパスの横にあるプロジェクトにタイトルを与えます
地物が選択されたときに使用する色を選択してください
地図キャンバスに使用する色:背景色を選択してください
プロジェクト内のレイヤーへのパスが絶対(フル)またはプロジェクトファイルの場所に対する相対などとして保存すべきかどうかを設定します。レイヤーとプロジェクトファイルの両方を移動または共有やプロジェクトは、異なるプラットフォーム上のコンピュータからアクセスされた場合に可能な相対パスを好むかもしれません。
プロジェクトは地図タイルとしてレンダリングされたときにアーチファクトを回避することを選択する。このオプションをチェックすると、パフォーマンスの低下につながる可能性があります。
Calculating areas and distances is a common need in GIS. However, these values are really tied to the underlying projection settings. The Measurements frame lets you control these parameters. You can indeed choose:
- the ellipsoid to use: it can be an existing one, a custom one (you’ll need to set values of the semi-major and semi-minor axis) or None/Planimetric.
長さと周長のための 距離計測の単位 と 面積計測の単位 。これらの設定は、デフォルトではQGISオプションで設定した単位、その後現在のプロジェクトのためにそれを上書きし、以下において使用されます:
属性テーブルのフィールド更新バー
フィールド計算機の計算
識別ツール由来の長さ、周囲および面積値
デフォルトの単位は、測定ダイアログに表示します
The Coordinate display allows you to choose and customize the format of units to use to display the mouse coordinate in the status bar and the derived coordinates shown via the identify tool.
Finally, you can define a project scale list, which overrides the global predefined scales.
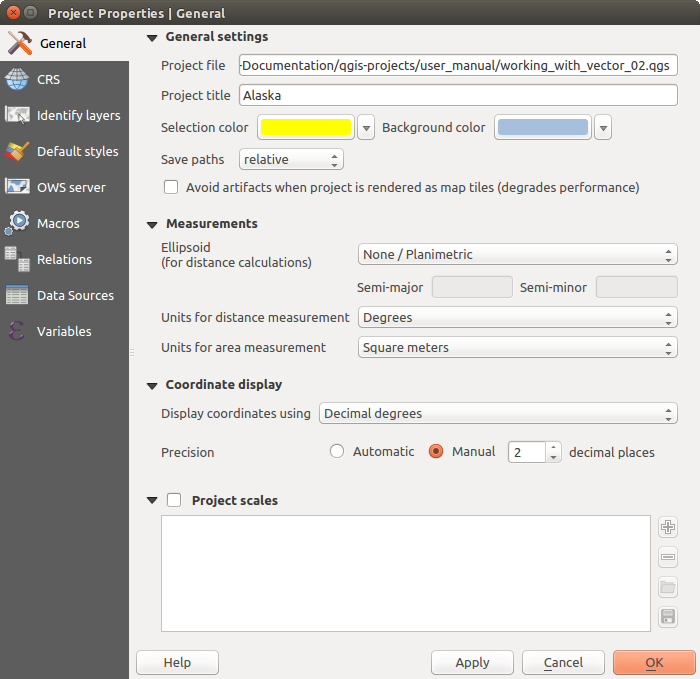
[プロジェクトのプロパティ]ダイアログの[全般]タブ
The CRS tab enables you to choose the Coordinate Reference System for this project, and to enable on-the-fly re-projection of raster and vector layers when displaying layers from a different CRS. For more information on projection’s handling in QGIS, please read 投影法の利用方法 section.
With the Identify layers tab, you set (or disable) which layers will respond to the identify tool. By default, layers are set queryable.
You can also set whether a layer should appear as read-only, meaning that it can not be edited by the user, regardless of the data provider’s capabilities. Although this is a weak protection, it remains a quick and handy configuration to avoid end-users modifying data when working with file-based layers.
The Default Styles tab lets you control how new layers will be drawn when they do not have an existing .qml style defined. You can also set the default transparency level for new layers and whether symbols should have random colors assigned to them. There is also an additional section where you can define specific colors for the running project. You can find the added colors in the drop down menu of the color dialog window present in each renderer.
The tab OWS Server allows you to configure your project in order to publish it online. Here you can define information about the QGIS Server WMS and WFS capabilities, extent and CRS restrictions. More information available in section Prepare a project to serve and subsequent.
マクロ タブはPythonマクロの編集のために使います. 現時点では: openProject(), saveProject() そして closeProject() の3つのマクロのみ使用可能です.
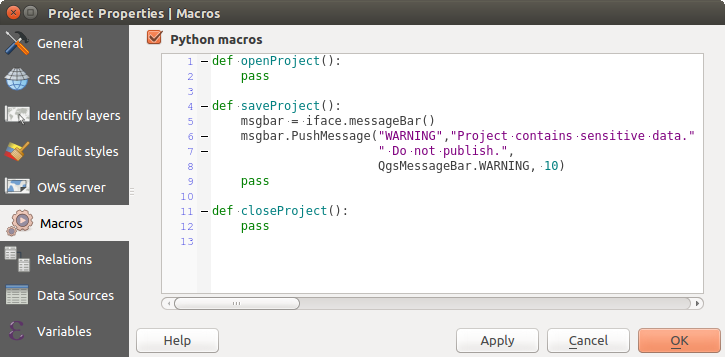
QGISでマクロの設定
関係 タブは1:nの関係を定義するために使用されます。関係は、プロジェクトのプロパティダイアログで定義されています。関係は、レイヤーに存在すると、フォームビュー(例えば、地物を識別し、そのフォームを開くとき)で、新しいユーザーインターフェイス要素は、関連するエンティティのリストが表示されます。これは、例えばパイプラインや道路区間の長さの検査履歴を表現するための強力な方法を提供します。1:n関係のサポートについての詳細はセクション 1対多または多対多の関係を作成する にあります。
データソース タブでは、できることは:
- Evaluate default values on provider side: When adding
new features in a PostGreSQL table, fields with default value constraint are
evaluated and populated at the form opening, and not at the commit moment.
This means that instead of an expression like nextval('serial'), the field
in the Add Feature form will display expected value (e.g., 25).
- Automatically create transaction groups where possible:
When this mode is turned on, all
(postgres) layers from the same database are synchronised in their edit state,
i.e. when one layer is put into edit state, all are, when one layer is committed
or one layer is rolled back, so are the others. Also, instead of buffering edit
changes locally, they are directly sent to a transaction in the database which
gets committed when the user clicks save layer.
Note that you can (de)activate this option only if no layer is being edited
in the project.
変数 タブには、プロジェクトのレベルで使用可能なすべての変数(すべてのグローバル変数を含む)がリストされます。また、プロジェクトレベルの変数を管理することもできます。
ボタンをクリックして、新しいカスタムプロジェクトレベル変数を追加します。同様に、リストからカスタムプロジェクトレベルの変数を選択し、 ボタンを押して削除します。変数の使用法の詳細は一般ツール Variables セクションで。
カスタマイズ
カスタマイズダイアログでは、QGISのユーザーインターフェイスのほぼすべての要素を有効(無効)にできます。彼らが必要とする唯一のアイコン、メニューやパネルを含む、QGISの「光」バージョンを使用して、エンドユーザーに提供したい場合、これは非常に便利です。
ノート
変更が適用される前に、QGISを再起動する必要があります。
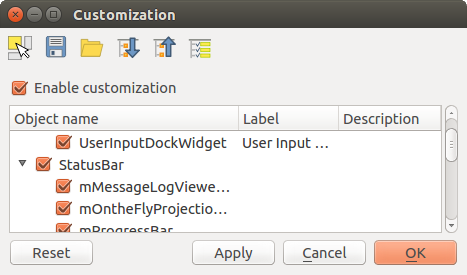
カスタマイズダイアログ
カスタマイズ チェックボックスを切り替えるのは、QGISのカスタマイズへの道の最初のステップです。これはツールバーやウィジェットパネルを有効にし、それらからチェックを外していくつかのGUIの項目を無効にできます。
設定可能な項目があることができます:
メニュー または メニューバー からのそのサブメニューのいくつか
全体 パネル ( パネルとツールバー 参照)
ステータスバー で説明される ステータスバー またはその項目の何か
ツールバー : バー全体またはそのアイコンの何か
または任意の ウィジェット QGISで任意のダイアログから:ラベル、ボタン、コンボボックス...
 メインアプリケーションでウィジェットを引くに切り替え では、隠したいQGISインターフェイスの中の項目をクリックして、QGISが自動的に[カスタマイズ]ダイアログ内の対応するエントリのチェックを外します。
Once you setup your configuration, click [Apply] or [Ok] to validate your changes. This configuration becomes the one used by default by QGIS at the next startup.
変更は  ファイルに保存 ボタン使用して .ini ファイルにも保存できます 。これは、複数のユーザー間で共通のQGISインターフェイスを共有するための便利な方法です。 .ini ファイルをインポートするためには、先のコンピュータから
  ファイルからロード をクリックするだけです。また同様に、 コマンドラインツール を実行してさまざまなユースケースのための各種設定を保存できます。
ちなみに
簡単に定義済みのQGISを復元
初期QGISのGUI構成は、以下のいずれかの方法で復元できます。
カスタマイズダイアログで
カスタマイズを有効にする オプションのチェックを外すか、  すべてチェック ボタンをクリック
- pressing the [Reset] button in the QSettings frame under Settings ‣ Options menu, System tab
次のコマンドラインを使用してコマンドプロンプトでQGISを起動します: qgis --nocustomization
false に 設定‣オプション メニュー、 高度な タブの下の UI ‣ カスタマイズ ‣有効化 変数の値を設定すると、( 警告 参照) 。
ほとんどの場合、変更が適用されるためにはQGISを再起動する必要があります。
キーボードショートカット
QGIS provides default keyboard shortcuts for many features. You can find them in section メニューバー. Additionally, the menu option Settings ‣ Configure Shortcuts... allows you to change the default keyboard shortcuts and add new keyboard shortcuts to QGIS features.
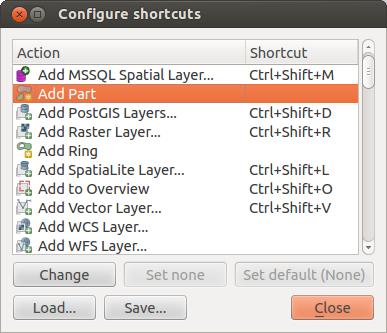
ショートカットオプションを定義
Configuration is very simple. Just select a feature from the list and click on :
- [Change] and press the new combination you want to assign as new shortcut
- [Set none] to clear any assigned shortcut
- or [Set default] to backup the shortcut to its original and default value.
Proceed as above for any other tools you wish to customize. Once you have finished your configuration, simply [Close] the dialog to have your changes applied. You can also [Save] the changes as an .XML file and [Load] them into another QGIS installation.