` `
Accedere ai dati
- Il Pannello Browser
- Il DB Manager
- Strumenti di caricamento per specifici provider di dati
- Formati QGIS personalizzati
- Connessione a web services
Facendo parte di un ecosistema Software Open Source QGIS è costruito su diverse librerie che, unitamente agli specifici provider, offrono la capacità di leggere e spesso scrivere molti formati:
- Vector data formats include ESRI formats (shapefiles, geodatabases...), MapInfo and MicroStation file formats, AutoCAD DWG/DXF, GeoPackage, GeoJSON, GRASS, GPX, KML, Comma Separated Values, and many more... Read the complete list of OGR vector supported formats;
- Raster data formats include ArcInfo Binary Grid, ArcInfo ASCII Grid, JPEG, GeoTIFF, ERDAS IMAGINE, MBTiles, R or Idrisi rasters, ASCII Gridded XYZ, GDAL Virtual, SRTM, Sentinel Data, and many more... Read the complete list of raster supported formats;
- Database formats include PostgreSQL/PostGIS, SQLite/SpatiaLite, Oracle, DB2 or MSSQL Spatial, MySQL...;
- Support of web data services (WM(T)S, WFS, WCS, CSW, ArcGIS Servers...) is also handled by QGIS providers (see QGIS come client di dati OGC);
Puoi anche leggere i files supportati dalle cartelle archiviate e utilizzare formati nativi di QGIS come i layer virtuali e i layer in memoria.
As of the date of this document, more than 80 vector and 140 raster formats are supported by the GDAL/OGR and QGIS native providers.
Nota
Non tutti i formati in elenco possono funzionare in QGIS per vari motivi. Ad esempio, alcuni richiedono librerie proprietarie esterne o il sistema operativo in uso potrebbe non essere tra quelli previsti per l’installazione del formato GDAL/OGR che tu desideri utilizzare. Per avere un elenco di formati disponibili, eseguire la linea di comando ogrinfo --formats (per i vettori) o vedere il menu Impostazioni ‣ Opzioni ‣ GDAL (per i raster) in QGIS.
Il Pannello Browser
QGIS Browser is one of the main panels of QGIS that lets you quickly and easily add your data to projects. It helps you navigate in your filesystem and manage geodata, regardless the type of layer (raster, vector, table), or the datasource format (plain or compressed files, database, web services).
To add a layer into a project:
- right-click on QGIS toolbar and check
 Browser Panel
to activate it or select it from the menu View ‣ Panels
(or
Browser Panel
to activate it or select it from the menu View ‣ Panels
(or  Settings ‣ Panels);
 - a browser tree with your filesystem, databases and web services is displayed;
- find the layer in the list;
- right-click on its name and select Add selected layer(s). Your layer is now added to the Layers Panel and can be viewed in the map canvas.
Nota
You can also add a layer or open a QGIS project directly from the Browser panel by double-clicking its name or by drag-and-drop into the map canvas.
Una volta caricato un file, puoi ingrandirlo utilizzando gli strumenti di navigazione della mappa. Per modificare lo stile di un layer, apri la finestra di dialogo Proprietà Layer facendo doppio clic sul nome del layer o facendo clic con il pulsante destro del mouse sul nome nella legenda e scegliendo Proprietà nel menu contestuale. Vedi la sezione Style Properties per ulteriori informazioni sull’impostazione di simbologia dei layer vettoriali.
Nella parte superiore del Browser panel trovi alcune icone che ti aiutano a:
 Aggiungi layer selezionati: puoi aggiungere dati nella mappa anche selezionando Aggiungi layer selezionato dal menu contestuale del layer;
 Aggiorna la visualizzazione ad albero;
 Browser filtro per cercare dati specifici. Immetti una parola di ricerca o un carattere jolly e il browser visualizzerà l’albero per visualizzare solo i percorsi corrispondenti a tabelle DB, file o cartelle DB - altri dati o cartelle non verranno visualizzate. Vedi l’esempio del Pannello di Browser (2) sulla figura figure_browser_panels. La ricerca può essere sensibile alla distinzione tra maiuscole e minuscole o meno. Può anche essere impostata su:
normale: restituisce qualsiasi elemento contenente il testo cercato;
utilizzando il/i carattere(i) jolly: confermare la ricerca utilizzando ? e/o * per specificare la posizione del testo cercato;
usando una espressione regolare.
 Racchiudi tutto collassa la struttura ad albero;
 Enable/disable properties widget: when toggled on,
a new widget is added at the bottom of the panel showing, if applicable,
metadatas of the selected item.
Enable/disable properties widget: when toggled on,
a new widget is added at the bottom of the panel showing, if applicable,
metadatas of the selected item.
Click destro su un elemento nell’albero del browser ti aiuta a:
in caso di un file o di una tabella, visualizzarne i metadati o aprirli nel tuo progetto. Le tabelle possono anche essere rinominate, cancellate o troncate;
in caso di cartella, definirla come segnalibro nei preferiti, nasconderla dall’albero del browser. Le cartelle nascoste possono essere gestite dalla scheda Impostazioni ‣ Opzioni ‣ Origine dati;
creare collegamento a database o server web;
aggiornare, rinominare o eliminare la scelta.
Puoi anche importare i files nei database o copiare le tabelle da uno schema/database a un altro con un semplice trascinamento drag-and-drop. C’è un secondo pannello del browser disponibile per evitare lunghi scorrimenti durante il trascinamento. Basta selezionare il file e fare drag-and-drop da un pannello all’altro.
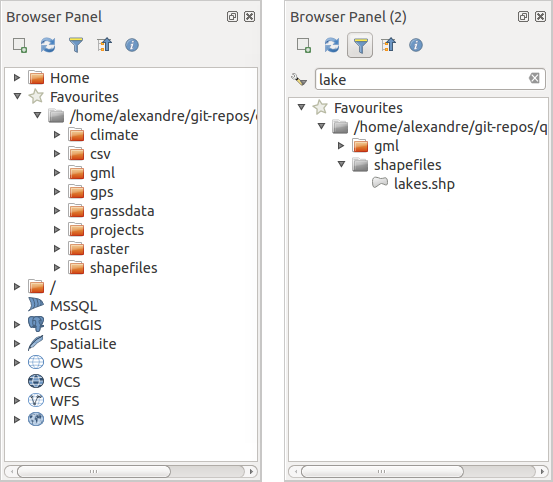
Pannelli QGIS Browser affiancati
Suggerimento
Aggiungi layers a QGIS con un semplice drag-and-drop dal visualizzatore file del tuo sistema operativo
Puoi anche aggiungere i file al progetto trascinandoli dal proprio visualizzatore di file del sistema operativo in uso al Panello Layer o all’area di visualizzazione mappa.
Il DB Manager
Il Plugin DB Manager è un altro degli strumenti principali e nativi per integrare e gestire i formati di database spaziali supportati da QGIS (PostGIS, SpatiaLite, GeoPackage, Oracle Spatial, MSSQL, DB2, Virtual layers) in un’interfaccia utente. Può essere attivato dal menu Plugins ‣ Gestisci ed installa Plugins....
Il Plugin  DB Manager offre diverse funzionalità:
collegarsi a database e visualizzare la struttura e il contenuto;
anteprima di tabelle di database;
aggiungere layers alla visualizzazione mappa, sia con un doppio clic che con trascina e rilascia;
aggiungere layers a un database da QGIS Browser o da un altro database;
creare e aggiungere l’output delle query SQL alla visualizzazione mappa;
creare virtual layers.
Ulteriori informazioni sulle funzionalità di DB Manager sono esposte in Plugin DB Manager.
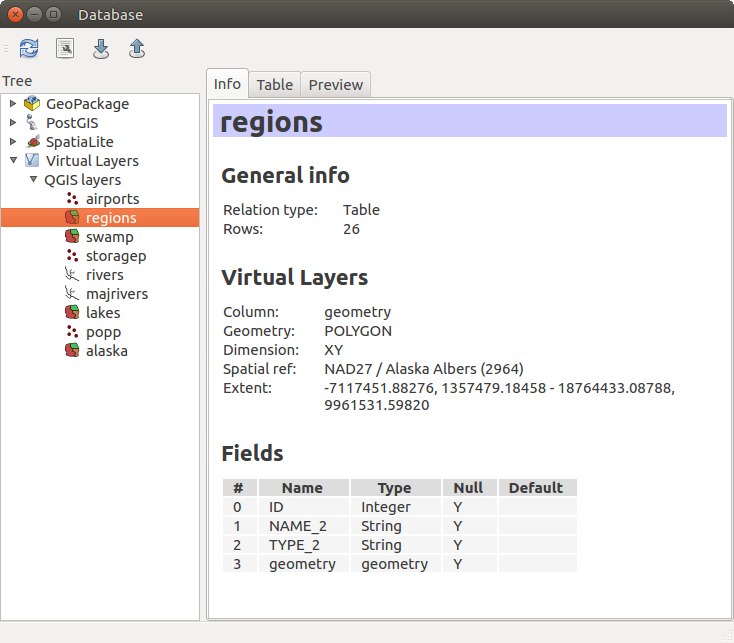
Finestra di dialogo DB Manager
Strumenti di caricamento per specifici provider di dati
Oltre a Pannello Browser e DB Manager che sono gli strumenti di base forniti da QGIS per aggiungere layers a prescindere dal formato, puoi anche trovate strumenti che sono specifici ai fornitore di dati.
Nota
Alcuni external plugins propongono anche strumenti per aprire file di formato specifico in QGIS..
Caricare un layer da un file
Per caricare un layer da un file, puoi:
for vector data (like Shapefile, Mapinfo or dxf layer), click on
 Add Vector Layer toolbar button, select the
Layer ‣ Add Layer ‣ Add Vector
Layer menu option or press Ctrl+Shift+V.
This will bring up a new window (see figure_vector_add) from which you can
check
Add Vector Layer toolbar button, select the
Layer ‣ Add Layer ‣ Add Vector
Layer menu option or press Ctrl+Shift+V.
This will bring up a new window (see figure_vector_add) from which you can
check  File and click on [Browse]. You can
also specify the encoding for the file if desired.
File and click on [Browse]. You can
also specify the encoding for the file if desired.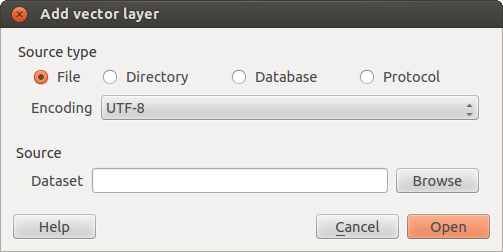
Finestra di dialogo aggiungi vettore
per i layer raster, clicca sull’icona
 Aggiungi raster, selezione l’opzione del menu Layer ‣ Aggiungi layer ‣ o digita Ctrl+Shift+R.
Verrà visualizzata una finestra di dialogo standard per i file aperti (vedi figure_vector_open), che ti consente di navigare nel file system e caricare uno shapefile, un geotiff o un’altra fonte dati supportata. La casella di selezione Filtro  ti consente di preselezionare alcuni formati di file supportati. Solo i formati che sono stati ben testati appaiono nella lista. Altri formati non testati possono essere caricati selezionando Tutti i file (*. *) .
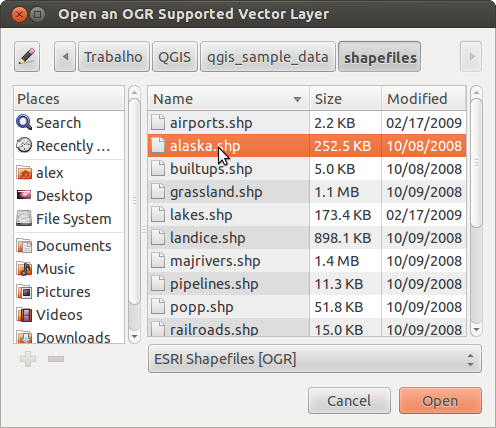
Aprire una finestra di dialogo di un layer vettoriale supportato OGR
Selecting a file from the list and clicking [Open] loads it into QGIS. More than one layer can be loaded at the same time by holding down the Ctrl or Shift key and clicking on multiple items in the dialog. Figure_vector_loaded shows QGIS after loading the alaska.shp file.
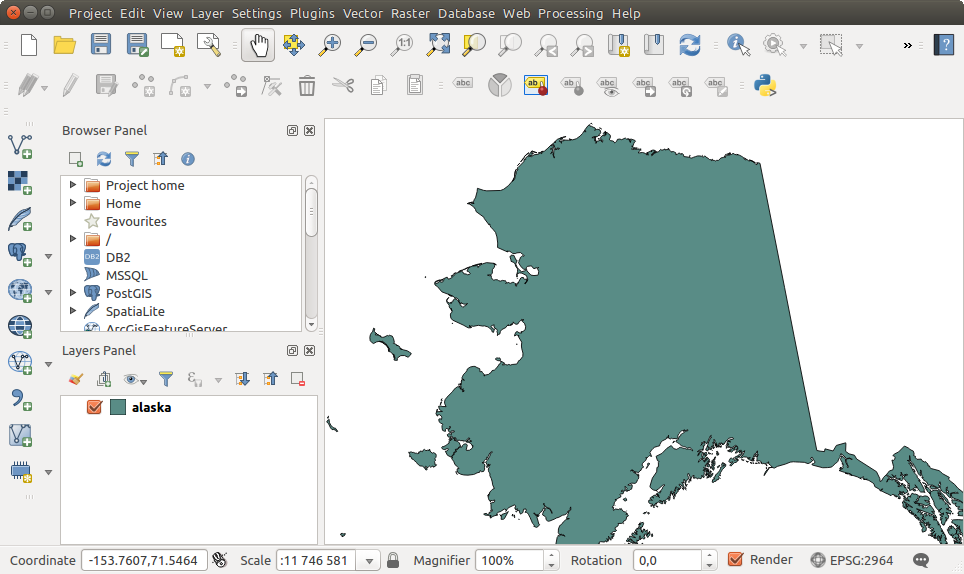
QGIS con il caricamento dello Shapefile Alaska
Nota
Poiché alcuni formati come MapInfo (ad esempio .tab) o Autocad (.dxf) consentono di mescolare diversi tipi di geometrie in un singolo file, il caricamento di tale formato in QGIS apre una finestra di dialogo per selezionare le geometrie da utilizzare in modo da ricavare un layer a singola tipologia geometrica.
Using the Add Vector Layer tool:
You can also load specific formats like ArcInfo Binary Coverage, UK. National Transfer Format, as well as the raw TIGER format of the US Census Bureau or OpenfileGDB. To do that, you’d need to select
Directory as Source type. In this case
a directory can be selected in the dialog after pressing [Browse].With the
Database source type you can select an
existing database connection or create one to the selected database type.
Available database types are ODBC, OGDI Vectors, Esri Personal
Geodatabase, MySQL as well as PostgreSQL or MSSQL.Pressing the [New] button opens the Create a New OGR Database Connection dialog whose parameters are among the ones you can find in Creazione della connessione. Pressing [Open] you can select from the available tables for example of the PostGIS enabled database.
The last source type,
Protocol, enables to open
data from the web using for example GeoJSON or CouchDB format. After
selecting the type you have to fill URI of the source.
Suggerimento
Caricare layers e progetti da unità esterne montate su macOS
On macOS, portable drives that are mounted beside the primary hard drive do not show up as expected under File ‣ Open Project. We are working on a more macOS-native open/save dialog to fix this. As a workaround, you can type /Volumes in the File name box and press Enter. Then you can navigate to external drives and network mounts.
Importare file di testo delimitato
Delimited text file (e.g. .csv, .txt) can be loaded in QGIS
using the tools described above. However, loaded this way, it’ll show up like a
simple table data. Sometimes, delimited text files can contain geometric data
you’d want to visualize; this is what the  Add
Delimited Text Layer is designed for.
Add
Delimited Text Layer is designed for.
Click the toolbar icon Add Delimited Text Layer in the
Manage layers toolbar to open the Create a Layer from a
Delimited Text File dialog, as shown in figure_delimited_text.

Finestra di dialogo Testo Delimitato
First, select the file to import (e.g., qgis_sample_data/csv/elevp.csv) by clicking on the [Browse] button. Once the file is selected, QGIS attempts to parse the file with the most recently used delimiter. To enable QGIS to properly parse the file, it is important to select the correct delimiter. You can specify a delimiter by activating:
- CSV (comma separated values);
 Delimitatori personalizzati, scegliendo tra alcuni delimitatori predefiniti come comma, spazio, TAB`, punto e virgola...;
o
Delimitatore espressione regolare e inserendo un testo nel campo Espressione. Per esempio se vuoi usare TAB come delimitatore usa \t (questa è l’espressione regolare usata per TAB).
Once the file is parsed, set Geometry definition to
Point coordinates and choose the X and Y
fields from the dropdown lists. If the coordinates are defined as
degrees/minutes/seconds, activate the DMS coordinates
checkbox.
Finally, enter a layer name (e.g., elevp), as shown in figure_delimited_text. To add the layer to the map, click [OK]. The delimited text file now behaves as any other map layer in QGIS.
There is also a helper option that allows you to trim leading and trailing
spaces from fields — Trim fields. Also, it is possible
to Discard empty fields. If necessary, you can force a
comma to be the decimal separator by activating Decimal
separator is comma.
If spatial information is represented by WKT, activate the
Well Known Text option and select the field with the WKT definition
for point, line or polygon objects. If the file contains non-spatial data,
activate No geometry (attribute only table) and it
will be loaded as an ordinal table.
Puoi anche attivare:
- Use spatial index to improve the performance of
displaying and spatially selecting features;
- Use subset index;
- Watch file to watch for changes to the file by other
applications while QGIS is running.
Importare file DXF o DWG
DXF and DWG files can be added to QGIS by simple drag-and-drop from the common Browser Panel. You’ll be prompted to select the sublayers you’d like to add to the project. Layers are added with random style properties.
Nota
Per i file DXF contenenti diversi tipi di geometria (punto, linea e/o poligono) il nome del layer verrà ricavato da <filename.dxf> entities <geometry type>.
To keep the dxf/dwg structure and its symbology in QGIS, you may want to use the dedicated Project ‣ DWG/DXF Import... tool. Indeed, the DWG/DXF Import dialog allows you to import into GeoPackage database any element of the drawing file.
In the dialog, you have to:
- Input a location for a GeoPackage file, that will be created to store the DWG/DXF content to;
- Specify which coordinate system the data in the DWG data is in;
- Then use the [Import] button to select the DWG/DXF file to use (one per geopackage). The GeoPackage database will be automatically populated with the drawing file content. Depending on the size of the *CAD file, this could take some time;
- The Expand block references will transform the existing
blocks into normal elements;
- the Use curves promotes the output layers geometry type
to a curved one.
After the .dwg or .dxf data is imported into the GeoPackage database the frame in the lower half of the dialog is populated with the list of layers from the imported file. There you can select which layers to add to the QGIS project:
- At the top, set a Group name to group the drawing files in the project;
- Check layers to show: Each selected layer is added to an ad hoc group which contains vector layers for the point, line, label and area features of the drawing layer. The style of each layer is setup so that it resembles the look it originally had in *CAD;
- Check whether layer should be visible at opening;
- Alternatively using the Merge layers option places all
layers in a single group;
- Press [OK] to open the layers in QGIS.
Importare vettori OpenStreetMap
Negli ultimi anni il progetto OpenStreetMap ha guadagnato popolarità perché in molti Paesi non sono disponibili dati geodati gratuiti quali mappe stradali digitali. L’obiettivo del progetto OSM è quello di creare una mappa liberamente modificabile del mondo da dati GPS, fotografia aerea o conoscenze locali. Per supportare questo obiettivo, QGIS fornisce il supporto per i dati OSM.
Utilizzando il Browser Panel, puoi caricare un file .osm sulla mappa, nel qual caso ti verrà visualizzata una finestra di dialogo per selezionare i sublayers in base al tipo di geometria. I layers caricati conterrano tutti i dati di quella tipologia di geometria presenti nel file e manterranno la struttura dati del file osm.
To avoid working with a such complex data structure, and be able to select only features you need based on their tags, QGIS provides a core and fully integrated OpenStreetMap import tool:
- To connect to the OSM server and download data, open the menu Vector ‣ OpenStreetMap ‣ Download data.... You can skip this step if you already obtained an .osm XML file using JOSM, Overpass API or any other source;
- The menu Vector ‣ OpenStreetMap ‣ Import Topology from XML... will convert your .osm file into a SpatiaLite database and create a corresponding database connection;
- The menu Vector ‣ OpenStreetMap ‣ Export Topology to
SpatiaLite... then allows you to open the database connection, select the
type of data you want (points, lines, or polygons) and choose tags to import.
This creates a SpatiaLite geometry layer that you can add to your
project by clicking on the
 Add SpatiaLite Layer toolbar button or by selecting the
Add SpatiaLite Layer... option
from the Layer menu (see section SpatiaLite Layers).
Add SpatiaLite Layer toolbar button or by selecting the
Add SpatiaLite Layer... option
from the Layer menu (see section SpatiaLite Layers).
GPS
Il caricamento dei dati GPS in QGIS può essere effettuato utilizzando il plugin di base: Strumenti GPS. Le istruzioni sono descritte nel paragrafo Plugin GPS.
GRASS
Lavorare con i dati vettoriali GRASS è descritto nel capitolo Integrazione con GRASS GIS.
SpatiaLite Layers
La prima volta che carichi i dati da un database di SpatiaLite, inizia da:
facendo clic sul pulsante
Aggiungi vettore SpatiaLite della barra degli strumenti;selezionando l’opzione
Aggiungi vettore SpatiaLite... dal menu Layer ‣ Aggiungi Layer;o digitando Ctrl+Shift+L.
This will bring up a window that will allow you either to connect to a SpatiaLite database already known to QGIS, which you can choose from the drop-down menu, or to define a new connection to a new database. To define a new connection, click on [New] and use the file browser to point to your SpatiaLite database, which is a file with a .sqlite extension.
QGIS supporta anche viste modificabili in SpatiaLite.
Strumenti riferiti ai Database
Creazione della connessione
In order to read and write tables from the many database formats QGIS supports you’ll need to create a connection to that database. While QGIS Browser Panel is the simplest and recommanded way to connect and use databases within, QGIS provides specific tools you can use to connect to each of them and load their tables:
 Add PostGIS Layer... or by typing
Ctrl+Shift+D
Add PostGIS Layer... or by typing
Ctrl+Shift+D Add MSSQL Spatial Layer or by typing
Ctrl+Shift+M
Add MSSQL Spatial Layer or by typing
Ctrl+Shift+M Add Oracle Spatial Layer... or typing
Ctrl+Shift+O
Add Oracle Spatial Layer... or typing
Ctrl+Shift+O Add DB2 Spatial Layer... or typing
Ctrl+Shift+2
Add DB2 Spatial Layer... or typing
Ctrl+Shift+2
Questi strumenti sono accessibili dalla Barra degli strumenti Gestisci la barra dei layer o dal menu Layer ‣ Aggiungi Layer ‣ menu. La connessione al database SpatiaLite è descritta in SpatiaLite Layers.
Suggerimento
Creare una connessione al database dal pannello Browser QGIS
Seleziona il formato di database corrispondente nell’albero Browser, fai clic con il pulsante destro del mouse e scegliendo connetti ti fornirà la finestra di dialogo per la connessione al database.
Most of the connection dialogs follow a common basis that will be described below using the PostGreSQL database tool as example.
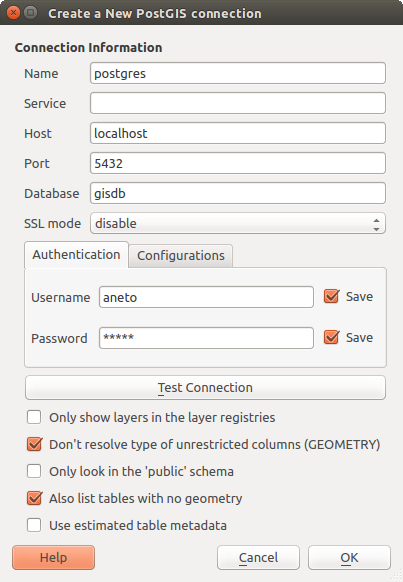
The first time you use a PostGIS data source, you must create a connection to a database that contains the data. Begin by clicking the appropriate button as exposed above, opening an Add PostGIS Table(s) dialog (see figure_add_postgis_tables). To access the connection manager, click on the [New] button to display the Create a New PostGIS Connection dialog.
Crea una nuova finestra di dialogo PostGIS
I parametri richiesti per la connessione di PostGIS sono elencati di seguito. Per gli altri tipi di database, vedere le loro differenze ai requisiti di connessione in Requisiti specifici per le connessioni.
Nome: Nome della connessione. Può essere uguale a quello del Database.
Servizio: Parametri del servizio da usare alternativamente a host/porta (e potenzialmente database). Lo puoi definire in pg_service.conf. Vedi la sezione File per la connessione a Servizio PostgreSQL per maggiori dettagli.
Host: Nome del server che ospita il database. Deve essere un host con indirizzo raggiungibile, lo stesso che potrebbe essere usato per aprire una connessione telnet o per fare il ping all’host. Se il database è sullo stesso computer sul quale è installato QGIS, inserisci semplicemente localhost.
Porta: Numero della porta del server database PostgreSQL. La porta di default per PostGIS è 5432.
Database: Nome del database.
Modalità SSL: Come la connessione SSL verrà negoziata con il server. Puoi velocizzare la visualizzazione dei vettori PostGIS disabilitando la connessione SSL. Sono disponibili le seguenti opzioni:
Disabilitato: Prova solo una connessione SSL non criptata.
Permesso: Tenta una connessione non-SSL, se questa fallisce ne tenta una SSL;
Preferito (predefinito): Tenta una connessione SSL, se questa fallisce ne prova una non-SSL;
Richiesto: Tenta solo una connessione SSL.
Nome utente: Nome dell’utente usato per accedere al database.
Password: Password usata dal Nome utente per collegarsi al database.
You can save any or both of the username and password parameters, in which case they will be used by default each time you need to connect to this database. If not saved, you’ll be prompted to fill the missing credentials to connect to the database in next QGIS sessions; meanwhile the connection parameters you entered are stored in a temporary internal cache and returned whenever a username/password for the same database is requested, until you close the current QGIS process.
Avvertimento
QGIS impostazioni utente e sicurezza
Nella scheda Authentication il salvataggio del filenome utente e della password manterrà le credenziali non protette nella configurazione di connessione. Queste credenziali saranno visibili se, ad esempio, hai condiviso il progetto con qualcuno. Pertanto, è consigliabile salvare le credenziali in una Configurazione di autenticazione (scheda Configurations, - vedi Authentication System per maggiori dettagli) o in una connessione di servizio (vedi File per la connessione a Servizio PostgreSQL per un esempio).
In alternativa, a seconda del tipo di database, è possibile attivare le seguenti caselle di controllo:
- Cerca solo nei registri del layer
- Non risolvere tipo di geometria senza restrizioni (GEOMETRY)
- Cerca solo nello schema ‘public’
- Mostra anche le tabelle senza geometria
- Usa i metadati stimati della tabella
Suggerimento
Utilizza metadati di tabella stimati per velocizzare le operazioni
Durante l’inizializzazione dei layer, potrebbero essere necessarie varie query per stabilire le caratteristiche delle geometrie memorizzate nella tabella del database. Quando l’opzione Usa i metadati stimati della tabella è selezionata, queste query esaminano solo un esempio delle righe e utilizzano le statistiche della tabella anziché l’intera tabella. Ciò può accelerare in modo drastico le operazioni su grandi set di dati, ma può causare una caratterizzazione non corretta dei layers (ad esempio, il conteggio delle funzioni dei layer risolti non verrà determinato in modo preciso) e può anche causare un comportamento strano nel caso in cui le colonne che si supponga siano uniche in realtà non lo sono.
Once all parameters and options are set, you can test the connection by clicking on the [Test connection] button or apply it hitting [OK]. From the Add PostGIS Table(s), click now on [Connect] and the dialog is filled with tables from the selected database (as shown in figure_add_postgis_tables).
Requisiti specifici per le connessioni
In funzione delle particolarità del tipo di database, le opzioni fornite sono tutte uguali per tutti i database. Di seguito sono esposte queste specificità di connessione.
File per la connessione a Servizio PostgreSQL
Il file di connessione del servizio consente di associare parametri di connessione PostgreSQL a un singolo nome di servizio. Quel nome di servizio può essere specificato da un client e verranno utilizzate le impostazioni associate.
Si chiama .pg_service.conf nei sistemi *nix systems (GNU/Linux, macOS etc.) e pg_service.conf in Windows.
Il file di servizio è del tipo:
[water_service]
host=192.168.0.45
port=5433
dbname=gisdb
user=paul
password=paulspass

[wastewater_service]
host=dbserver.com
dbname=water
user=waterpass
Nota
Nell’esempio precedente ci sono due servizi: water_service e wastewater_service. Puoi utilizzarli per connetterti da QGIS, pgAdmin etc. specificando solo il nome del servizio a cui desideri connetterti (senza le parentesi di chiusura). Se vuoi utilizzare il servizio con psql devi fare qualcosa come export PGSERVICE=water_service prima di eseguire i comandi psql.
Nota
Puoi trovare tutti i parametri qui
Nota
Se non desideri salvare le password nel file di servizio puoi utilizzare l’opzione .pg_pass .
Nei sistemi operativi *nix (GNU/Linux, macOS etc.) puoi salvare il file .pg_service.conf nella directory home dell’utente e i clients PostgreSQL ne saranno automaticamente a conoscenza. Ad esempio, se l’utente registrato è web, .pg_service.conf dovrebbe essere salvato nella directory /home/web/ per funzionare direttamente (senza specificare nessun altro ambiente variabili).
Puoi specificare la posizione del file di servizio creando una variabile di ambiente PGSERVICEFILE (e.g. eseguire il comando export PGSERVICEFILE=/home/web/.pg_service.conf nel proprio OS *nix OS per impostare temporaneamente la variabile PGSERVICEFILE)
Puoi anche rendere disponibile il file di servizio a livello di sistema (tutti gli utenti) o posizionando il .pg_service.conf in pg_config --sysconfdir o aggiungendo la variabile di ambiente PGSYSCONFDIR per specificare la directory contenente il file di servizio. Se esistono definizioni di servizio con lo stesso nome nel file utente e nel file di sistema, il file utente ha la precedenza.
Avvertimento
Ci sono alcune particolarità per Windows:
Il service file deve essere salvato come pg_service.conf e non come .pg_service.conf.
Il service file deve essere salvato nel formato Unix. Un modo per fare ciò è di aprire il file con Notepad++ ed eseguire Edit ‣ EOL Conversion ‣ UNIX Format ‣ File save.
Puoi aggiungere le variabili di ambiente in vario modo, un modo testato è Control Panel ‣ System and Security ‣ System ‣ Advanced system settings ‣ Environment Variables aggiungendo PGSERVICEFILE e un percorso del tipo C:\Users\John\pg_service.conf
Dopo l’aggiunta di una variabile di ambiente è necessario riavviare il computer.
Connessione a Oracle Spatial
Le caratteristiche spaziali di Oracle Spatial aiutano gli utenti a gestire i dati geografici e di localizzazione in un tipo nativo all’interno di un database Oracle. Oltre ad alcune delle opzioni in Creazione della connessione, la finestra di dialogo di connessione propone:
Database: SID o SERVICE_NAME dell’istanza Oracle;
Porta: Numero di porta su cui il database Oracle rimane in ascolto. La porta predefinita è 1521;
Workspace: La Workspace alla quale collegarsi.
Opzionalmente puoi attivare le seguenti scelte:
- Only look in metadata table: restricts the displayed
tables to those that are in the all_sdo_geom_metadata view. This can
speed up the initial display of spatial tables;
- Only look for user’s tables: when searching for spatial
tables, restrict the search to tables that are owned by the user;
- Also list tables with no geometry: indicates that
tables without geometry should also be listed by default;
- Use estimated table statistics for the layer metadata:
when the layer is set up, various metadata are required for the Oracle table.
This includes information such as the table row count, geometry type and
spatial extents of the data in the geometry column. If the table contains a
large number of rows, determining this metadata can be time-consuming. By
activating this option, the following fast table metadata operations are
done: Row count is determined from all_tables.num_rows. Table extents
are always determined with the SDO_TUNE.EXTENTS_OF function, even if a layer
filter is applied. Table geometry is determined from the first 100
non-null geometry rows in the table;
- Only existing geometry types: only list the existing
geometry types and don’t offer to add others;
- Includere attributi aggiuntivi alla geometrie.
Suggerimento
Vettori Oracle Spatial
Normalmente un vettore Oracle Spatial è definito con una voce nella tabella USER_SDO_METADATA.
Connessione a DB2 Spatial
Oltre a alcune delle opzioni descritte in Creazione della connessione, è possibile specificare la connessione a un database DB2 (vedi Layers DB2 Spatial per maggiori informazioni) utilizzando o un nome di Servizio/DSN definito in ODBC o i parametri driver, host e porta.
Una connessione ODBC Service/DSN richiede il nome del servizio definito per ODBC.
Una connessione driver/host/porta richiede:
Driver: Nome del driver DB2. In genere questo dovrebbe essere IBM DB2 ODBC DRIVER.
Host DB2: Nome del database nell’host. Questo deve essere un nome host risolvibile come quello utilizzato per aprire una connessione TCP/ IP o per il ping all’host. Se il database è sullo stesso computer di QGIS, digitare localhost.
Porta DB2: Numero di porta in cui il server di database DB2 ascolta. La porta DBW LUW predefinita è 50000. La porta DB2 z/OS predefinita è 446.
Suggerimento
DB2 Spatial Layers
Un DB2 Spatial layer è definito da una riga nella vista DB2GSE.ST_GEOMETRY_COLUMNS.
Nota
Per poter lavorare in modo efficace con le tabelle spaziali DB2 in QGIS, è importante che le tabelle presentino una colonna INTEGER o BIGINT definita come PRIMARY KEY e se nuove funzioni saranno aggiunte, questa colonna dovrebbe avere anche la caratteristica GENERATED.
È inoltre utile che la colonna spaziale venga registrata con un identificativo spaziale specifico (spesso 4326 per le coordinate WGS84). Una colonna spaziale può essere registrata chiamando la procedura di memorizzazione ST_Register_Spatial_Column.
Connessione a MSSQL Spatial
Oltre ad alcune delle opzioni in Creazione della connessione, la creazione di una nuova finestra di connessione MSSQL ti propone di inserire un nome a Provider/DSN. Puoi anche visualizzare i database disponibili.
Caricare layer da Database
Una volta che disponi di una o più connessioni definite in un database (vedi la sezione Creazione della connessione), puoi caricare dei layer da esso. Naturalmente, questo richiede la disponibilità di dati. Vedi ad esempio la sezione Importare dati in PostgreSQL per una discussione sull’importazione di dati in un database PostGIS.
Per caricare un layer da un database, puoi eseguire le seguenti operazioni:
- Open the “Add <database> table(s)” dialog (see Creazione della connessione),
- Choose the connection from the drop-down list and click [Connect].
Selezionare o deselezionare
Mostra anche le tabelle senza geometria.- Optionally, use some Search Options to reduce the
list of tables to those matching your search. You can also set this option
before you hit the [Connect] button, speeding this way the database
fetching.
Individuare il(i) layer(s) che vuoi aggiungere nell’elenco dei layers disponibili.
Selezionalo facendo clic su di esso. Puoi selezionare più layers tenendo premuto il tasto Shift mentre fai clic.
- If applicable, use the [Set Filter] button (or double-click the layer) to start the Query builder dialog (See section Costruttore di interrogazioni) and define which features to load from the selected layer. The filter expression appears in the sql column. This restriction can be removed or edited in the Layer Properties ‣ General ‣ Provider Feature Filter frame.
- The checkbox in the Select at id column that is activated by default gets the features ids without the attributes and speed in most cases the data loading.
- Click on the [Add] button to add the layer to the map.
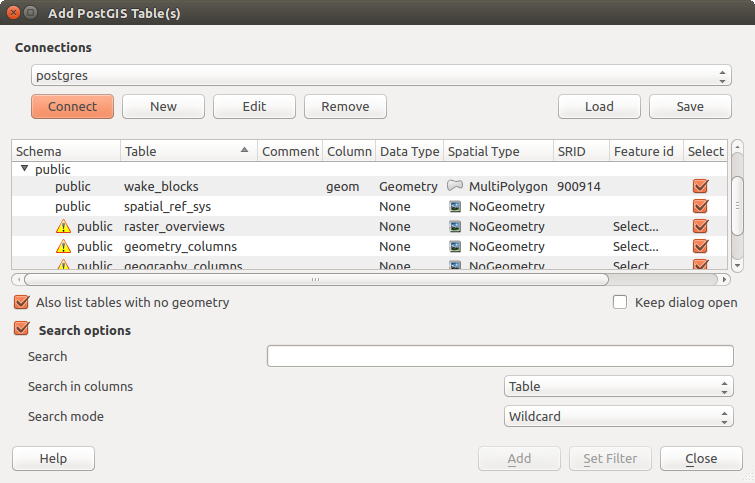
Finestra di dialogo Aggiungi tabella(e) PostGIS
Suggerimento
Load database table(s) from the Browser Panel
Like simple files, connected database are also listed in the Browser Panel. Hence, you can load tables from databases using the Browser:
- Find the layer to use with the Filter Browser tool at
the top the browser panel (see Il Pannello Browser for the search options);
- select and drag-and-drop it in the map canvas.
Formati QGIS personalizzati
QGIS dispone di due formati personalizzati che puoi caricare nell’applicazione utilizzando l’appropriato strumento di caricamento:
Layer temporaneo: un layer in memoria associato al progetto con il quale viene aperto (vedi Creazione di un nuovo Layer temporaneo per ulteriori informazioni)
Layers virtuali: un layer risultante da una query su altro(i) layer(s) (per ulteriori informazioni, vedi Layers virtuali)
Connessione a web services
Con QGIS puoi accedere a diversi tipi di servizi web OGC (WM(T)S, WFS(-T), CSW ...). Grazie a QGIS Server, puoi anche pubblicare questi servizi. La descrizione di queste funzionalità e le istruzioni per l’uso sono fornite nel capitolo Lavorare con i dati OGC.