I dati raster sono matrici di celle discrete che rappresentano oggetti della superficie terrestre o dell’ambiente al di sopra o al di sotto di essa. Ogni cella nella matrice ha la stessa dimensione e le celle sono solitamente rettangolari (in QGIS sono sempre rettangolari). Esempi tipici di dati raster sono quelli provenienti dal telerilevamento come le fotografie aeree, le immagini da satellite e i dati modellati come le matrici dell’elevazione.
Unlike vector data, raster data typically do not have an associated database
record for each cell. They are geocoded by pixel resolution and the x/y
coordinate of a corner pixel of the raster layer. This allows QGIS to position
the data correctly in the map canvas.
QGIS per posizionare e visualizzare correttamente i dati utilizza le informazioni di georeferenziazione incorporate direttamente nel file raster (ad es. GeoTiff) o quelle contenute in un apposito world file.
Many of the features available in QGIS work the same, regardless the vector
data source. However, because of the differences in formats specifications
(ESRI shapefiles, MapInfo and MicroStation file formats, AutoCAD DXF, PostGIS,
SpatiaLite, DB2, Oracle Spatial and MSSQL Spatial databases, and many more),
QGIS may handle differently some of their properties.
This section describes how to work with these specificities.
Nota
QGIS supporta geometrie con formati (multi)point, (multi)line, (multi)polygon, CircularString, CompoundCurve, CurvePolygon, MultiCurve, tutti con valori Z e/o M.
Devi tener presente che alcuni driver non supportano alcuni di questi formati come CircularString, Compound-Curve, CurvePolygon, MultiCurve, MultiSurface. QGIS li convertirà in geometrie multi-poligono.
The ESRI shapefile is still one of the most used vector file format in QGIS.
However, this file format has some limitation that some other file format have
not (like Geopackage, spatialite). Support is provided by the
OGR Simple Feature Library.
A shapefile actually consists of several files. The following three are
required:
.shp file contenente le geometrie
.dbf file contenente gli attributi in formato dBase
.shx file indici
Shapefiles also can include a file with a .prj suffix, which contains
the projection information. While it is very useful to have a projection file,
it is not mandatory. A shapefile dataset can contain additional files. For
further details, see the ESRI technical specification at
http://www.esri.com/library/whitepapers/pdfs/shapefile.pdf.
Improving Performance for Shapefiles
To improve the performance of drawing a shapefile, you can create a spatial
index. A spatial index will improve the speed of both zooming and panning.
Spatial indexes used by QGIS have a .qix extension.
Segui questi passi per creare un indice spaziale:
- Load a shapefile (see Il Pannello Browser);
- Open the Layer Properties dialog by double-clicking on the
shapefile name in the legend or by right-clicking and choosing
from the context menu.
- In the General tab, click the [Create Spatial Index] button.
Problem loading a shape .prj file
If you load a shapefile with a .prj file and QGIS is not able to read the
coordinate reference system from that file, you will need to define the proper
projection manually within the General tab of the
Layer Properties dialog of the layer by clicking the
[Specify...] button. This is due to the fact that .prj files
often do not provide the complete projection parameters as used in QGIS and
listed in the CRS dialog.
For the same reason, if you create a new shapefile with QGIS, two different
projection files are created: a .prj file with limited projection
parameters, compatible with ESRI software, and a .qpj file, providing
the complete parameters of the used CRS. Whenever QGIS finds a .qpj
file, it will be used instead of the .prj.
Tabular data is a very common and widely used format because of its simplicity
and readability – data can be viewed and edited even in a plain text editor.
A delimited text file is an attribute table with each column separated by a
defined character and each row separated by a line break. The first row usually
contains the column names. A common type of delimited text file is a CSV
(Comma Separated Values), with each column separated by a comma.
Such data files can also contain positional information in two main forms:
- As point coordinates in separate columns
- As well-known text (WKT) representation of geometry
QGIS allows you to load a delimited text file as a layer or ordinal table. But
first check that the file meets the following requirements:
- The file must have a delimited header row of field names. This must be the
first line in the text file.
- The header row must contain field(s) with geometry definition. These field(s)
can have any name.
- The X and Y coordinates (if geometry is defined by coordinates) must be
specified as numbers. The coordinate system is not important.
Se hai dati che non sono una stringa (testo) e il file è un file CSV, devi avere un file CSVT (vedi sezione CSVT Files).
Come esempio di un file di testo valido, importa il file di punti quotati elevp.csv presente nell’insieme di dati campione di QGIS (vedi sezione Sample Data):
X;Y;ELEV
-300120;7689960;13
-654360;7562040;52
1640;7512840;3
[...]
Alcune cose da tenere in considerazione in merito al file di testo:
Il file di testo usato come esempio usa ; (punto e virgola) come delimitatore. Ma qualsiasi carattere può essere usato per delimitare i campi.
La prima riga è la riga di intestazione. Questa contiene i campi X, Y e ELEV.
Nessun tipo di virgoletta (") dev’essere usata per delimitare i campi di testo.
Le coordinate X sono contenute nel campo X.
Le coordinate Y sono contenute nel campo Y.
Quando carichi i file CSV, il driver OGR presuppone che tutti i campi siano stringhe (cioè tipo testo) a meno che non sia detto diversamente. Puoi creare un file CSVT per indicare a OGR (e QGIS) quali tipi di dati ci sono nelle diverse colonne:
| Type |
Name |
Example |
|---|
| Whole number |
Integer |
4 |
| Decimal number |
Real |
3.456 |
| Date |
Date (YYYY-MM-DD) |
2016-07-28 |
| Time |
Time (HH:MM:SS+nn) |
18:33:12+00 |
| Date & Time |
DateTime (YYYY-MM-DD HH:MM:SS+nn) |
2016-07-28 18:33:12+00 |
Il file CSVT è un file di testo normale di UNA sola riga con i tipi di dati racchiusi da virgolette e separati da virgole, ad esempio:
"Integer","Real","String"
Puoi anche specificare la larghezza e la precisione di ogni colonna, ad esempio:
"Integer(6)","Real(5.5)","String(22)"
Questo file viene salvato nella stessa cartella del file .csv, con lo stesso nome, ma con .csvt come estensione.
You can find more information at GDAL CSV Driver.
I vettori PostGIS sono memorizzati in un database PostgreSQL. PostGIS ha diversi vantaggi: creazione dell’indice spaziale, capacità di filtraggio e di interrogazione molto potenti. Usando PostGIS, le funzioni vettoriali come la selezione e l’identificazione sono più precise che con i vettori OGR in QGIS.
Suggerimento
Layer PostGIS
Normalmente, un vettore PostGIS è definito da una voce nella tabella geometry_columns. QGIS può caricare layers che non dispongono di una voce nella tabella geometry_columns. Ciò include sia tabelle che viste. La definizione di una vista spaziale fornisce un potente mezzo per visualizzare i tuoi dati. Consulta il tuo manuale PostgreSQL per informazioni sulla creazione di viste.
Questa sezione contiene alcuni dettagli su come QGIS accede ai vettori PostgreSQL. La maggior parte delle volte QGIS dovrebbe semplicemente fornirti un elenco di tabelle del database che possono essere caricate e dovrebbe poi caricarle in base alla tua richiesta. Comunque se hai difficoltà a caricare una tabella di PostgreSQL in QGIS, le informazioni seguenti ti possono aiutare a capire tutti i messaggi di QGIS e ti possono dare un’indicazione di come cambiare le tabelle o le definizioni delle viste di PostgreSQL in modo che QGIS le possa caricare.
QGIS richiede che i vettori PostgreSQL contengano una colonna che possa essere usata come chiave univoca per il vettore. Le tabelle devono contenere una chiave primaria o una colonna con un vincolo univoco. Questa colonna deve essere di tipo int4 (un numero intero di 4 byte). Alternativamente, la colonna ctid può essere usata come chiave primaria. Se a una tabella mancano queste informazioni, verrà usata la colonna oid. Le prestazioni saranno migliori se la colonna è indicizzata (le chiavi primarie sono indicizzate automaticamente in PostgreSQL).
QGIS prevede una casella di controllo Seleziona all’ID che viene attivata per impostazione predefinita. Questa opzione ottiene gli id senza gli attributi il che è più veloce nella maggior parte dei casi.
Se il layer di PostgreSQL è una vista sussistono gli stessi requisiti, ma non sempre necessitano chiavi primarie o colonne con vincoli univoci. Devi definire un campo della chiave primaria (deve essere un intero) nella finestra di dialogo di QGIS prima di caricare la vista. Se non c’è una colonna adatta nella vista, QGIS non caricherà il vettore. Se succede la soluzione è di modificare la vista in modo che contenga una colonna adatta (un intero e una chiave primaria con un vincolo univoco, preferibilmente indicizzato).
Come per le tabelle, una casella di controllo Seleziona all’ID è attiva per impostazione predefinita (vedere sopra per il significato della casella di controllo). Può aver senso disattivare questa opzione quando si utilizzano viste impegnative.
If you want to make a backup of your PostGIS database using the pg_dump and
pg_restore commands, and the default layer styles as saved by QGIS fail to
restore afterwards, you need to set the XML option to DOCUMENT and the
restore will work.
QGIS consente di filtrare le geometrie già sul lato server. Per fare ciò attiva  . Saranno accettate solo le espressioni supportate dal database. Le espressioni che utilizzano operatori o funzioni non supportati saranno restituite alla esecuzione in locale.
Most of common data types are supported by the PostgreSQL provider: integer, float,
varchar, geometry and timestamp.
Array data types are not supported.
I dati possono essere importati in PostreSQL/PostGIS usando diversi strumenti, come il plugin DB Manager e gli strumenti da riga di comando shp2pgsql e ogr2ogr
QGIS comes with a core plugin named  DB Manager. It can
be used to load shapefiles and other data formats, and it includes support for
schemas. See section Plugin DB Manager for more information.
DB Manager. It can
be used to load shapefiles and other data formats, and it includes support for
schemas. See section Plugin DB Manager for more information.
PostGIS includes an utility called shp2pgsql that can be used to import
shapefiles into a PostGIS-enabled database. For example, to import a
shapefile named lakes.shp into a PostgreSQL database named
gis_data, use the following command:
shp2pgsql -s 2964 lakes.shp lakes_new | psql gis_data
Questo comando crea un nuovo vettore, chiamato lakes_new , nel database gis_data. Il nuovo vettore avrà un identificatore del sistema di riferimento (SRID) corrispondente a 2964. Vedi la sezione Lavorare con le proiezioni per ulteriori informazioni sui sistemi di riferimento spaziali e sulle proiezioni.
Suggerimento
Esportare dati da PostGIS
Like the import tool shp2pgsql, there is also a tool to export
PostGIS datasets as shapefiles: pgsql2shp. This is shipped within
your PostGIS distribution.
Oltre a shp2pgsql e DB Manager c’è un altro strumento per caricare dati in PostGIS: ogr2ogr. Questo strumento fa parte dell’installazione di GDAL
To import a shapefile into PostGIS, do the following:
ogr2ogr -f "PostgreSQL" PG:"dbname=postgis host=myhost.de user=postgres
password=topsecret" alaska.shp
This will import the shapefile alaska.shp into the PostGIS database
postgis using the user postgres with the password topsecret on host
server myhost.de.
Nota che OGR deve essere compilato con PostgreSQL per supportare PostGIS. Puoi verificare ciò digitando (in  ) :
) :
ogrinfo --formats | grep -i post
Se preferisci utilizzare il comando COPY di PostgreSQL invece del metodo predefinito INSERT INTO, puoi esportare la seguente variabile d’ambiente (disponibile almeno in e  ):
):
ogr2ogr non crea indici spaziali come shp2pgsl. Devi crearli manualmente, usando come passo aggiuntivo il comando SQL CREATE INDEX dopo l’importazione, come passo aggiuntivo (come descritto nella sezione seguente Migliorare le prestazioni).
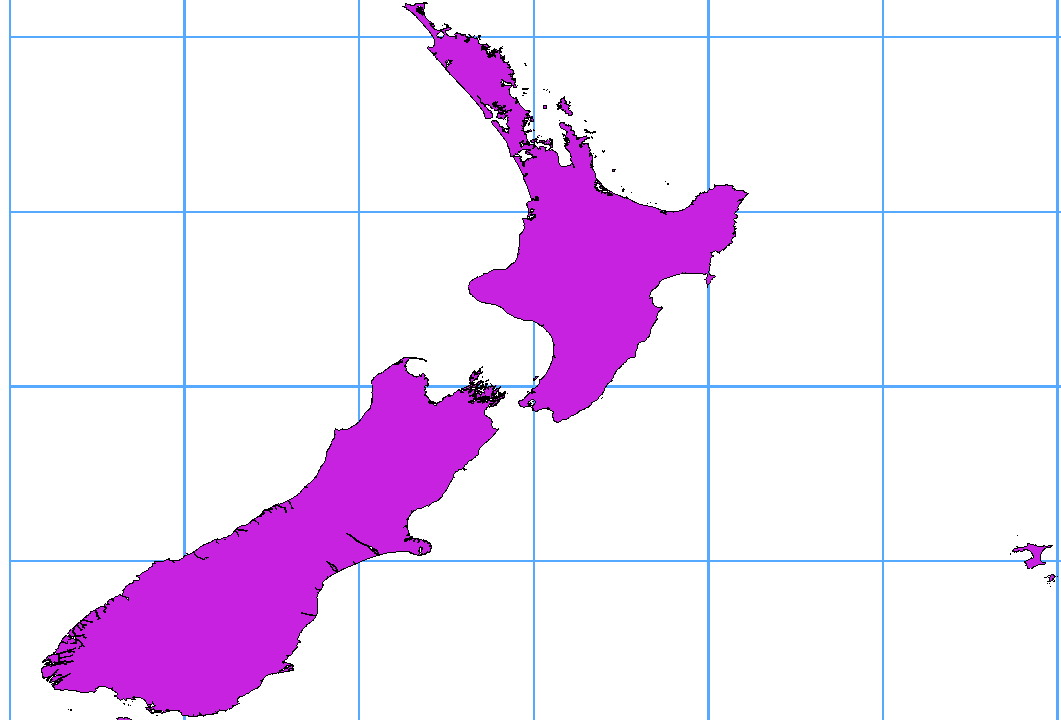
Many GIS packages don’t wrap vector maps with a geographic reference system
(lat/lon) crossing the 180 degrees longitude line
(http://postgis.refractions.net/documentation/manual-2.0/ST_Shift_Longitude.html).
As result, if we open such a map in QGIS, we will see two far, distinct locations,
that should appear near each other. In Figure_vector_crossing, the tiny point on the far
left of the map canvas (Chatham Islands) should be within the grid, to the right of the
New Zealand main islands.
Una soluzione consiste nel trasformare i valori di longitudine utilizzando PostGIS e la funzione ST_Shift_Longitude. Questa funzione legge i punti/vertici di ogni elemento di una geometria e se la coordinata di longitudine è < 0° , aggiunge 360°. Il risultato sarà una versione 0° - 360° dei dati, che verranno poi visualizzati su una mappa centrata a 180°.
Importa i dati in PostGIS (Importare dati in PostgreSQL) usando, per esempio, il plugin DB Manager.
Usa l’interfaccia da linea di comando di PostGIS per dare il seguente comando (nell’esempio “TABLE” è il nome della tua tabella PostGIS): gis_data=# update TABLE set the_geom=ST_Shift_Longitude(the_geom);
Se tutto è andato a buon fine, riceverai la conferma sul numero di geometrie che sono state aggiornate. Potrai cosi caricare la mappa e vedere le differenze (Figure_vector_crossing_map).
If you want to save a vector layer to SpatiaLite format, you can do this by
right clicking the layer in the legend. Then, click on ,
define the name of the output file, and select ‘SpatiaLite’ as format and the CRS.
Also, you can select ‘SQLite’ as format and then add SPATIALITE=YES in the
OGR data source creation option field. This tells OGR to create a SpatiaLite
database. See also http://www.gdal.org/ogr/drv_sqlite.html.
QGIS supporta anche viste modificabili in SpatiaLite.
Se vuoi creare un nuovo layer SpatiaLite, fai riferimento alla sezione Creare un nuovo layer SpatiaLite.
Suggerimento
SpatiaLite data management Plugins
Per la gestione dei dati di SpatiaLite puoi utilizzare anche diversi plugin Python: QSpatiaLite, SpatiaLite Manager o DB Manager (plugin core, consigliato). Se necessario, possono essere scaricati e installati con il programma di installazione plugin.
IBM DB2 per Linux, Unix e Windows (DB2 LUW), i prodotti IBM DB2 per z/OS (mainframe) e IBM DashDB consentono agli utenti di memorizzare e analizzare i dati spaziali nelle colonne della tabella relazionale. La funzione DB2 per QGIS supporta la gamma completa di visualizzazione, analisi e manipolazione dei dati spaziali in questi database.
La documentazione utente su queste funzionalità può essere trovata in DB2 z/OS KnowledgeCenter, DB2 LUW KnowledgeCenter e DB2 DashDB KnowledgeCenter.
Per ulteriori informazioni sul funzionamento delle opzioni spaziali DB2, consulta il Tutorial DB2 Spatial Tutorial su IBM DeveloperWorks.
La funzionalità DB2 attualmente supporta solo l’ambiente Windows tramite il driver ODBC di Windows.
Il client che esegue QGIS deve disporre di uno dei seguenti componenti installati:
- DB2 LUW
- IBM Data Server Driver Package
- IBM Data Server Client
Se stai accedendo a un database DBW LUW sulla stessa macchina o che utilizza DB2 LUW come client, i file di esecuzione e i files di supporto DB2 devono essere inclusi nel percorso di Windows. Ciò può essere fatto creando una file batch come seguire con il nome db2.bat e includendolo nella directory %OSGEO4W_ROOT%/etc/ini.
@echo off
REM Point the following to where DB2 is installed
SET db2path=C:\Program Files (x86)\sqllib
REM This should usually be ok - modify if necessary
SET gskpath=C:\Program Files (x86)\ibm\gsk8
SET Path=%db2path%\BIN;%db2path%\FUNCTION;%gskpath%\lib64;%gskpath%\lib;%path%