` `
Coordinate Capture Plugin
The coordinate capture plugin is easy to use and provides the ability to display coordinates on the map canvas for two selected coordinate reference systems (CRS).
Coordinate Capture Plugin
- Start QGIS, select
 Project Properties from the
Settings (KDE, Windows) or File (Gnome, macOS) menu
and click on the Projection tab. As an alternative, you can also
click on the
Project Properties from the
Settings (KDE, Windows) or File (Gnome, macOS) menu
and click on the Projection tab. As an alternative, you can also
click on the  CRS status icon in the lower
right-hand corner of the status bar.
CRS status icon in the lower
right-hand corner of the status bar. - Click on the
 Enable on the fly projection checkbox and select
a projected coordinate system of your choice (see also Práce s projekcemi).
Enable on the fly projection checkbox and select
a projected coordinate system of your choice (see also Práce s projekcemi). - Activate the coordinate capture plugin in the Plugin Manager (see
The Plugins Dialog) and ensure that the dialog is visible by going to
View ‣ Panels and ensuring that
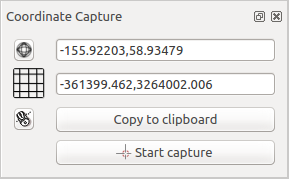
Coordinate Capture is enabled. The coordinate capture dialog
appears as shown in Figure figure_coordinate_capture. Alternatively,
you can also go to Vector ‣ Coordinate Capture and see
if Coordinate Capture is enabled.
- Click on the
 Click to the select the CRS to use for
coordinate display icon and select a different CRS from the one you selected
above.
Click to the select the CRS to use for
coordinate display icon and select a different CRS from the one you selected
above. - To start capturing coordinates, click on [Start capture]. You can now click anywhere on the map canvas and the plugin will show the coordinates for both of your selected CRS.
- To enable mouse coordinate tracking, click the
 mouse tracking
icon.
mouse tracking
icon. - You can also copy selected coordinates to the clipboard.