` `
QGIS Konfigurace
QGIS is highly configurable through the Settings menu. Choose between Options, Project Properties and Customization.
Poznámka
QGIS follows desktop guidelines for the location of options and project properties item. Consequently related to the OS you are using, location of some of items described below could be in the Project or the Settings menu.
Možnosti
 Some basic options for QGIS can be selected using the
Options dialog. Select the menu option Settings ‣
Options.
You can modify the options according to your needs. Some of the changes may
require a restart of QGIS before they will be effective.
Some basic options for QGIS can be selected using the
Options dialog. Select the menu option Settings ‣
Options.
You can modify the options according to your needs. Some of the changes may
require a restart of QGIS before they will be effective.
The tabs where you can customize your options are described below.
General Settings
Aplikace
- Select the Style (QGIS restart required)
 and choose
between ‘Oxygen’, ‘Windows’, ‘Motif’, ‘CDE’, ‘Plastique’ and ‘Cleanlooks’.
and choose
between ‘Oxygen’, ‘Windows’, ‘Motif’, ‘CDE’, ‘Plastique’ and ‘Cleanlooks’. - Define the Icon theme . It can be ‘default’ or ‘Night Mapping’.
- Define the Icon size .
- Define the Font and its Size. The font can be
 Qt default or a user-defined one.
 - Change the Timeout for timed messages or dialogs .
 Hide splash screen at startup
- Show tips at startup
- Check QGIS version at startup to keep you informed
if a newer version is released
- QGIS-styled group boxes
- Use native color chooser dialogs (see Výběr barvy)
- Use live-updating color chooser dialogs (see Výběr barvy)
- Canvas rotation support (restart required)
Soubory projektu
- Open project on launch (choose between ‘New’,
‘Most recent’, ‘Welcome Page’, and ‘Specific’). When choosing ‘Specific’ use
the
 to define the project to use by default. The ‘Welcome Page’
displays a list of recent projects with screenshot.
to define the project to use by default. The ‘Welcome Page’
displays a list of recent projects with screenshot. - Vytvořit nový projekt z výchozího projektu. Máte možnost vybrat Nastavit aktuální projekt jako výchozí nebo Obnovit výchozí. Můžete procházet soubory a definovat adresář, kde najdete své uživatelsky definované šablony projektů. Ty budou přidávány z Projekt ‣ Nový ze šablony. V případě, že nejprve aktivujete Vytvořit nový projekt z výchozího projektu a poté uložíte projekt do složky šablon projektů.
- Prompt to save project and data source changes when
required
- Žádat o upozornění při odstraňování vrstvy
- Warn when opening a project file saved with an older
version of QGIS
- Enable macros . This option was created to handle
macros that are written to perform an action on project events. You can
choose between ‘Never’, ‘Ask’, ‘For this session only’ and
‘Always (not recommended)’.
System Settings
SVG paths
Add or Remove Path(s) to search for Scalable Vector Graphic (SVG) symbols. These SVG files are then available to symbolize features or decorate your map composition.
Cesty k zásuvným modulům
Add or Remove Path(s) to search for additional C++ plugin libraries
QSettings
It helps you Reset user interface to default settings (restart required) if you made any customization.
Prostředí
Systémové proměnné a mnohé konfigurace lze zobrazit v části Prostředí (viz figure_environment_variables). Toto je užitečné pro platformy, jako jsou Mac, kde GUI aplikace nemusí nutně dědit prostředí uživatele. Je to také užitečné pro nastavení a prohlížení proměnných prostředí pro externí sady nástrojů ovládaných zpracovávajícími programi (např. SAGA, GRASS) a také pro zapnutí ladění výstupu pro specifické úseky zdrojového kódu.
- Use custom variables (restart required - include separators).
You can [Add] and [Remove] variables. Already-defined environment
variables are displayed in Current environment variables, and it’s
possible to filter them by activating
Show only QGIS-specific variables.
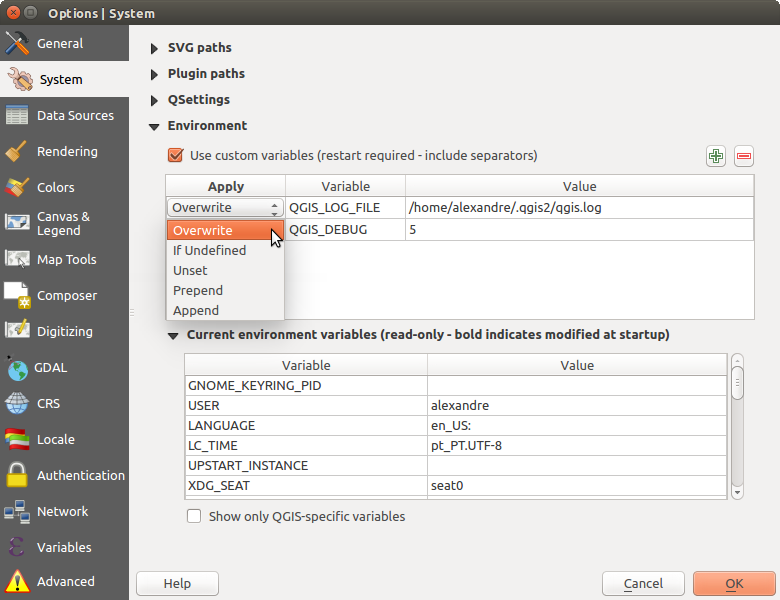
System environment variables in QGIS
Data Sources Settings
Atributy prvku a tabulka
- Open attribute table in a dock window
- Copy features as ‘Plain text, no geometry’, ‘Plain text, WKT geometry’, or ‘GeoJSON’ when pasting features in other applications.
- Attribute table behavior : set filter on the attribute
table at the opening. There are three possibilities: ‘Show all features’,
‘Show selected features’ and ‘Show features visible on map’.
- Default view: define the view mode of the attribute table at every opening. It can be ‘Remember last view’, ‘Table view’ or ‘Form view’.
- Attribute table row cache
 . This row cache makes
it possible to save the last loaded N attribute rows so that working with the
attribute table will be quicker. The cache will be deleted when closing the
attribute table.
. This row cache makes
it possible to save the last loaded N attribute rows so that working with the
attribute table will be quicker. The cache will be deleted when closing the
attribute table. Reprezentace pro NULL hodnoty. Zde můžete definovat hodnotu datových polí, které obsahují NULL hodnotu.
Tip
Improve opening of big data attribute table
When working with layers with big amount of records, opening the attribute table may be slow as the dialog request all the rows in the layer. Setting the Attribute table behavior to Show features visible on map will make QGIS request only the features in the current map canvas when opening the table, allowing a quick data loading.
Note that data in this attribute table instance will be always tied to the canvas extent it was opened with, meaning that selecting Show All Features within such a table will not display new features. You can however update the set of displayed features by changing the canvas extent and selecting Show Features Visible On Map option in the attribute table.
Zacházení s datovými zdroji
- Scan for valid items in the browser dock . You can
choose between ‘Check extension’ and ‘Check file contents’.
- Scan for contents of compressed files (.zip) in browser dock
. ‘No’, ‘Basic scan’ and ‘Full scan’ are possible.
Výzva pro rastrové subvrstvy při otevírání. Některé podpůrné rastrové subvrstvy — jsou v GDAL nazývány jako podřízené datové sady. Například v netCDF souborech — pokud obsahují mnho netCDF proměnných, GDAL vidí každou proměnnou jako podřízenou datovou sadu. ‘Možnosti’ umožňují kontrolovat, jak se vypořádat s podvrstvami při otevření souboru se subvrstvami. Máte následující možnosti:
‘Vždy’: Vždy se dotázat (pokud existují nějaké subvrstvy)
‘Pokud je potřeba’: Dotázat se, jestli nemá vrstva žádná pásma, ale má podvrstvy
‘Nikdy’: Nikdy nevyzve a nenačte nic
‘Načíst vše’: Nikdy nevyzve, ale načte všechny subvrstvy
- Ignore shapefile encoding declaration. If a shapefile
has encoding information, this will be ignored by QGIS.
- Přidat vrstvy PostGIS dvojklikem a vybírat v rozšířeném režimu
- Přidat vrstvy Oracle dvojklikem a vybírat v rozšířeném režimu
- Execute expressions on server-side if possible
Hidden Browser Path
This widget lists all the folder you chose to hide from the Browser panel. Removing a folder from the list will make it available in the Browser panel.
Rendering Settings
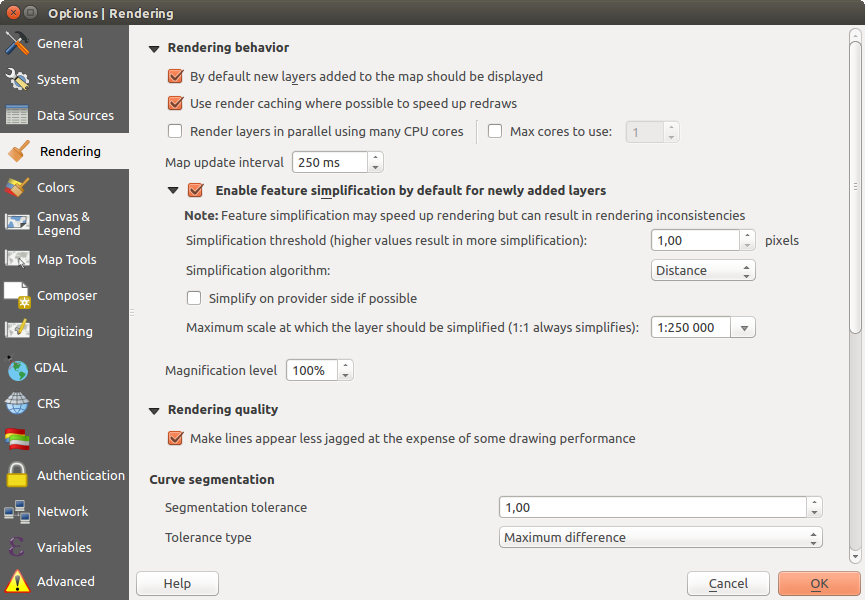
Rendering tab of Project Properties dialog
Rendering behavior
- By default new layers added to the map should be displayed
- Pokud to jde, používat vyrovnávací paměť pro zrychlení překreslování
- Vykreslovat vrstvy paralelně pomocí více jader CPU
- Maximální počet jader k dispozici
Interval aktualizace mapy (výchozí hodnota 250 ms)
- Enable feature simplification by default for newly added layers
- Simplification threshold
- Simplification algorithm: This option performs a local “on-the-fly” simplification on feature’s and speeds up geometry rendering. It doesn’t change the geometry fetched from the data providers. This is important when you have expressions that use the feature geometry (e.g. calculation of area) - it ensures that these calculations are done on the original geometry, not on the simplified one. For this purpose, QGIS provides three algorithms: ‘Distance’ (default), ‘SnapToGrid’ and ‘Visvalingam’.
- Simplify on provider side if possible: the geometries
are simplified by the provider (PostGIS, Oracle...) and unlike the
local-side simplification, geometry-based calculations may be affected
- Maximum scale at which the layer should be simplified
 Magnification level (see the magnifier)
Poznámka
Besides the global setting, feature simplification can be set for any specific layer from its Layer properties ‣ Rendering menu.
Kvalita vykreslování
- Linie bude vykreslena jako méně roztřepená, nicméně na úkor rychlosti vykreslování
Curve segmentation
Segmentation tolerance: this setting controls the way circular arcs are rendered. The smaller maximum angle (between the two consecutive vertices and the curve center, in degrees) or maximum difference (distance between the segment of the two vertices and the curve line, in map units), the more straight line segments will be used during rendering.
Tolerance type: it can be ‘Maximum angle’ or ‘Maximum distance’
Rastry
S Výběr RGB pásma můžete definovat hodnotu pro červené, zelené a modré pásmo.
Vylepšení kontrastu
- Single band gray . A single band gray can have
‘No stretch’, ‘Stretch to MinMax’, ‘Stretch and Clip to MinMax’ and also
‘Clip to MinMax’.
- Multi band color (byte/band) . Options are ‘No stretch’,
‘Stretch to MinMax’, ‘Stretch and Clip to MinMax’ and ‘Clip to MinMax’.
- Multi band color (>byte/band) . Options are ‘No stretch’,
‘Stretch to MinMax’, ‘Stretch and Clip to MinMax’ and ‘Clip to MinMax’.
- Limits (minimum/maximum) . Options are
‘Cumulative pixel count cut’, ‘Minimum/Maximum’, ‘Mean +/- standard deviation’.
Limity ořezu dle kumulativního počtu pixelů
Multiplikátor směrodatné odchylky
Ladění
- Map canvas refresh
Colors Settings
This menu allows you to add some custom color that you can find in each color dialog window of the renderers. You will see a set of predefined colors in the tab: you can delete or edit all of them. Moreover you can add the color you want and perform some copy and paste operations. Finally you can export the color set as a gpl file or import them.
Canvas and Legend Settings
Default map appearance (overridden by project properties)
- Define a Selection color and a Background color.
Layer legend
- Double click action in legend . You can either
‘Open layer properties’, ‘Open attribute table’ or ‘Open layer styling dock’
with the double click.
- The following Legend item styles are possible:
- Capitalise layer names
- Bold layer names
- Bold group names
- Display classification attribute names
- Create raster icons (may be slow)
- you can also set the WMS getLegendGraphic Resolution
Map tools Settings
This tab offers some options regarding the behavior of the Identify tool.
- Search radius for identifying and displaying map tips is a tolerance distance within which the identify tool will depict results as long as you click within this tolerance.
- Highlight color allows you to choose with which color should features being identified be highlighted.
- Buffer determines a buffer distance to be rendered from the outline of the identify highlight.
- Minimum width determines how thick should the outline of a highlighted object be.
Nástroj pro měření
Definujte Barva pravítka pro měřící nástroje
Definujte Desetinná místa
- Keep base unit to not automatically convert large numbers
(e.g., meters to kilometers)
- Preferred distance units (‘Meters’, ‘Kilometers’, ‘Feet’,
‘Yards’, ‘Miles’, ‘Nautical Miles’, ‘Degrees’ or ‘Map Units’ )
- Preferred area units (‘Square meters’, ‘Square
kilometers’, ‘Square feet’, ‘Square yards’, ‘Square miles’, ‘Hectares’,
‘Acres’, ‘Square nautical miles’, ‘Square degrees” or ‘Map Units’)
- Preferred angle units (‘Degrees’, ‘Radians’, ‘Gon/gradians’,
‘Minutes of arc’, ‘Seconds of arc’ or ‘Turns/revolutions’)
Posouvat a zvětšovat
- Define a Zoom factor for zoom tools or wheel mouse
Předdefinovaná měřítka
Here, you find a list of predefined scales. With the  and
and  buttons you can add or remove your personal scales.
You can also import or export scales from/to a .XML file. Note that you still have
the possibility to remove your changes and reset to the predefined list.
buttons you can add or remove your personal scales.
You can also import or export scales from/to a .XML file. Note that you still have
the possibility to remove your changes and reset to the predefined list.
Composer Settings
Výchozí nastavení kompozice
You can define the Default font used within the print composer.
Vzhled mřížky
- Define the Grid style (‘Solid’, ‘Dots’, ‘Crosses’)
Definujte Barva mřížky
Výchozí mřížka a vodítka
- Define the Grid spacing
- Define the Grid offset for x and y
- Define the Snap tolerance
Composer Paths
- Define Path(s) to search for extra print templates: a list of folders with custom composer templates to use while creating new one.
Digitizing Settings
This tab helps you configure general settings when editing vector layer (attributes and geometry).
Vytváření prvku
- Suppress attribute form pop-up after feature creation
- Reuse last entered attribute values
- Validate geometries. Editing complex lines and polygons with many nodes can result in very slow rendering. This is because the default validation procedures in QGIS can take a lot of time. To speed up rendering, it is possible to select GEOS geometry validation (starting from GEOS 3.3) or to switch it off. GEOS geometry validation is much faster, but the disadvantage is that only the first geometry problem will be reported.
Gumička
- Define Rubberband Line width, Line color and Fill color
- Don’t update rubberband during node editing
Uchycení
- Open snapping options in a dock window (QGIS restart required)
- Define Default snap mode (‘To vertex’, ‘To segment’,
‘To vertex and segment’, ‘Off’)
Definujte Výchozí přichytávací tolerance v mapových jednotkách nebo pixelech
Definujte Vyhledávající poloměr pro editaci lomových bodů v mapových jednotkách nebo pixelech
Symboly lomových bodů
- Zobrazit symboly pouze u vybraných prvků
- Define vertex Marker style (‘Cross’ (default), ‘Semi
transparent circle’ or ‘None’)
Definujte vrchol Velikost značky
Nástroj odsazení křivky
The next 3 options refer to the  Offset Curve tool in
Advanced digitizing. Through the various settings, it is possible to
influence the shape of the line offset. These options are possible starting
from GEOS 3.3.
Offset Curve tool in
Advanced digitizing. Through the various settings, it is possible to
influence the shape of the line offset. These options are possible starting
from GEOS 3.3.
- Join style: ‘Round’, ‘Mitre’ or ‘Bevel’
Segmenty kvadrantu
- Miter limit
GDAL Settings
GDAL is a data exchange library for raster files. In this tab, you can Edit create options and Edit Pyramids Options of the raster formats. You can define which GDAL driver is to be used for a raster format, as in some cases more than one GDAL driver is available.
CRS Settings
Default CRS for new projects
 Don’t enable ‘on the fly’ reprojection
- Automatically enable ‘on the fly’ reprojection if
layers have different CRS
- Enable ‘on the fly’ reprojection by default
- Select a CRS and Always start new projects with this CRS
SRS pro nové
Tato oblast vám umožňuje definovat akci, která nastane v případě, že je vytvořena nová vrstva nebo když je vložena vrstva bez počítačového rezervačního systému.
- Prompt for CRS
- Use project CRS
- Use default CRS
Výchozí transformace souřadnic
- Ask for datum transformation when no default is defined
With the ‘on-the-fly’ CRS transformation enabled and the above option checked, adding layers of different CRS opens the Select datum transformations dialog. This offers you to select the most appropriate transformation settings. Validating this dialog with the ‘Remember selection’ option checked populates the table under CRS ‣ Default datum transformations with information about ‘Source CRS’ and ‘Destination CRS’ as well as ‘Source datum transform’ and ‘Destination datum transform’. From now, QGIS automatically uses the selected datum transformation for further transformation between these two CRSs until you
remove it from the list.You can use the
button to add a datum transformation if you know
its parameters (source and destination ellipsoids and the numbers from the
transformation table). You then need to manually enter each setting.
Poznámka
For more information on how QGIS handles layers projection, please read the dedicated section at Práce s projekcemi.
Locale Settings
- Override system locale and Locale to use instead
- Information about active system locale
Authentication Settings
In the Authentication tab you can set authentication configurations and manage PKI certificates. See Authentication System for more details.
Network Tab
Obecné
Definujte Vyhledávací adresy WMS, výchozí je http://geopole.org/wms/search?search=\%1\&type=rss
Definujte Časový limit pro síťové požadavky (ms) - výchozí je 60000
- Define Default expiration period for WMS Capabilities (hours) - default is 24
Definujte Výchozí expirační perioda pro dlaždice WMS-C/WMTS (hodin) - výchozí je 24
- Define Max retry in case of tile or feature request errors
Definujte User-Agent
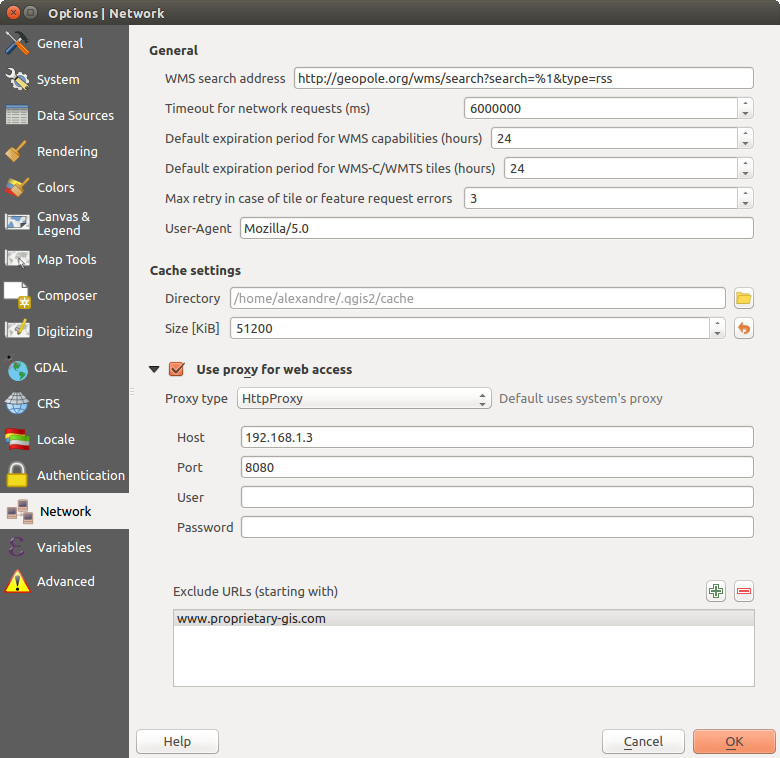
Proxy-settings in QGIS
Nastavení vyrovnávací paměti
Define the Directory and a Size for the cache.
- Use proxy for web access and define ‘Host’, ‘Port’, ‘User’,
and ‘Password’.
- Set the Proxy type according to your needs.
- Default Proxy: Proxy is determined based on the application proxy set using
Socks5Proxy: Druhový proxy server pro jakýkoliv druh připojení. Podporuje TCP, UDP, vazbu na port (příchozí spojení) a ověřování.
HttpProxy: Implementace pomocí příkazu “CONNECT”, podporuje pouze odchozí TCP spojení; podporuje ověřování.
HttpCachingProxy: Implementace pomocí běžných příkazů HTTP, je užitečná pouze v kontextu HTTP požadavků.
FtpCachingProxy: Implementace pomocí FTP proxy, je užitečná pouze v souvislosti s požadavky FTP.
Vyloučení některých URL adres může být přidáno do textového pole pod nastavením serveru proxy (koukněte na Figure_Network_Tab).
If you need more detailed information about the different proxy settings, please refer to the manual of the underlying QT library documentation at http://doc.qt.io/qt-4.8/qnetworkproxy.html#ProxyType-enum
Tip
Použití proxy
Using proxies can sometimes be tricky. It is useful to proceed by ‘trial and error’ with the above proxy types, to check if they succeed in your case.
Variables Settings
The Variables tab lists all the variables available at the global-level.
It also allows the user to manage global-level variables. Click the
button to add a new custom global-level variable. Likewise, select a custom
global-level variable from the list and click the button to remove
it.
More information about variables in the Variables section.
Advanced Settings
Depending on your OS, all the settings related to QGIS (UI, tools, data providers, default values, plugins options...) are saved:
 in a text file: $HOME/.config/QGIS/QGIS2.conf
 in the properties list file: $HOME/Library/Preferences/org.qgis.qgis.plist
 in the registry under: HKEY\CURRENT_USER\Software\QGIS\qgis
The Advanced tab offers you in a single place, regardless your OS, means to manage these settings through the Advanced Settings Editor. After you promise to be careful, the widget is populated with a tree of all QGIS settings, which you can directly edit.
Varování
Avoid using the Advanced tab settings blindly
Be careful while modifying items in this dialog given that changes are automatically applied. Doing changes without knowledge can break your QGIS installation in various ways.
Vlastnosti projektu
In the properties window for the project under Project ‣
Project Properties (or  Settings ‣ Project Properties),
you can set project-specific options.
Settings ‣ Project Properties),
you can set project-specific options.
The project-specific options overwrite their equivalent in the options described above.
In the General tab, the general settings let you:
Uveďte název projektu spolu s cestou k souboru projektu
Zvolte barvu, kterou chcete použít pro vrstvy, když jsou vybrány.
Zvolte barvu pozadí: barvu, kterou chcete použít pro mapový podklad.
Nastavte, zda má být cesta k vrstvám v projektu uložena jako absolutní (úplná) nebo jako relativní k umístění souboru projektu. Můžete upřednostnit relativní cestu, pokud lze přesunout nebo sdílet vrstvy i soubory projektu, nebo pokud je projekt přístupný z počítačů na různých platformách.
Můžete zvolit vyhýbání se artefaktům, je-li projekt vykreslen jako mapová dlaždice. Všimněte si, že změna této možnosti může vést k degradaci provedení.
Calculating areas and distances is a common need in GIS. However, these values are really tied to the underlying projection settings. The Measurements frame lets you control these parameters. You can indeed choose:
- the ellipsoid to use: it can be an existing one, a custom one (you’ll need to set values of the semi-major and semi-minor axis) or None/Planimetric.
- the units for distance measurements for length and perimeter and
the units for area measurements. These settings, which default
to the units set in QGIS options but then overrides it for the current project,
are used in:
Panel pro aktualizaci pole atributové tabulky
Kalkulace kalkulátoru pole
Určení nástroje odvození délky, obvodu a plochy
Výchozí jednotky zobrazované v dialogovém okně měření
The Coordinate display allows you to choose and customize the format of units to use to display the mouse coordinate in the status bar and the derived coordinates shown via the identify tool.
Finally, you can define a project scale list, which overrides the global predefined scales.
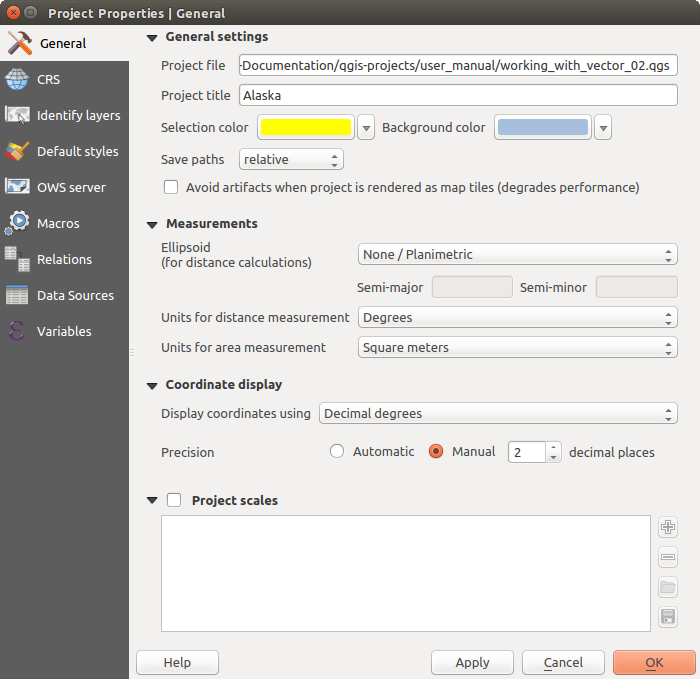
Záložka Obecné v dialogu vlastnosti projektu
The CRS tab enables you to choose the Coordinate Reference System for this project, and to enable on-the-fly re-projection of raster and vector layers when displaying layers from a different CRS. For more information on projection’s handling in QGIS, please read Práce s projekcemi section.
With the Identify layers tab, you set (or disable) which layers will respond to the identify tool. By default, layers are set queryable.
You can also set whether a layer should appear as read-only, meaning that it can not be edited by the user, regardless of the data provider’s capabilities. Although this is a weak protection, it remains a quick and handy configuration to avoid end-users modifying data when working with file-based layers.
The Default Styles tab lets you control how new layers will be drawn when they do not have an existing .qml style defined. You can also set the default transparency level for new layers and whether symbols should have random colors assigned to them. There is also an additional section where you can define specific colors for the running project. You can find the added colors in the drop down menu of the color dialog window present in each renderer.
The tab OWS Server allows you to configure your project in order to publish it online. Here you can define information about the QGIS Server WMS and WFS capabilities, extent and CRS restrictions. More information available in section Prepare a project to serve and subsequent.
The Macros tab is used to edit Python macros for projects. Currently, only three macros are available: openProject(), saveProject() and closeProject().
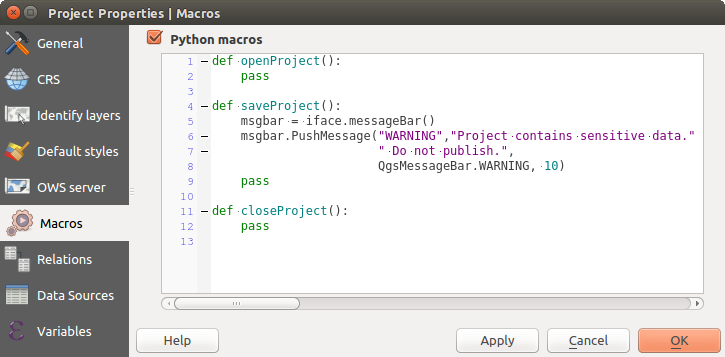
Makro nastavení v QGIS
- The Relations tab is used to define 1:n relations. The relations are defined in the project properties dialog. Once relations exist for a layer, a new user interface element in the form view (e.g. when identifying a feature and opening its form) will list the related entities. This provides a powerful way to express e.g. the inspection history on a length of pipeline or road segment. You can find out more about 1:n relations support in Section Creating one or many to many relations.
- In the Data Sources tab, you can:
- Evaluate default values on provider side: When adding
new features in a PostGreSQL table, fields with default value constraint are
evaluated and populated at the form opening, and not at the commit moment.
This means that instead of an expression like nextval('serial'), the field
in the Add Feature form will display expected value (e.g., 25).
- Automatically create transaction groups where possible:
When this mode is turned on, all
(postgres) layers from the same database are synchronised in their edit state,
i.e. when one layer is put into edit state, all are, when one layer is committed
or one layer is rolled back, so are the others. Also, instead of buffering edit
changes locally, they are directly sent to a transaction in the database which
gets committed when the user clicks save layer.
Note that you can (de)activate this option only if no layer is being edited
in the project.
- The Variables tab lists all the variables available at
the project’s level (which includes all global variables). Besides, it
also allows the user to manage project-level variables. Click the
button to add a new custom project-level variable. Likewise, select a custom
project-level variable from the list and click the button to
remove it.
More information on variables usage in the General Tools
Variables section.
Přizpůsobení
The customization dialog lets you (de)activate almost every element in the QGIS user interface. This can be very useful if you want to provide your end-users with a ‘light’ version of QGIS, containing only the icons, menus or panels they need.
Poznámka
Before your changes are applied, you need to restart QGIS.
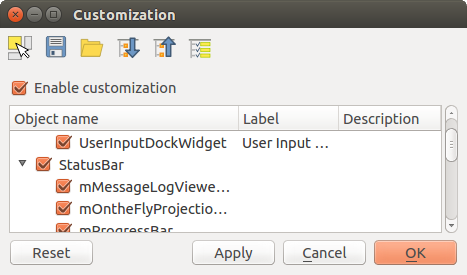
The Customization dialog
Ticking the Enable customization checkbox is the first step
on the way to QGIS customization. This enables the toolbar and the widget
panel from which you can uncheck and thus disable some GUI items.
The configurable item can be:
- a Menu or some of its sub-menus from the Menu lišta
- a whole Panel (see Panely a nástrojové lišty)
- the Status bar described in Stavová lišta or some of its items
- a Toolbar: the whole bar or some of its icons
- or any widget from any dialog in QGIS: label, button, combobox...
With  Switch to catching widgets in main application, you
can click on an item in QGIS interface that you want to be hidden and
QGIS automatically unchecks the corresponding entry in the Customization dialog.
Switch to catching widgets in main application, you
can click on an item in QGIS interface that you want to be hidden and
QGIS automatically unchecks the corresponding entry in the Customization dialog.
Once you setup your configuration, click [Apply] or [Ok] to validate your changes. This configuration becomes the one used by default by QGIS at the next startup.
The modifications can also be saved in a .ini file using  Save To File button. This is a handy way to share a common QGIS
interface among multiple users. Just click on
Save To File button. This is a handy way to share a common QGIS
interface among multiple users. Just click on  Load from File
from the destination computer in order to import the .ini file.
You can also run command line tools and save various
setups for different use cases as well.
Load from File
from the destination computer in order to import the .ini file.
You can also run command line tools and save various
setups for different use cases as well.
Tip
Easily restore predefined QGIS
The initial QGIS GUI configuration can be restored by one of the methods below:
- unchecking Enable customization option in the
Customization dialog or click the
 Check All button
 - pressing the [Reset] button in the QSettings frame under Settings ‣ Options menu, System tab
- launching QGIS at a command prompt with the following command line qgis --nocustomization
- setting to false the value of UI ‣ Customization ‣ Enabled variable under Settings ‣ Options menu, Advanced tab (see the warning).
In most cases, you need to restart QGIS in order to have the change applied.
Keyboard shortcuts
QGIS provides default keyboard shortcuts for many features. You can find them in section Menu lišta. Additionally, the menu option Settings ‣ Configure Shortcuts... allows you to change the default keyboard shortcuts and add new keyboard shortcuts to QGIS features.
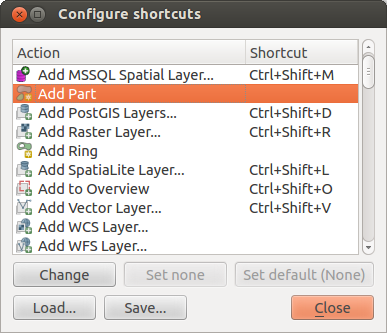
Define shortcut options
Configuration is very simple. Just select a feature from the list and click on :
- [Change] and press the new combination you want to assign as new shortcut
- [Set none] to clear any assigned shortcut
- or [Set default] to backup the shortcut to its original and default value.
Proceed as above for any other tools you wish to customize. Once you have finished your configuration, simply [Close] the dialog to have your changes applied. You can also [Save] the changes as an .XML file and [Load] them into another QGIS installation.