` `
QGIS GUI
When QGIS starts, you are presented with the GUI as shown in the figure (the numbers 1 through 5 in yellow circles are discussed below).
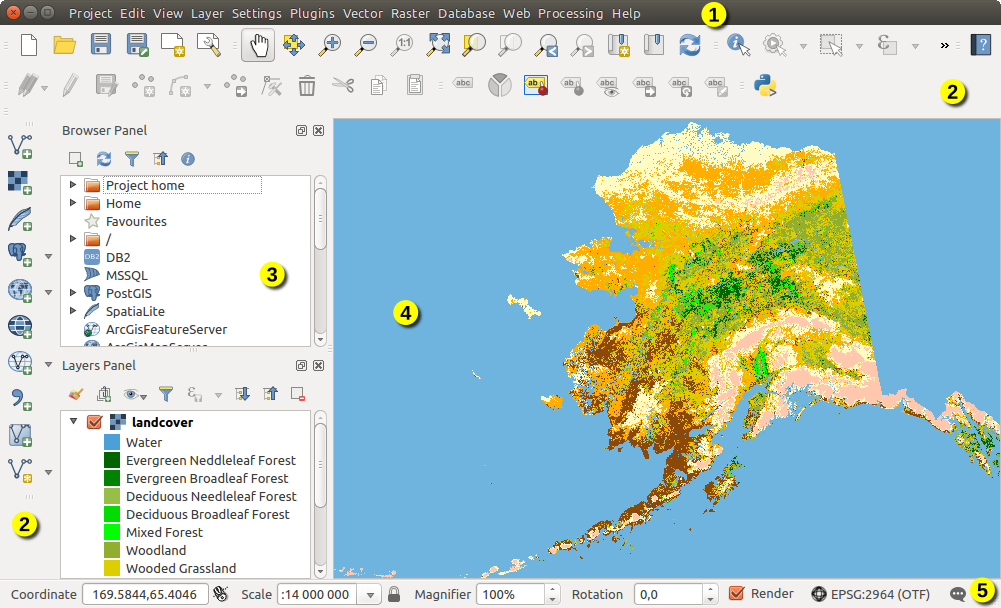
QGIS uživatelské rozhraní se vzorovými daty Alaska
Poznámka
Vzhled Vašeho okna (záhlaví atd.) se může lišit v závislosti na Vašem operačním systému a správci okna.
QGIS uživatelské rozhraní je rozděleno do pěti částí:
Menu lišta
Nástrojové lišty
Panely
Zobrazení mapy
Stavová lišta
These five components of the QGIS interface are described in more detail in the following sections. Two more sections present keyboard shortcuts and context help.
Menu lišta
The menu bar provides access to various QGIS features using a standard hierarchical menu. The top-level menus and a summary of some of the menu options are listed below, together with the associated icons as they appear on the toolbar, and keyboard shortcuts. The shortcuts presented in this section are the defaults; however, keyboard shortcuts can also be configured manually using the Configure shortcuts dialog, opened from Settings ‣ Configure Shortcuts....
Although most menu options have a corresponding tool and vice-versa, the menus are not organized exactly like the toolbars. The toolbar containing the tool is listed after each menu option as a checkbox entry. Some menu options only appear if the corresponding plugin is loaded. For more information about tools and toolbars, see section Nástrojové lišty.
Poznámka
QGIS is a cross-platform application meaning that though it provides you with the same tools, they may be placed in different menus according to the operating system specification. The lists below show the most common location and precise when there is a variation.
Projekt
Menu Možnosti |
Zkratka |
Reference | Panel nástrojů |
|---|---|---|---|
|
Ctrl+N | see Projects | Projekt |
 Open Open |
Ctrl+O | see Projects | Projekt |
Nový ze šablony ‣ |
see Projects | ||
Otevřít nedávné ‣ |
see Projects | ||
|
Ctrl+S | see Projects | Projekt |
|
Ctrl+Shift+S | see Projects | Projekt |
 Save as Image... Save as Image... |
see Output | ||
| DXF Export... | see Output | ||
| DWG/DXF Import... | |||
 Project Properties... Project Properties... |
Ctrl+Shift+P | see Projects | |
 New Print Composer New Print Composer |
Ctrl+P | see Print Composer | Projekt |
 Composer manager... Composer manager... |
see Print Composer | Projekt |
|
| Print Composers ‣ | see Print Composer | ||
|
Ctrl+Q |


 Ukončit QGIS
Pod  macOS, Ukončit QGIS příkaz odpovídá QGIS ‣ Ukončit QGIS (Cmd+Q).
Editovat
Menu Možnosti |
Zkratka |
Reference | Panel nástrojů |
|---|---|---|---|
|
Ctrl+Z | see Advanced digitizing | Pokročilá digitalizace |
|
Ctrl+Shift+Z | see Advanced digitizing | Pokročilá digitalizace |
|
Ctrl+X | see Digitizing an existing layer | Digitalizace |
|
Ctrl+C | see Digitizing an existing layer | Digitalizace |
|
Ctrl+V | see Digitizing an existing layer | Digitalizace |
| Paste features as ‣ | see Working with the Attribute Table | ||
 Add Feature Add Feature |
Ctrl+. | see Digitizing an existing layer | Digitalizace |
|
see Digitizing an existing layer | Digitalizace |
|
|
see Digitizing an existing layer | Digitalizace |
|
|
see Digitizing an existing layer | Digitalizace |
|
|
see Digitizing an existing layer | Digitalizace |
|
|
see Editing attribute values | Digitalizace |
|
|
see Advanced digitizing | Pokročilá digitalizace |
|
|
see Advanced digitizing | Pokročilá digitalizace |
|
|
see Advanced digitizing | Pokročilá digitalizace |
|
|
see Advanced digitizing | Pokročilá digitalizace |
|
|
see Advanced digitizing | Pokročilá digitalizace |
|
|
see Advanced digitizing | Pokročilá digitalizace |
|
|
see Advanced digitizing | Pokročilá digitalizace |
|
|
see Advanced digitizing | Pokročilá digitalizace |
|
|
see Advanced digitizing | Pokročilá digitalizace |
|
|
see Advanced digitizing | Pokročilá digitalizace |
|
|
see Advanced digitizing | Pokročilá digitalizace |
|
|
see Advanced digitizing | Pokročilá digitalizace |
|
 Merge Attr. of Selected Features Merge Attr. of Selected Features |
see Advanced digitizing | Pokročilá digitalizace |
|
 Node Tool Node Tool |
see Digitizing an existing layer | Digitalizace |
|
|
see Advanced digitizing | Pokročilá digitalizace |
|
|
see Advanced digitizing | Pokročilá digitalizace |


After activating  Toggle editing mode for a layer,
you will enable the Add Feature icon in the Edit menu
depending on the layer type (point, line or polygon).
Toggle editing mode for a layer,
you will enable the Add Feature icon in the Edit menu
depending on the layer type (point, line or polygon).
Edit (extra)
Menu Možnosti |
Zkratka |
Reference | Panel nástrojů |
|---|---|---|---|
| Add Feature |
see Digitizing an existing layer | Digitalizace |
|
 Add Feature Add Feature |
see Digitizing an existing layer | Digitalizace |
|
 Add Feature Add Feature |
see Digitizing an existing layer | Digitalizace |
Zobrazit
Menu Možnosti |
Zkratka |
Reference | Panel nástrojů |
|---|---|---|---|
|
see Zooming and Panning | Navigace v mapě |
|
|
Navigace v mapě |
||
|
Ctrl+Alt++ | see Zooming and Panning | Navigace v mapě |
|
Ctrl+Alt+- | see Zooming and Panning | Navigace v mapě |
Vybrat ‣ |
see Selecting features | Atributy |
|
|
Ctrl+Shift+I | see Identify Features | Atributy |
Měřit ‣ |
see Měření | Atributy |
|
|
see Statistical Summary Panel | Atributy |
|
|
Ctrl+Shift+F | Navigace v mapě |
|
|
Navigace v mapě |
||
|
Ctrl+J | Navigace v mapě |
|
|
Navigace v mapě |
||
|
Navigace v mapě |
||
 Zoom To Native Resolution Zoom To Native Resolution |
Navigace v mapě |
||
Dekorace ‣ |
see Dekorace | ||
Režim náhledu ‣ |
|||
 Map Tips Map Tips |
see Display Properties | Atributy |
|
|
Ctrl+B | see Prostorové záložky | Atributy |
|
Ctrl+Shift+B | see Prostorové záložky | Atributy |
|
F5 | Navigace v mapě |
|
Panely ‣ |
see Panely a nástrojové lišty | ||
Nástrojové lišty ‣ |
see Panely a nástrojové lišty | ||
Přepnout režim celé obrazovky |
F11 |


Under  Linux KDE, Panels ‣, Toolbars ‣
and Toggle Full Screen Mode are rather placed in Settings
menu.
Preview mode ‣ is not available under macOS.
Linux KDE, Panels ‣, Toolbars ‣
and Toggle Full Screen Mode are rather placed in Settings
menu.
Preview mode ‣ is not available under macOS.
Vrstva
Menu Možnosti |
Zkratka |
Reference | Panel nástrojů |
|---|---|---|---|
Vytvořit vrstvu ‣ |
see Creating new vector layers | Manage Layers | |
Přidat vrstvu ‣ |
see Exploring Data Formats and Fields | Manage Layers | |
Přiložit vrstvy a skupiny... |
see Vnořování projektů | ||
Přidat ze souboru definice vrstvy... |
|||
 Copy style Copy style |
see Save and Share Layer Properties | ||
 Paste style Paste style |
see Save and Share Layer Properties | ||
|
F6 | see Working with the Attribute Table | Atributy |
|
see Digitizing an existing layer | Digitalizace |
|
|
see Digitizing an existing layer | Digitalizace |
|
|
see Digitizing an existing layer | Digitalizace |
|
| Save As... | see Creating new layers from an existing layer | ||
| Save As Layer Definition File... | |||
|
Ctrl+D | ||
|
|||
Nastavit měřítko viditelnosti vrstvy(vrstev) |
|||
Nastavit SRS vrstvy/(vrstev) |
Ctrl+Shift+C | ||
Nastavit projekt CRS z vrstvy |
|||
Vlastnosti... |
see The Vector Properties Dialog | ||
Filtrovat... |
Ctrl+F | see Query Builder | |
|
see Labels Properties | ||
 Add to Overview Add to Overview |
Ctrl+Shift+O | Manage Layers | |
 Add All To Overview Add All To Overview |
|||
 Remove All From Overview Remove All From Overview |
|||
|
Ctrl+Shift+U | Manage Layers | |
|
Ctrl+Shift+H | Manage Layers | |
 Show selected Layers Show selected Layers |
|||
 Hide selected Layers Hide selected Layers |


Nastavení
Menu Možnosti |
Zkratka |
Reference | Panel nástrojů |
|---|---|---|---|
 Custom CRS... Custom CRS... |
see Vlastní souřadnicový referenční systém | ||
 Style Manager... Style Manager... |
see The Style Manager | ||
 Configure shortcuts... Configure shortcuts... |
see Keyboard shortcuts | ||
| Customization... |
see Přizpůsobení | ||
|
see Možnosti | ||
Možnosti přichytávání... |
see Nastavení přichytávací tolerance a vyhledání poloměru |
Under Linux KDE, you’ll find more tools in Settings
menu such as Project Properties, Panels ‣,
Toolbars ‣ and Toggle Full Screen Mode.
Zásuvné moduly
Menu Možnosti |
Zkratka |
Reference | Panel nástrojů |
|---|---|---|---|
|
see The Plugins Dialog | ||
| Python Console | Ctrl+Alt+P |

Při prvním spuštění QGIS nejsou načteny všechny základní zásuvný moduly.
Vektor
Menu Možnosti |
Zkratka |
Reference | Panel nástrojů |
|---|---|---|---|
| OpenStreetMap ‣ | see Importing OpenStreetMap Vectors | ||
 Analysis Tools ‣ Analysis Tools ‣ |
see Vector menu | ||
 Research Tools ‣ Research Tools ‣ |
see Vector menu | ||
 Geoprocessing Tools ‣ Geoprocessing Tools ‣ |
see Vector menu | ||
 Geometry Tools ‣ Geometry Tools ‣ |
see Vector menu | ||
 Data Management Tools ‣ Data Management Tools ‣ |
see Vector menu |
When starting QGIS for the first time not all core plugins are loaded. Many of the above-mentioned sub-menus require the core plugin Processing to be activated.
Rastr
Menu Možnosti |
Zkratka |
Reference | Panel nástrojů |
|---|---|---|---|
| Raster calculator... | see Raster Calculator | ||
Zarovnat rastry... |
see Raster Alignment | ||
| Analysis ‣ |
see GDAL Tools Plugin | ||
| Projection ‣ |
see GDAL Tools Plugin | ||
| Conversion ‣ |
see GDAL Tools Plugin | ||
| Miscellaneous ‣ |
see GDAL Tools Plugin | ||
| Extraction ‣ |
see GDAL Tools Plugin |
When starting QGIS for the first time not all core plugins are loaded. Many of the above-mentioned sub-menus require the core plugin Processing to be activated.
Databáze
Menu Možnosti |
Zkratka |
Reference | Panel nástrojů |
|---|---|---|---|
| Database ‣ | see DB Manager Plugin | Databáze |
Při prvním spuštění QGIS nejsou načteny všechny základní zásuvný moduly.
Web
Menu Možnosti |
Zkratka |
Reference | Panel nástrojů |
|---|---|---|---|
| Metasearch | see Katalogový klient MetaSearch | Web |
Při prvním spuštění QGIS nejsou načteny všechny základní zásuvný moduly.
Zpracování
Menu Možnosti |
Zkratka |
Reference | Panel nástrojů |
|---|---|---|---|
 Toolbox Toolbox |
see The toolbox | ||
|
see The graphical modeler | ||
 History and log... History and log... |
see The history manager | ||
 Options... Options... |
see Configuring the processing framework | ||
 Results viewer... Results viewer... |
see Configuring external applications | ||
 Commander Commander |
Ctrl+Alt+M | see The QGIS Commander |

Při prvním spuštění QGIS nejsou načteny všechny základní zásuvný moduly.
Nápověda
Menu Možnosti |
Zkratka |
Reference | Panel nástrojů |
|---|---|---|---|
|
F1 | Nápověda |
|
 What’s This? What’s This? |
Shift+F1 | Nápověda |
|
API dokumentace |
|||
Nahlásit problém |
|||
Potřebujete komerční podporu? |
|||
|
Ctrl+H | ||
 Check QGIS Version Check QGIS Version |
|||
 About About |
|||
|


QGIS
Toto menu je přístupné pod macOS a obsahuje některé OS spojené příkazy.
Menu Možnosti |
Zkratka |
Reference |
|---|---|---|
Preference |
||
O QGIS |
||
Skrýt QGIS |
||
Ukázat vše |
||
Skrýt ostatní |
||
Ukončit QGIS |
Cmd+Q |
Preference a O QGIS jsou stejné příkazy jako Nastvavení ‣ Možnosti a Nápověda ‣ O programu. Ukončit QGIS koresponduje s Projekt ‣ Ukončit QGIS pod ostatními platformami.
Panely a nástrojové lišty
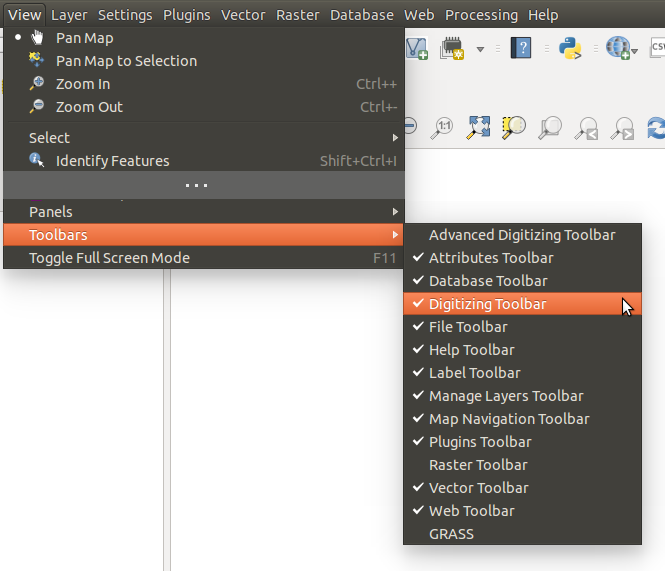
From the View menu (or Settings), you can
switch on and off QGIS widgets (Panels ‣) or toolbars
(Toolbars ‣). You can (de)activate any of them by
right-clicking the menu bar or a toolbar and choose the item you want.
Each panel or toolbar can be moved and placed wherever you feel comfortable
within QGIS interface.
The list can also be extended with the activation of Core or external
plugins.
Nástrojové lišty
The toolbar provides access to most of the same functions as the menus, plus additional tools for interacting with the map. Each toolbar item has pop-up help available. Hold your mouse over the item and a short description of the tool’s purpose will be displayed.
Každou nástrojovou lištou lze pohyboval podle vašich potřeb. Navíc každou lištu lze vypnout pomocí pravého tlačítka myši kontextového menu nebo podržením myši nad nástrojovou lištou.
Nástrojové lišty menu
Tip
Obnovení panelu nástrojů
Pokus jste omylem schovali nástrojovou lištu, můžete ji dát zpátky vybráním možnosti v menu:menuselection:Pohled –> Nástrojové lišty –> (nebo Nastavení ‣ Nástrojové lišty ‣ ). Pokud z nějakého důvodu nástrojová lišta (nebo jakýkoliv widget) úplně zmizí z rozhraní, najdete tipy jak ji získat zpět zde obnovení původního GUI.
Panely
Besides toolbars, QGIS provides by default many panels to work with. Panels are special widgets that you can interact with (selecting options, checking boxes, filling values...) in order to perform a more complex task.

Panelové menu
Níže jsou uvedeny defaultní panely poskytnuty z QGIS:
- the Browser Panel
the Měřítkový panel
Zobrazení mapy
Also called Map canvas, this is the “business end” of QGIS — maps are displayed in this area. The map displayed in this window will depend on the vector and raster layers you have chosen to load.
When you add a layer (see e.g. Opening Data), QGIS automatically looks for its Coordinate Reference System (CRS) and zooms to its extent if you work in a blank QGIS project. The layer’s CRS is then applied to the project. If there are already layers in the project, and in the case the new layer has the same CRS as the project, its features falling in the current map canvas extent will be visualized. If the new layer is in a different CRS from the project’s, you must Enable on-the-fly CRS transformation from the Project ‣ Project Properties ‣ CRS (see Define On The Fly (OTF) CRS Transformation). The added layer should now be visible if data are available in the current view extent.
The map view can be panned, shifting the focus of the map display to another region, and it can be zoomed in and out. Various other operations can be performed on the map as described in the Nástrojové lišty description. The map view and the legend are tightly bound to each other — the maps in view reflect changes you make in the legend area.
Tip
Zvětšení mapy kolečkem myši
Můžete použít kolečko myši pro přiblížení a oddálení mapy. Umístěte kurzor myši do mapové oblasti a otáčením kolečka dopředu (směrem od sebe) přiblížíte mapu. Otáčením dozadu (směrem k sobě) oddálíte mapu. Zoom je zaměřen na pozici kurzoru myši. Chování zoomu lze přizpůsobit kolečkem myši pomocí: guilabel: Nástroje mapy, která je umístěna v menuselection:Nastavení -> Možnosti.
Tip
Posouvání mapy šipkami a mezerníkem
You can use the arrow keys to pan the map. Place the mouse cursor inside the map area and click on the right arrow key to pan east, left arrow key to pan west, up arrow key to pan north and down arrow key to pan south. You can also pan the map using the space bar or the click on mouse wheel: just move the mouse while holding down space bar or click on mouse wheel.
Stavová lišta
The status bar provides you with general information about the map view, and actions processed or available and offers you tools to manage the map view.
On the left side of the status bar, you can get a summary of actions you’ve done (such as selecting features in a layer, removing layer) or a long description of the tool you are hovering over (not available for all tools). On startup, the bar status also informs you about availability of new or upgradeable plugins (if checked in Plugin Manager settings).
In case of lengthy operations, such as gathering of statistics in raster layers or rendering several layers in map view, a progress bar is displayed in the status bar to show the current progress of the action.
The ![]() Coordinate option shows the current position of the mouse,
following it while moving across the map view. You can set the unit (and precision)
to use in the project properties, General tab.
Click on the small button at the left of the textbox to toggle between
the Coordinate option and the
Coordinate option shows the current position of the mouse,
following it while moving across the map view. You can set the unit (and precision)
to use in the project properties, General tab.
Click on the small button at the left of the textbox to toggle between
the Coordinate option and the  Extents option that displays
in map units, the coordinates of the current lower leftmost and upper rightmost
points of the map view, as you pan and zoom in and out.
Extents option that displays
in map units, the coordinates of the current lower leftmost and upper rightmost
points of the map view, as you pan and zoom in and out.
Next to the coordinate display you will find the Scale display. It shows the scale of the map view. If you zoom in or out, QGIS shows you the current scale. There is a scale selector, which allows you to choose among predefined and custom scales to assign to the map view.
On the right side of the scale display you can define a current magnification level for your map view. This allows to zoom in to a map without altering the map scale, making it easier to accurately tweak the positions of labels and symbols. The magnification level is expressed as a percentage. If the Magnifier has a level of 100%, then the current map is not magnified. Additionally, a default magnification value can be defined within Settings ‣ Options ‣ Rendering ‣ Rendering behaviour, which is very useful for high resolution screen to avoid too small symbols.
To the right of the magnifier tool you can define a current clockwise rotation for your map view in degrees.
On the right side of the status bar, there is a small checkbox which can be used to temporarily prevent layers being rendered to the map view (see section Vykreslování).
To the right of the render functions, you find the  Current CRS: icon with the EPSG code of the current
project CRS. Clicking on this lets you Enable ‘on the fly’ CRS
transformation properties for the current project and apply another CRS to the
map view.
Current CRS: icon with the EPSG code of the current
project CRS. Clicking on this lets you Enable ‘on the fly’ CRS
transformation properties for the current project and apply another CRS to the
map view.
Finally, the  Messages button opens the Log
Messages Panel which informs you on underlying process (QGIS startup, plugins
loading, processing tools...)
Messages button opens the Log
Messages Panel which informs you on underlying process (QGIS startup, plugins
loading, processing tools...)
Tip
Výpočet správného měřítka vašeho mapového plátna
When you start QGIS, the default CRS is WGS 84 (epsg 4326) and
units are degrees. This means that QGIS will interpret any
coordinate in your layer as specified in degrees. To get correct scale values,
you can either manually change this setting, e.g. to meters, in the General
tab under Project ‣ Project Properties, or you can use
the Current CRS: icon seen above. In the latter case,
the units are set to what the project projection specifies (e.g., +units=us-ft).
Všimněte si, že volba CRS při spuštění může být nastavena v :menuselection: “Nastavení -> Volba -> CRS”.