重要
Translation is a community effort you can join. This page is currently translated at 31.40%.
13.1. 表达式
基于图层数据和预构建或用户定义的函数, 表达式 提供了一种强大的方式来操作属性值、几何图形和变量,以便动态更改几何图形样式、标注的内容或位置、图表的值、布局项的高度、选择一些要素、创建虚拟字段等。
备注
可以在 函数列表 中找到用于编写表达式的默认函数和变量的列表,其中包含详细信息和示例。
13.1.1. 表达式字符串构建器
用于构建表达式的主对话框,QGIS的许多部件都可以使用 表达式字符串构建器 ,尤其是以下情况下访问特别有用:
点击
 按钮;
按钮;使用
 按表达式选择... 工具 选择要素 ;
使用
 字段计算器 等工具 编辑属性 ;
使用
 数据定义重写 工具控制符号、标注或布局项参数 (请参阅 Data defined override setup) ;
构建 几何图形生成器 符号图层;
完成一些 地理处理 工作。
通过表达式构建器对话框可以访问:
Expression tab which, thanks to a list of predefined functions, helps to write and check the expression to use;
函数编辑器选项卡 ,通过创建自定义函数来帮助扩展函数列表。
13.1.1.1. 界面
表达式 选项卡提供了使用函数、图层字段和值编写表达式的主界面,包含以下控件:
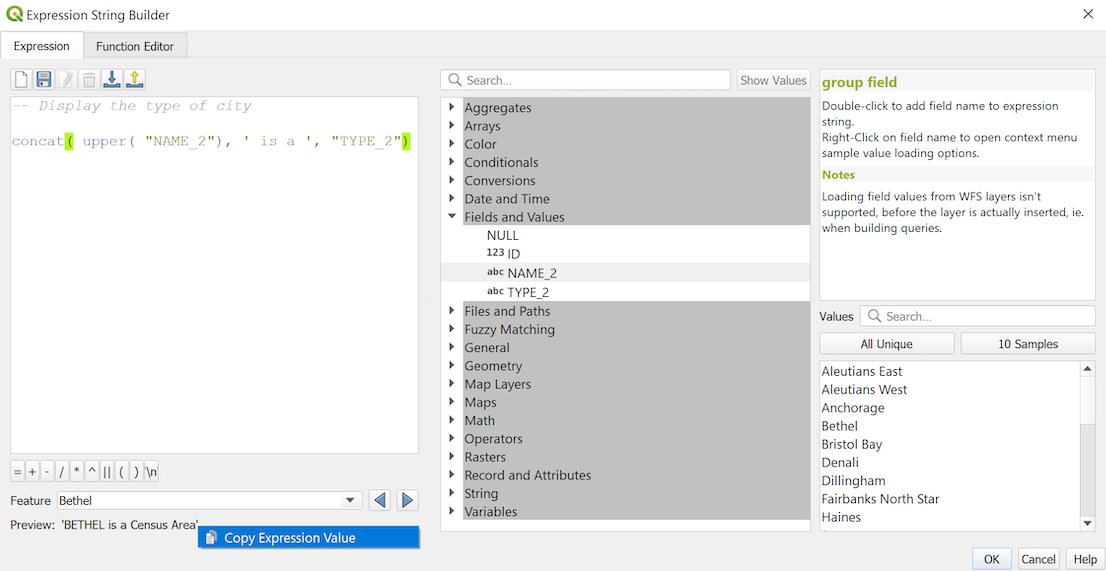
图 13.1 表达式选项卡
用于键入或粘贴表达式的表达式编辑区域,自动补全功能可用于加快表达式的编写速度:
输入文本的对应变量、函数名和字段名,如下所示:使用 上 和 下 方向箭浏览条目,按 Tab 键插入表达式,或只需单击所需的条目。
填充时显示函数参数。
QGIS还会检查表达式的正确性,并使用以下方法突出显示所有错误:
下划线: 表示未知函数、参数错误或无效;
标记: 表示单个位置的每个其他错误 (例如,缺少括号、意外字符)。
小技巧
用备注记录您的表达式
When using complex expression, it is good practice to add text either as a multiline comment or inline comments to help you remember.
/*
Labels each region with its highest (in altitude) airport(s)
and altitude, eg 'AMBLER : 264m' for the 'Northwest Artic' region
*/
with_variable(
  'airport_alti', -- stores the highest altitude of the region
  aggregate(
    'airports',
    'max',
    "ELEV", -- the field containing the altitude
    -- and limit the airports to the region they are within
    filter := within( @geometry, geometry( @parent ) )
  ),
    aggregate( -- finds airports at the same altitude in the region
      'airports',
      'concatenate',
      "NAME",
      filter := within( @geometry, geometry( @parent ) )
        and "ELEV" = @airport_alti
    )
    || ' : ' || @airport_alti || 'm'
    -- using || allows regions without airports to be skipped
)
Above the expression editor, a set of tools helps you:
 Clear the expression editor
Create and manage user expressions
Under the expression editor, you find:
A set of basic operators to help you build the expression
An indication of the expected format of output when you are data-defining feature properties
A live Output preview of the expression (up to 60 characters), evaluated on the first feature of the Layer by default. To view output preview text exceeding 60 characters, you can hover your cursor over the text to display a tooltip pop-up containing the entire output preview. To copy the output preview text onto your clipboard, right-click on the output preview text and select
 Copy Expression Value.
You can browse and evaluate other features of the layer using the Feature combobox (the values are taken from the display name property of the layer).
In case of error, it indicates it and you can access the details with the provided hyperlink.
A function selector displays the list of functions, variables, fields... organized in groups. A search box is available to filter the list and quickly find a particular function or field. Double-clicking an item adds it to the expression editor.
A help panel displays help for each selected item in the function selector.
小技巧
Press Ctrl+Click when hovering a function name in an expression to automatically display its help in the dialog.
A field's values widget shown when a field is selected in the function selector helps to fetch features attributes:
Look for a particular field value
Display the list of All Unique or 10 Samples values. Also available from right-click.
When the field is mapped with another layer or a set of values, i.e. if the field widget is of RelationReference, ValueRelation or ValueMap type, it's possible to list all the values of the mapped field (from the referenced layer, table or list). Moreover, you can filter this list to
 Only show values in use in the current field.
Double-clicking a field value in the widget adds it to the expression editor.
小技巧
The right panel, showing functions help or field values, can be collapsed (invisible) in the dialog. Press the Show Values or Show Help button to get it back.
13.1.1.2. Writing an expression
QGIS expressions are used to select features or set values. Writing an expression in QGIS follows some rules:
The dialog defines the context: if you are used to SQL, you probably know queries of the type select features from layer where condition or update layer set field = new_value where condition. A QGIS expression also needs all these information but the tool you use to open the expression builder dialog provides parts of them. For example, giving a layer (
buildings) with a field (height):pressing the
Select by expression tool means that
you want to "select features from buildings". The condition is the
only information you need to provide in the expression text widget,
e.g. type "height" > 20to select buildings that are higher than 20.with this selection made, pressing the
Field calculator
button and choosing "height" as Update existing field, you already
provide the command "update buildings set height = ??? where height > 20".
The only remaining bits you have to provide in this case is the new value,
e.g. just enter 50in the expression editor textbox to set the height of the previously selected buildings.
Pay attention to quotes: single quotes return a literal, so a text placed between single quotes (
'145') is interpreted as a string. Double quotes will give you the value of that text so use them for fields ("myfield"). Fields can also be used without quotes (myfield). No quotes for numbers (3.16).备注
Functions normally take as argument a string for field name. Do:
attribute( @atlas_feature, 'height' ) -- returns the value stored in the "height" attribute of the current atlas feature
And not:
attribute( @atlas_feature, "height" ) -- fetches the value of the attribute named "height" (e.g. 100), and use that value as a field
                                      -- from which to return the atlas feature value. Probably wrong as a field named "100" may not exist.
小技巧
Use named parameters to ease expression reading
Some functions require many parameters to be set. The expression engine supports the
use of named parameters. This means that instead of writing the cryptic expression
clamp( 1, 2, 9), you can use clamp( min:=1, value:=2, max:=9). This also allows
arguments to be switched, e.g. clamp( value:=2, max:=9, min:=1). Using named parameters
helps clarify what the arguments for an expression function refer to, which is helpful
when you are trying to interpret an expression later!
13.1.1.3. Some use cases of expressions
From the Field Calculator, calculate a "pop_density" field using the existing "total_pop" and "area_km2" fields:
"total_pop" / "area_km2"
Label or categorize features based on their area:
CASE WHEN $area > 10 000 THEN 'Larger' ELSE 'Smaller' END
Update the field "density_level" with categories according to the "pop_density" values:
CASE WHEN "pop_density" < 50 THEN 'Low population density'
     WHEN "pop_density" >= 50 and "pop_density" < 150 THEN 'Medium population density'
     WHEN "pop_density" >= 150 THEN 'High population density'
END
Apply a categorized style to all the features according to whether their average house price is smaller or higher than 10000€ per square metre:
"price_m2" > 10000
Using the "Select By Expression..." tool, select all the features representing areas of “High population density” and whose average house price is higher than 10000€ per square metre:
"density_level" = 'High population density' and "price_m2" > 10000
The previous expression could also be used to define which features to label or show on the map.
Select features that overlap a natural zone from the "lands" layer:
overlay_intersects( layer:='lands', filter:="zone_type"='Natural' )
Count for each feature the number of buildings they contain:
array_length( overlay_contains( layer:='buildings', expression:=@id ) )
Create a different symbol (type) for the layer, using the geometry generator:
point_on_surface( @geometry )
Given a point feature, generate a closed line (using
make_line) around its geometry:make_line( -- using an array of points placed around the original array_foreach( -- list of angles for placing the projected points (every 90°) array:=generate_series( 0, 360, 90 ), -- translate the point 20 units in the given direction (angle) expression:=project( @geometry, distance:=20, azimuth:=radians( @element ) ) ) )In a print layout label, display the name of the "airports" features that are within the layout "Map 1" item:
with_variable( 'extent',
               map_get( item_variables( 'Map 1' ), 'map_extent' ),
               aggregate( 'airports', 'concatenate', "NAME",
                          intersects( @geometry, @extent ), ' ,'
                        )
             )
13.1.1.4. Saving Expressions
Using the  Add current expression to user expressions button
above the expression editor frame, you can save important expressions you want
to have quick access to. These are available from the User expressions group
in the middle panel. They are saved under the user profile
(
Add current expression to user expressions button
above the expression editor frame, you can save important expressions you want
to have quick access to. These are available from the User expressions group
in the middle panel. They are saved under the user profile
(<userprofile>/QGIS/QGIS3.ini file) and available in all expression
dialogs inside all projects of the current user profile.
A set of tools available above the expression editor frame helps you manage the user expressions:
- Add the current expression to user expressions: store the
expression in the user profile. A label and a help text can be added for
easy identification.
 Edit selected expression from user expressions,
as well as their help and label
Edit selected expression from user expressions,
as well as their help and label Remove selected expression from user expressions
 Import user expressions from a
 .jsonfile into the active user profile folder Export user expressions as a
 .jsonfile; all the user expressions in the user profileQGIS3.inifile are shared
13.1.2. Function Editor
With the Function Editor tab, you are able to write your own functions in Python language. This provides a handy and comfortable way to address particular needs that would not be covered by the predefined functions.
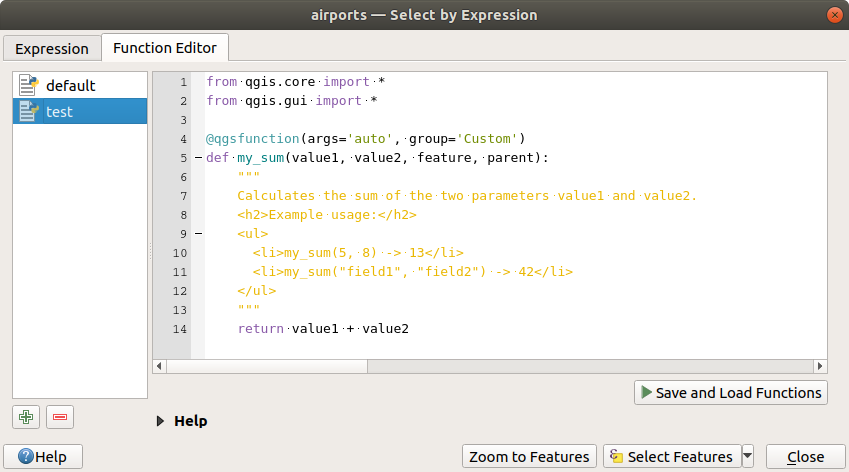
图 13.2 The Function Editor tab
To create a new function:
Press the
 New File button.
Enter a name to use in the form that pops up and press OK.
A new item of the name you provide is added in the left panel of the Function Editor tab; this is a Python
.pyfile based on QGIS template file and stored in the/python/expressionsfolder under the active user profile directory.The right panel displays the content of the file: a python script template. Update the code and its help according to your needs.
Press the
 Save and Load Functions button.
The function you wrote is added to the functions tree in the Expression
tab, by default under the
Save and Load Functions button.
The function you wrote is added to the functions tree in the Expression
tab, by default under the Customgroup.Enjoy your new function.
If the function requires improvements, enable the Function Editor tab, do the changes and press again the
Save and Load
Functions button to make them available in the file, hence in any expression
tab.
Custom Python functions are stored under the user profile directory, meaning that at
each QGIS startup, it will auto load all the functions defined with the current user
profile. Be aware that new functions are only saved in the /python/expressions
folder and not in the project file.
If you share a project that uses one of your custom functions you will need to also
share the .py file in the /python/expressions folder.
To delete a custom function:
Enable the Function Editor tab
Select the function in the list
Press the
 Remove selected function. The function is
removed from the list and the corresponding
Remove selected function. The function is
removed from the list and the corresponding .pyfile deleted from the user profile folder.
Example
Here's a short example on how to create your own my_sum function that
will operate with two values.
from qgis.core import *
from qgis.gui import *

@qgsfunction(args='auto', group='Custom')
def my_sum(value1, value2, feature, parent):
    """
    Calculates the sum of the two parameters value1 and value2.
    <h2>Example usage:</h2>
    <ul>
      <li>my_sum(5, 8) -> 13</li>
      <li>my_sum("field1", "field2") -> 42</li>
    </ul>
    """
    return value1 + value2
The @qgsfunction decorator accepts the following arguments:
args: the number of arguments. When using theargs='auto'argument the number of function arguments required will be calculated by the number of arguments the function has been defined with in Python (minus 2 -feature, andparent). Withargs = -1, any number of arguments are accepted.The
groupargument indicates the group in which the function should be listed in the Expression dialog.usesgeometry=Trueif the expression requires access to the features geometry. By defaultFalse.handlesnull=Trueif the expression has custom handling for NULL values. IfFalse(default), the result will always be NULL as soon as any parameter is NULL.referenced_columns=[list]: An array of attribute names that are required to the function. Defaults to[QgsFeatureRequest.ALL_ATTRIBUTES].
The function itself allows following arguments:
any number and type of parameters you want to pass to your function, set before the following arguments.
feature: the current featureparent: theQgsExpressionobjectcontext: If there is an argument calledcontextfound at the last position, this variable will contain aQgsExpressionContextobject, that gives access to various additional information like expression variables. E.g.context.variable( 'layer_id' )
The previous example function can then be used in expressions:
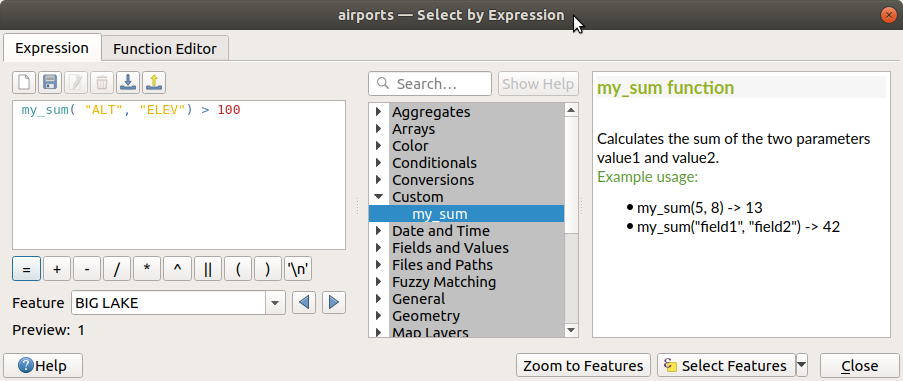
图 13.3 Custom Function added to the Expression tab
Further information about creating Python code can be found in the PyQGIS Developer Cookbook.