14.6. Lesson: 지도책 도구로 상세지도 생성
체계적인 표본 조사구 설계를 완료했고 현장 팀도 내비게이션 기기에 GPS 좌표를 입력했습니다. 또한 표본 조사구에서 산정된 정보를 수집하는 데 쓰일 현장 조사 양식도 준비됐습니다. 그런데 현장 팀이 보다 쉽게 표본 조사구를 찾을 수 있도록 해당 지역에 대한 대략적인 정보와 함께 몇몇 표본 조사구를 기준으로 지상에 대한 정보를 확실히 알아볼 수 있는 상세지도 여러 장을 요청했습니다. 여러분은 지도책(atlas) 도구를 이용해서 양식이 공통된 지도 여러 장을 자동적으로 생성할 수 있습니다.
이 강의의 목표: QGIS에서 지도책 도구를 사용하여 현장 목록화 작업에 도움이 될, 인쇄할 수 있는 상세한 맵을 생성하기.
14.6.1.  Follow Along: 인쇄 조판 준비
삼림 지역 및 표본 조사구의 상세한 맵을 자동생산하기 전에, 현장 조사에 도움이 될 모든 요소들을 갖춘 지도 템플릿을 만들어야 합니다. 물론 적절한 스타일을 적용하는 일이 가장 중요하지만, 이전에 경험했듯이, 인쇄 지도를 완성하기 위해서는 다른 요소들도 많이 필요합니다.
Open the QGIS project from the previous lesson
forest_inventory.qgs. You should have at least the following layers:forest_stands_2012 (with a 50% transparency, green fill and darker green border lines)
systematic_plots_clip
rautjarvi_aerial
Save the project with a new name,
map_creation.qgs.
인쇄할 수 있는 맵을 생성하려면 Layout Manager 도구를 사용하면 됩니다.
In the Layout manager dialog:
Under New from template, press the Create… button next to the Empty layout entry
Name your print layout
forest_map.Press OK. A new print layout is created and opened, showing a blank paper.
In the print Layout window, ensure properties are set for an A4 paper:
Right-click over the paper and select Page properties. The Page properties panel is open on the right side of the layout.
Check Size is A4.
Check Orientation is Landscape.
Enable the Layout tab next to the Page properties panel and set Export resolution to
300 dpi.
서로 다른 요소들을 배치하는 데 캔버스 그리드를 사용하면 맵 작성 작업이 더 쉬워집니다. 조판기 그리드 설정을 살펴봅시다.
In the Layout tab expand the Guides and Grid region.
Check that Grid spacing is set to
10 mmand that Snap tolerance is set to5 px.
그리드 사용을 활성화해야 합니다.
메뉴에서 를 클릭하십시오.
Show grid 체크박스를 체크합니다.
Snap to grid 체크박스를 체크합니다.
Notice that options for using Guides are checked by default, which allows you to see guiding lines when you are moving elements in the layout.
이제 조판에 요소를 추가할 수 있습니다. 레이어의 심볼을 변경할 경우 맵 캔버스가 어떻게 보이는지 살펴볼 수 있도록 맵 요소를 먼저 추가합니다.
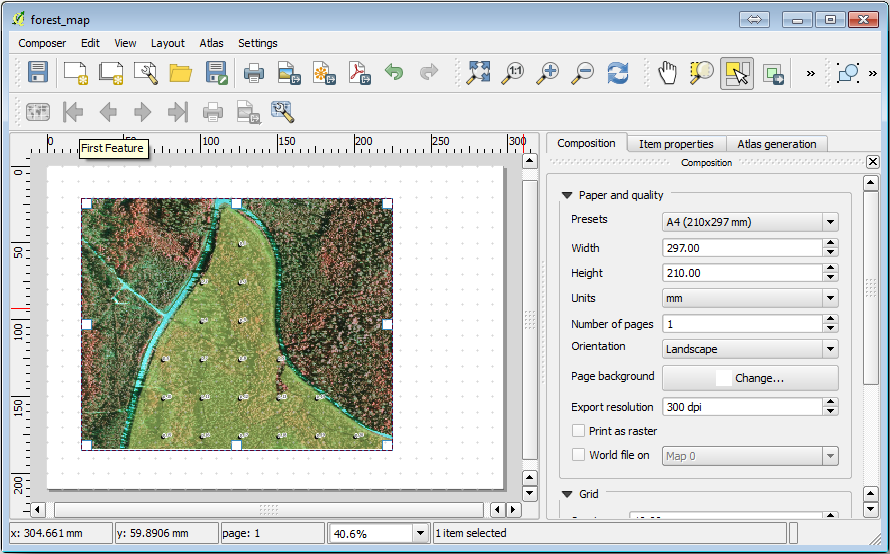
마우스 커서가 캔버스 그리드에 스냅되어 붙는 걸 알 수 있을 겁니다. 다른 요소를 추가할 때 이 기능을 사용하십시오. 좀 더 정확히 작업하고 싶다면, 그리드의 Spacing 설정을 변경하십시오. 작업 도중 어떤 이유로든 그리드에 스냅하고 싶지 않게 될 경우, 메뉴에서 언제든지 체크/해제할 수 있습니다.
14.6.2.  Follow Along: 배경 맵 추가
Leave the layout open but go back to the map. Let’s add some background data and create some styling so that the map content is as clear as possible.
exercise_data\forestry\폴더에 있는 배경 래스터 파일basic_map.tif를 추가하십시오.If prompted select the ETRS89 / ETRS-TM35FIN CRS for the raster.
배경 맵에 이미 스타일이 적용된 걸 알 수 있습니다. 이렇게 미리 준비된 유형의 지도 제작용 래스터는 많이 있습니다. 이 배경 맵은 벡터 데이터를 기반으로 생성되어 표준 포맷 스타일을 적용해서, 여러 벡터 레이어에 일일이 스타일을 적용하면서 괜찮은 결과가 나올지 걱정할 필요가 없도록 래스터로 저장된 파일입니다.
이제 조사구 주변에 서너 개의 라인만 보일 때까지 표본 조사구를 확대해보십시오.
The current styling of the sample plots is not the best:
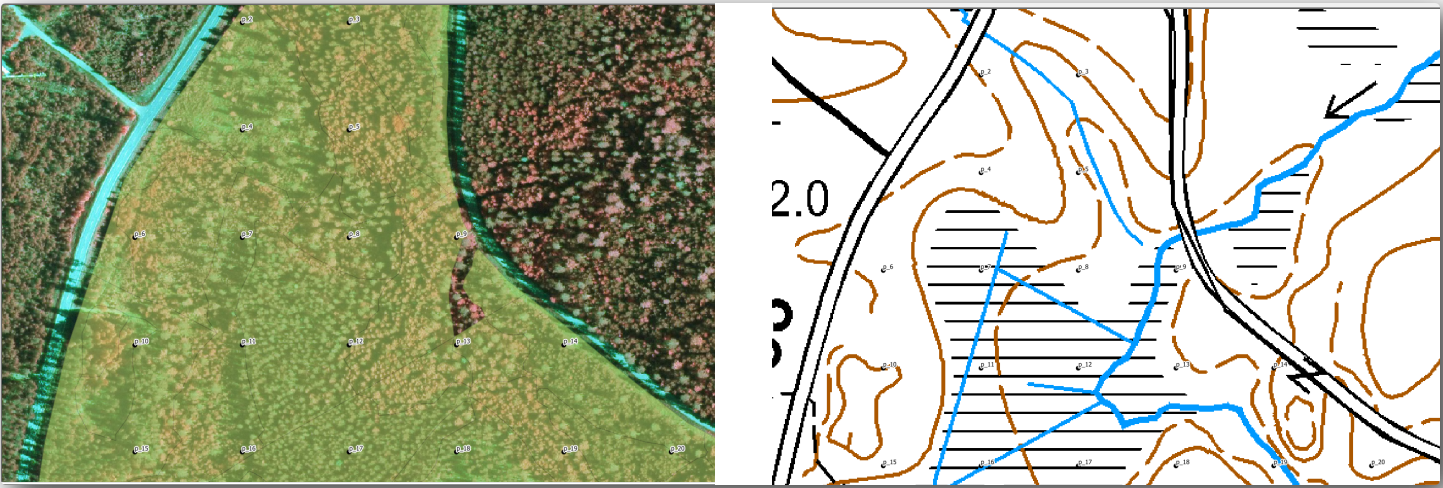
While during the last exercises, the white buffer was OK on top of the aerial image, now that the background image is mostly white you barely can see the labels. But how does it look in the print layout? Let’s check it:
Go to the print layout window.
Use the
 Select/Move item button to select the map element
in the layout.
Select/Move item button to select the map element
in the layout.Item properties 탭으로 이동합니다.
If you need to refresh the element, click on
 Update map preview.
Obviously this is not good enough; you want to make the plot numbers as clearly visible as possible for the field teams.
14.6.3.  Try Yourself 레이어의 심볼 변경
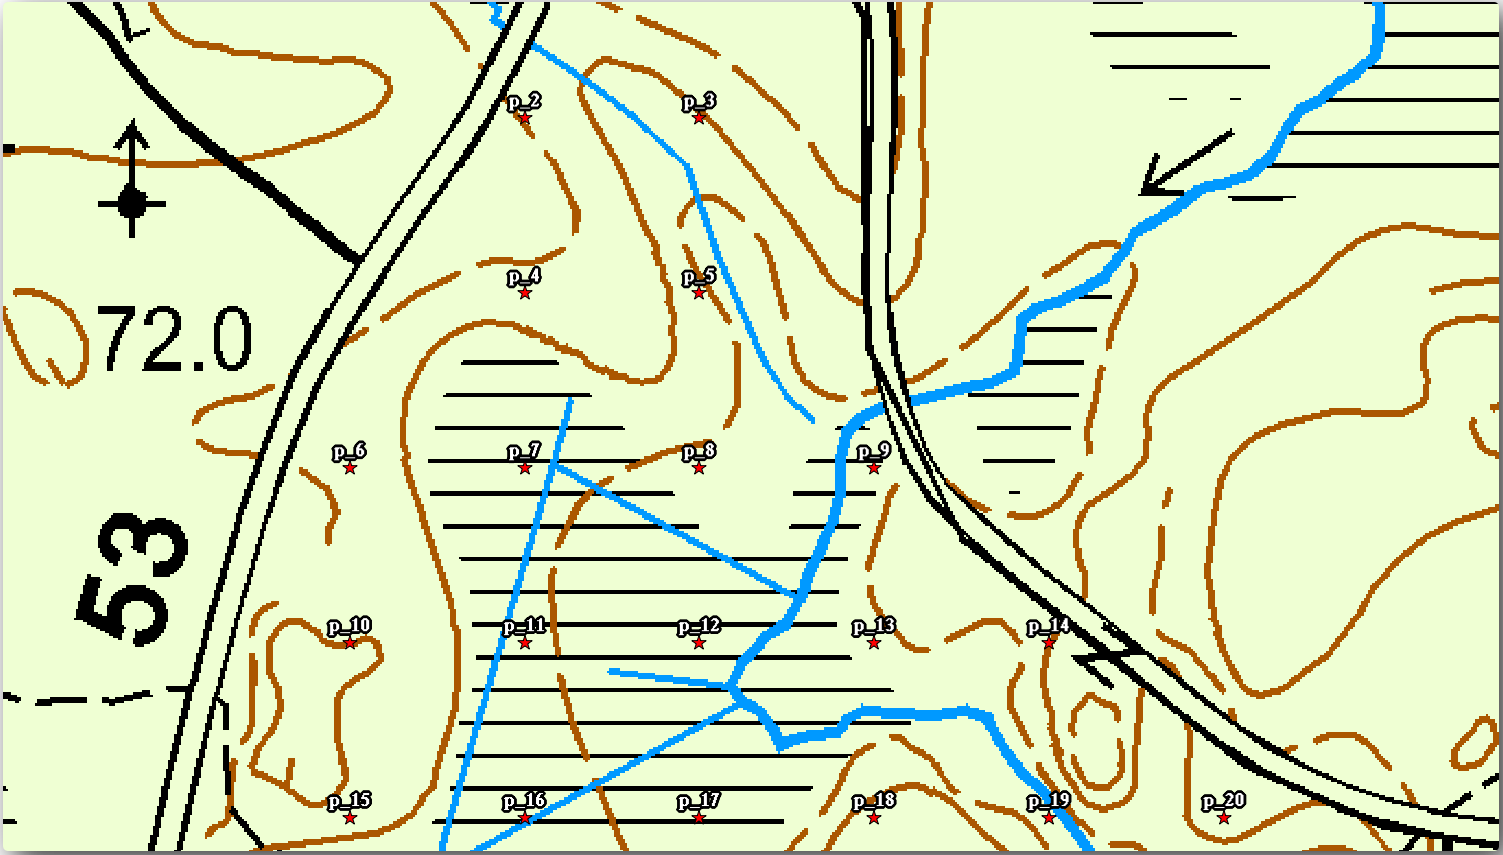
Module: 기본 맵 생성 및 탐색 강의에서 심볼에 대해, Module: 벡터 데이터 범주화 강의에서 라벨에 대해 배웠습니다. 필요하다면 다시 해당 강의들을 복습해서 사용할 수 있는 옵션 및 도구에 대한 기억을 되살리십시오. 이번 예제의 목표는 가능한 한 조사구의 위치와 명칭을 뚜렷이 보이게 만들지만 동시에 언제나 배경 맵의 요소들도 볼 수 있도록 만드는 일입니다. 다음 그림을 기준으로 삼아도 좋습니다.
You will use later the the green styling of the forest_stands_2012 layer.
In order to keep it, and have a visualization of it that shows only the stand borders:
Right click on forest_stands_2012 and select Duplicate
You get a new layer named
forest_stands_2012 copythat you can use to define a different style, for example with no filling and red borders.이제 수종경계를 두 가지 서로 다른 스타일로 보여줄 수 있게 되었습니다. 상세지도에 어떤 스타일을 사용할지, 여러분이 선택할 수 있습니다.
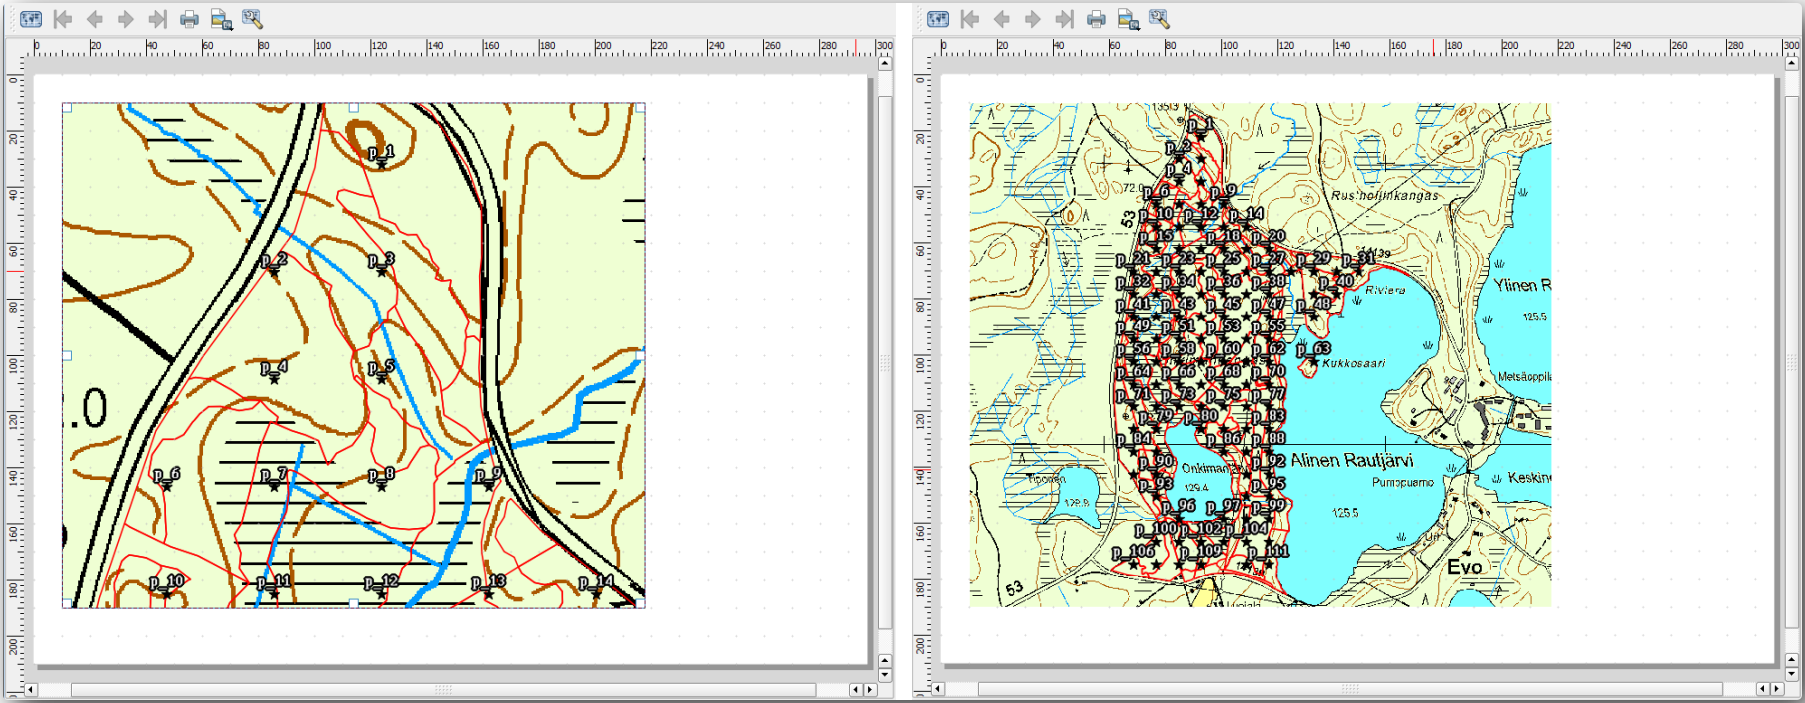
Go back to the print layout window often to see what the map would look like. For the purposes of creating detailed maps, you are looking for a symbology that looks good not at the scale of the whole forest area (left image below) but at a closer scale (right image below). Remember to use
 Update map preview and
  Set map extent to match main canvas extent
whenever you change the zoom in your map or the layout.
14.6.4.  Try Yourself 기본 맵 템플릿 생성
Once you have a symbology you are happy with, you are ready to add some more information to your printed map. Add at least the following elements:
제목
스케일바
사용자 맵을 위한 격자 테두리
격자 주위의 좌표 표시
You have created a similar layout already in Module: 지도 레이아웃. Go back to that module as you need. You can look at this example image for reference:
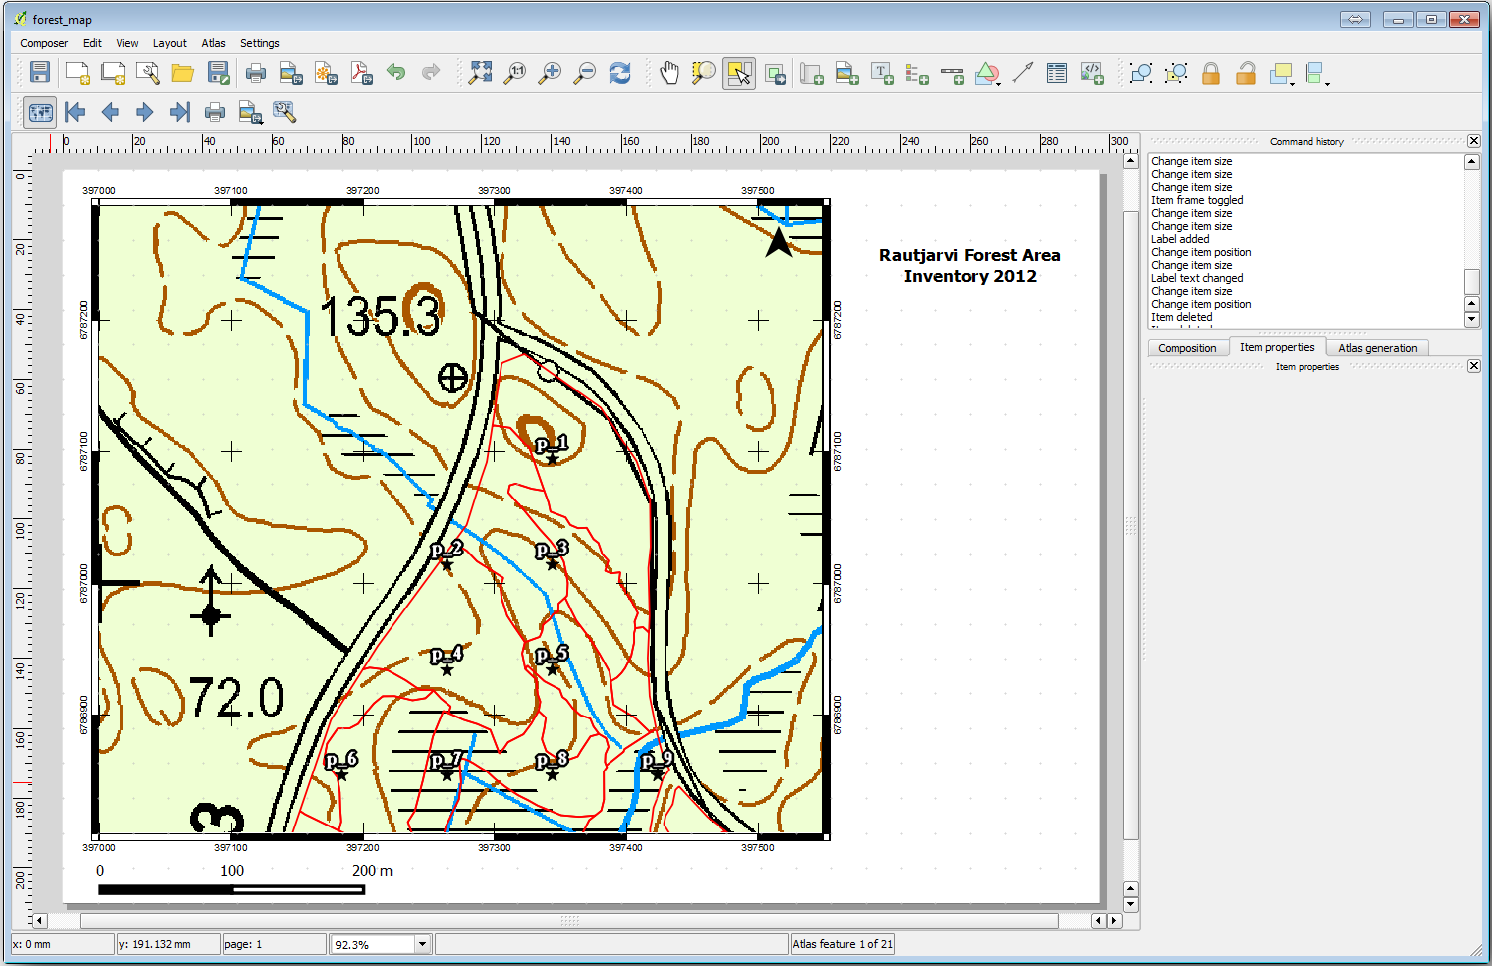
여러분의 맵을 이미지 파일로 내보내기 한 다음 살펴보십시오.
메뉴에서 를 클릭합니다.
Use for example the JPG format.
맵을 인쇄하면 바로 이렇게 보일 것입니다.
14.6.5.  Follow Along: 인쇄 조판에 더 많은 요소를 추가하기
예시로 보여드린 맵 템플릿 이미지에서 아마 알아차렸을 테지만, 캔버스 오른쪽에 공간이 많이 남아 있습니다. 이 공간에 어떤 것들을 넣을 수 있는지 알아봅시다. 이번 강의의 목적을 생각하면 범례가 꼭 필요하지는 않지만, 개요(overview) 맵과 텍스트 상자 몇 개를 추가하면 맵이 훨씬 쓸 만해질 것입니다.
현장 팀이 전체 삼림 지역 안에서 상세지도가 어느 곳을 가리키는지 파악하는 데 개요 맵이 도움이 됩니다.
캔버스의 제목 바로 아래에 맵 요소를 하나 더 추가하십시오.
Item properties 탭으로 이동, Overview 드롭다운 메뉴를 펼치십시오.
Overview frame 을 Map 0 로 설정합니다. 이렇게 하면 상세 맵이 개요 맵 어디에 위치하는지 그 범위를 어두운 사각형으로 표시해줍니다.
Check also the Frame option with a black color and a Thickness of
0.30.
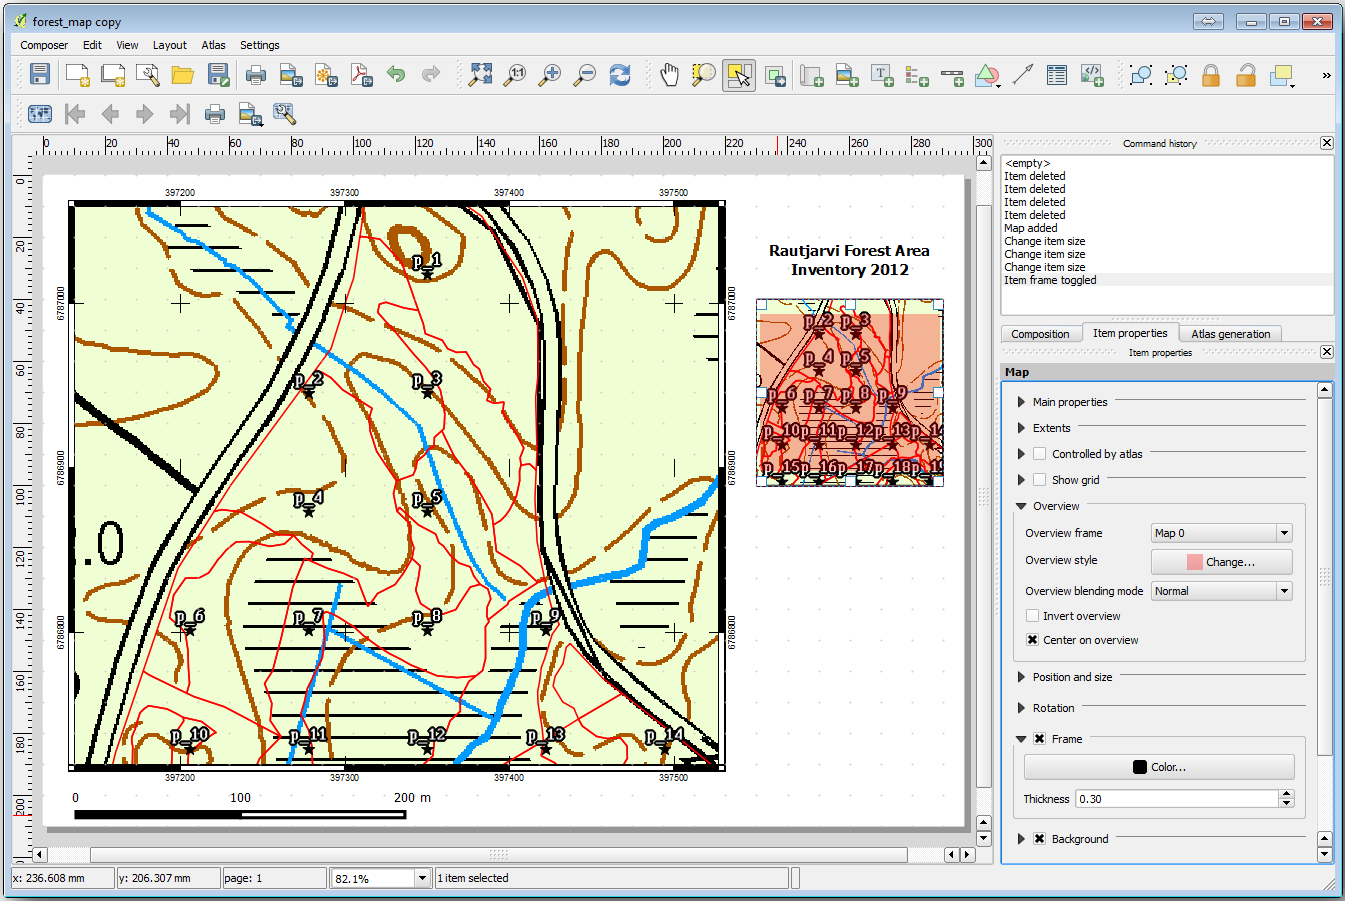
지금 개요 맵은 여러분이 바라는 대로 삼림 지역 전체를 보여주고 있지 않습니다. 개요 맵은 삼림 지역 전체를 보여주면서 forest_stands_2012 레이어와 배경 맵만을 표출해야 합니다. 개요 맵에 표본 조사구는 필요없습니다. 또 여러분이 레이어들의 가시성이나 순서를 변경할 때마다 개요 맵이 바뀌지 않도록 개요 맵의 뷰를 고정해야 합니다.
다시 프로젝트의 맵으로 이동하십시오. 이때 Print Layout 을 끄면 안 됩니다.
Right click the forest_stands_2012 layer and click on Zoom to Layer Extent.
Deactivate all layers except for basic_map and forest_stands_2012.
Expand the Manage map themes tool on the Layers panel and select Add theme.
Name it
basic_overview.Go back to the print layout.
With the small map selected, click the Set map extent to match main canvas extent to set its extents to what you can see in the map window.
Lock the view for the overview map by checking Follow map theme and selecting
basic_overviewunder Main properties.
Now your overview map is more what you expected and its view will not change anymore. But, of course, now your detail map is not showing anymore the stand borders nor the sample plots. Let’s fix that:
Go to the map window again and select the layers you want to be visible (
systematic_plots_clip,forest_stands_2012 copyandBasic_map).다시 표본 조사구의 라인이 서너 개만 보일 때까지 확대하십시오.
Print Layout 창으로 이동합니다.
Select the bigger map in your layout.
In Item properties click on Update preview and Set map extent to match main canvas extent.
상세 맵만 현재 맵 뷰에 보이는 대로 표출되고, 개요 맵은 여러분이 고정한 대로 변하지 않는다는 사실을 잘 기억해두세요.
또한 상세 맵의 범위가 개요 맵에 어두운 사각형으로 표시된다는 것도 기억하세요.
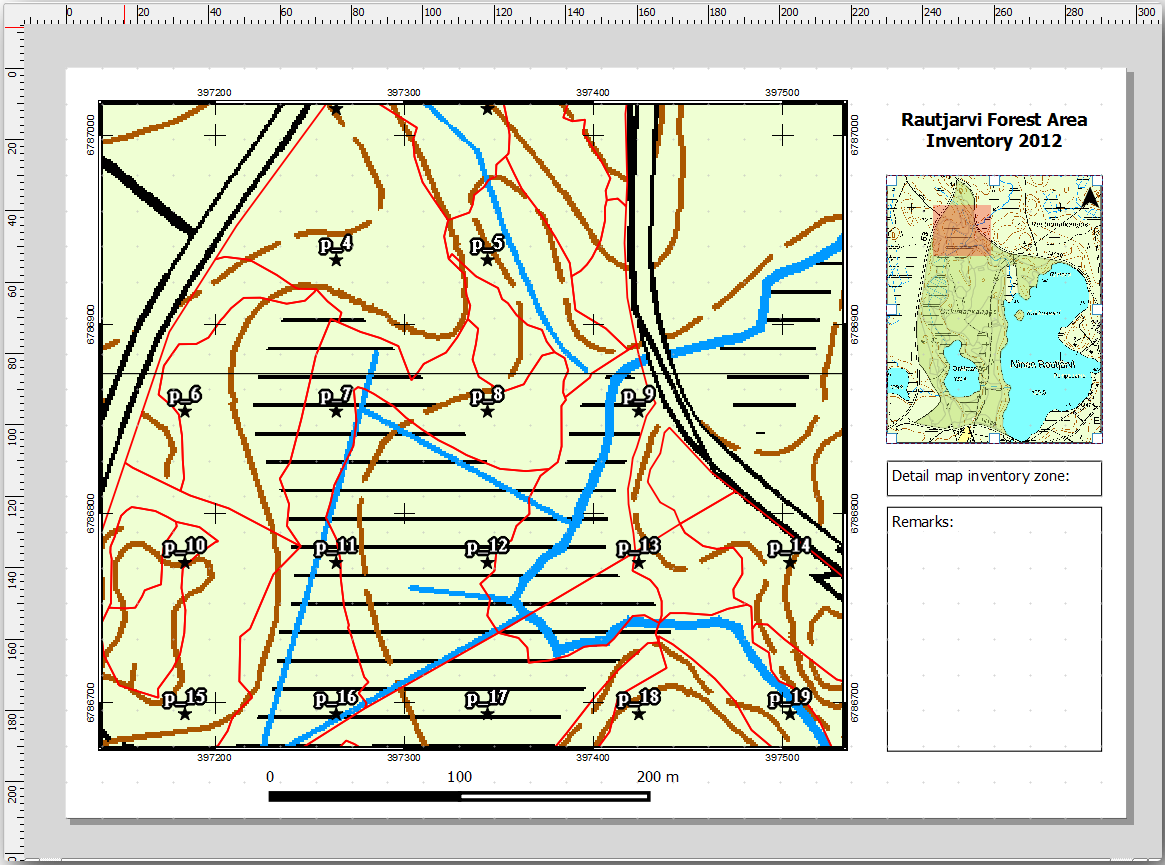
템플릿 맵의 준비가 거의 끝났습니다. 맵 하단에 텍스트 상자 두 개를 추가하고, 하나엔 ‘Detailed map zone: ‘ 그리고 다른 하나엔 ‘Remarks: ‘를 입력하십시오. 텍스트 상자를 앞의 그림처럼 배치하세요.
또 개요 맵에 북쪽을 가리키는 화살표를 추가해도 됩니다.
Click and drag a rectangle at the upper right corner of the overview map.
In Item properties Check SVG image
Browse for an arrow image.
Under Image rotation, check the Sync with map and select Map 1 (the overview map).
개요 맵에 잘 어울리도록 화살표 이미지의 크기를 조정합니다.
인쇄 조판기의 기본적인 준비가 끝났습니다. 이제 지도책 도구를 통해 이 양식의 상세지도를 필요한 만큼 얼마든지 생성할 수 있습니다.
14.6.6.  Follow Along: 지도책 커버리지 생성
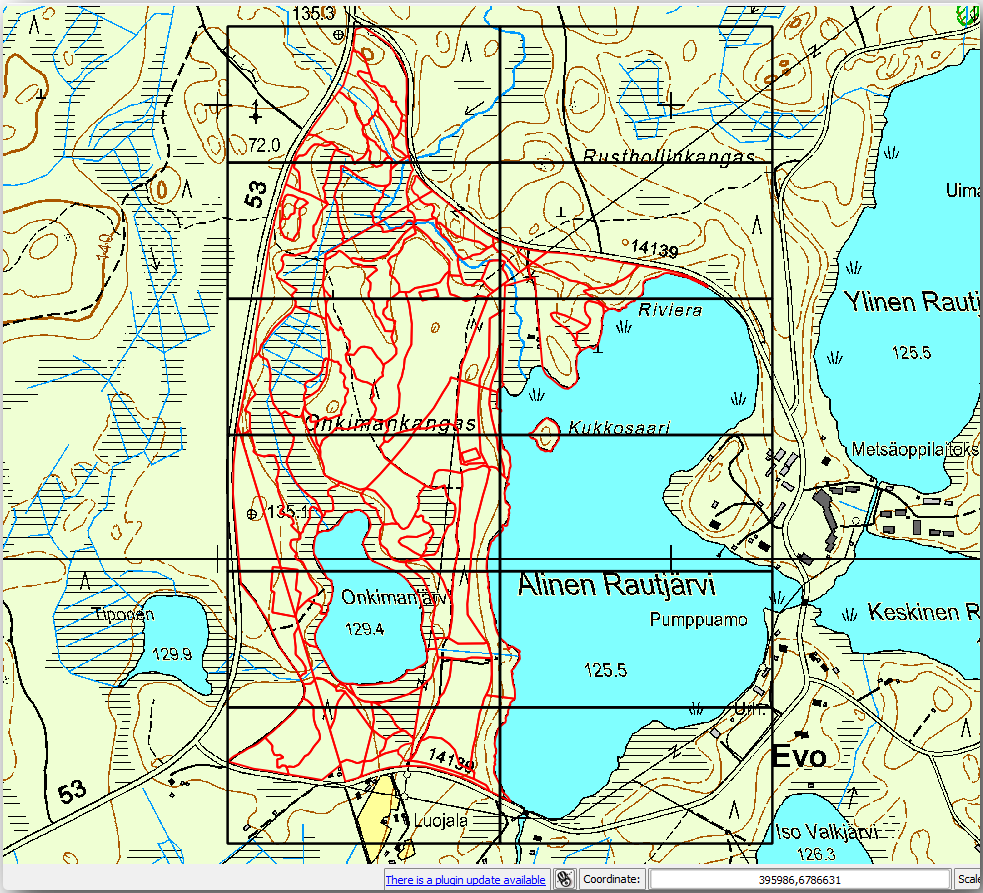
지도책 커버리지란 해당 커버리지 안에 있는 모든 피처를 표출 하는 하나의 맵, 상세지도를 생성하는 데 쓰일 벡터 레이어일 뿐입니다. 다음 단계가 어떤 작업일지 알고 싶다면, 삼림 지역에 대한 모든 상세지도를 모아놓은 다음 그림을 살펴보십시오.
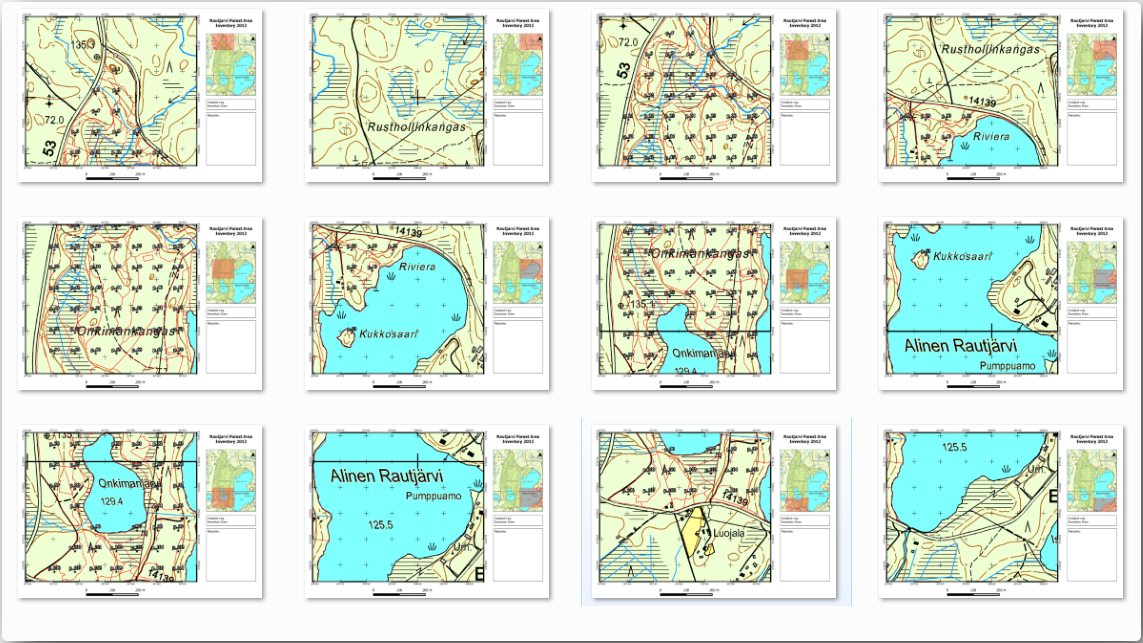
어떤 기존 레이어도 커버리지가 될 수 있지만, 이 특정한 목적을 위한 새 레이어를 생성하는 편이 더 합당할 것입니다. 삼림 지역을 커버하는 폴리곤 그리드를 생성해봅시다.
다음 그림처럼 도구를 설정하십시오.
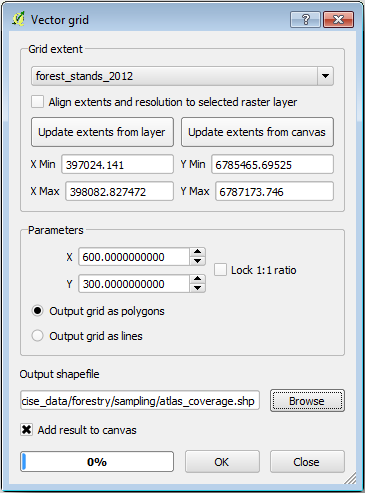
Save the output as
atlas_coverage.shp.Style the new
atlas_coveragelayer so that the polygons have no filling.
새로운 폴리곤들은 삼림 지역 전체를 커버하며, (각 폴리곤으로부터 생성된) 각각의 상세지도가 어떤 내용을 담게 될지 알 수 있습니다.
14.6.7.  Follow Along: 지도책 도구 설정
마지막 단계는 지도책 도구를 설정하는 것입니다.
Go back to the print layout.
오른쪽 패널에 있는 Atlas generation 탭을 선택합니다.
다음과 같이 옵션을 설정하십시오.
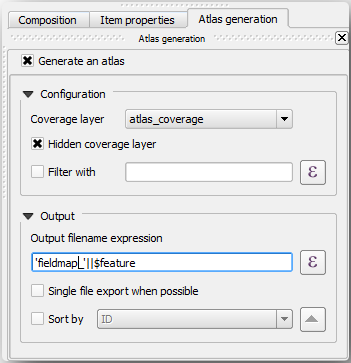
이렇게 하면 지도책 도구가
atlas_coverage레이어 안에 있는 피처(폴리곤들)를 모든 상세지도의 맵 범위로 이용하게 됩니다. 레이어의 각 피처가 상세지도 하나를 산출할 것입니다. Hidden coverage layer 옵션은 산출된 맵에 폴리곤을 보이지 않게 하는 역할을 합니다.
한 가지 더 해야 할 일이 있습니다. 모든 상세지도에 어떤 맵 요소를 업데이트할지 지도책 도구를 설정해야 합니다. 지금쯤이면 캔버스에서 더 상위 요소인 표본 조사구의 상세 뷰를 담도록 여러분이 준비해온 맵이 각 폴리곤에 따라 업데이트돼야 한다는 사실을 알 수 있을 겁니다.
Select the bigger map element (
Map 0).Item properties 탭으로 이동합니다.
목록에서 Controlled by atlas 체크박스를 체크합니다.
And set the Marging around feature to
10%. The view extent will be 10% bigger than the polygons, which means that your detail maps will have a 10% overlap.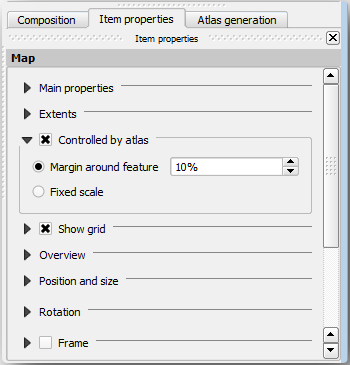
이제 지도책 맵에 대해 미리보기 도구를 사용해서 여러분의 맵이 어떻게 보일지 살펴볼 수 있습니다.
지도책 툴바 또는 메뉴의 화살표를 이용해서 생성될 맵을 둘러볼 수 있습니다.
Note that some of them cover areas that are not interesting. Let’s do something about it and save some trees by not printing those useless maps.
14.6.8.  Follow Along: 커버리지 레이어 편집
관심 지역이 아닌 지역의 폴리곤을 제거하는 작업 외에도, 여러분의 맵 안에 있는 텍스트 라벨을 사용자 지정해서 커버리지 레이어의 Attribute table 안의 내용으로 생성할 수 있습니다.
맵뷰로 다시 이동하십시오.
Enable editing for the atlas_coverage layer.
다음 그림에서 (노랑색으로) 선택된 폴리곤들을 선택하십시오.
선택한 폴리곤들을 제거합니다.
편집 모드를 해제하고 변경 사항을 저장하십시오.
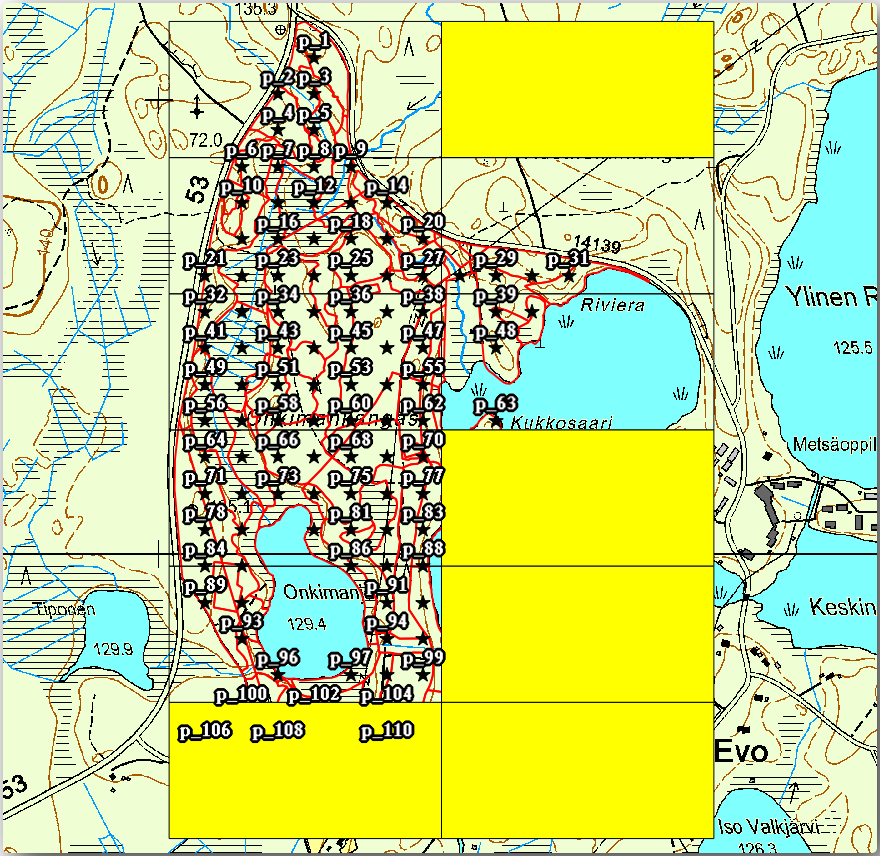
You can go back to the print layout and check that the previews of the Atlas use only the polygons you left in the layer.
현재 사용 중인 커버리지 레이어는 상세 맵의 라벨 내용으로 사용자 지정할 수 있는 쓸모 있는 정보를 담고 있지 않습니다. 그런 정보를 생성하는 첫 번째 단계로, 예를 들어 폴리곤 지역의 구역 번호와 현장 팀이 고려해야 할 의견을 담은 항목을 추가할 수 있을 것입니다.
Open the Attribute table for the atlas_coverage layer.
편집 모드를 활성화합니다.
Create a field named
Zoneof type Whole number (integer).In the Expression box write/copy/construct
$rownum.Create another field named
Remarks, of type Text (string) and a width of255.In the Expression box write
'No remarks.'. This will set all the default value for all the polygons.
The forest manager will have some information about the area that might be useful when visiting the area. For example, the existence of a bridge, a swamp or the location of a protected species. The atlas_coverage layer is probably in edit mode still, add the following text in the Remarks field to the corresponding polygons (double click the cell to edit it):
For the Zone 2:
Bridge to the North of plot 19. Siberian squirrel
between p_13 and p_14.
For the Zone 6: Difficult to transit in swamp to the North of the lake.`
For the Zone 7:
Siberian squirrel to the South East of p_94.편집 모드를 해제하고 변경 사항을 저장하십시오.
Almost ready, now you have to tell the Atlas tool that you want some of the text labels to use the information from the atlas_coverage layer’s attribute table.
Print Layout 으로 이동합니다.
Select the text label containing
Detailed map....Set the Font size to
12.라벨 안의 텍스트 끝부분에 커서를 위치시킵니다.
Item properties 탭으로 이동, Main properties 안에 있는 Insert or Edit an Expression… 을 클릭하십시오.
In the Function list double-click on the field Zone under Field and Values.
OK 를 클릭하십시오.
The text inside the box in the Item properties should show
Detail map inventory zone: [% "Zone" %]. Note that the[% "Zone" %]will be substituted by the value of the field Zone for the corresponding feature from the layer atlas_coverage.각각의 지도책 미리보기를 살펴 라벨의 내용이 제대로 표출되는지 확인하십시오.
Do the same for the labels with the text Remarks: using the field with the zone information. You can leave a break line before you enter the expression. You can see the result for the preview of zone 2 in the image below:
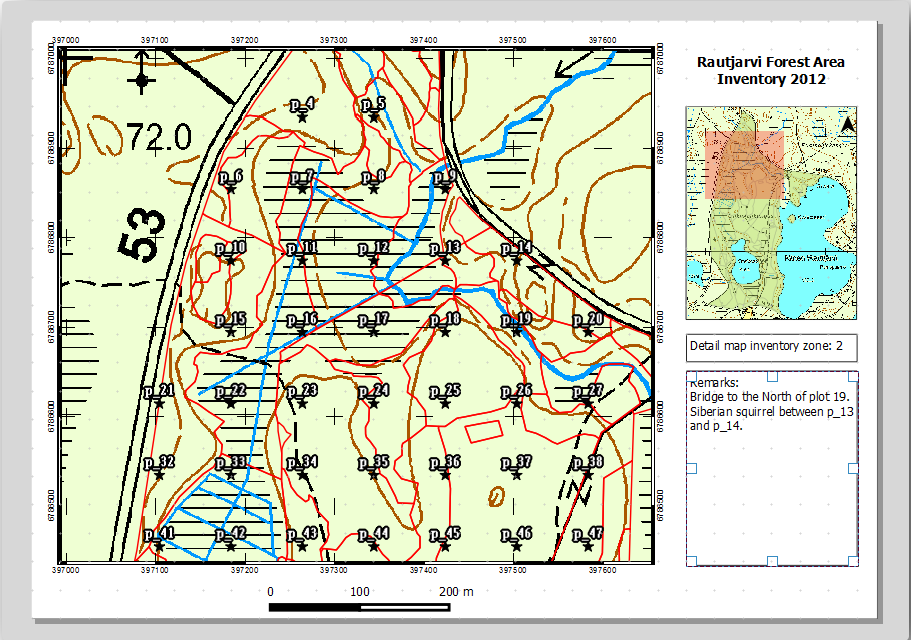
이제 곧 인쇄에 들어갈 맵들을 지도책 미리보기를 통해 살펴보세요.
14.6.9.  Follow Along: 지도 인쇄
마지막으로 여러분의 지도를 이미지 또는 PDF 파일로 인쇄 또는 내보내기할 차례입니다. 메뉴 또는 메뉴를 이용하면 됩니다. 현재 버전에서 SVG 형식으로 내보내기 기능은 제대로 동작하지 않아 좋은 산출물을 얻기 힘듭니다.
맵들을 현장 사무소에 보내 인쇄하게 할 수 있는 PDF 파일 하나로 출력해봅시다.
오른쪽 패널에 있는 Atlas generation 탭으로 이동합니다.
Output 아래에 있는 Single file export when possible 체크박스를 체크하십시오. 모든 맵을 하나의 PDF 파일로 출력합니다. 이 옵션이 해제된 경우, 맵 하나마다 PDF 파일 하나씩 출력됩니다.
메뉴를 실행하십시오.
Save the PDF file as
inventory_2012_maps.pdfin yourexercise_data\forestry\samplig\map_creation\folder.모든 작업이 제대로 됐는지 PDF 파일을 열어 확인해보십시오.
모든 맵을 개별 이미지로 쉽게 출력할 수 있습니다. (파일 하나로 생성 옵션을 해제하면 됩니다.) 다음은 그렇게 출력한 이미지의 썸네일들입니다.
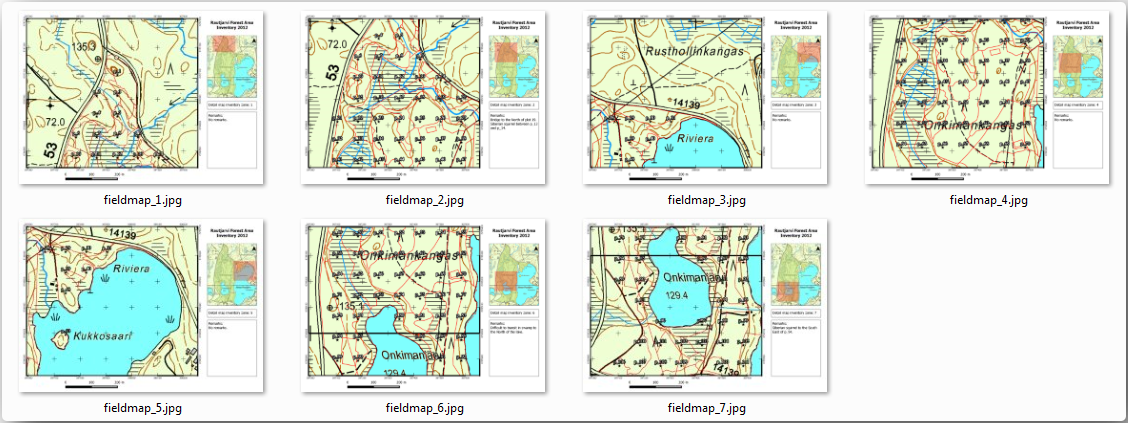
In the Print Layout, press
 Save in order
to save your print layout changes in the project. This also saves the project file.
You can reopen the project at any time and run or edit the atlas.
Save in order
to save your print layout changes in the project. This also saves the project file.
You can reopen the project at any time and run or edit the atlas.It is also possible to save your map as a layout template as
forestry_atlas.qptin yourexercise_data\forestry\map_creation\folder. Use . You will be able to use this template again and again in other projects.Close the Print Layout and the project.
14.6.10. In Conclusion
여러분은 현장에서 여러 곳의 표본 조사구를 찾아가는 데 쓰일 상세지도를 자동적으로 생성할 수 있는 맵 템플릿을 생성했습니다. 여러분도 경험했듯이 쉬운 작업은 아니었지만, 이렇게 저장한 템플릿은 향후 여러분이 다른 지역의 유사한 지도를 생성해야 할 때 큰 도움이 될 겁니다.
14.6.11. What’s Next?
In the next lesson, you will see how you can use LiDAR data to create a DEM and then use it to enhance your data and maps visibility.


