12.1. Ausdrücke
Based on layer data and prebuilt or user defined functions, Expressions offer a powerful way to manipulate attribute value, geometry and variables in order to dynamically change the geometry style, the content or position of the label, the value for diagram, the height of a layout item, select some features, create virtual field, …
Bemerkung
A list of the default functions and variables for writing expressions can be found at Liste der Funktionen, with detailed information and examples.
12.1.1. Der Ausdruckseditor
Der Hauptdialog zur Erstellung von Ausdrücken, der Ausdruckeditor ist an vielen Stellen in QGIS verfügbar. Er kann z.B. hier aufgerufen werden:
durch Klick auf den
 Knopf;
Auswahl von Objekten mit Hilfe des Tools
 Objekte über Ausdruck wählen;
Attribute bearbeiten z.B. mit Hilfe des Tools
 Feldrechner;
Änderung der Symbolisierung, der Beschriftung oder der Parameter von Layoutelementen mit Hilfe des Tools
 Datendefinierte Übersteuerung (see Datendefinierte Übersteuerung Setup);
Erstellung eines Layers mit Symbolisierung mit Hilfe des Geometriegenerators;
Ausführung einer Geoprozessierung.
Der Ausdruckseditor erlaubt den Zugang zu:
den Ausdrucksbereich der die Erstellung und Prüfung von Ausdrücken mit Hilfe einer Liste von vordefinierten Funktionen erleichtert;
den Funktionseditor der bei der Erstellung angepasster Funktionen und damit der Erweiterung der Liste der Funktionen unterstützt.
12.1.1.1. The Interface
The Expression tab provides the main interface to write expressions using functions, layer fields and values. It contains the following widgets:
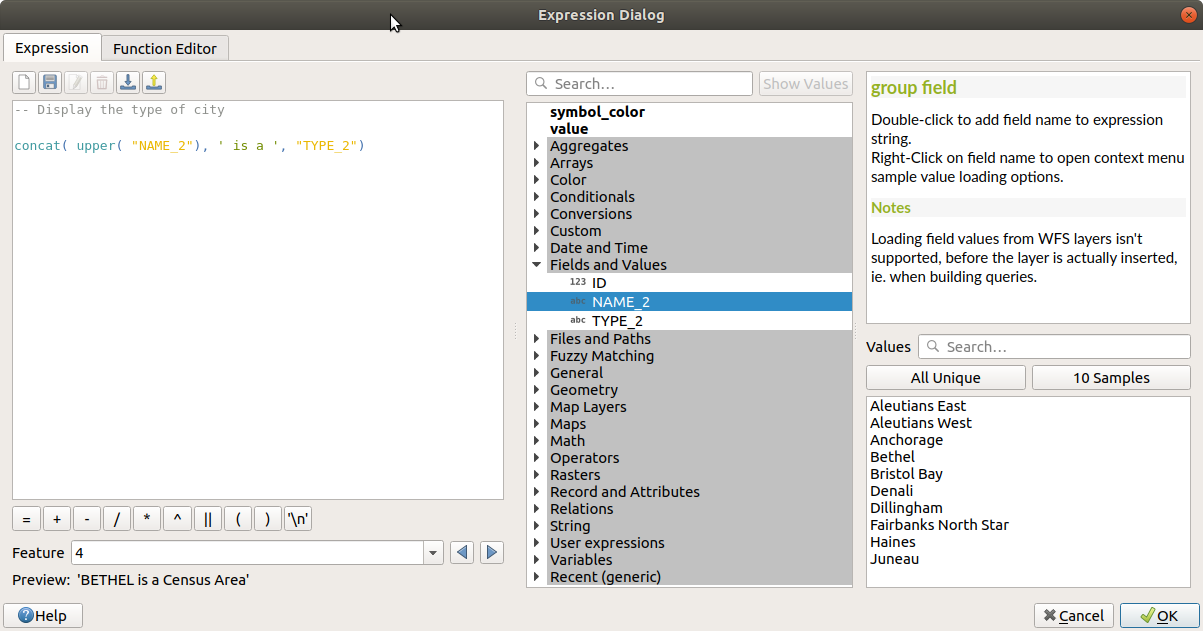
Abb. 12.1 Der Ausdruck Reiter
An expression editor area for typing or pasting expressions. Autocompletion is available to speed expression writing:
Die zum Eingabetext passenden Variablen, Funktionsnamen und Feldnamen werden unterhalb der Eingabe angezeigt. Nutzen Sie die Up und Down Tasten, um die Einträge durchzublättern und die Taste Tab, um einen Eintrag in den Ausdruck zu übernehmen oder klicken Sie einfach doppelt auf den gewünschten Eintrag.
Die Parameter von Funktionen werden beim Ausfüllen angezeigt.
QGIS prüft die Richtigkeit des Ausdrucks und hinterlegt alle Fehler farbig:
Unterstreichung: unbekannte Funktionen, falsche oder ungültige Funktionsargumente;
Markierung: alle weiteren Fehler (z.B. fehlende Klammern, unerwartete Zeichen) an der jeweiligen Stelle.
Tipp
Dokumentieren Sie Ihre Ausdrücke mit Kommentaren
Bei Nutzung komplexer Ausdrücke, ist es eine gute Praxis mehrzeilige Kommentare bzw. im Ausdruck eingeschlossene Kommentare als Erinnerungshilfen zu verwenden.
/*
Labels each region with its highest (in altitude) airport(s)
and altitude, eg 'AMBLER : 264m' for the 'Northwest Artic' region
*/
with_variable(
  'airport_alti', -- stores the highest altitude of the region
  aggregate(
    'airports',
    'max',
    "ELEV", -- the field containing the altitude
    -- and limit the airports to the region they are within
    filter := within( $geometry, geometry( @parent ) )
  ),
    aggregate( -- finds airports at the same altitude in the region
      'airports',
      'concatenate',
      "NAME",
      filter := within( $geometry, geometry( @parent ) )
        and "ELEV" = @airport_alti
    )
    || ' : ' || @airport_alti || 'm'
    -- using || allows regions without airports to be skipped
)
Above the expression editor, a set of tools helps you:
 Clear the expression editor
create and manage user expressions
Under the expression editor, you find:
a set of basic operators to help you build the expression
an indication of the expected format of output when you are data-defining feature properties
a live Output preview of the expression, evaluated on the first feature of the Layer by default. You can browse and evaluate other features of the layer using the Feature combobox (the values are taken from the display name property of the layer).
In case of error, it indicates it and you can access the details with the provided hyperlink.
In einem Auswahlfeld sind die Funktionen, Variablen, Felder, … in Gruppen organisiert aufgelistet. Ein Suchfeld dient zur Filterung der Gesamtliste, um schnell eine bestimmte Funktion oder Feld zu finden. Mit Hilfe eines Doppelklicks wird das Element in den Ausdruckseditor eingefügt.
Ein Bedienfeld, das Hilfe für jedes ausgewählte Element aus der Funktionsauwahl anzeigt.
Tipp
Drücke Ctrl+Click beim Überfahren eines Funktionsnamens, um automatisch die Hilfe zu dieser Funktion im Hilfe-Dialog anzuzeigen.
A field’s values widget shown when a field is selected in the function selector helps to fetch features attributes:
Look for a particular field value
Display the list of All Unique or 10 Samples values. Also available from right-click.
When the field is mapped with another layer or a set of values, i.e. if the field widget is of RelationReference, ValueRelation or ValueMap type, it’s possible to list all the values of the mapped field (from the referenced layer, table or list). Moreover, you can filter this list to
 Only show values in use in the current field.
Double-clicking a field value in the widget adds it to the expression editor.
Tipp
Das rechte Bedienfeld mit der Hilfe zu Funktionen und den Feldwerten kann ausgeblendet werden (durch nach rechts ziehen der Bedienfeldbegrenzung). Durch Drücken des Knopfes Werte anzeigen oder Hilfe anzeigen wird er wieder angezeigt.
12.1.1.2. Writing an expression
QGIS expressions are used to select features or set values. Writing an expression in QGIS follows some rules:
The dialog defines the context: if you are used to SQL, you probably know queries of the type select features from layer where condition or update layer set field = new_value where condition. A QGIS expression also needs all these information but the tool you use to open the expression builder dialog provides parts of them. For example, giving a layer (
buildings) with a field (height):pressing the
Select by expression tool means that
you want to „select features from buildings“. The condition is the
only information you need to provide in the expression text widget,
e.g. type "height" > 20to select buildings that are higher than 20.with this selection made, pressing the
Field calculator
button and choosing „height“ as Update existing field, you already
provide the command „update buildings set height = ??? where height > 20“.
The only remaining bits you have to provide in this case is the new value,
e.g. just enter 50in the expression editor textbox to set the height of the previously selected buildings.
Pay attention to quotes: single quotes return a literal, so a text placed between single quotes (
'145') is interpreted as a string. Double quotes will give you the value of that text so use them for fields ("myfield"). Fields can also be used without quotes (myfield). No quotes for numbers (3.16).Bemerkung
Functions normally take as argument a string for field name. Do:
attribute( @atlas_feature, 'height' ) -- returns the value stored in the "height" attribute of the current atlas feature
And not:
attribute( @atlas_feature, "height" ) -- fetches the value of the attribute named "height" (e.g. 100), and use that value as a field
                                      -- from which to return the atlas feature value. Probably wrong as a field named "100" may not exist.
Tipp
Use named parameters to ease expression reading
Some functions require many parameters to be set. The expression engine supports the
use of named parameters. This means that instead of writing the cryptic expression
clamp( 1, 2, 9), you can use clamp( min:=1, value:=2, max:=9). This also allows
arguments to be switched, e.g. clamp( value:=2, max:=9, min:=1). Using named parameters
helps clarify what the arguments for an expression function refer to, which is helpful
when you are trying to interpret an expression later!
12.1.1.3. Some use cases of expressions
From the Field Calculator, calculate a „pop_density“ field using the existing „total_pop“ and „area_km2“ fields:
"total_pop" / "area_km2"
Label or categorize features based on their area:
CASE WHEN $area > 10 000 THEN 'Larger' ELSE 'Smaller' END
Aktualisieren Sie das Feld „density_level“ mit zugehörigen Kategorien zu den „pop_density“ Werten:
CASE WHEN "pop_density" < 50 THEN 'Low population density'
     WHEN "pop_density" >= 50 and "pop_density" < 150 THEN 'Medium population density'
     WHEN "pop_density" >= 150 THEN 'High population density'
END
Wenden Sie einen kategorisierten Stil auf alle Objekte an, je nachdem, ob der durchschnittliche Hauspreis kleiner oder größer als 10000€ pro Quadratmeter ist:
"price_m2" > 10000
Mit dem „Durch Ausdruck wählen…“ Werkzeug, wählen Sie alle Objekte die eine Fläche mit „Hoher Bevölkerungsdichte“ und einem durchschnittlichen Hauspreis größer als 10000€ pro Quadratmeter darstellen:
"density_level" = 'High population density' and "price_m2" > 10000
The previous expression could also be used to define which features to label or show on the map.
Create a different symbol (type) for the layer, using the geometry generator:
point_on_surface( $geometry )
Given a point feature, generate a closed line (using
make_line) around its geometry:make_line( -- using an array of points placed around the original array_foreach( -- list of angles for placing the projected points (every 90°) array:=generate_series( 0, 360, 90 ), -- translate the point 20 units in the given direction (angle) expression:=project( $geometry, distance:=20, azimuth:=radians( @element ) ) ) )In a print layout label, display the name of the „airports“ features that are within the layout „Map 1“ item:
with_variable( 'extent',
               map_get( item_variables( 'Map 1' ), 'map_extent' ),
               aggregate( 'airports', 'concatenate', "NAME",
                          intersects( $geometry, @extent ), ' ,'
                        )
             )
12.1.1.4. Saving Expressions
Using the  Add current expression to user expressions button
above the expression editor frame, you can save important expressions you want
to have quick access to. These are available from the User expressions group
in the middle panel. They are saved under the user profile
(
Add current expression to user expressions button
above the expression editor frame, you can save important expressions you want
to have quick access to. These are available from the User expressions group
in the middle panel. They are saved under the user profile
(<userprofile>/QGIS/QGIS3.ini file) and available in all expression
dialogs inside all projects of the current user profile.
A set of tools available above the expression editor frame helps you manage the user expressions:
- Add the current expression to user expressions: store the
expression in the user profile. A label and a help text can be added for
easy identification.
 Edit selected expression from user expressions,
as well as their help and label
Edit selected expression from user expressions,
as well as their help and label Remove selected expression from user expressions
 Import user expressions from a
 .jsonfile into the active user profile folder Export user expressions as a
 .jsonfile; all the user expressions in the user profileQGIS3.inifile are shared
12.1.2. Funktions Editor
Mit dem Reiter Funktionseditor ist man in der Lage, eigene Funktionen mit Python zu schreiben. Dies bietet einen einfachen und komfortablen Weg, um besondere Anforderungen zu erfüllen, die nicht durch die enthaltenen Funktionen abgedeckt werden.
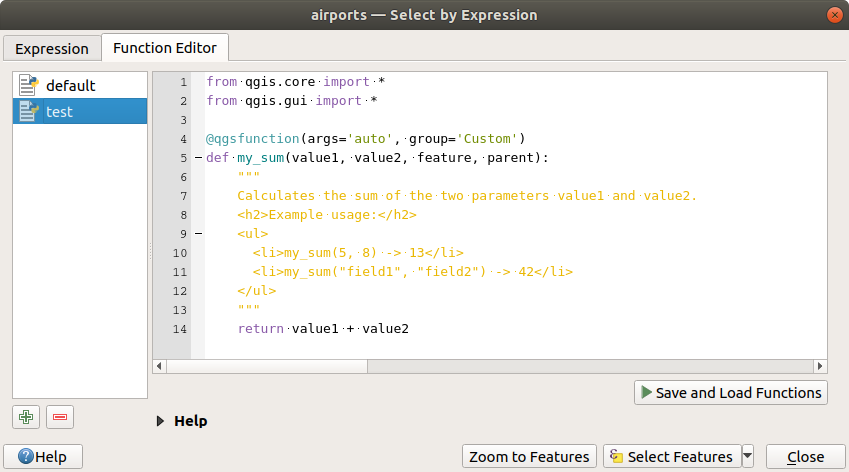
Abb. 12.2 Der Funktionseditor Reiter
Um eine neue Funtkion zu erstellen:
Drücken Sie auf die
 New File Schaltfläche.
Geben Sie einen Namen in das sich öffnende Formular ein und drücken dann auf OK.
Ein neues Element mit dem vergebenen Namen wird nun im linken Bedienfeld des Funktionseditor bereitgestellt; dabei handelt es sich um eine Python
.pyDatei, basierend auf einer QGIS Template-Datei, gespeichert im Ordner/python/expressionsim Verzeichnis des aktiven :ref:`user profile `.Das rechte Bedienfeld stellt den Inhalt der Datei dar: ein Python Skript Template. Aktualisieren den Kode und die Hilfeienträge entsprechend ihrer Erfordernisse.
Drücken Sie auf die Schaltfläche
 Lade- und Speicherfunktionen. Die von ihnen geschriebene Funktion wird in der Liste der Funktionen im Reiter Ausdruck in der Voreinstellung in der Gruppe
 Customhinzugefügt.Haben Sie Spaß mit ihrer neuen Funktion.
Wenn die Funktion verbessert werden soll, geht man zum Reiter Funktionseditor, nimmt die Änderungen vor und drückt erneut auf die Schaltfläche
Lade- und Speicherfunktionen. Damit werden die Änderungen in der Datei und somit auch im Reiter Ausdruck verfügbar.
Benutzerdefinierte Pythonfunktionen werden im Profilverzeichnis des Nutzer gespeichert. Das heißt das QGIS beim Start automatische alle Funktionen des aktuellen Nutzerprofils lädt. Beachten Sie, dass neue Funktionen nur im Ordner /python/expressions gespeichert werden und nicht in der Projektdatei. Wenn Sie ein Projekt mit benutzerdefinierten Funktionen verteilen möchten, müssen Sie auch die Datei .py im Ordner /python/expressions mitliefern.
To delete a custom function:
Enable the Function Editor tab
Select the function in the list
Press the
 Remove selected function. The function is
removed from the list and the corresponding
Remove selected function. The function is
removed from the list and the corresponding .pyfile deleted from the user profile folder.
Example
Here’s a short example on how to create your own my_sum function that
will operate with two values.
from qgis.core import *
from qgis.gui import *

@qgsfunction(args='auto', group='Custom')
def my_sum(value1, value2, feature, parent):
    """
    Calculates the sum of the two parameters value1 and value2.
    <h2>Example usage:</h2>
    <ul>
      <li>my_sum(5, 8) -> 13</li>
      <li>my_sum("field1", "field2") -> 42</li>
    </ul>
    """
    return value1 + value2
When using the args='auto' function argument the number of function
arguments required will be calculated by the number of arguments the function
has been defined with in Python (minus 2 - feature, and parent).
The group='Custom' argument indicates the group in which the function
should be listed in the Expression dialog.
It is also possible to add keywords arguments like:
usesgeometry=Trueif the expression requires access to the features geometry. By defaultFalse.handlesnull=Trueif the expression has custom handling for NULL values. IfFalse(default), the result will always be NULL as soon as any parameter is NULL.referenced_columns=[list]: An array of attribute names that are required to the function. Defaults to[QgsFeatureRequest.ALL_ATTRIBUTES].
The previous example function can then be used in expressions:
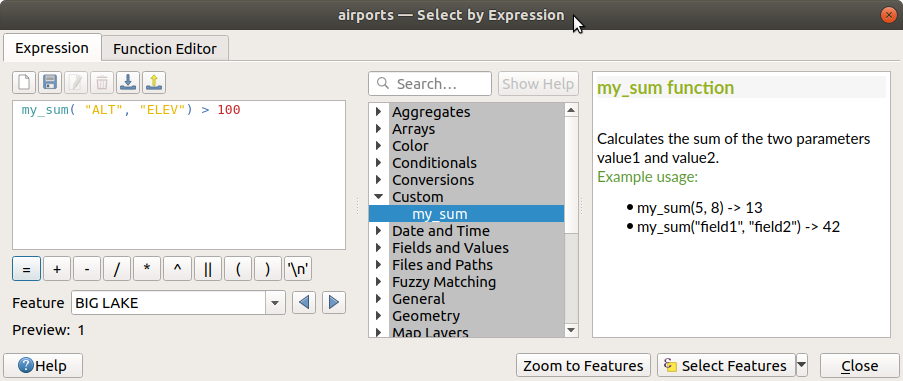
Abb. 12.3 Benutzerdefinierte Funktion im Reiter Ausdruck
Weitere Informationen über das Erstellen von Python-Kodes können in PyQGIS-Entwicklerkochbuch gefunden werden.