21. Fișă de răspunsuri
21.1. Results For O privire de ansamblu asupra interfeței
21.1.1.  Vedere Generală (Partea 1)
Consultați iarăși imaginea care prezintă aspectul interfeței și verificați dacă vă amintiți numele și funcțiile elementelor de pe ecran.
21.1.2. Vedere Generală (Partea a 2-a)
Salvare ca
Transfocare pe Strat
Invert selection
:guilabel:`Randare activată/dezactivată
Măsurare Linie
21.2. Results For Adăugarea Primului Dvs. Strat
21.2.1. Pregătire
In the main area of the dialog you should see many shapes with different colors. Each shape belongs to a layer you can identify by its color in the left panel (your colors may be different from the ones below):

21.2.2. Data loading
Your map should have seven layers:
protected_areas
locații
rivers
roads
landuse
buildings (taken from
training_data.gpkg) andwater (taken from
exercise_data/shapefile).
21.3. Results For Symbologie
21.3.1. Culori
Verificați dacă puteți schimba culorile după dorință.
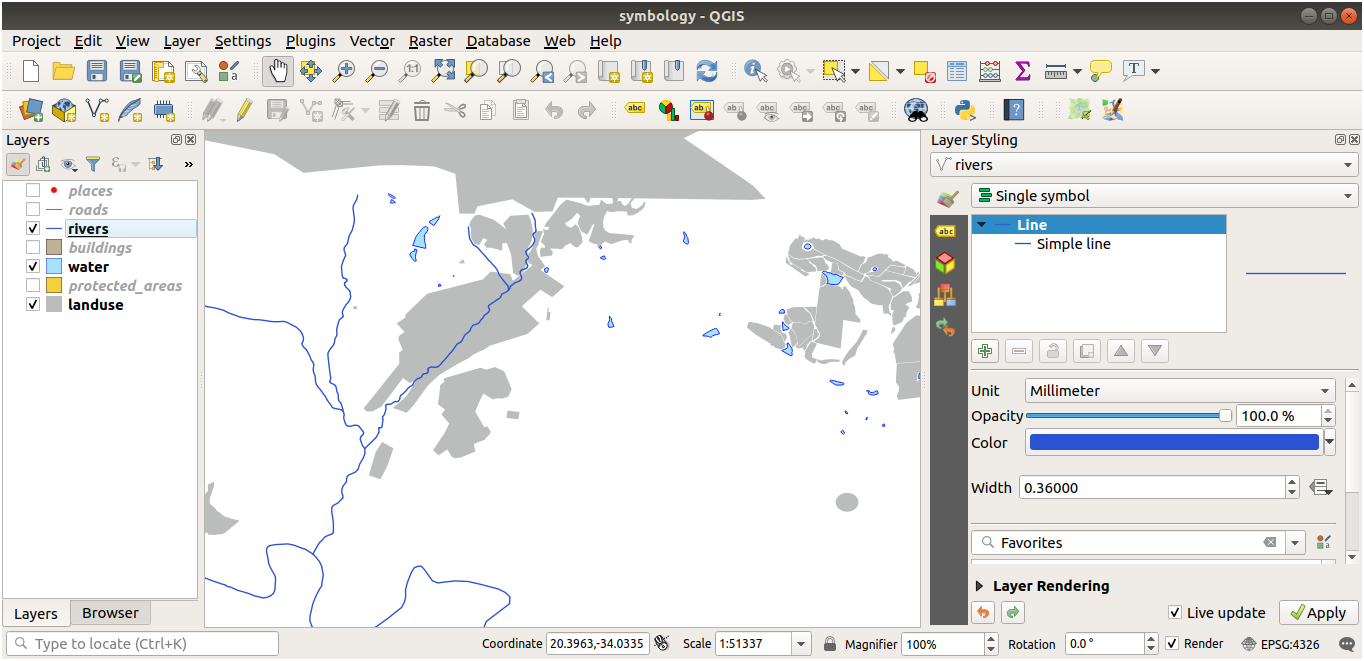
It is enough to select the water layer in the legend and then click on the
 Open the Layer Styling panel button. Change the color
to one that fits the water layer.
Open the Layer Styling panel button. Change the color
to one that fits the water layer.

Notă
If you want to work on only one layer at a time and don’t want the other layers to distract you, you can hide a layer by clicking in the checkbox next to its name in the layers list. If the box is blank, then the layer is hidden.
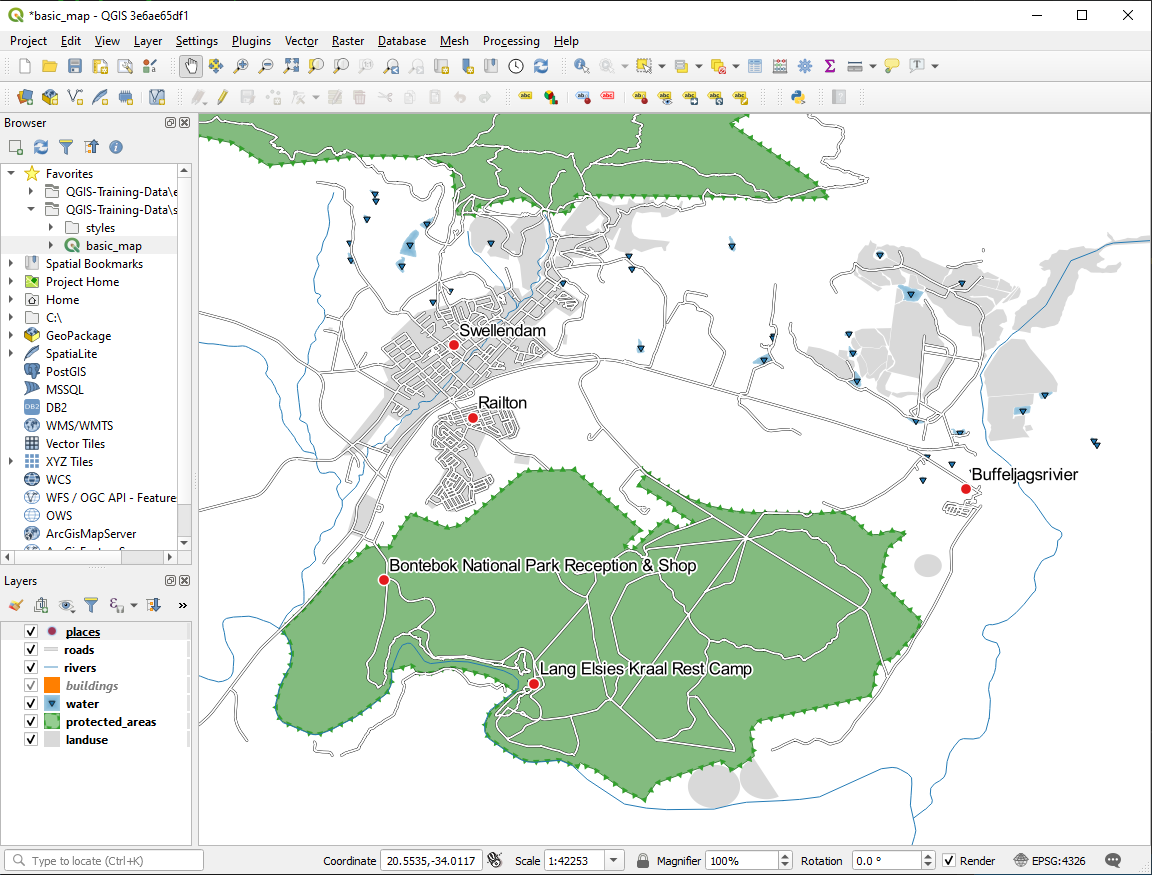
21.3.2. Structura Simbolului
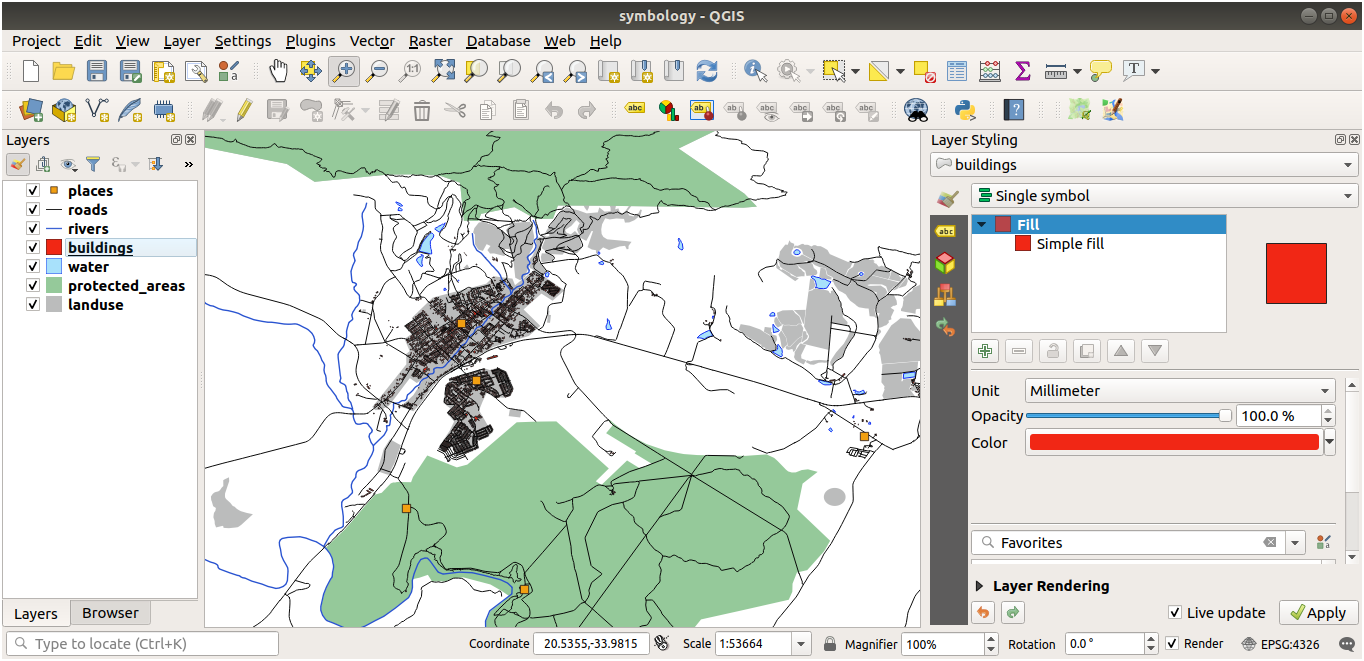
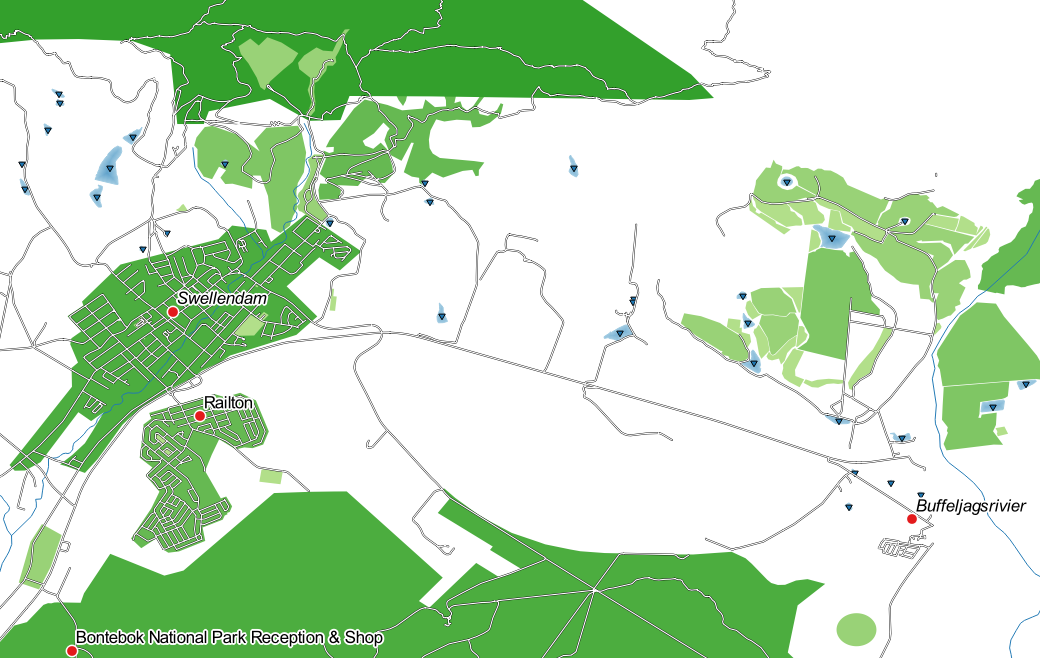
Harta ar trebui să arate așa:
Dacă sunteți la nivelul de Utilizator Începător, v-ați putea opri aici.
Utilizați metoda de mai sus pentru a schimba culorile și stilurile pentru toate straturile rămase.
Încercați să folosiți culori naturale pentru obiecte. De exemplu, un drum nu ar trebui să fie de culoare roșie sau albastră, dar poate fi de culoare gri sau neagră.
Also feel free to experiment with different Fill style and Stroke style settings for the polygons.
21.3.3.  Straturile Simbolului
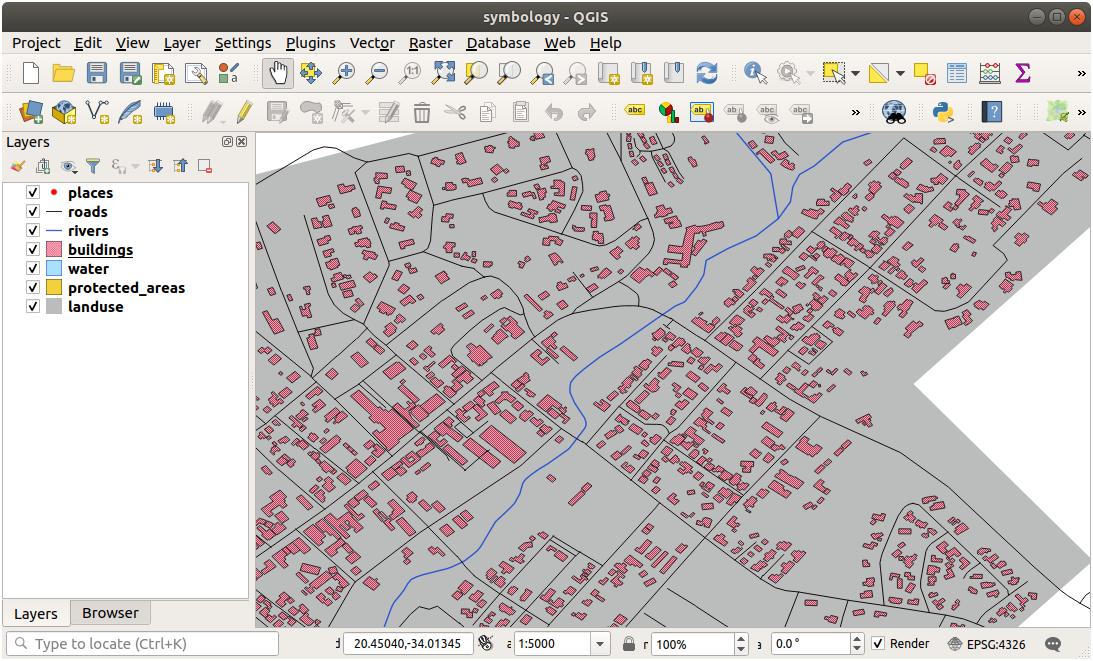
Personalizați-vă stratul de clădiri așa cum doriți, dar nu uitați că trebuie să fie ușor să distingeți diferitele straturi de pe hartă.
Iată un exemplu:
21.3.4. Nivelurile Simbolului
To make the required symbol, you need three symbol layers:
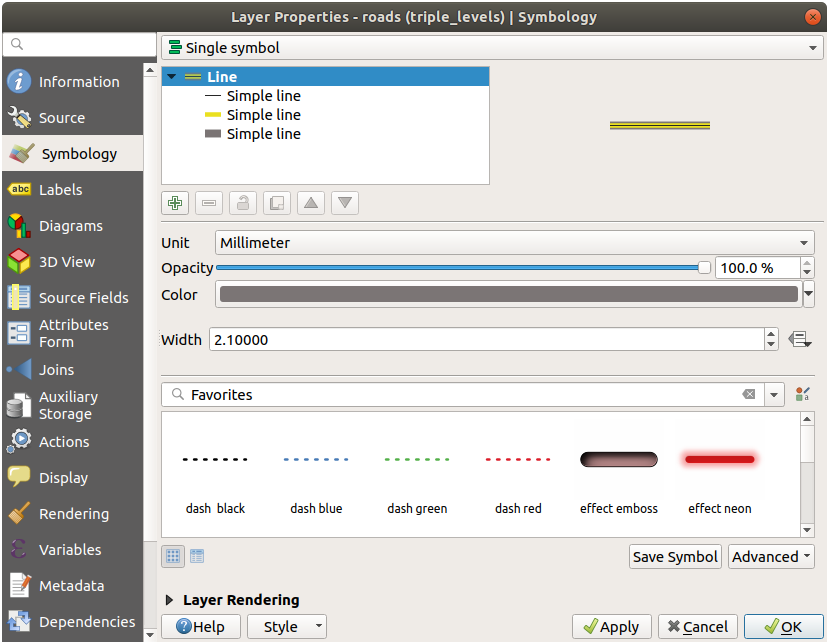
The lowest symbol layer is a broad, solid gray line. On top of it there is a slightly thinner solid yellow line and finally another thinner solid black line.
If your symbol layers resemble the above but you’re not getting the result you want:
Check that your symbol levels look something like this:
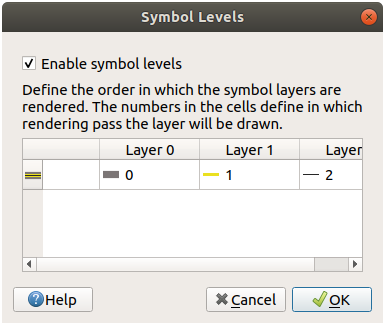
Acum, harta ar trebui să arate în felul următor:

21.3.5.  Nivelurile Simbolului
Ajustați nivelurile simbolurilor la aceste valori:

Experimentați cu valori diferite, pentru a obține rezultate diferite.
Deschideți iarăși harta originală, înainte de a continua cu exercițiul următor.
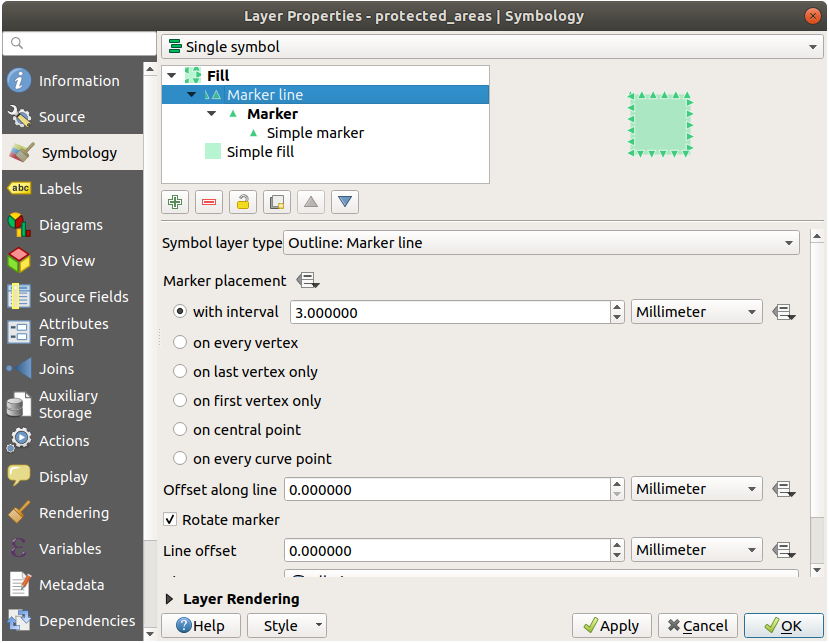
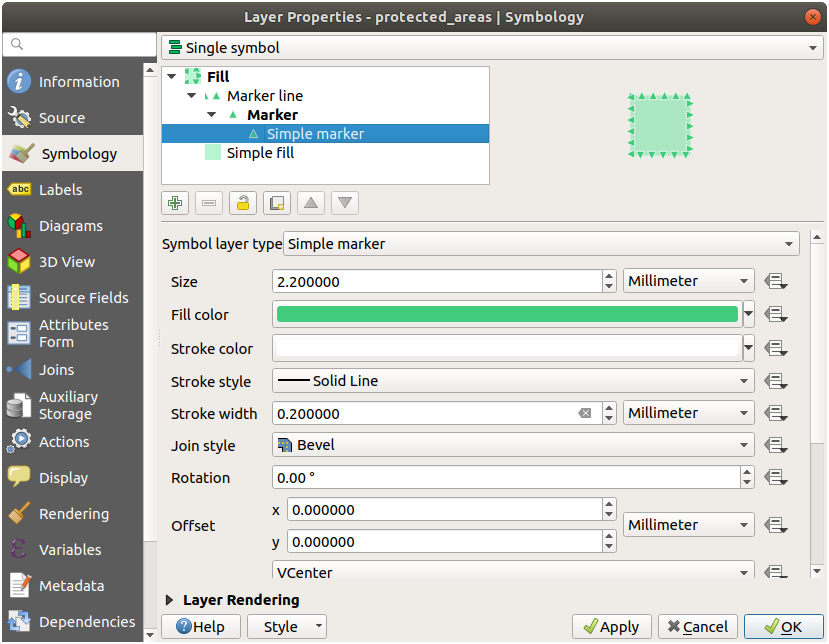
21.4. Outline Markers
Here are examples of the symbol structure:
21.4.1. Geometry generator symbology
Click on the
 button to add another Symbol level.
Move the new symbol at the bottom of the list clicking the
 button.
Choose a good color to fill the water polygons.
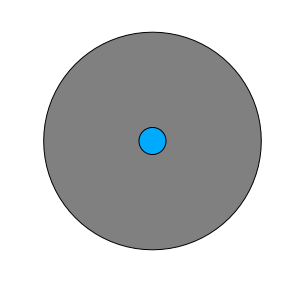
Click on Marker of the Geometry generator symbology and change the circle with another shape as your wish.
Try experimenting other options to get more useful results.
21.5. Results For Vector Attribute Data
21.5.1. Exploring Vector Data Attributes
There should be 9 fields in the rivers layer:
Select the layer in the Layers panel.
Right-click and choose Open Attribute Table, or press the
 button on the Attributes Toolbar.
Count the number of columns.
Sfat
A quicker approach could be to double-click the rivers layer, open the tab, where you will find a numbered list of the table’s fields.
Information about towns is available in the places layer. Open its attribute table as you did with the rivers layer: there are two features whose place attribute is set to
town: Swellendam and Buffeljagsrivier. You can add comment on other fields from these two records, if you like.The
namefield is the most useful to show as labels. This is because all its values are unique for every object and are very unlikely to contain NULL values. If your data contains some NULL values, do not worry as long as most of your places have names.
21.6. Results For Labels
21.6.1. Personalizarea Etichetelor (Partea 1)
Your map should now show the marker points and the labels should be offset by 2mm. The style of the markers and labels should allow both to be clearly visible on the map:
21.6.2. Personalizarea Etichetelor (Partea a 2-a)
O soluție posibilă o reprezintă acest produs final:
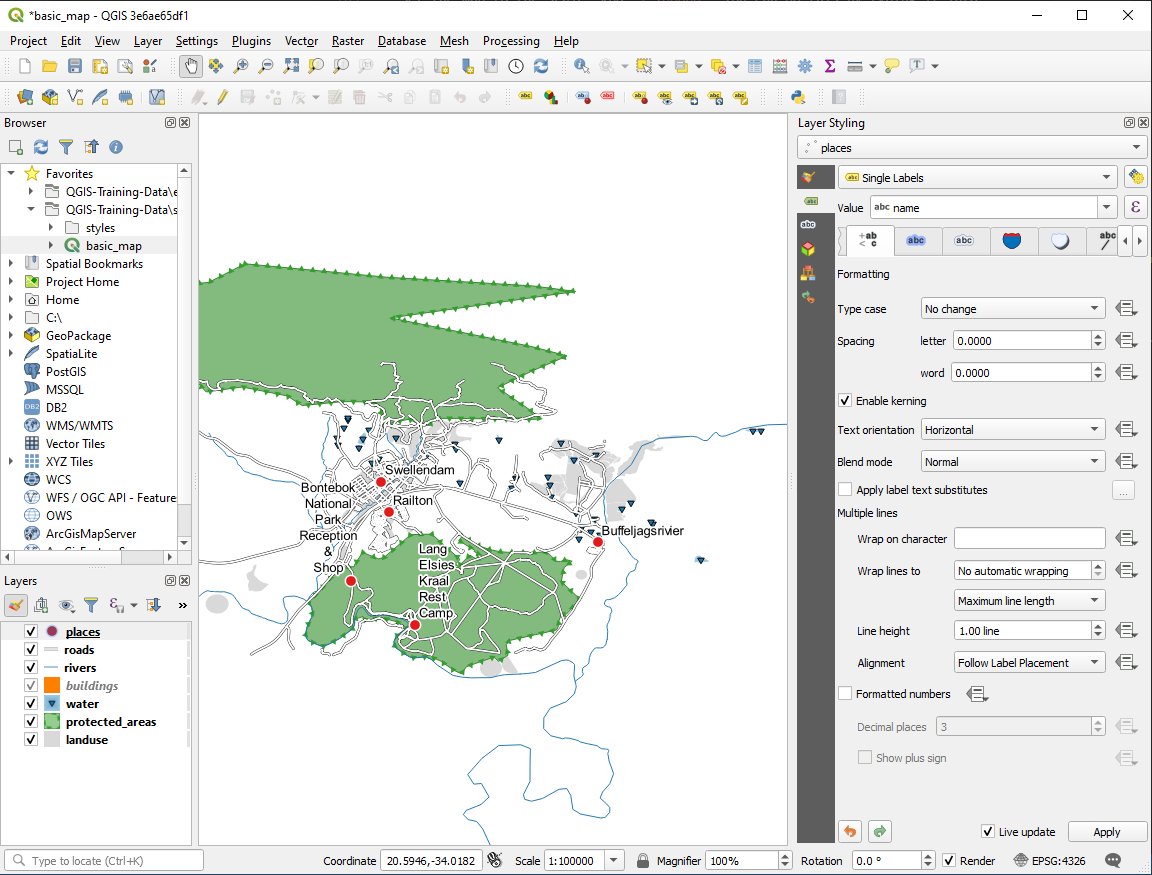
Pentru a ajunge la acest rezultat:
Use a font size of
10Use an around point placement distance of
1.5 mmUse a marker size of
3.0 mmIn addition, this example uses the Wrap on character option:
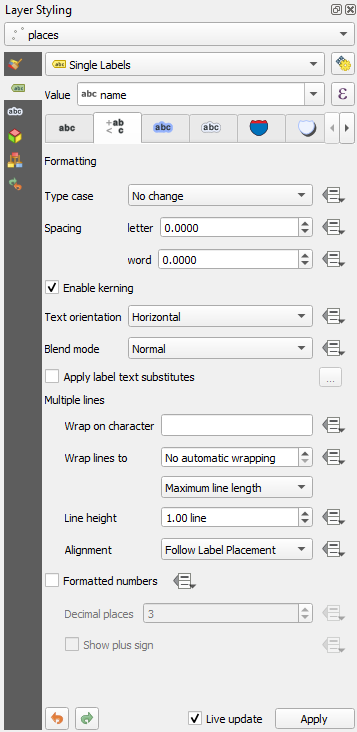
Enter a
spacein this field and click Apply to achieve the same effect. In our case, some of the place names are very long, resulting in names with multiple lines which is not very user friendly. You might find this setting to be more appropriate for your map.
21.6.3. Utilizarea Setărilor Definite cu ajutorul Datelor
Still in edit mode, set the
FONT_SIZEvalues to whatever you prefer. The example uses16for towns,14for suburbs,12for localities, and10for hamlets.Remember to save changes and exit edit mode
Return to the Text formatting options for the
placeslayer and selectFONT_SIZEin the Attribute field of the font size data defined override dropdown:
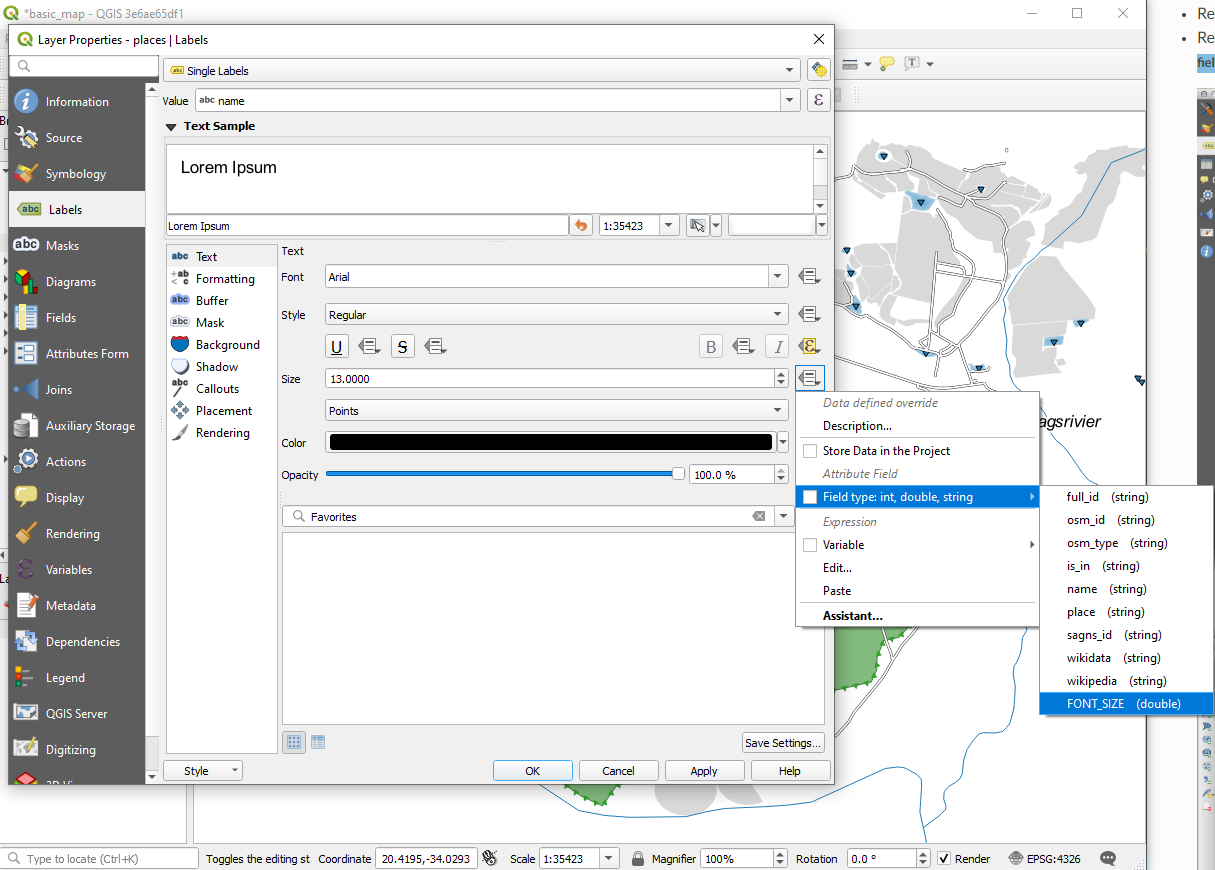
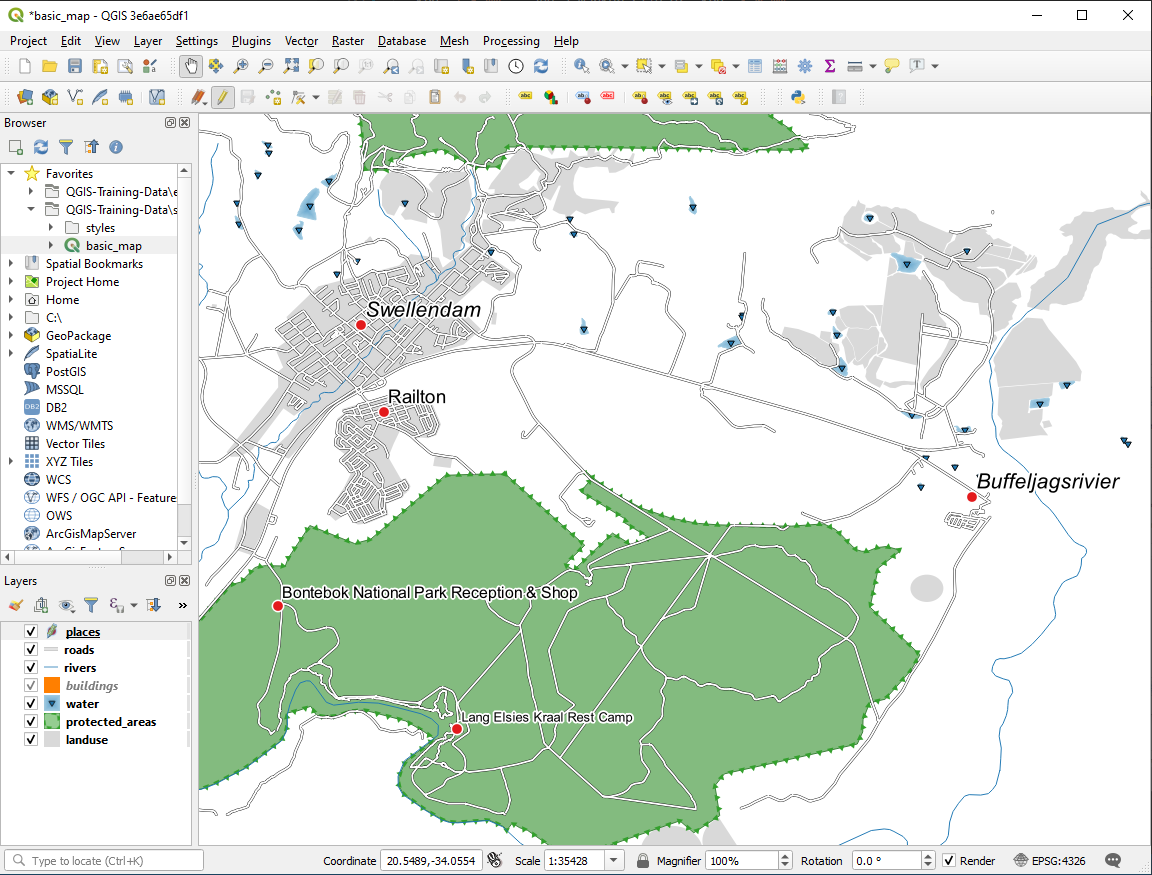
Rezultatele, dacă se utilizează valorile de mai sus, ar trebui să fie următoarele:
21.7. Results For Clasificare
21.7.1. Rafinarea Clasificării
The settings you used might not be the same, but with the values
Classes = 6 and Mode = Natural Breaks
(Jenks) (and using the same colors, of course), the map will look like this:
21.8. Results For Crearea unui Nou Set de Date Vectoriale
21.8.1. Digitizare
Simbolistica nu contează, dar rezultatele ar trebui să arate mai mult sau mai puțin ca acesta:

21.8.2. Topologia: Adăugarea Instrumentului Inel
Forma exactă nu contează, dar ar trebui să fie obțineți o gaură în mijlocul entității dvs., ca aceasta:
Anulați editările dumneavoastră înainte de a continua exercițiul pentru instrumentul următor.
21.8.3. Topologia: Adăugarea Instrumentului Parte
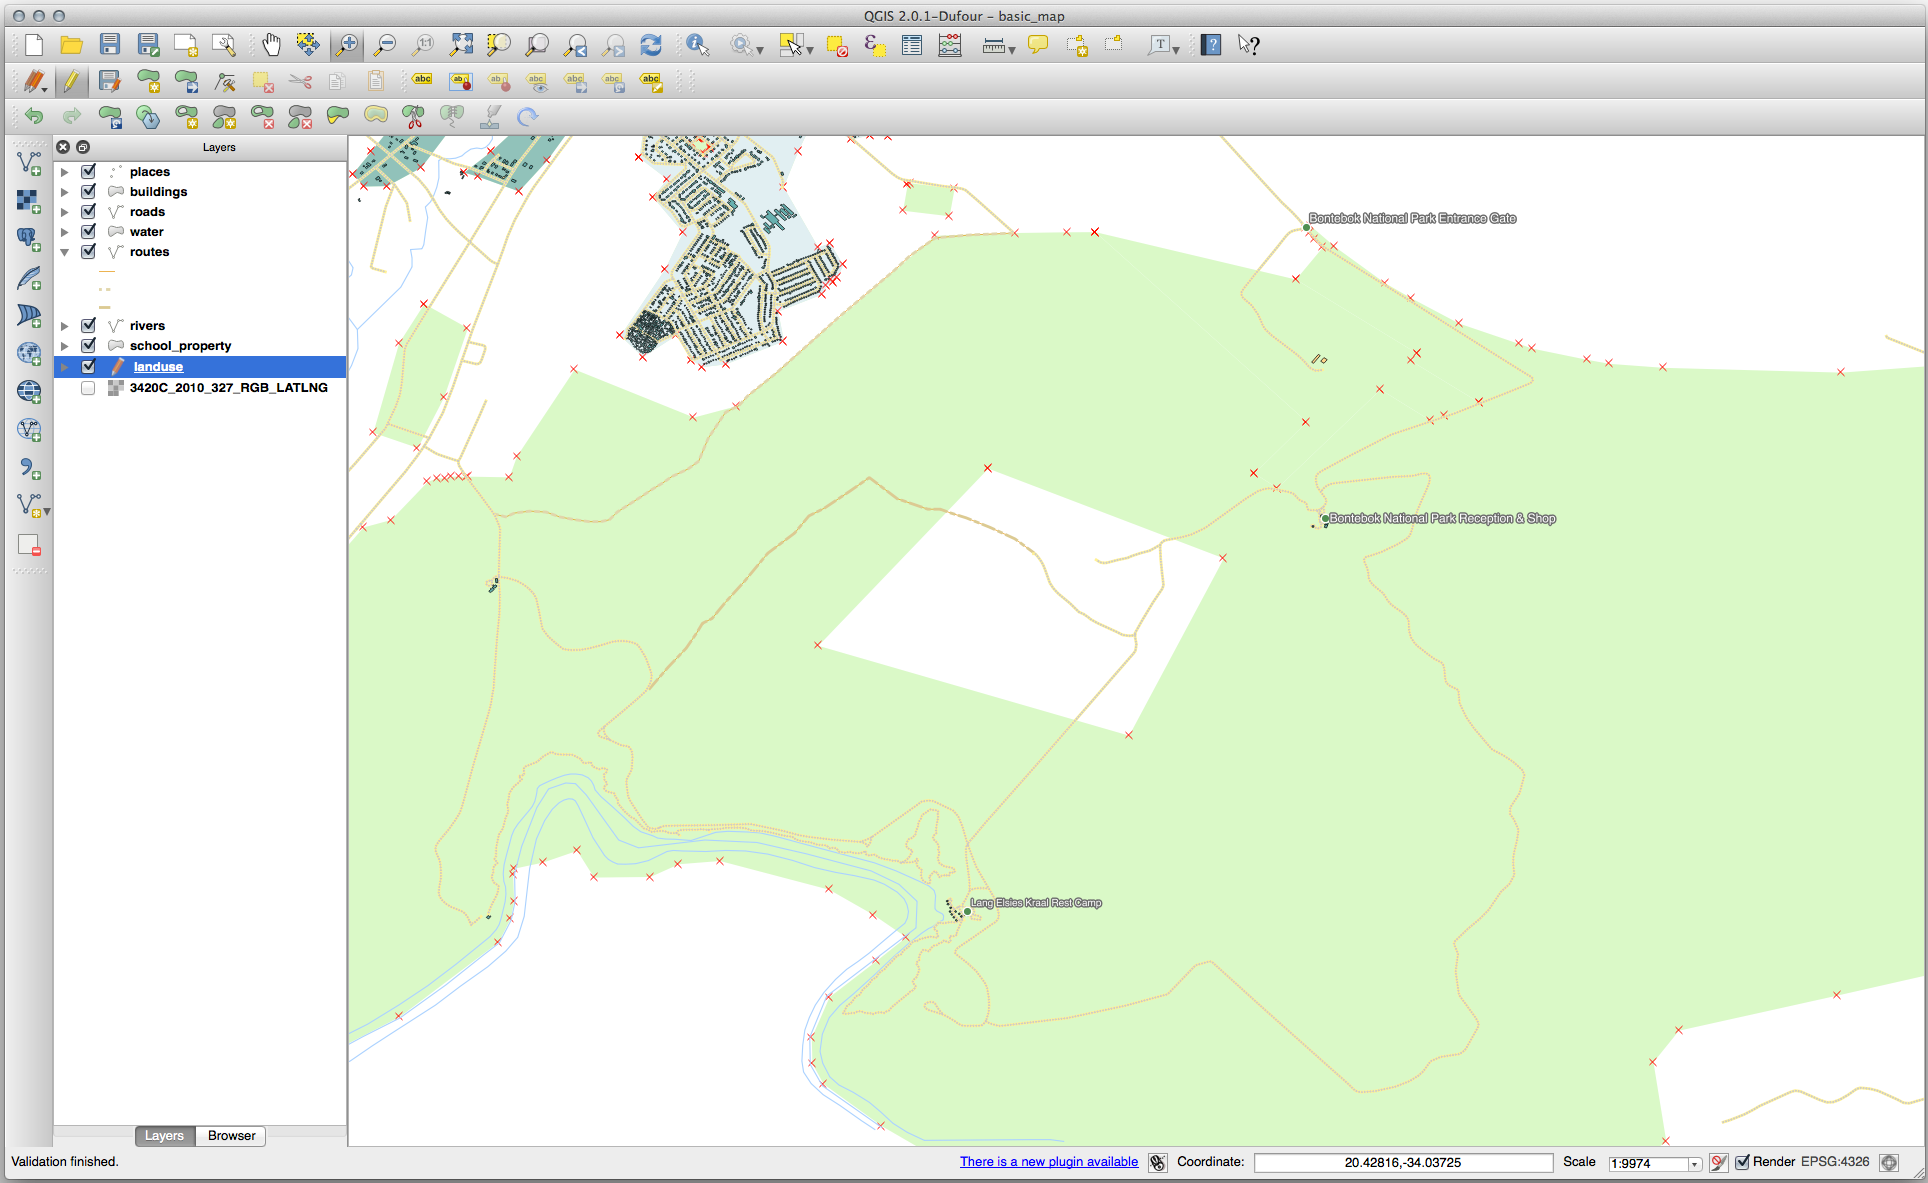
Mai întâi selectați Bontebok National Park:
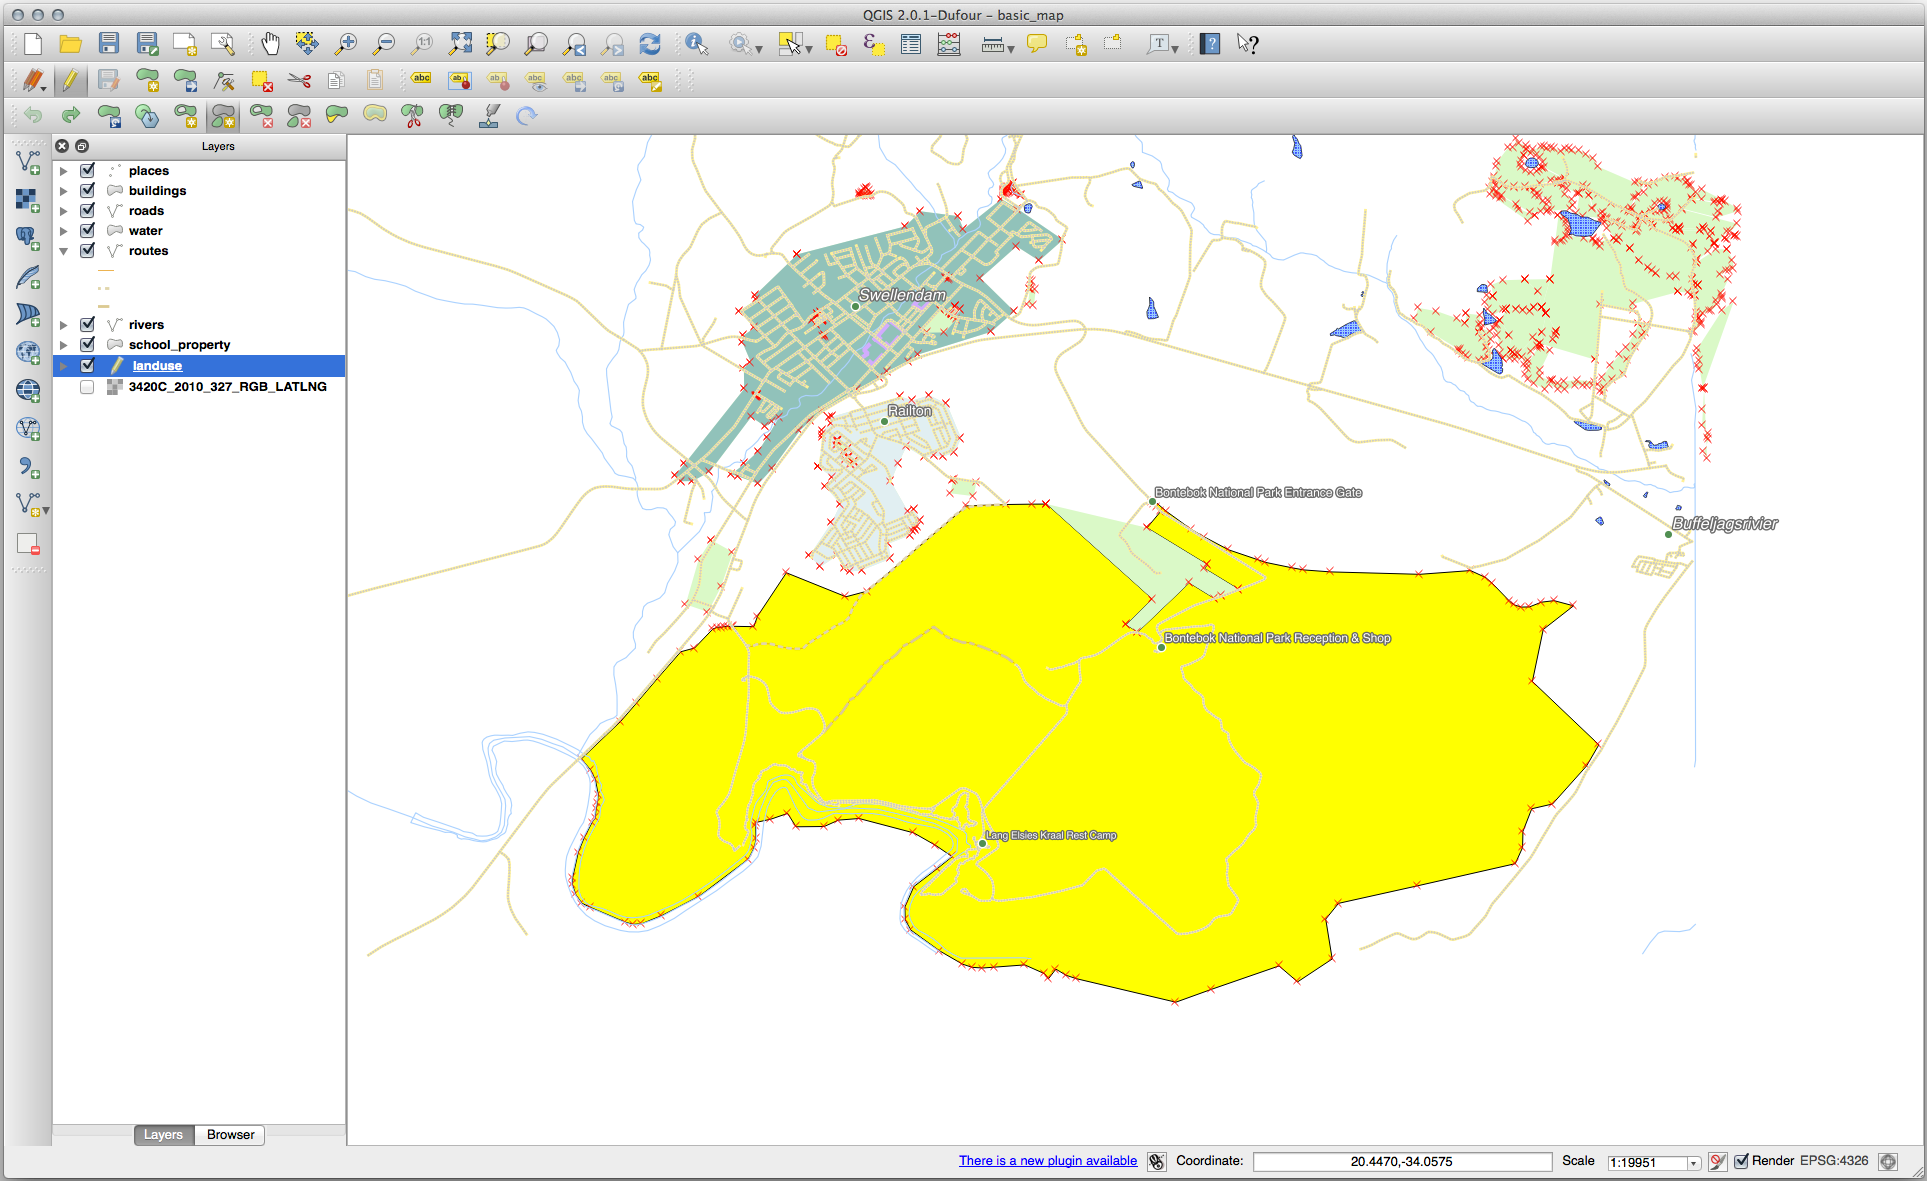
Acum, adăugați noua parte:
Anulați editările dumneavoastră înainte de a continua exercițiul pentru instrumentul următor.
21.8.4. Îmbinare Entități
Folosiți instrumentul de Îmbinare a Entităților Selectate, asigurându-vă că ați selectat mai întâi ambele poligoane pe care doriți să le îmbinați.
Utilizați entitatea cu OGC_FID-ul 1 ca sursă pentru atributele dvs. (clic pe intrările sale din dialog, apoi faceți clic pe butonul Preia atributele din entitatea selectată):
Notă
If you’re using a different dataset, it is highly likely that your
original polygon’s OGC_FID will not be 1. Just choose the
feature which has an OGC_FID.
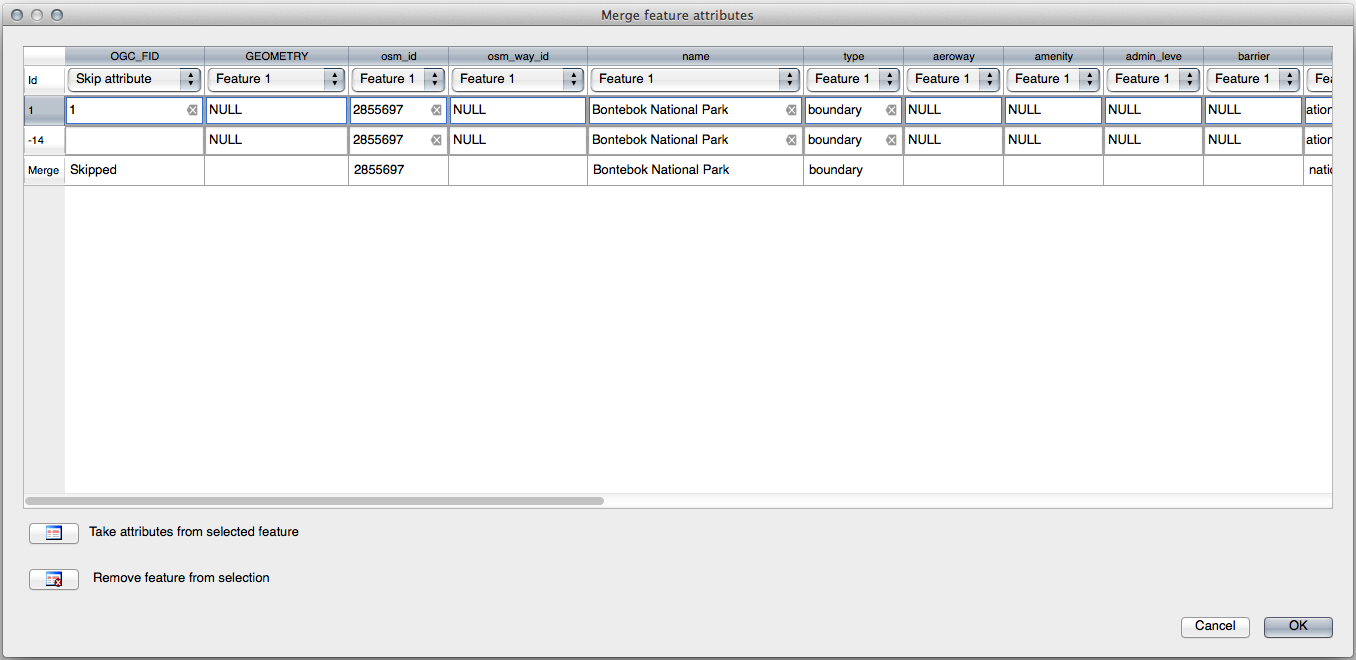
Notă
Folosind instrumentul de Îmbinare a Entităților Selectate,vom păstra geometriile distincte, dar le vom acorda aceleași atribute.
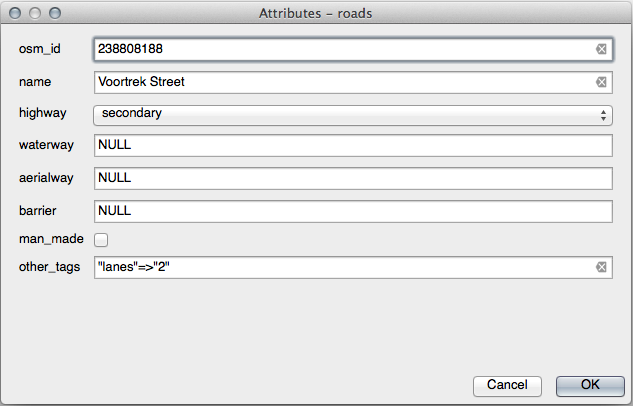
21.8.5. Formulare
Pentru TIP există, în mod evident, o cantitate limitată de tipuri de drumuri, iar dacă veți verifica tabelul de atribute pentru acest strat, veți vedea că acestea sunt predefinite.
Setați widget-ul la Valorile Hărții apoi faceți clic pe Încărcare Date din Strat.
Selectați drumurile din caseta cu derulare verticală a Etichetelor și autostrăzile pentru opțiunile Valoare și Descriere:
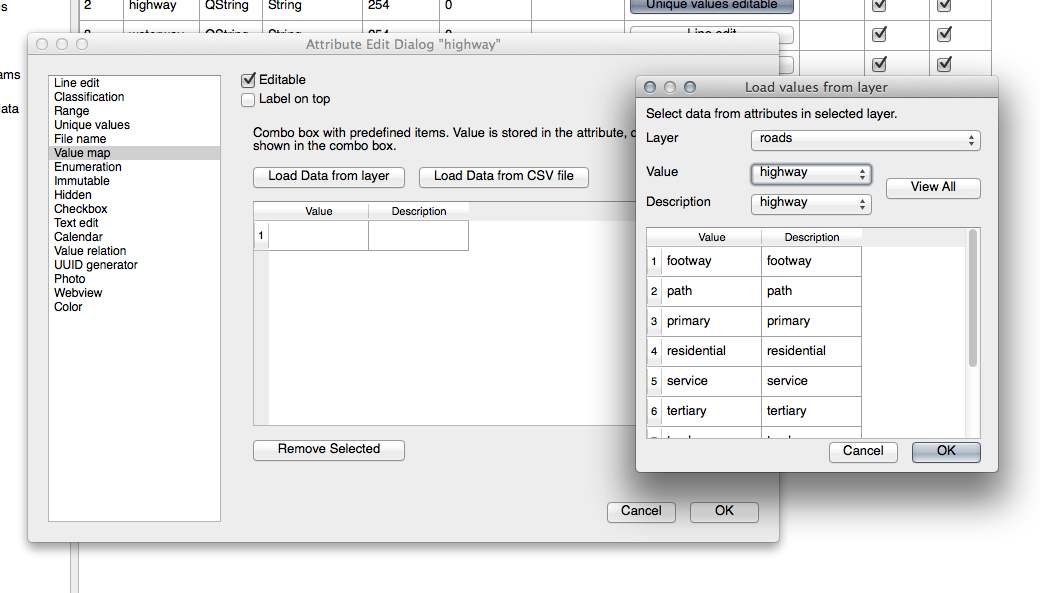
Click OK three times.
Dacă veți folosi instrumentul Identificare asupra unei străzi, în timp ce modul de editare este activ, dialogul ar trebui să arate astfel:
21.9. Results For Analiza Vectorială
21.9.1. Distanța față de Licee
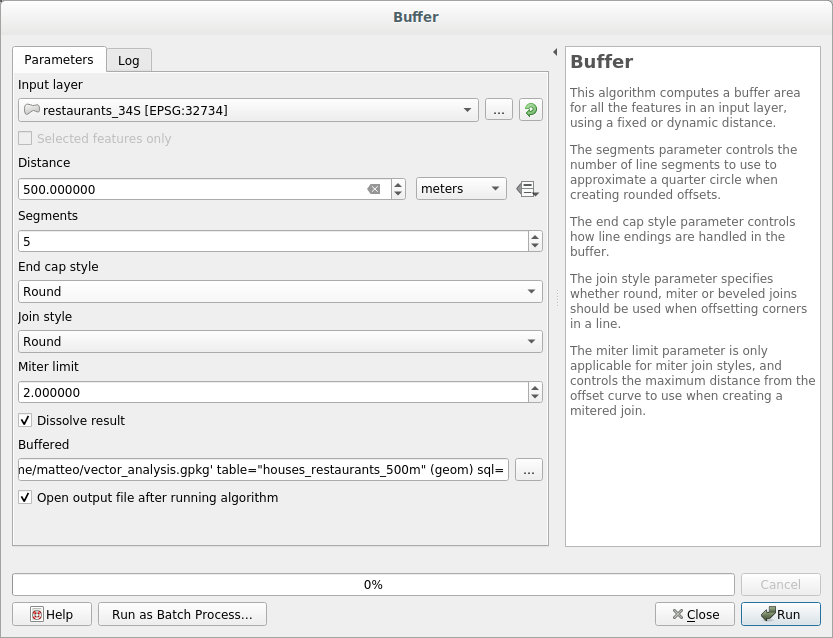
Dialogul tamponului dvs. ar trebui să arate astfel:
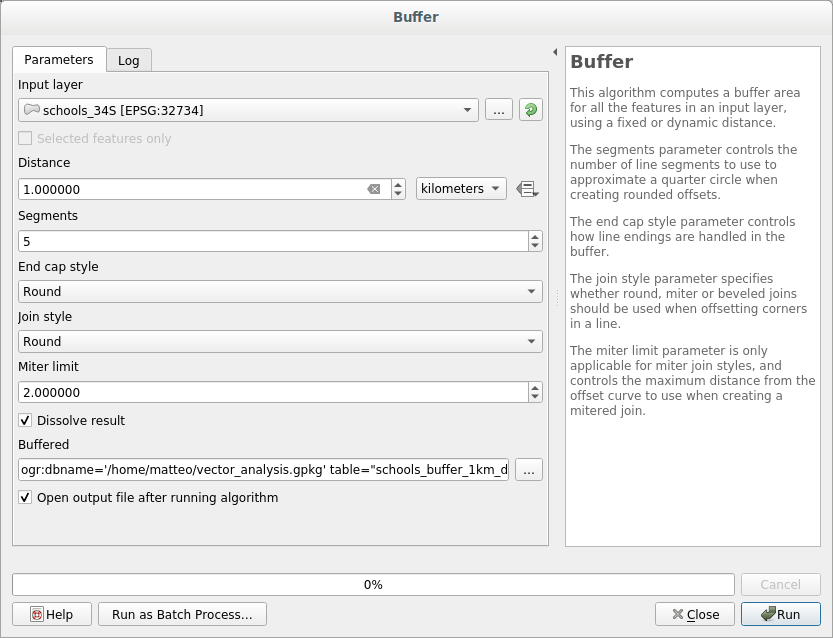
The Buffer distance is 1 kilometer.
The Segments to approximate value is set to 20. This is optional, but it’s recommended, because it makes the output buffers look smoother. Compare this:
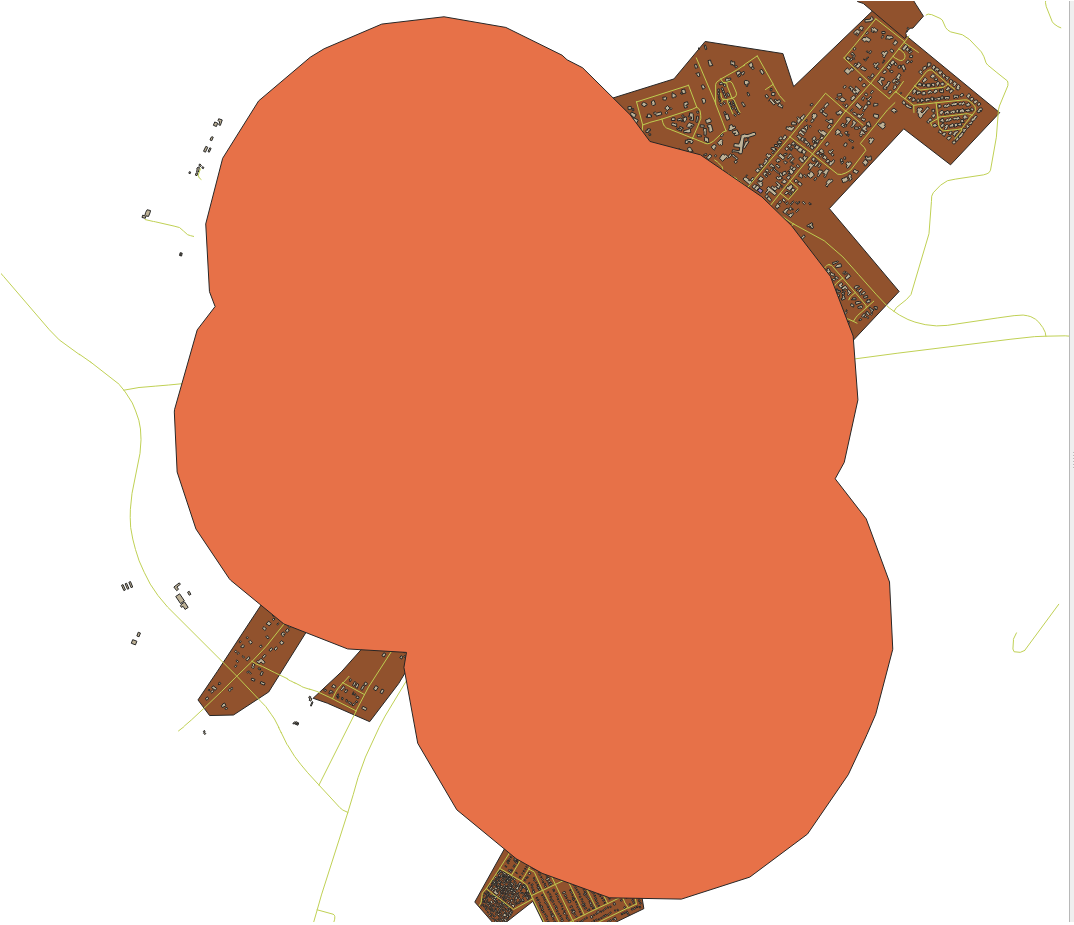
Cu aceasta:
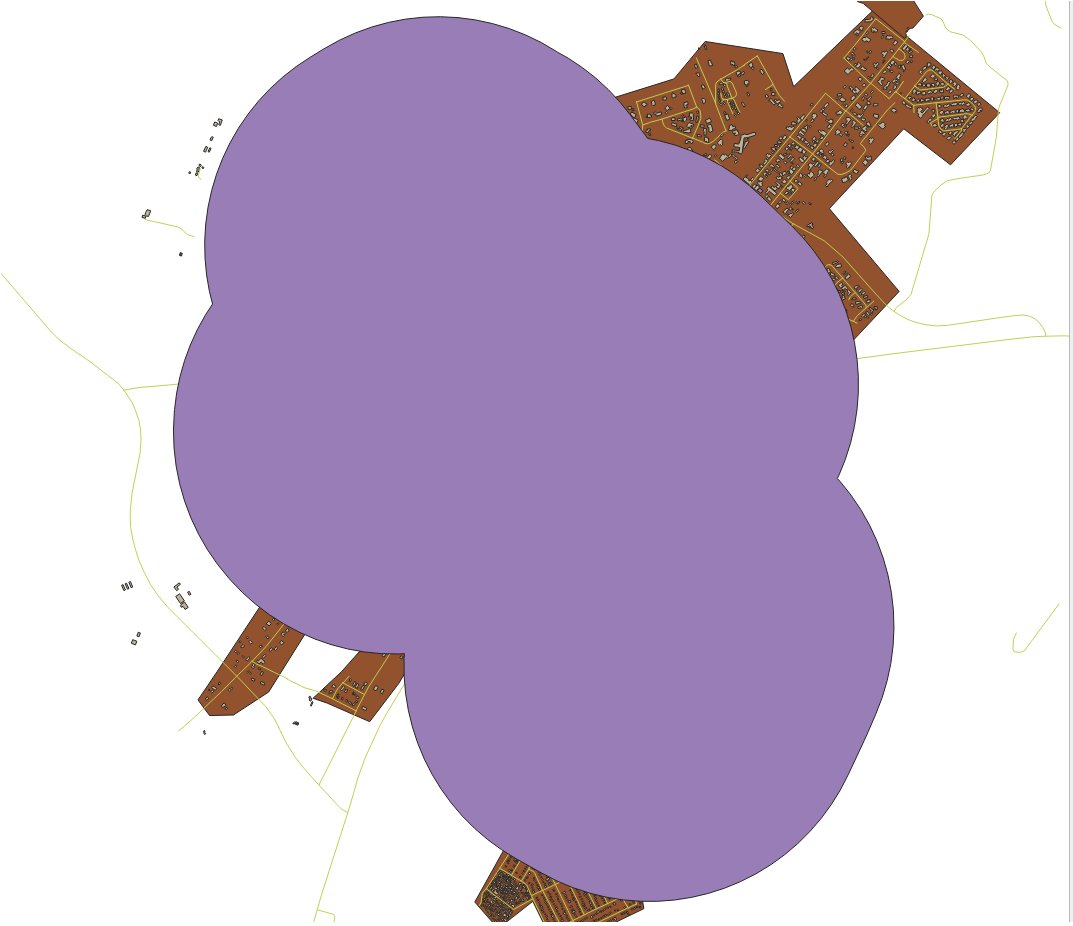
The first image shows the buffer with the Segments to approximate value set to 5 and the second shows the value set to 20. In our example, the difference is subtle, but you can see that the buffer’s edges are smoother with the higher value.
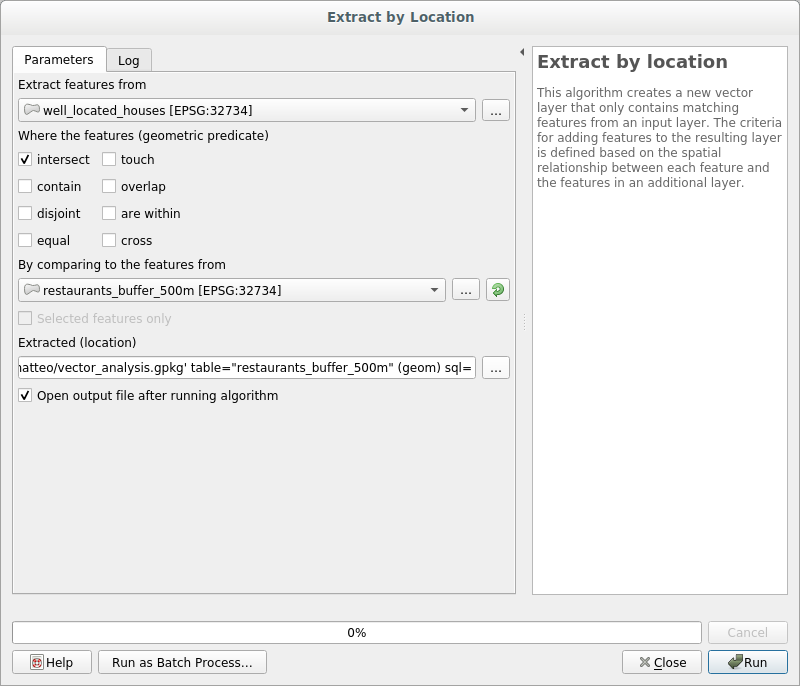
21.9.2. Distanța față de Restaurante
To create the new houses_restaurants_500m layer, we go through a two step process:
În primul rând, creați un tampon de 500 de metri în jurul restaurantelor și adăugați stratul la hartă:
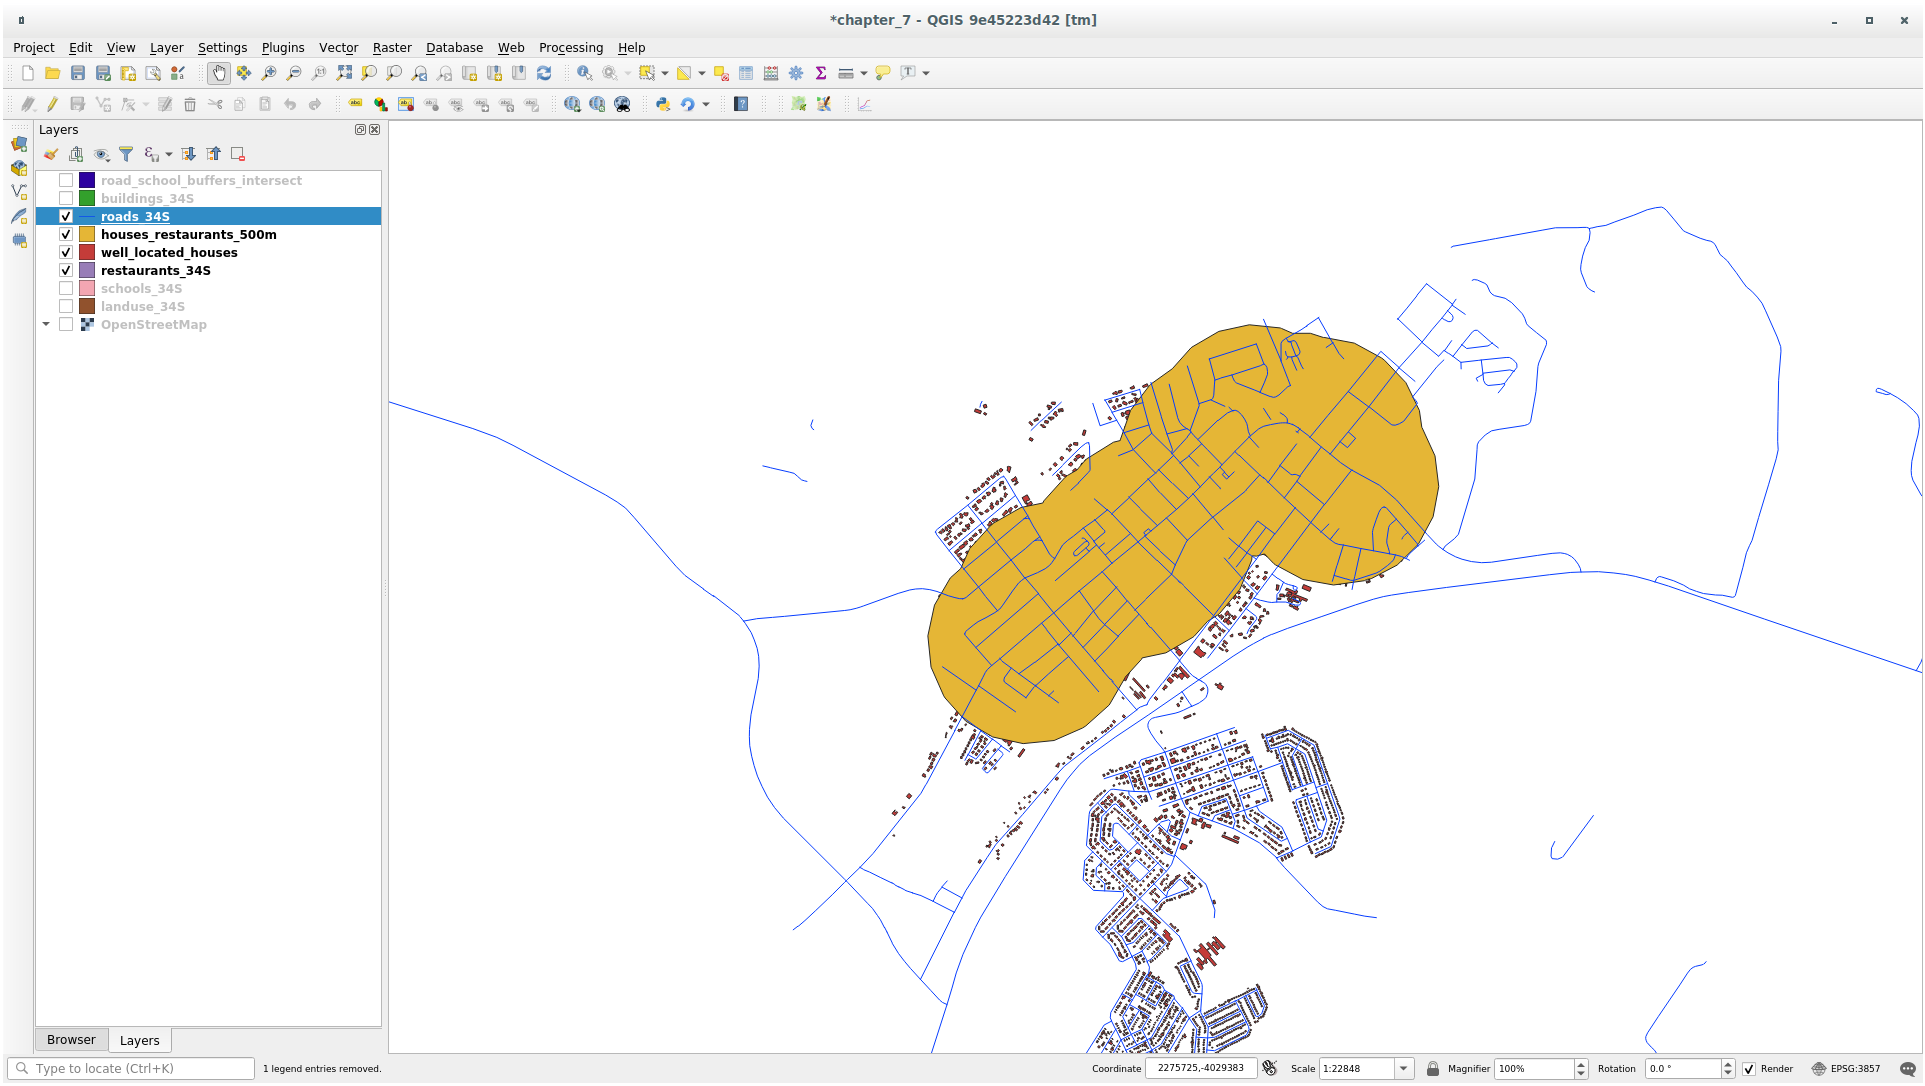
Next, extract buildings within that buffer area:
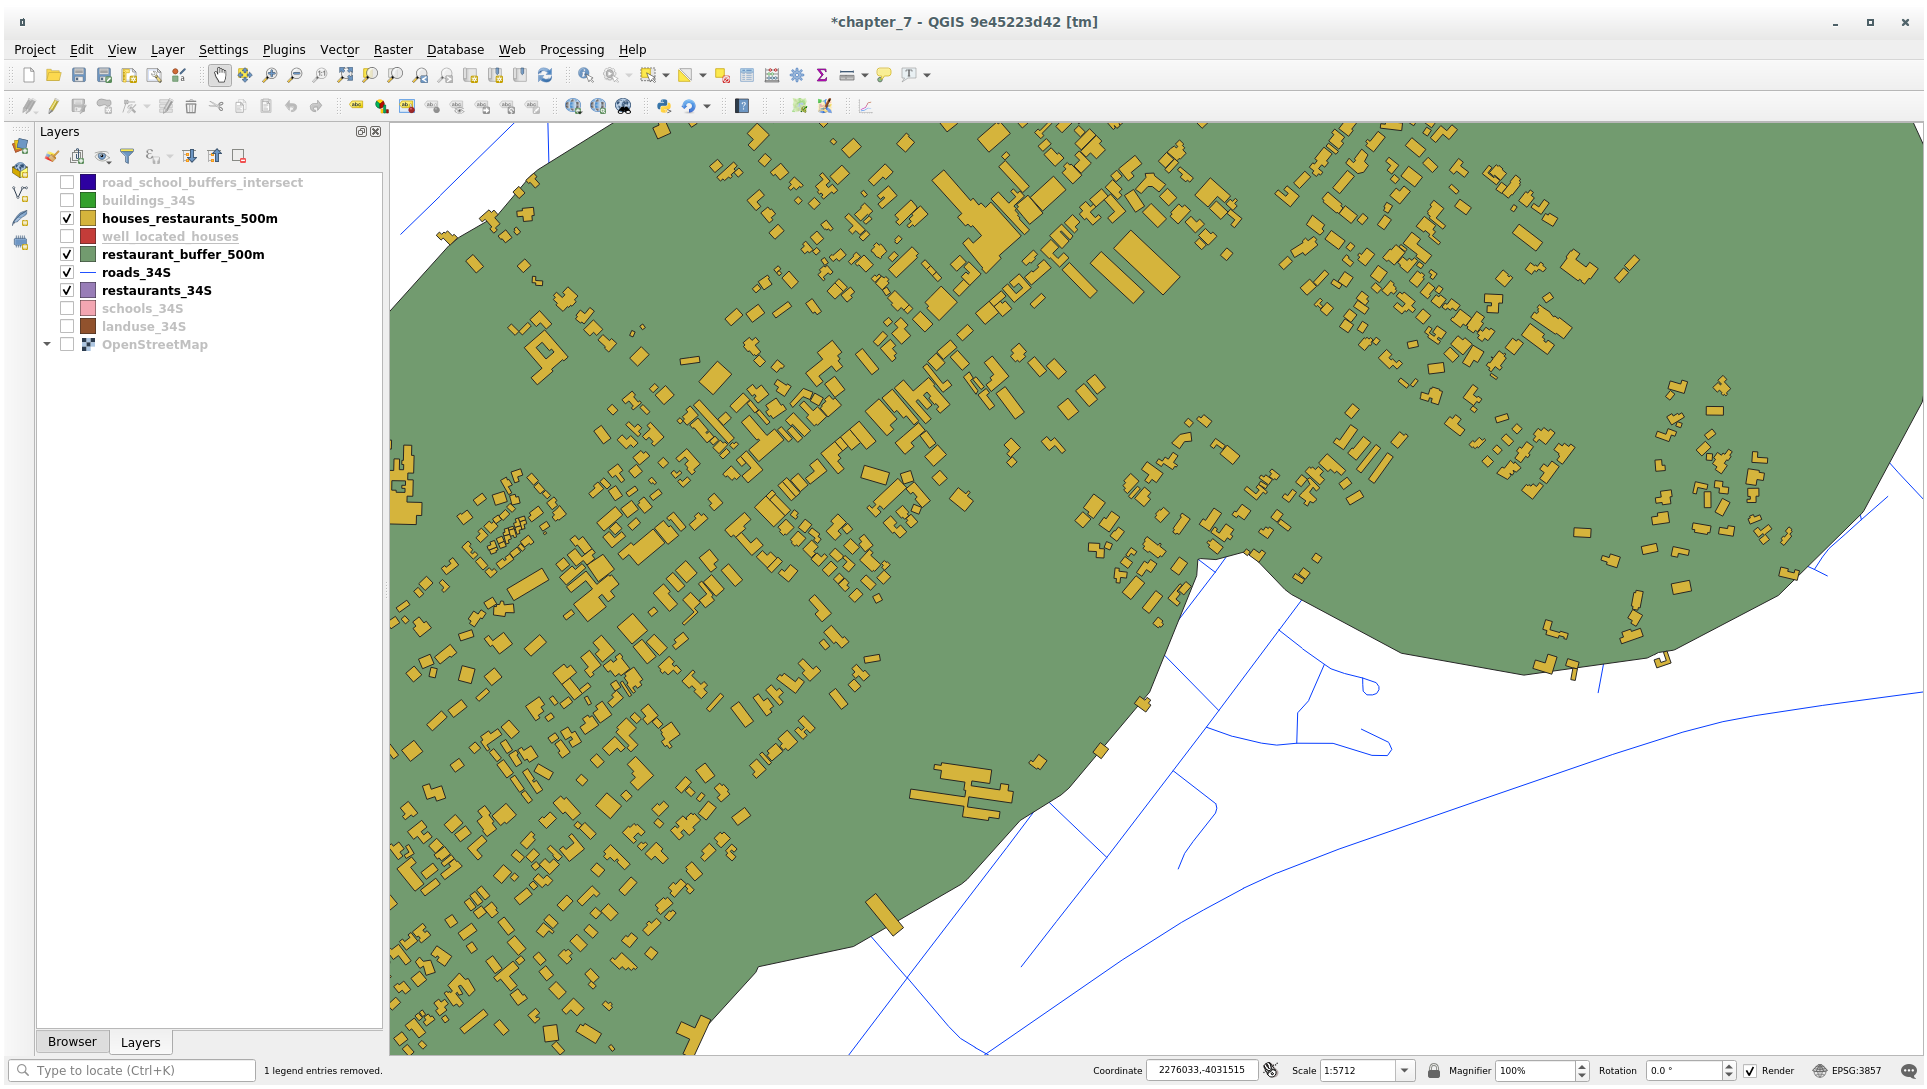
Harta dvs. ar trebui să arate acum numai acele clădiri care sunt la 50 m față de drum, la 1 km de o școală și la 500 m de un restaurant:
21.10. Results For Network Analysis
21.11. Fastest path
Open and fill the dialog as:
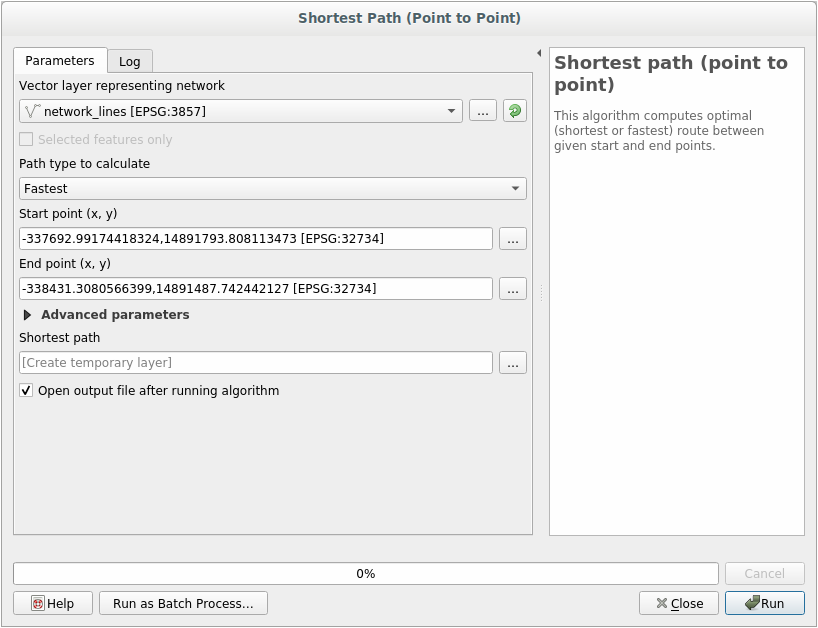
Make sure that the Path type to calculate is Fastest.
Click on Run and close the dialog.
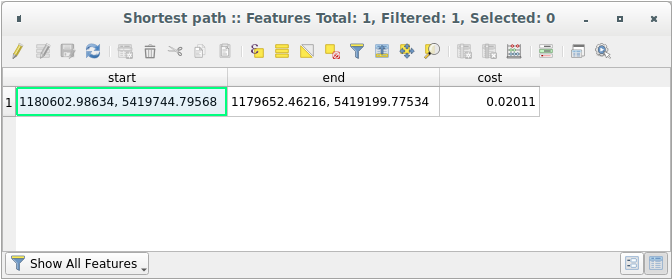
Open now the attribute table of the output layer. The cost field contains the travel time between the two points (as fraction of hours):
21.12. Results For Analiza Raster
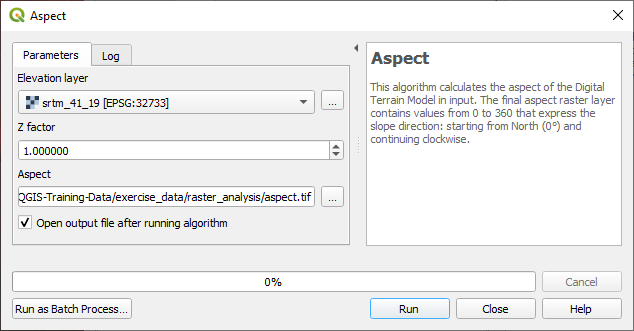
21.12.1. Calculare Aspect
Set your Aspect dialog up like this:
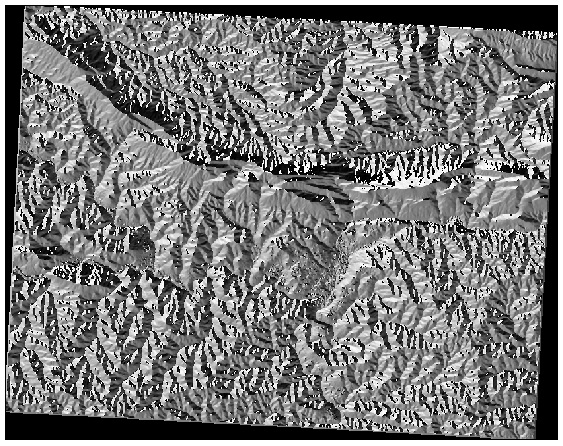
Rezultatul dvs.:
21.12.2. Calculează Panta (mai puțin de 2 sau de 5 grade)
Set your Raster calculator dialog up with:
the following expression:
slope@1 <= 2the
slopelayer as the Reference layer(s)
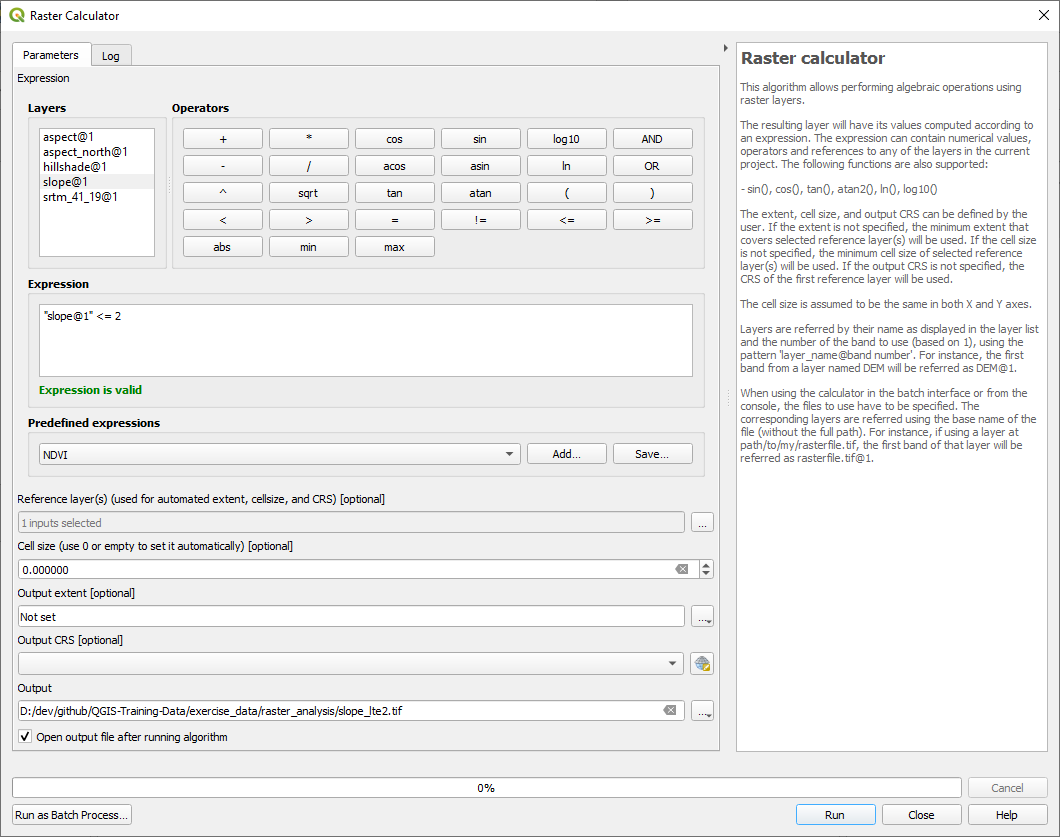
For the 5 degree version, replace the
2in the expression and file name with5.
Rezultatele dvs.:
2 grade:
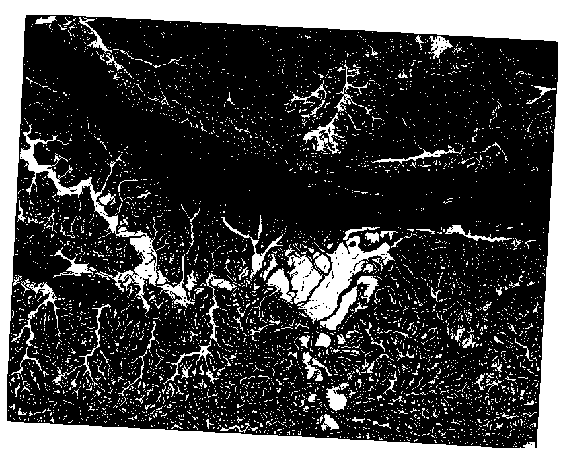
5 grade:
21.13. Results For Completarea Analizei
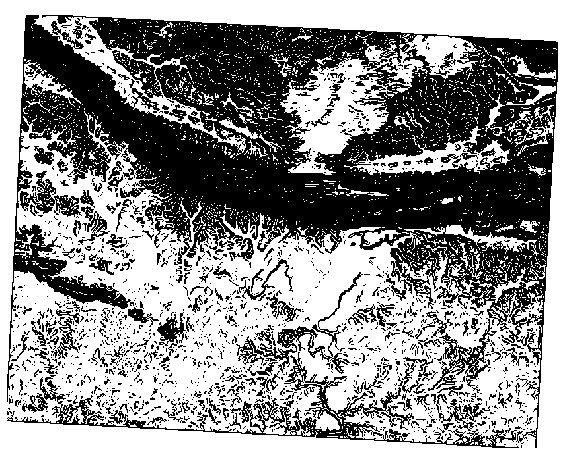
21.13.1. Din Raster în Vector
Open the Query Builder by right-clicking on the all_terrain layer in the Layers panel, and selecting the tab.
Then build the query
"suitable" = 1.Clic pe OK pentru a filtra toate poligoanele în care această condiție nu este îndeplinită.
Atunci când sunt puse deasupra rasterului original, zonele trebuie să se suprapună perfect:
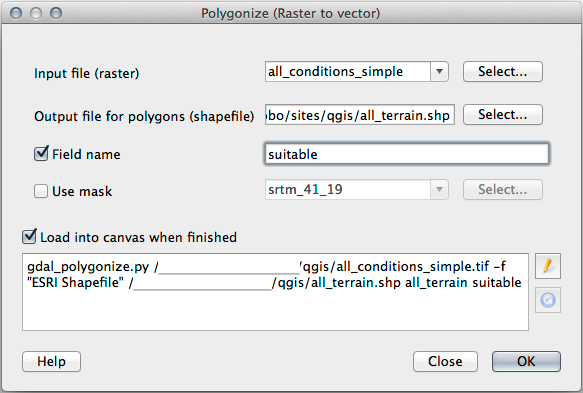
You can save this layer by right-clicking on the all_terrain layer in the Layers panel and choosing Save As…, then continue as per the instructions.
21.13.2. Inspectarea Rezultatelor
You may notice that some of the buildings in your new_solution layer have
been „sliced” by the Intersection tool. This shows that only part of the
building - and therefore only part of the property - lies on suitable terrain.
We can therefore sensibly eliminate those buildings from our dataset.
21.13.3. Rafinarea Analizei
Pentru moment, analiza dvs. ar trebui să arate în felul următor:
Luați în considerare o zonă circulară, continuă pentru 100 de metri, în toate direcțiile.
În cazul în care raza este mai mare de 100 de metri, prin scăderea a 100 de metri din dimensiunea sa (din toate direcțiile) va rezulta o parte care rămâne în mijloc.
Prin urmare, puteți rula un tampon interior de 100 de metri pe stratul vectorial existent suitable_terrain. În rezultatul funcției tampon, indiferent de ceea ce a mai rămas din stratul original, se vor reprezenta zonele în care există teren potrivit pentru 100 de metri în orice direcție.
Pentru demonstrație:
Mergeți la pentru a deschide diaolgul Tampo(anelor).
Setați-l astfel:
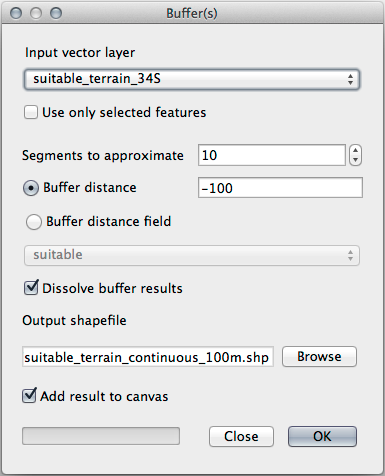
Use the suitable_terrain layer with
10segments and a buffer distance of-100. (The distance is automatically in meters because your map is using a projected CRS.)Save the output in
exercise_data/residential_development/assuitable_terrain_continuous100m.shp.If necessary, move the new layer above your original suitable_terrain layer.
Rezultatele dvs. vor arăta în felul următor:

Acum, folosiți instrumentul Selectare după by Locație ().
Setați-l astfel:

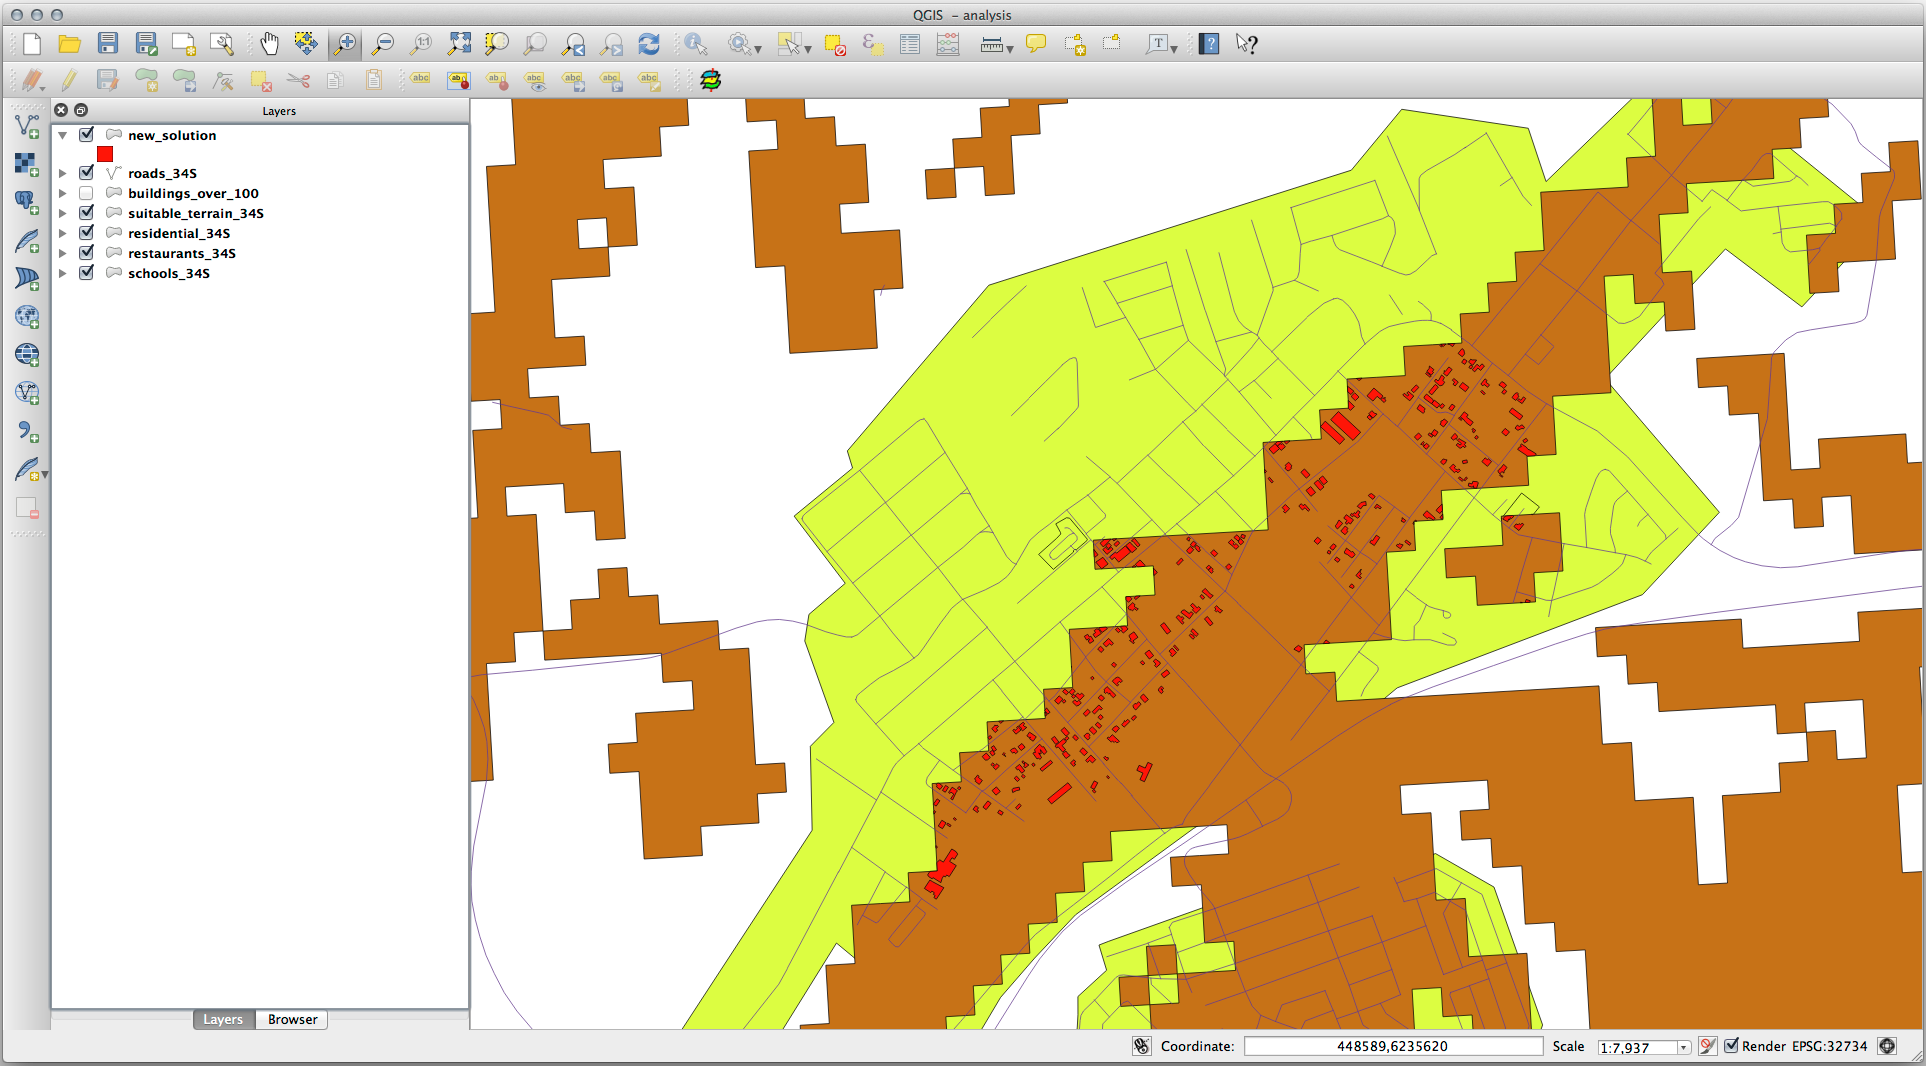
Selectați entitățile din new_solution care le intersectează pe cele din suitable_terrain_continuous100m.shp.
Acesta este rezultatul:
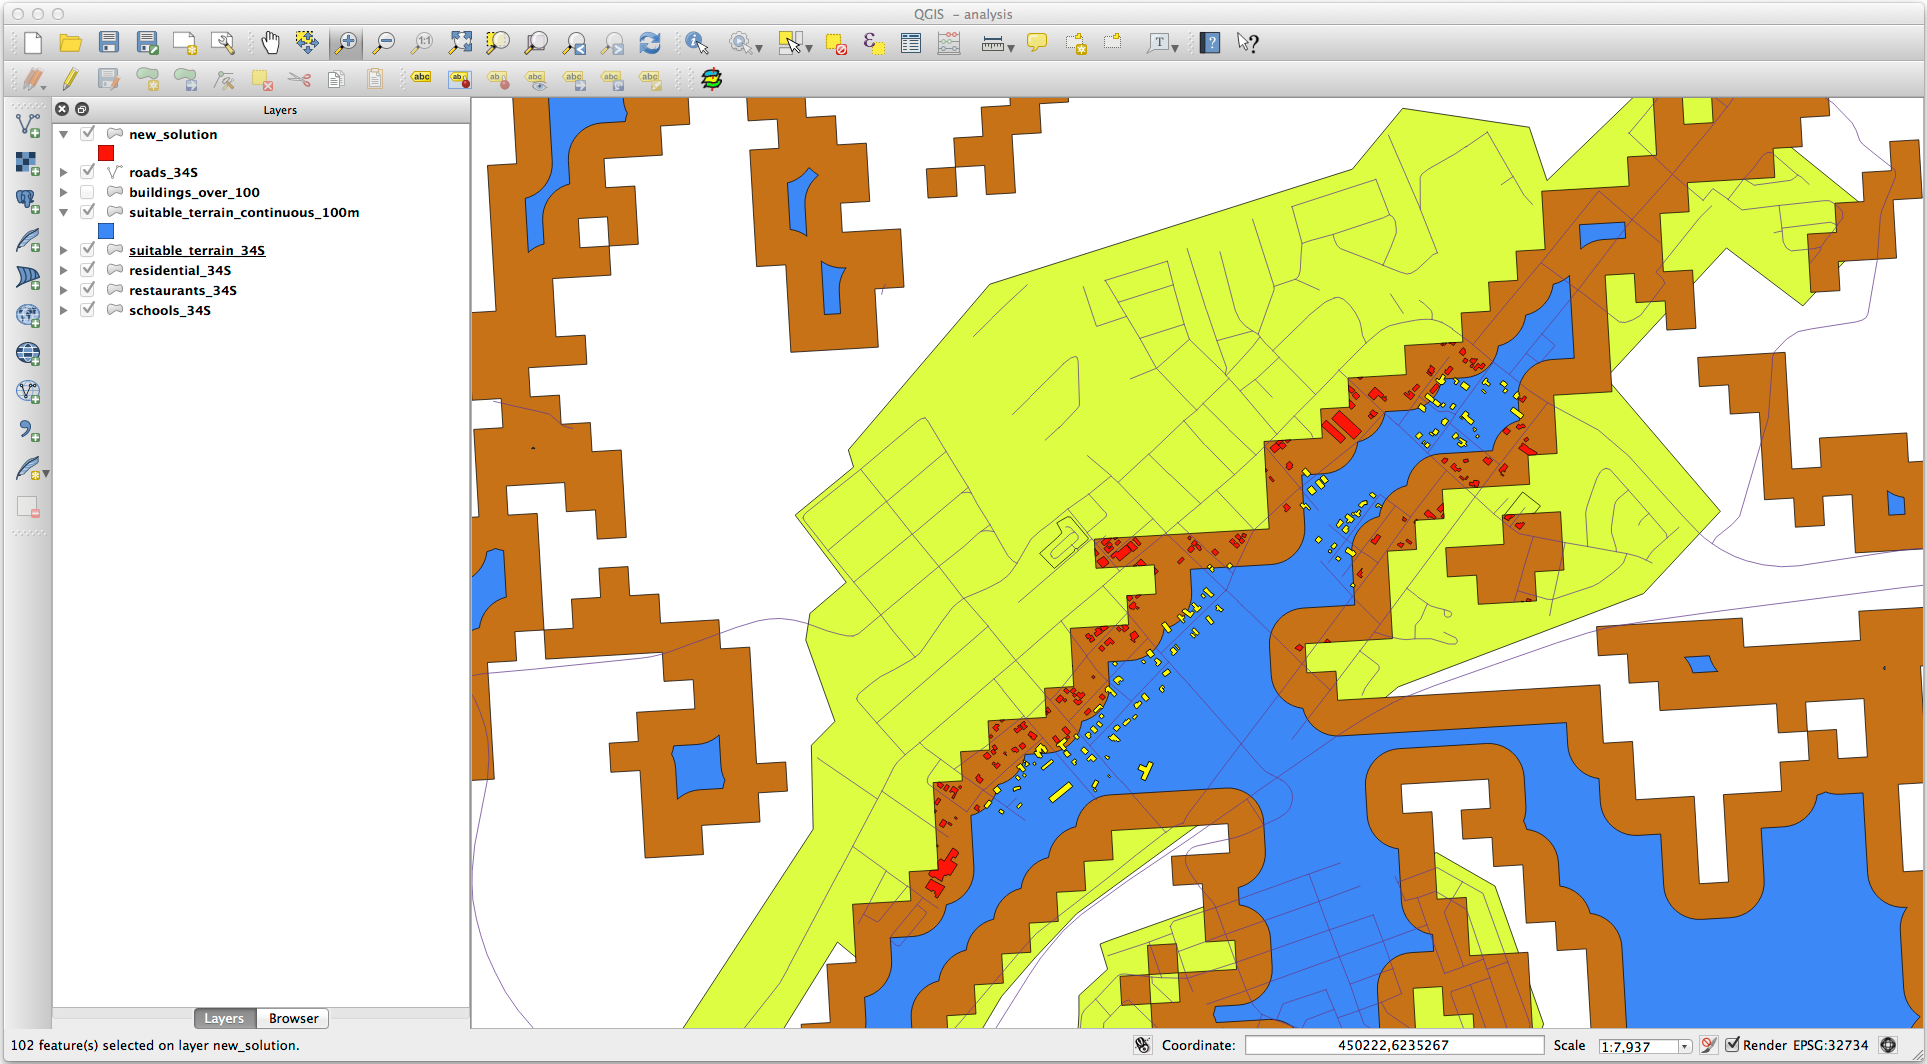
The yellow buildings are selected. Although some of the buildings fall partly outside the new suitable_terrain_continuous100m layer, they lie well within the original suitable_terrain layer and therefore meet all of our requirements.
Save the selection under
exercise_data/residential_development/asfinal_answer.shp.
21.14. Results For WMS
21.14.1. Adăugarea Altui Strat WMS
Harta dvs. ar trebui să arate astfel (este posibil să fie necesară reordonarea straturilor):
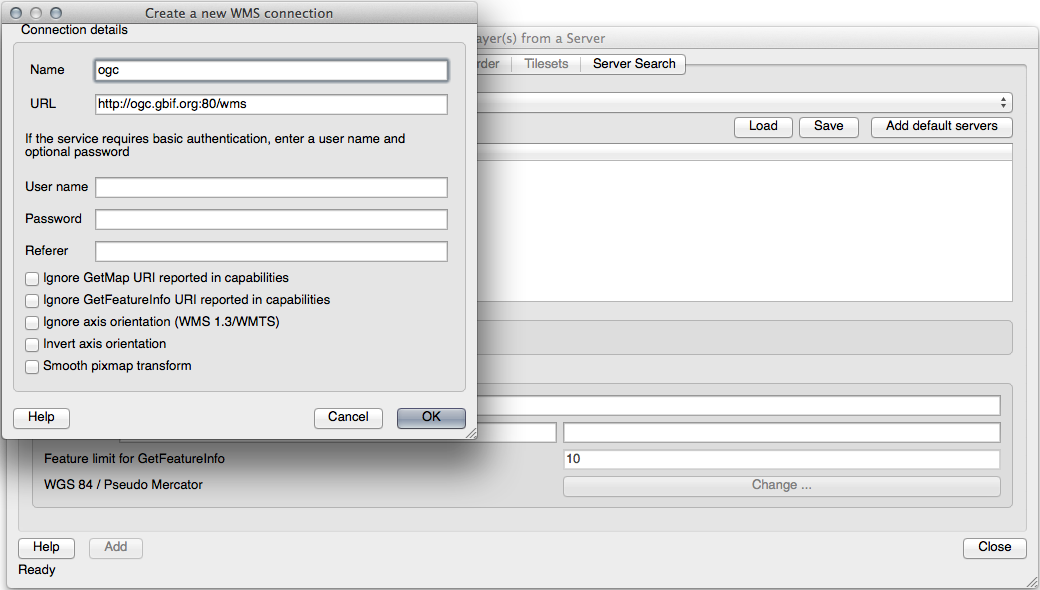
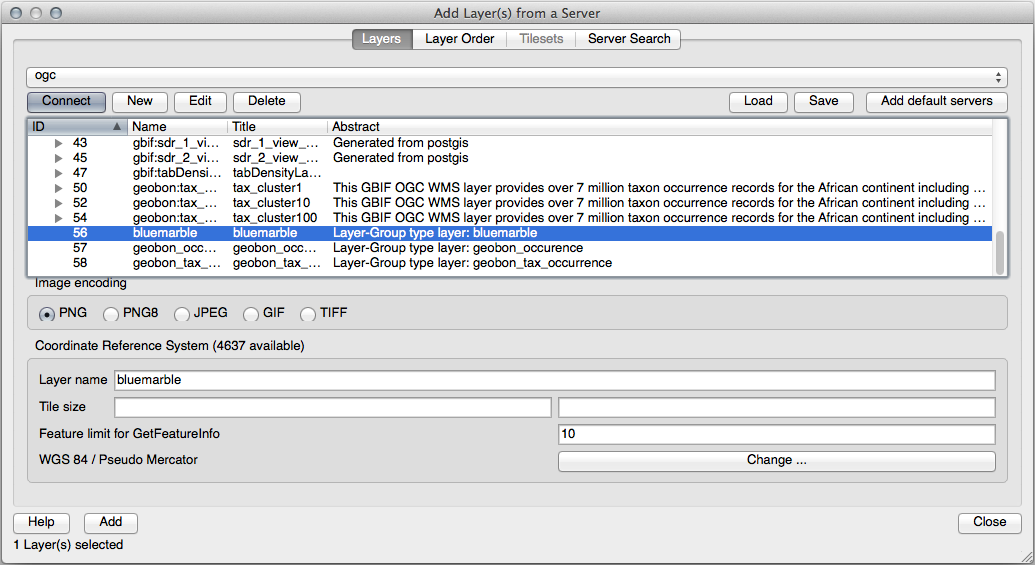
21.14.2. Adăugarea unui Nou Server WMS
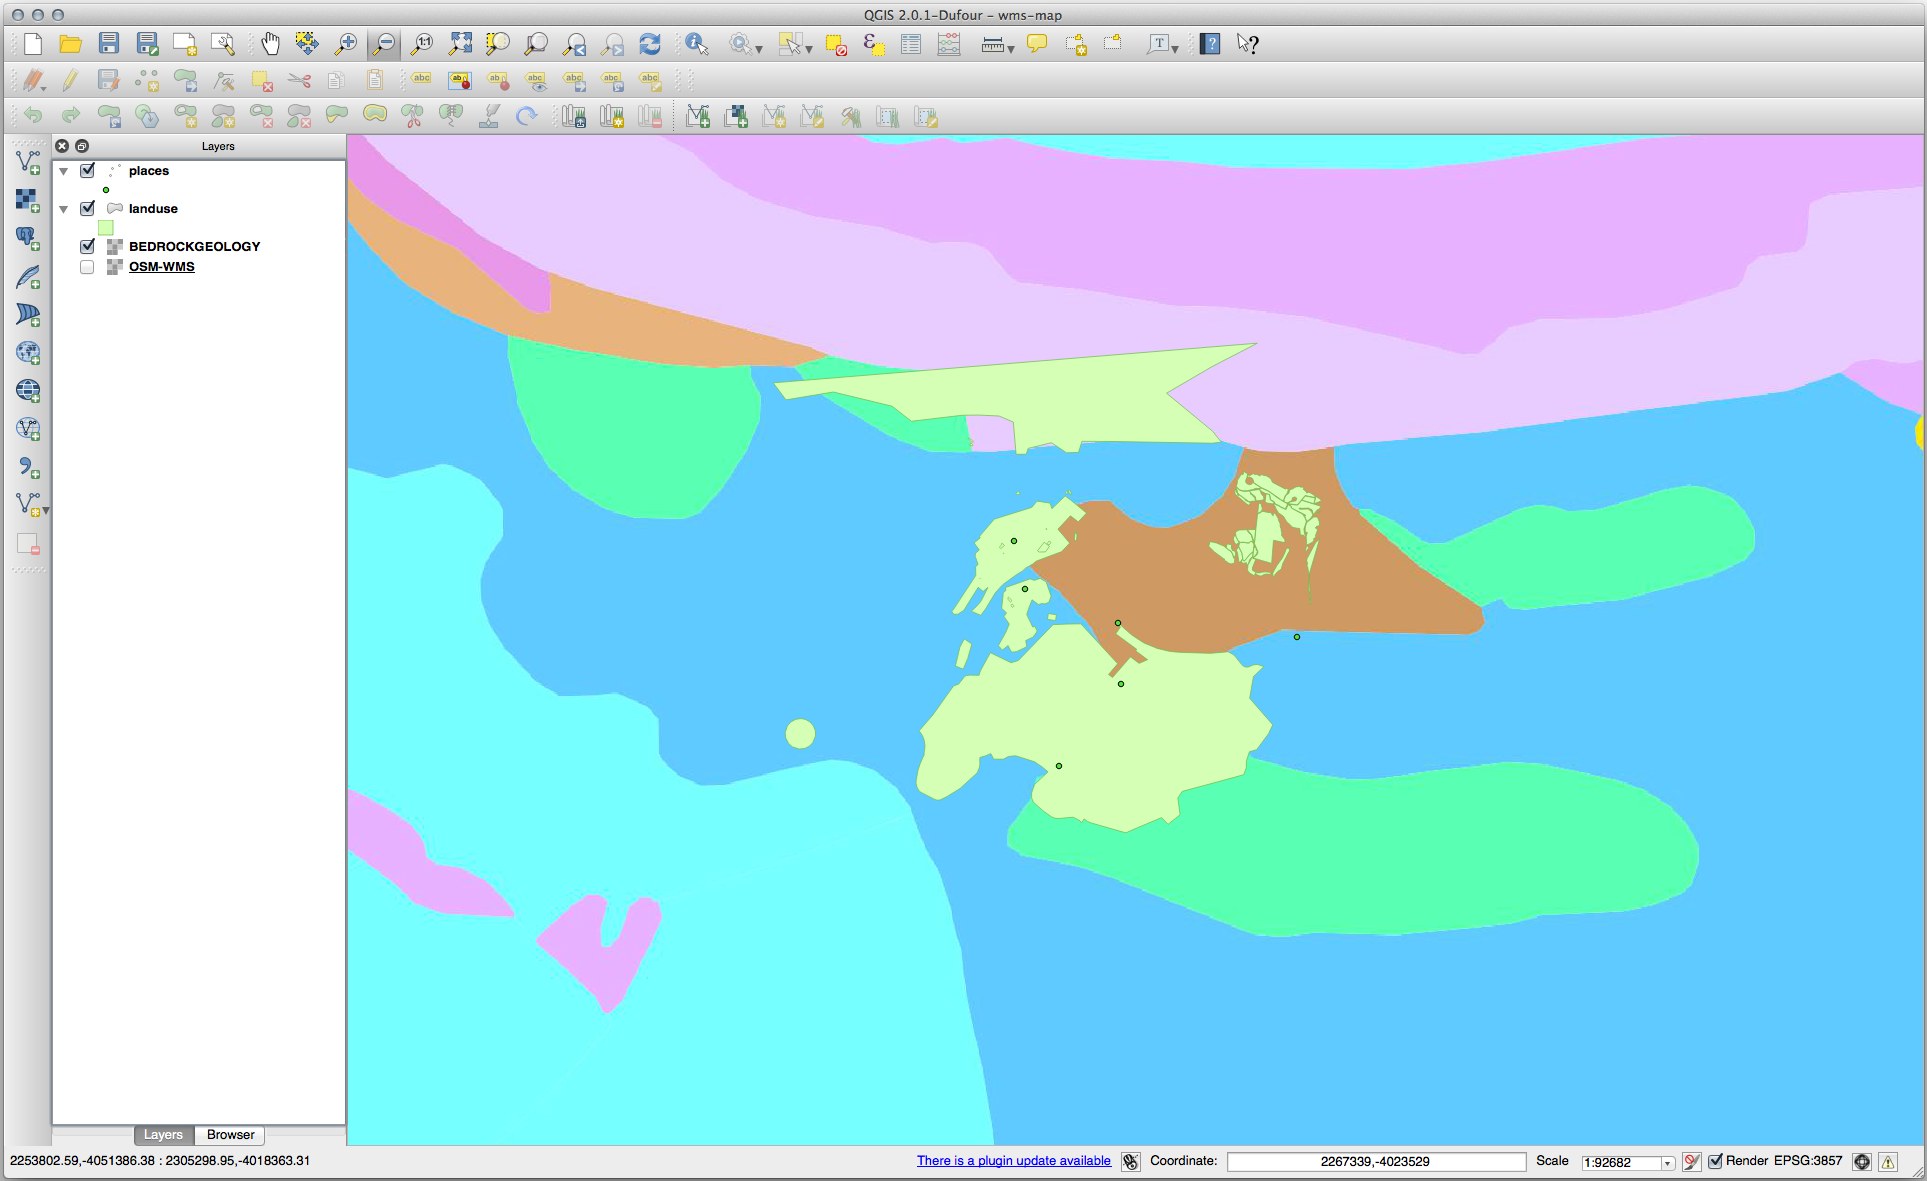
Utilizați aceeași abordare ca și mai înainte pentru a adăuga noul server, și stratul corespunzător, așa cum este găzduit pe acel server:
Dacă ați transfocat în zona | majorUrbanName |, veți observa că acest set de date are o rezoluție mică:
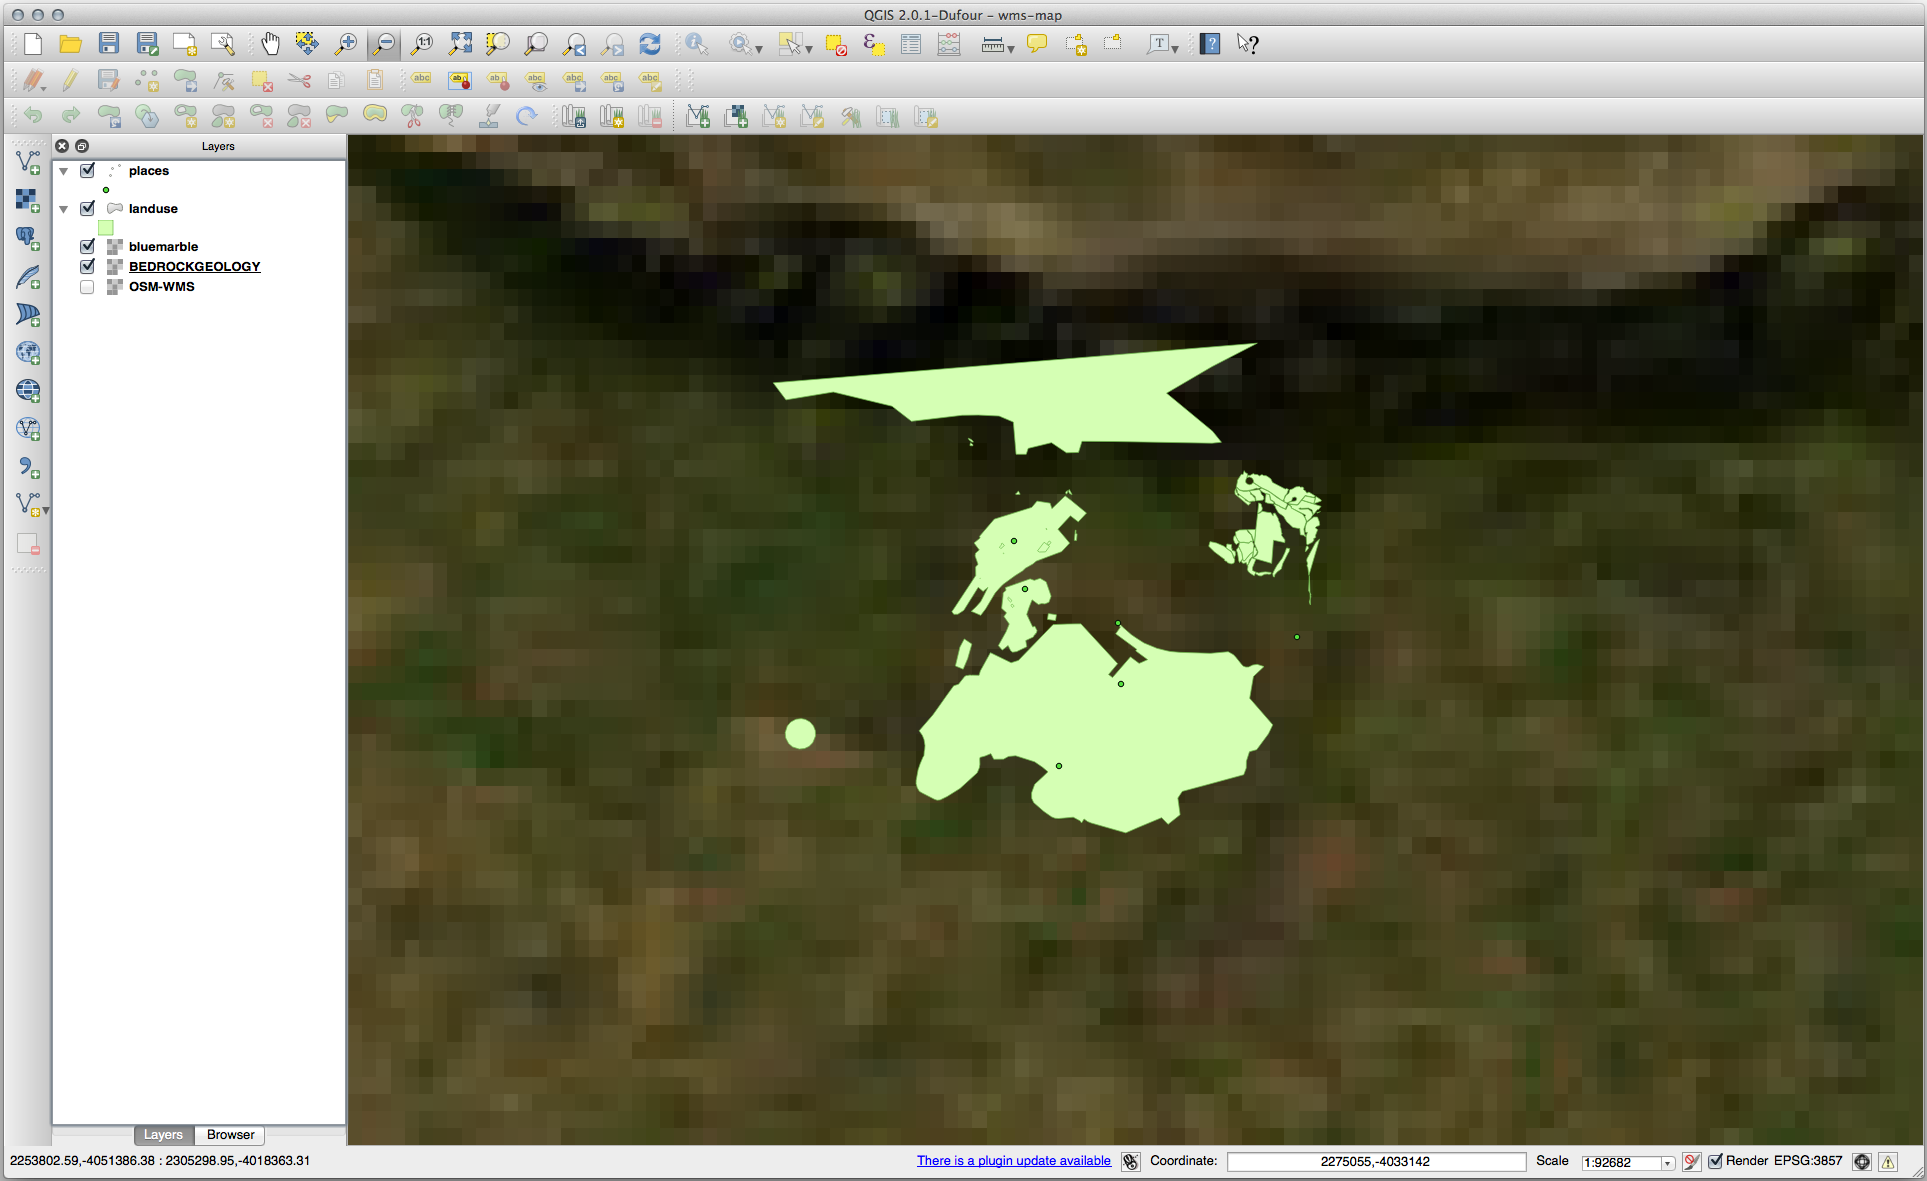
Prin urmare, este mai bine să nu utilizați aceste date pentru harta curentă. Datele Blue Marble sunt mult mai potrivite la scări globale sau naționale.
21.14.3. Găsirea unui Server WMS
You may notice that many WMS servers are not always available. Sometimes this is temporary, sometimes it is permanent. An example of a WMS server that worked at the time of writing is the World Mineral Deposits WMS at http://apps1.gdr.nrcan.gc.ca/cgi-bin/worldmin_en-ca_ows. It does not require fees or have access constraints, and it is global. Therefore, it does satisfy the requirements. Keep in mind, however, that this is merely an example. There are many other WMS servers to choose from.
21.15. Results For GRASS Integration
21.15.1. Add Layers to Mapset
You can add layers (both vector and raster) into a GRASS Mapset by drag and drop
them in the Browser (see Follow Along: Load data using the QGIS Browser) or by using the v.in.gdal.qgis
for vector and r.in.gdal.qgis for raster layers.
21.15.2. Reclassify raster layer
To discover the maximum value of the raster run the r.info tool: in the console you will see that the maximum value is 1699.
You are now ready to write the rules. Open a text editor and add the following rules:
0 thru 1000 = 1
1000 thru 1400 = 2
1400 thru 1699 = 3
save the file as a my_rules.txt file and close the text editor.
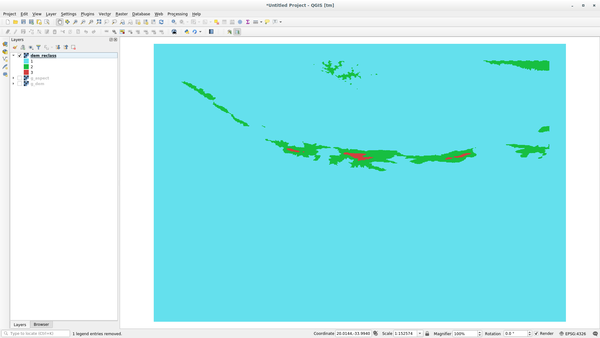
Run the r.reclass tool, choose the g_dem layer and load the file containing the rules you just have saved.
Click on Run and then on View Output. You can change the colors and the final result should look like the following picture:
21.16. Results For Noțiuni despre Bazele de date
21.16.1. Adresarea Tabelei de Properietăți
Pentru tabela noastră teoretică de adresare, am putea dori să stocheze următoarele proprietăți:
House Number
Street Name
Suburb Name
City Name
Postcode
Country
La crearea tabelului pentru reprezentarea unui obiect adresă, vom crea coloane pentru a reprezenta fiecare dintre aceste proprietăți și le vom denumi cu nume acceptate de SQL și, eventual, scurtate:
house_number
street_name
suburb
city
postcode
country
21.16.2. Normalizarea Tabelei de Personal
Problema majoră a tabelei people rezidă în inexistența unui câmp de adresă singular, care să conțină întreaga adresă a unei persoane. Gândindu-ne la tabela noastră teoretică address de la începutul acestei lecții, știm că o adresă este formată din mai multe proprietăți diferite. Prin stocarea tuturor acestor proprietăți într-un singur câmp, am îngreuna mult actualizarea și interogarea datelor noastre. Prin urmare, trebuie să divizăm câmpul de adresă în diferite proprietăți. Va rezulta, astfel, un tabel cu următoarea structură:
id |     name      | house_no |  street_name   |    city    |   phone_no
 --+---------------+----------+----------------+------------+-----------------
 1 | Tim Sutton    |     3    | Buirski Plein  | Swellendam | 071 123 123
 2 | Horst Duester |     4    | Avenue du Roix | Geneva     | 072 121 122
Notă
În secțiunea următoare, veți învăța despre relațiile cheilor externe, care ar putea fi utilizate în acest exemplu, pentru a îmbunătăți în continuare structura bazei noastre de date.
21.16.3. Normaliarea Suplimentară a Tabelei de Personal
Tabela noastră de personal arată, în mod curent, astfel:
id |     name     | house_no | street_id |  phone_no
---+--------------+----------+-----------+-------------
 1 | Horst Duster |        4 |         1 | 072 121 122
Coloana street_id reprezintă o relație «una la mai multe» între obiectul people și obiectul street, care este în tabela streets.
O modalitate de a normaliza și mai mult tabela este de a împărți câmpul în prenume și nume:
id | first_name | last_name  | house_no | street_id |  phone_no
---+------------+------------+----------+-----------+------------
 1 |    Horst   |   Duster   |     4    |     1     | 072 121 122
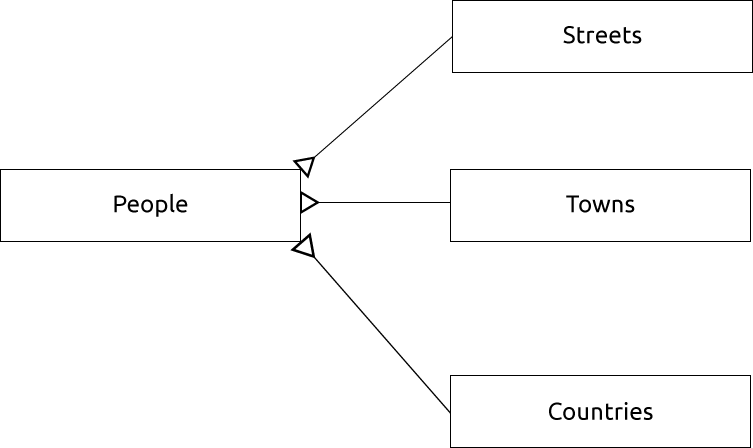
Putem crea, de asemenea, tabele separate pentru numele orașului și al țării, corelându-le cu tabela noastră people, prin intermediul relațiilor «una la multe»:
id | first_name | last_name | house_no | street_id | town_id | country_id
---+------------+-----------+----------+-----------+---------+------------
 1 |    Horst   |   Duster  |     4    |     1     |    2    |     1
O diagramă ER care reprezintă acest lucru ar putea arăta astfel:
21.16.4. Crearea Tabelei de Personal
SQL-ul necesar creării tabelei de personal corecte este:
create table people (id serial not null primary key,
                     name varchar(50),
                     house_no int not null,
                     street_id int not null,
                     phone_no varchar null );
Schema pentru tabel (introduceți \d personal) arată astfel:
Table "public.people"

Column     |         Type          |                      Modifiers
-----------+-----------------------+-------------------------------------
id         | integer               | not null default
           |                       | nextval('people_id_seq'::regclass)
name       | character varying(50) |
house_no   | integer               | not null
street_id  | integer               | not null
phone_no   | character varying     |
Indexes:
  "people_pkey" PRIMARY KEY, btree (id)
Notă
În scop ilustrativ, intenționat am omis constrângerea fkey.
21.16.5. Commanda DROP
Motivul pentru care comanda DROP nu ar funcționa în acest caz se datorează faptului că tabela people are o constrângere de Cheie Externă în tabela streets. Acest lucru înseamnă că eliminarea (sau ștergerea) tabelei streets ar lăsa tabela people cu referințe către date inexistente despre străzi.
Notă
Este posibil să «forțăm» ștergerea tabelului streets cu ajutorul comenzii CASCADE, dar acest lucru ar elimina, de asemenea, tabela people și oricare alta care a avut o relație cu tabela` streets`. Utilizați-o cu prudență!
21.16.6. Inserarea unei Noi Străzi
Comanda SQL pe care ar trebui să o utilizați arată astfel (puteți înlocui numele străzii cu altul, la alegere):
insert into streets (name) values ('Low Road');
21.16.7. Adăugarea unei Noi Persoane Cu Relația Cheii Externe
Aici este instrucțiunea SQL corectă:
insert into streets (name) values('Main Road');
insert into people (name,house_no, street_id, phone_no)
  values ('Joe Smith',55,2,'072 882 33 21');
Dacă priviți iarăși la tabela străzilor (folosind o instrucțiune SELECT ca mai înainte), veți vedea că id-ul pentru intrarea Drumului Principal este 2.
De aceea, am putea mai degrabă doar să introducem numărul 2 de mai sus. Chiar dacă nu vedem Main Road scris integral în intrarea de mai sus, baza de date va fi capabilă să se asocieze valoarea street_id cu 2.
Notă
Dacă ați adăugat deja un nou obiect street, ați putea descoperi că noul Drum Principal are ID-ul 3 nu 2.
21.16.8. Returnează Numele Străzilor
Aici este instrucțiunea SQL corectă, pe care ar trebui să o folosiți:
select count(people.name), streets.name
from people, streets
where people.street_id=streets.id
group by streets.name;
Rezultatul:
count |    name
------+-------------
    1 | Low Street
    2 | High street
    1 | Main Road
(3 rows)
Notă
Veți observa că am prefixat numele câmpurilor cu numele tabelei (de exemplu, people.name și streets.name). Acest lucru trebuie să fie făcut de fiecare dată când numele câmpului este ambiguu (de exemplu, când nu este unic în toate tabelele din baza de date).
21.17. Results For Interogări spaţiale
21.17.1. Unitățile Folosite în Interogările Spațiale
Unitățile utilizate de interogarea din exemplu sunt în grade, deoarece CRS-ul pe care îl folosește stratul este WGS 84. Acesta este un CRS Geografic, ceea ce înseamnă că unitățile sale sunt în grade. Un CRS proiectat, similar proiecțiilor UTM, este în metri.
Amintiți-vă că, atunci când scrieți o interogare, trebuie să cunoașteți CRS-ul stratului. Acest lucru vă va permite să scrieți o interogare care va returna rezultatele pe care le așteptați.
21.17.2. Crearea unui Index Spațial
CREATE INDEX cities_geo_idx
  ON cities
  USING gist (the_geom);
21.18. Results For Construirea Geometriei
21.18.1. Crearea Șirurilor de Linii
alter table streets add column the_geom geometry;
alter table streets add constraint streets_geom_point_chk check
     (st_geometrytype(the_geom) = 'ST_LineString'::text OR the_geom IS NULL);
insert into geometry_columns values ('','public','streets','the_geom',2,4326,
     'LINESTRING');
create index streets_geo_idx
  on streets
  using gist
  (the_geom);
21.18.2. Legarea Tabelelor
delete from people;
alter table people add column city_id int not null references cities(id);
(captura orașelor în QGIS)
insert into people (name,house_no, street_id, phone_no, city_id, the_geom)
   values ('Faulty Towers',
           34,
           3,
           '072 812 31 28',
           1,
           'SRID=4326;POINT(33 33)');

insert into people (name,house_no, street_id, phone_no, city_id, the_geom)
   values ('IP Knightly',
           32,
           1,
           '071 812 31 28',
           1,F
           'SRID=4326;POINT(32 -34)');

insert into people (name,house_no, street_id, phone_no, city_id, the_geom)
   values ('Rusty Bedsprings',
           39,
           1,
           '071 822 31 28',
           1,
           'SRID=4326;POINT(34 -34)');
Dacă ați obținut următorul mesaj de eroare:
ERROR:  insert or update on table "people" violates foreign key constraint
        "people_city_id_fkey"
DETAIL: Key (city_id)=(1) is not present in table "cities".
atunci înseamnă că în timp ce experimentați crearea poligoanelor pentru tabela orașelor, trebuie să fi șters unele dintre ele și să fi reînceput. Doar verificați intrările din tabelul de orașe și folosiți orice id care există.
21.19. Results For Modelul Entității Simple
21.19.1. Popularea Tabelelor
create table cities (id serial not null primary key,
                     name varchar(50),
                     the_geom geometry not null);
 alter table cities
 add constraint cities_geom_point_chk
 check (st_geometrytype(the_geom) = 'ST_Polygon'::text );
21.19.2. Popularea Tabelei Geometry_Columns
insert into geometry_columns values
      ('','public','cities','the_geom',2,4326,'POLYGON');
21.19.3. Adăugarea Geometriei
select people.name,
       streets.name as street_name,
       st_astext(people.the_geom) as geometry
from   streets, people
where  people.street_id=streets.id;
Rezultatul:
     name     | street_name |   geometry
--------------+-------------+---------------
 Roger Jones  | High street |
 Sally Norman | High street |
 Jane Smith   | Main Road   |
 Joe Bloggs   | Low Street  |
 Fault Towers | Main Road   | POINT(33 -33)
(5 rows)
După cum puteți vedea, constrângerea noastră permite null-uri care urmează să fie adăugate în baza de date.