4. Ghidul traducerilor
Acest manual este dedicat traducătorilor. Mai întâi este explicat procesul general de realizare a unei traduceri. Mai departe, este detaliată traducerea în olandeză a unui document scris, în original, în engleză. La final sunt rezumate Regulile de traducere.
Notă
Deși se concentrează pe documentația QGIS, metodele și regulile descrise mai jos se aplică, de asemenea, și traducerii aplicației QGIS și a site-ului web.
4.1. Procesul de traducere
QGIS Documentation is written in English with .rst files.
In order to provide translations:
A prebuild script creates translation files named
.pofiles for the English language in the folder/QGIS-Documentation/locale/en.These „originals” are then copied by the script to the
localefolders for other languages.The sentences in the
.pofiles are pushed to the Transifex web platform, and made available for translators who can begin to translate from English to their language with the editor.At the end of the day, a script pulls back all validated translations
At the next build of the documentation (which occurs at least once a day), a script reuses the sentences to create translated output
When afterwards an
.rstdocument is updated a new.pofile is created in the English part. The contents of this new file will be merged with already existing.pofiles for each language. This means that when a new line is added to an.rstdocument that was already translated, only the new/updated sentences are added in the translated.pofile and needs to be translated. The amount of work for updating translations for next release should be relatively small.
Notă
The process above is the same followed to translate QGIS website, QGIS
Desktop and QGIS Server. The difference with the applications is that instead
of .po files, all the translatable strings in the .py,
.cpp, .yaml and others… files that shape the application are
pushed to and pulled from transifex as a single .ts file.
În prezent, sunt folosite două instrumente diferite pentru a efectua traducerile QGIS:
The Transifex web platform, the easiest and recommended way to translate QGIS, transparently does the process described above and pulls all the translatable texts in one place for the translator. Just pick the files you want and translate. Translated files are stored in the platform until another release is pushed.
Qt Linguist, a Qt development tool, requires the translator to pull locally the
.po(or.ts) files from the source code, translate and then push back.
Rețineți că indiferent de instrumentul ales, regulile de traducere sunt aceleași.
4.2. Traducerea unui fișier
Pentru a explica cum funcționează traducerea, vom folosi plugin-ul Heatmap ca exemplu. În acest exemplu, îl vom traduce din engleză în olandeză, dar procedeul va fi, practic, similar pentru traducerea în oricare altă limbă.
Sursa unui document se poate găsi aici:
QGIS-Documentation/source/docs/user_manual/plugins/plugins_heatmap.rst
Deci, de ce am ales acest document?
It includes images, captions, headers, references and replacements.
Eu l-am scris, deci este mult mai ușor pentru mine să efectuez traducerea ;-)
The build process has created the English .po file which can be found here:
QGIS-Documentation/locale/en/LC_MESSAGES/docs/user_manual/plugins/plugins_heatmap.po
The equivalent Dutch .po file (basically a copy) can be found here:
QGIS-Documentation/locale/nl/LC_MESSAGES/docs/user_manual/plugins/plugins_heatmap.po
Along this file you will see a tiny .mo file which indicates that it
does not hold any translations yet.
4.2.1. Traducerea pe Transifex
In order to translate using Transifex, you need to:
Once you are part of a language team, click on the corresponding project (in this case
QGIS Documentation). A list of available languages with their ratio of translation is displayed.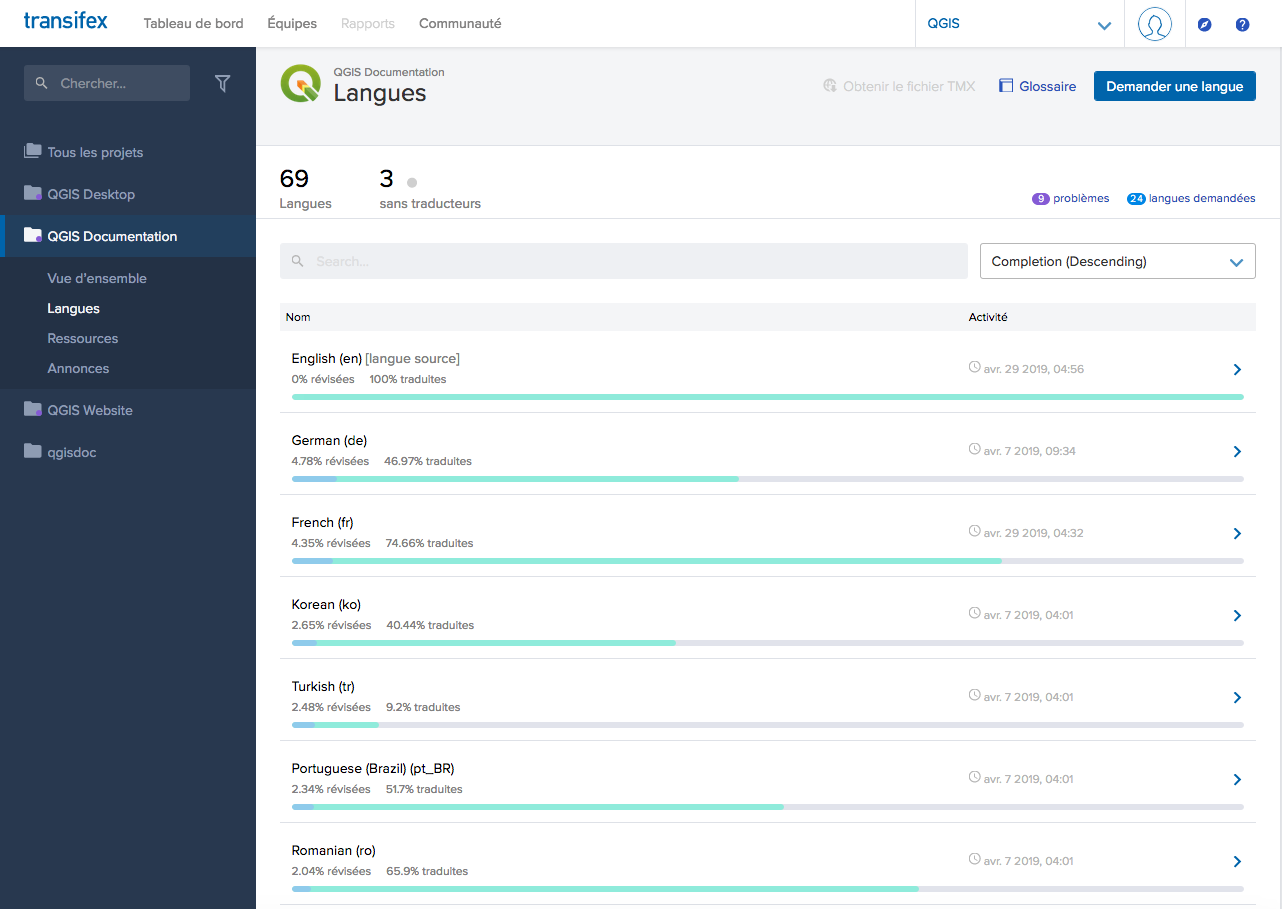
Fig. 4.15 Select language for translation in the Transifex menu
Hover over your language and click either:
View resources: translatable
.pofiles with their ratio of translation, number of strings and some more metadata are now displayed.or Translate: opens the interface of translation with all the available
.pofiles
Identify the file you’d like to translate (in our case we are looking for the
docs_user-manual_plugins_plugins-heatmap, the heatmap plugin file) or any unfinished file and click on it: strings in the files are loaded and you can use the interface to filter, translate, suggest translation…Sfat
For the documentation or the website, clicking the
Fix melink in the footer of a page brings you directly to its corresponding translation page in Transifex.All you need to do is select each text and translate following the guidelines.
For further information on the use of Transifex Web Editor, see https://docs.transifex.com/translation/translating-with-the-web-editor.
4.2.2. Traducere în Qt Linguist
With Qt Linguist, you need to:
manually grab the
.poor.tsfile(s). This can be achieved by downloading the file(s) either from Transifex platform or from thelocale/$languagefolder of the source repository (in GitHub),proceed to the translation locally
upload the modified files to their sources (Transifex or GitHub).
While downloading and uploading translatable files can be done with Transifex, it’s not advised to use this process. Since there’s no versioning system on Transifex, the file you upload will simply replace the existing one and potentially overwrite any modification made by others on the platform in the meantime.
When you open the file in Qt Linguist for the first time you will see the following dialog:
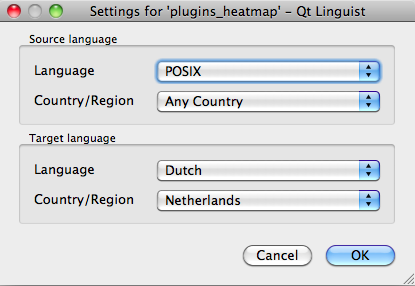
Fig. 4.16 Selectați limba pentru traducere în meniul linguist
Limba Țintă trebuie să fie completată corect. Limba Sursă poate fi lăsată așa cum este, cu limba POSIX și Țara/Regiunea pe Orice Țară.
When you press the OK button Qt Linguist is filled with sentences and you can start translating, see Fig. 4.17.
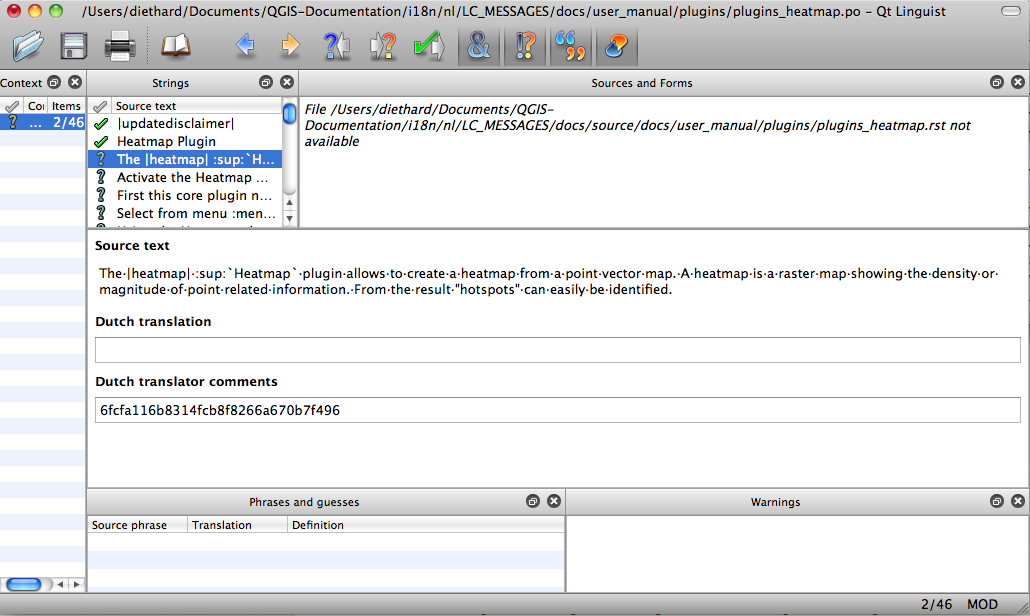
Fig. 4.17 Traducerea cu ajutorul meniului Linguist
În meniu veți vedea următoarele butoane, ușor de utilizat.
 Butonul Translation Done Next este cel mai important. Dacă elementul are nevoie de traducere, introduceți o traducere în câmpul de text, apoi apăsați acest buton. Dacă elementul nu necesită traducere, lăsați gol câmpul de text și apăsați, de asemenea, acest buton, care indică faptul că elementul este în regulă, continuându-se cu următorul.
 Butonul Goto Previous, poate fi folosit pentru a merge la elementul tradus anterior.
 Butonul Goto Next, poate fi folosit pentru a merge la următorul element de tradus.
 Butonul Next Todo, efectuează saltul la prima traducere care necesită o traducere. Este foarte util atunci când documentul original s-a schimbat și numai câteva expresii noi/modificate trebuie să fie traduse.
 Butonul Previous Todo, caută înapoi și sare la primul element de traducere care necesită o traducere.
For further information on the use of Qt Linguist, see https://doc-snapshots.qt.io/qt5-5.12/linguist-translators.html
Atenționare
If you want to download content to translate from the source
repository, never do this in the master branch. For translations
there are always translation branches available, once a document is fully
updated in English for a certain version. As an example, to translate
the manual of QGIS 2.8, you have to use the manual_en_v2.8 branch.
4.2.3. Traduceți un manual
Acum vom începe traducerea manualului pentru pluginul_heatmap!
Traducerea celor mai multe propoziții ar trebui să fie simplă. Pe durata acestei sesiuni de traducere, vom sublinia părțile (expresiile rst) care necesită traducere.
Mai jos, vedem o propoziție de tradus, mai interesantă:
The |heatmap| :sup:`Heatmap` plugin allows to create a heatmap from a
point vector map. A heatmap is a raster map showing the density or
magnitude of point related information. From the result "hotspots" can
easily be identified.
Această frază conține două declarații rst:
|heatmap|cuvintele dintre|sunt înlocuiri și nu ar trebui să fie traduse niciodată! Acesta, de exemplu, va fi înlocuit de pictograma plugin-ului Heatmap!:sup:`Heatmap`, expresia:sup:este o declarație de superpoziție, care imprimă textul următor, un pic mărit. Se folosește pentru a prezenta textele într-un balon, care apare la trecerea pe deasupra elementului din bara de instrumente, el putând arăta în mod diferit dacă a fost tradus în aplicația QGIS. În cazul limbii olandaeze, nu a fost tradus!
Toate celelalte texte simple din această propoziție pot fi traduse!
Următorul element de tradus conține expresia :ref:, care este frecvent folosită pentru a face trimitere la o altă secțiune a manualului respectiv! Textul urmat de expresia :ref: nu ar trebui să fie schimbat, pentru că acesta reprezintă un identificator unic!
First this core plugin needs to be activated using the Plugin Manager
(see Section :ref:`load_core_plugin`). After activation the heatmap icon
|heatmap| can be found in the Raster Toolbar.
In this case load_core_plugin is a unique reference identifier placed before
an rst item that has a caption. The ref statement will be replaced with the text
of the header and turned into a hyperlink. When the header this reference is
referring to is translated, all references to this header will be automatically
translated as well.
Articolul următor conține eticheta rst :menuselection: urmat de textul afișat, în mod curent, într-un meniu din aplicația QGIS, acesta putând fi tradus în cerere și, prin urmare, ar trebui să fie schimbat atunci când este cazul.
Select from menu :menuselection:`View --> Toolbars --> Raster` to activate
the Raster Toolbar when it is not yet activated.
La punctul de mai sus „View –>”este, de fapt, tradus ca „Beeld –>”, aceasta fiind traducerea olandeză utilizată din aplicația QGIS.
Un pic mai departe vom întâlni următoarele elemente greu de tradus:
The |heatmap| :sup:`Heatmap` tool button starts the Dialog of the Heatmap
plugin (see :numref:`figure_heatmap_settings`).
It holds a reference to a figure figure_heatmap_settings_, and like a reference
to a section this reference should not be changed!! The reference definition
from the rst-document is not included in the .po file and can therefore
not be changed. This means the reference to figures can not be translated. When
HTML is created you will see figure_heatmap_settings. When a PDF document is
created figure_heatmap_settings_ is replaced with a figure number.
Următorul element de traducere cu atribute rst este următorul:
**Input Point dialog**: Provides a selection of loaded point vector maps.
Nu eliminați steluțele din linia de mai sus. Textul conținut între ele va fi transcris îngroșat. Adesea, textul este inclus chiar în dialog și poate fi, la fel de bine, tradus în aplicație.
Următoarea traducere conține eticheta rst :guilabel:.
When the |checkbox| :guilabel:`Advanced` checkbox is checked it will
give access to additional advanced options.
Textul Avansat al etichetei poate fi tradus din aplicația QGIS și, probabil, chiar trebuie tradus!
Următorul element de tradus conține ``airports``. Apostrofurile sunt folosite pentru a atribui textului un alt font. În acest caz, este vorba de o valoare literală și nu are nevoie de traducere.
For the following example, we will use the ``airports`` vector point
layer from the QGIS sample dataset (see :ref:`label_sampledata`).
Another excellent QGIS tutorial on making heatmaps can be found on
`https://www.qgistutorials.com
<https://www.qgistutorials.com/en/docs/creating_heatmaps.html>`_.
This item also includes a hyperlink with an url and an external presentation.
The url should of course be left intact, you are allowed to change the external
text https://www.qgistutorials.com which is visible by the reader. Never
remove the underscore at the end of the hyperlink which forms an essential
part of it!!
4.2.4. Sumarul regulior pentru traducere
Nu schimbați textul dintre două caractere
|, cum ar fi|bronze|,|checkbox|,|labels|,|selectString|,|addLayer|… Acestea sunt etichete speciale, folosite pentru a substitui imaginileDo not change references that start with roles like
:ref:,:file:,:numref:unless they include a title. In that case, you can translate the title but keep unchanged the link (i.e., the text between<and>)Sfat
When a title is provided for a reference, Transifex may display a number in the English source text in replacement of the link part. Click on the number in the source text to add the reference link next to the title being translated.
Nu schimbați referințe care se termină cu liniuțe de subliniere ca
figure_labels_1_Nu modificați adresa hiperlegăturilor, însă puteți modifica descrierea lor externă. Lăsați neatinsă liniuța de subliniere de la sfârșit, neintroducând spațieri adiționale (
>`_)Schimbați textul dintre ghilimele, care urmează după etichetele
:sup:,:guilabel:și:menuselection:. Verificați dacă/cum sunt traduse în aplicația QGIS. Nu schimbați denumirea etichetelor.Textul inclus între steluțe duble și apostrofuri duble indică adesea valori sau nume de câmpuri, uneori necesitând traducere, alteori nu.
Aveți grijă să utilizați exact același (număr de) caractere speciale, cum ar fi
`,``,*,**,::, similar textului sursă, . Acestea contribuie la cosmetizarea informațiilor furnizateNu puneți un spațiu, înainte sau după textul inclus între caractere speciale sau din cadrul etichetelor
Nu încheiați șirurile traduse cu un nou paragraf, în caz contrar, textul nu va fi tradus pe durata generării codului html.
Respectați regulile de mai sus iar documentul tradus va arăta foarte bine!
Pentru orice întrebare, vă rugăm să contactați Echipa Comunității QGIS sau Echipa de Traducere QGIS.