18.1. Visão Geral do Layout de Impressão
O layout de impressão fornece recursos de layout e impressão crescentes. Ele permite que você adicione elementos como a tela do mapa QGIS, rótulos de texto, imagens, legendas, barras de escala, formas básicas, setas, tabelas de atributos e quadros HTML. Você pode dimensionar, agrupar, alinhar, posicionar e girar cada elemento e ajustar suas propriedades para criar seu layout. O layout pode ser impresso ou exportado para formatos de imagem, PostScript, PDF ou SVG. Você pode salvar o layout como um modelo e carregá-lo novamente em outra sessão. Finalmente, a geração de vários mapas com base em um modelo pode ser feita por meio do gerador de atlas.
18.1.1. Sessão de Amostra para iniciantes
Before you start to work with the print layout, you need to load some raster
or vector layers in the QGIS map canvas and adapt their properties to suit your
own convenience. After everything is rendered and symbolized to your liking,
click the  New Print Layout icon in the toolbar or
choose . You will be prompted to
choose a title for the new layout.
New Print Layout icon in the toolbar or
choose . You will be prompted to
choose a title for the new layout.
To demonstrate how to create a map please follow the next instructions.
On the left side, select the
 Add map toolbar button
and draw a rectangle on the canvas holding down the left mouse button.
Inside the drawn rectangle the QGIS map view to the canvas.
Add map toolbar button
and draw a rectangle on the canvas holding down the left mouse button.
Inside the drawn rectangle the QGIS map view to the canvas.Select the
 Add scalebar toolbar button and click
with the left mouse button on the print layout canvas. A scalebar will be
added to the canvas.
Add scalebar toolbar button and click
with the left mouse button on the print layout canvas. A scalebar will be
added to the canvas.Select the
 Add legend toolbar button and draw a
rectangle on the canvas holding down the left mouse button.
Inside the drawn rectangle the legend will be drawn.
Add legend toolbar button and draw a
rectangle on the canvas holding down the left mouse button.
Inside the drawn rectangle the legend will be drawn.Select the
 Select/Move item icon to select the map on
the canvas and move it a bit.
Select/Move item icon to select the map on
the canvas and move it a bit.While the map item is still selected you can also change the size of the map item. Click while holding down the left mouse button, in a white little rectangle in one of the corners of the map item and drag it to a new location to change its size.
Click the Item Properties panel on the left down side and find the setting for the orientation. Change the value of the setting Map orientation to ‘15.00° ‘. You should see the orientation of the map item change.
Now, you can print or export your print layout to image formats, PDF or to SVG with the export tools in menu.
Finally, you can save your print layout within the project file with the
 Save Project button.
You can add multiple elements to the print layout. It is also possible to have more than one map view or legend or scale bar in the print layout canvas, on one or several pages. Each element has its own properties and, in the case of the map, its own extent. If you want to remove any elements from the layout canvas you can do that with the Delete or the Backspace key.
18.1.2. The Layout Manager
The Layout Manager is the main window to manage print layouts in the project. It gives you an overview of existing print layouts and reports in the project and offers tools to:
search for a layout;
add new print layout or new report from scratch, template or duplicating an existing one;
rename or delete any of them;
open them in the project.
To open the layout manager dialog:
from the main QGIS dialog, select menu or click on the
 Layout Manager button in
the Project Toolbar;
Layout Manager button in
the Project Toolbar;from a print layout or report dialog, select menu or click on the
Layout Manager button
in the Layout Toolbar.
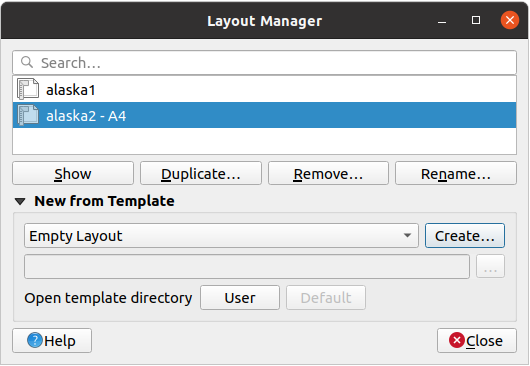
Fig. 18.1 The Print Layout Manager
The layout manager lists in its upper part all the available print layouts or reports in the project with tools to:
show the selection: you can select multiple reports and/or print layout(s) and open them in one-click. Double-click a name also opens it;
duplicate the selected print layout or report (available only if one item is selected): it creates a new dialog using the selected one as template. You’ll be prompted to choose a new title for the new layout;
rename the report or layout (available only if one item is selected): you’ll be prompted to choose a new title for the layout;
remove the layout: the selected print layout(s) will be deleted from the project.
In the lower part, it’s possible to create new print layouts or reports from scratch or a template. By default, QGIS will look for templates in the user profile and the application template directories (accessible with the two buttons at the bottom of the frame) but also in any folder declared as Path(s) to search for extra print templates in . Found templates are listed in the combobox. Select an item and press the Create button to generate a new report or print layout.
You can also use layout templates from a custom folder; in that case, select specific in the templates drop-down list, browse to the template and press Create.
Dica
Creating template-based print layouts from Browser panel
Drag-and-drop a print layout template .qpt file from any file browser
onto the map canvas or double-click it in the Browser panel
generates a new print layout from the template.
18.1.3. Menus, tools and panels of the print layout
Opening the print layout provides you with a blank canvas that represents the paper surface when using the print option. Initially you find buttons on the left beside the canvas to add print layout items: the current QGIS map canvas, text labels, images, legends, scale bars, basic shapes, arrows, attribute tables and HTML frames. In this toolbar you also find buttons to navigate, zoom in on an area and pan the view on the layout a well as buttons to select any layout item and to move the contents of the map item.
Fig. 18.2 shows the initial view of the print layout before any elements are added.
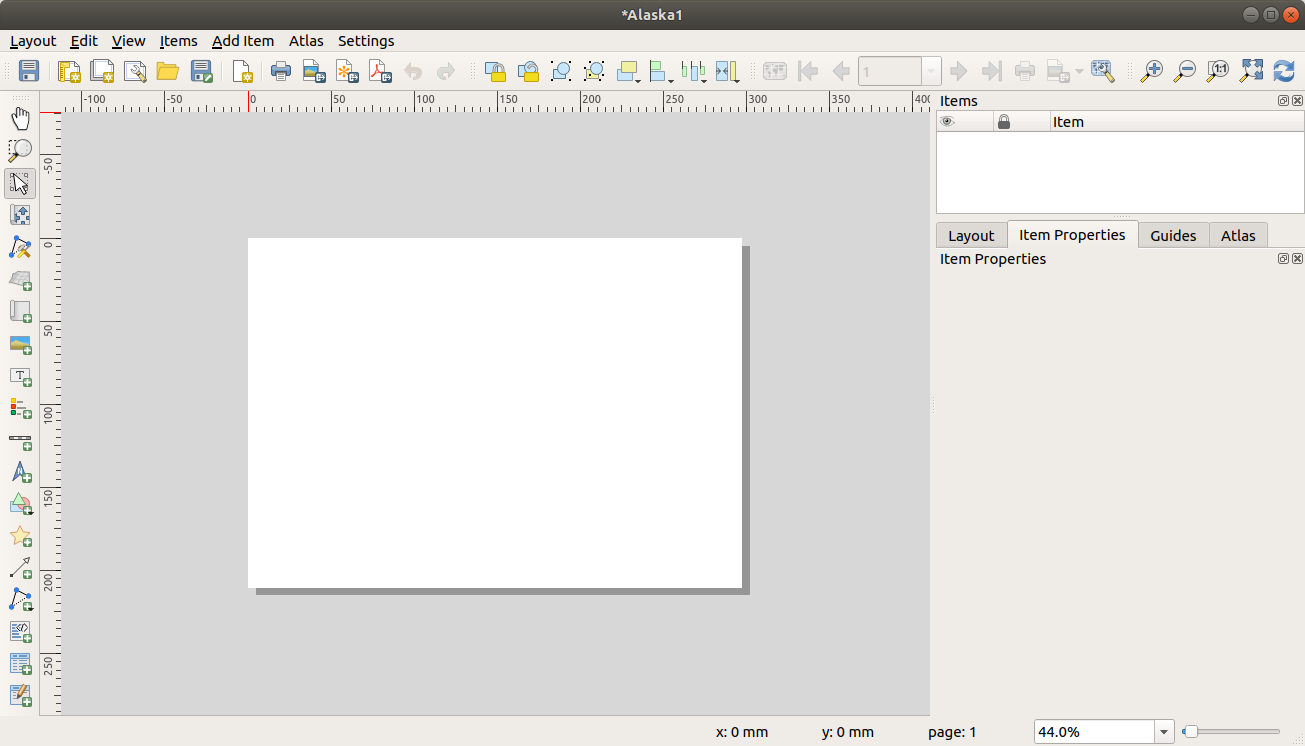
Fig. 18.2 Layout de impressão
On the right beside the canvas you find two set of panels. The upper one holds the panels Items and Undo History and the lower holds the panels Layout, Item properties and Atlas generation.
The Items panel provides a list of all the print layout items added to the canvas and ways to globally interact with them (see The Items Panel for more information).
The Undo History panel displays a history of all changes applied to the layout. With a mouse click, it is possible to undo and redo layout steps back and forth to a certain status.
The Layout panel allows you to set general parameters to apply to the layout when exporting or working within (see The Layout Panel for more details);
The Item Properties panel displays the properties for the selected item. Click the
Select/Move item icon to select
an item (e.g., legend, scale bar or label) on the canvas. Then click the
Item Properties panel and customize the settings for the selected
item (see Layout Items for detailed information on each item
settings).The Atlas panel allows you to enable the generation of an atlas for the current layout and gives access to its parameters (see Generate an Atlas for detailed information on atlas generation usage).
In the bottom part of the print layout window, you can find a status bar with mouse position, current page number, a combo box to set the zoom level, the number of selected items if applicable and, in the case of atlas generation, the number of features.
In the upper part of the print layout window, you can find menus and other toolbars. All print layout tools are available in menus and as icons in a toolbar.
The toolbars and the panels can be switched off and on using the right mouse button over any toolbar or through or .
18.1.3.1. Menus and Tools
Layout menu
The provides action to manage the layout:
Save the project file directly from the print layout window.
Create a new and blank print layout with
New Layout…. Duplicate Layout… : Create a new print layout
by duplicating the current one.
Duplicate Layout… : Create a new print layout
by duplicating the current one.Remove the current layout with
 Delete Layout….
Open the
Layout Manager….: Open an existing print layout.
Once the layout is designed, with  Save as Template
and
Save as Template
and  Add Items from Template icons, you can save
the current state of a print layout session as a
Add Items from Template icons, you can save
the current state of a print layout session as a .qpt template file
and load its items again in another session/print layout.
In the menu, there are also powerful ways to share
geographical information produced with QGIS that can be included in reports or
published. These tools are  Export as Image…,
 Export as PDF…,
  Export as
SVG… and
Export as
SVG… and  Print….
Below is a list of all the available tools in this menu with some convenient information.
Ferramenta |
Atalho |
Barra de Ferramentas |
Referência |
|---|---|---|---|
|
Ctrl+S |
Layout |
|
|
Ctrl+N |
Layout |
|
|
Layout |
||
|
|||
|
Layout |
||
Layout Properties… |
|||
Rename Layout… |
|||
|
Layout |
||
|
Layout |
||
|
Layout |
||
|
Layout |
||
|
Layout |
||
|
Layout |
||
Page Setup… |
Ctrl+Shift+P |
||
|
Ctrl+P |
Layout |
|
Fechar |
Ctrl+Q |
Edit menu
The menu offers tools to manipulate print layout items. It includes common actions like selection tools, Copy/Cut/Paste and undo/redo (see The Undo History Panel: Revert and Restore actions) functionality for the items in the layout.
When using the Paste action, the elements will be pasted according to the current mouse position. Using the action or pressing Ctrl+Shift+V will paste the items into the current page, at the same position they were in their initial page. It ensures to copy/paste items at the same place, from page to page.
Below is a list of all the available tools in this menu with some convenient information.
Ferramenta |
Atalho |
Barra de Ferramentas |
Referência |
|---|---|---|---|
|
Ctrl+Z |
Layout |
|
|
Ctrl+Y |
Layout |
|
|
Del |
||
|
Ctrl+X |
||
|
Ctrl+C |
||
|
Ctrl+V |
||
Paste in place |
Ctrl+Shift+V |
||
|
Ctrl+A |
||
|
Ctrl+Shift+A |
||
|
|||
Select Next Item Below |
Ctrl+Alt+[ |
||
Select Next Item above |
Ctrl+Alt+] |
||
|
P |
Toolbox |
|
|
Z |
Toolbox |
|
|
V |
Toolbox |
|
|
C |
Toolbox |
|
|
Toolbox |


View menu
The menu gives access to navigation tools and helps to configure general behavior of the print layout. Beside the common zoom tools, you have means to:
 Refresh view (if you find the view in an inconsistent state);
enable a grid you could snap items to when moving or creating them. Grids setting is done in or in the Layout Panel;
enable guides you could snap items to when moving or creating them. Guides are red lines that you can create by clicking in the ruler (above or at the left side of the layout) and drag and drop to the desired location;
Smart Guides: uses other layout items as guides to dynamically snap to as you move or reshape an item;
Clear Guides to remove all current guides;
Show Bounding box around the items to better identify your selection;
Show Rules around the layout;
Show Pages or set up pages to transparent. Often layout is used to create non-print layouts, e.g. for inclusion in presentations or other documents, and it’s desirable to export the composition using a totally transparent background. It’s sometimes referred to as “infinite canvas” in other editing packages.
In the print layout, you can change the zoom level using the mouse wheel or the slider and combo box in the status bar. If you need to switch to pan mode while working in the layout area, you can hold the Spacebar or the mouse wheel. With Ctrl+Spacebar, you can temporarily switch to Zoom In mode, and with Ctrl+Alt+Spacebar, to Zoom Out mode.
Panels and toolbars can be enabled from the menu.
To maximise the space available to interact with a composition you can check
the  option or
press Ctrl+Tab; all panels are hidden and only previously visible
panels are restored when unchecked.
option or
press Ctrl+Tab; all panels are hidden and only previously visible
panels are restored when unchecked.
It’s also possible to switch to a full screen mode to have more space to
interact with by pressing F11 or using
Toggle Full Screen.
Ferramenta |
Atalho |
Barra de Ferramentas |
Referência |
|---|---|---|---|
|
F5 |
Navigation |
|
|
Ctrl++ |
Navigation |
|
|
Ctrl+- |
Navigation |
|
|
Ctrl+1 |
Navigation |
|
|
Ctrl+0 |
Navigation |
|
Zoom to Width |
|||
|
Ctrl+' |
||
|
Ctrl+Shift+' |
||
|
Ctrl+; |
||
|
Ctrl+Shift+; |
||
|
Ctrl+Alt+; |
||
Manage Guides… |
|||
Clear Guides |
|||
|
Ctrl+R |
||
|
Ctrl+Shift+B |
||
|
|||
|
F11 |
||
|
Ctrl+Tab |


Items menu
The helps you configure items’ position in the layout and the relations between them (see Interacting with layout items).
Ferramenta |
Atalho |
Barra de Ferramentas |
Referência |
|---|---|---|---|
|
Ctrl+G |
Actions |
|
|
Ctrl+Shift+G |
Actions |
|
|
Ctrl+] |
Actions |
|
|
Ctrl+[ |
Actions |
|
|
Ctrl+Shift+] |
Actions |
|
|
Ctrl+Shift+[ |
Actions |
|
|
Ctrl+L |
Actions |
|
|
Ctrl+Shift+L |
Actions |
|
Actions |
|||
Actions |
|||
Actions |


Add Item menu
These are tools to create layout items. Each of them is deeply described in Layout Items chapter.
Ferramenta |
Barra de Ferramentas |
Referência |
|---|---|---|
|
Toolbox |
|
|
Toolbox |
|
|
Toolbox |
|
|
Toolbox |
|
|
Toolbox |
|
|
Toolbox |
|
|
Toolbox |
|
|
Toolbox |
|
|
Toolbox |
|
|
Toolbox |
|
|
Toolbox |
|
|
Toolbox |
|
|
Toolbox |
|
|
Toolbox |
|
|
Toolbox |
|
|
Toolbox |
|
|
Toolbox |
|
|
Toolbox |
|
|
Toolbox |


Atlas menu
Ferramenta |
Atalho |
Barra de Ferramentas |
Referência |
|---|---|---|---|
|
Ctrl+ALt+/ |
Atlas |
|
|
Ctrl+< |
Atlas |
|
|
Ctrl+, |
Atlas |
|
|
Ctrl+. |
Atlas |
|
|
Ctrl+> |
Atlas |
|
|
Atlas |
||
|
Atlas |
||
|
Atlas |
||
|
Atlas |
||
|
Atlas |


Contextual menus
Depending on where you right-click in the print layout dialog, you open a contextual menu with various features:
Right-click on the menu bar or any toolbar and you get the list of layout panels and toolbars you can enable or disable in one-click.
Right-click over a ruler and you can
Show Guides,
Snap to Guides, Manage Guides… opening
the Guides panel or Clear Guides.
It’s also possible to hide the rulers.Right-click in the print layout canvas and:
You’ll be able to Undo and Redo recent changes, or Paste any copied item (only available if no item is selected).
If you click over a page, you can additionally access the current Page Properties panel or Remove Page.
If you click on a selected item then you can cut or copy it as well as open the Item Properties panel.
If more than one item are selected, then you can either group them and/or ungroup if at least one group is already in the selection.
Right-click inside a text box or spinbox widget of any layout panel provides edit options to manipulate its content.
18.1.3.2. The Layout Panel
In the Layout panel, you can define the global settings of your print layout.
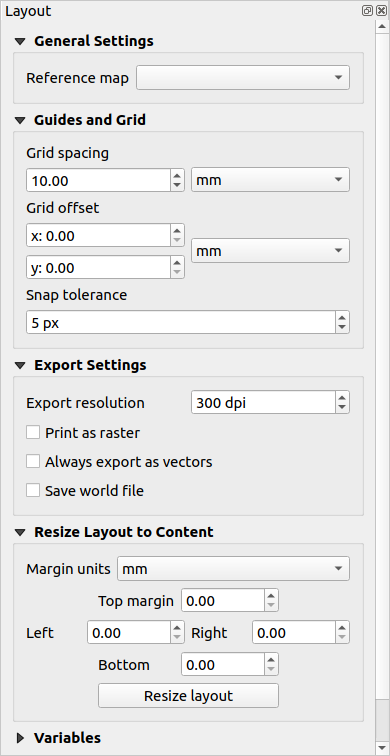
Fig. 18.3 Layout Settings in the Print Layout
General settings
In a print layout, you can use more than one map item. The Reference map represents the map item to use as the layout’s master map. It’s assigned as long as there’s a map item in the layout. The layout will use this map in any of their properties and variables calculating units or scale. This includes exporting the print layout to georeferenced formats.
Moreover, new layout items such as scale bar, legend or north arrow have by default their settings (orientation, displayed layers, scale, …) bound to the map item they are drawn over, and fall back to the reference map if no overlapping map.
Guides and Grid
You can put some reference marks on your paper sheet to help you accurately place some items. These marks can be:
simple horizontal or vertical lines (called Guides) put at the position you want (see The Guides Panel for guides creation).
or regular Grid: a network of horizontal and vertical lines superimposed over the layout.
Settings like Grid spacing or Grid offset can be adjusted in this group as well as the Snap tolerance to use for items. The tolerance is the maximum distance below which the mouse cursor is snapped to a grid or a guide, while moving, resizing or creating an item.
Whether grid or guides should be shown is set in menu. There, you can also decide if they might be used to snap layout items. When both a grid line and a guide line are within tolerance of a point, guides will always take precedence - since they have been manually set (hence, assumption that they have been explicitly placed at highly desirable snapping locations, and should be selected over the general grid).
Nota
In the menu, you can also set the grid and guides parameters exposed above. However, these options will only apply as defaults to new print layouts.
Definições para exportação
You can define a resolution to use for all exported maps in Export resolution. This setting can then be overridden each time you export a map.
Because of some advanced rendering options (blending mode, effects…), a layout item may need rasterization in order to be exported correctly. QGIS will individually rasterize it without forcing every other item to also be rasterized. This allows printing or saving as PostScript or PDF to keep items as much as possible as vectors, e.g. a map item with layer opacity won’t force labels, scale bars, etc to be rasterized too. You can however:
force all the items to be rasterized checking the
Print
as raster box;or use the opposite option, i.e. Always export as vectors, to force the export to keep items as vectors when exported to a compatible format. Note that in some cases, this could cause the output to look different to layout.
Where the format makes it possible (e.g., .TIF, .PDF) exporting
a print layout results by default in a georeferenced file (based on the
Reference map item in the General settings group).
For other formats, georeferenced output requires you to generate a world file
by checking Save world file. The world file is created
beside the exported map(s), has the name of the page output with the reference
map item and contains information to georeference it easily.
Resize layout to content
Using the Resize page tool in this group, you create a unique page composition whose extent covers the current contents of the print layout (with some optional margins around the cropped bounds).
Note that this behavior is different from the crop to content option in that all the items are placed on a real and unique page in replacement of all the existing pages.
Variáveis
The Variables lists all the variables available at the layout’s level (which includes all global and project’s variables).
It also allows the user to manage layout-level variables. Click the
 button to add a new custom layout-level variable. Likewise,
select a custom layout-level variable from the list and click the
button to add a new custom layout-level variable. Likewise,
select a custom layout-level variable from the list and click the
 button to remove it.
More information on variables usage in the General Tools section.
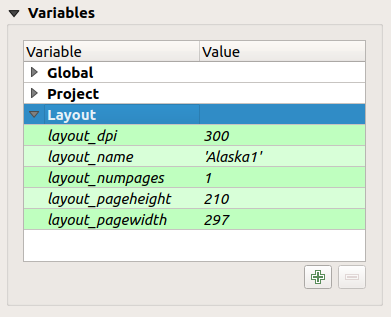
Fig. 18.4 Variables Editor in the Print Layout
18.1.3.3. Working with the page properties
A layout can be composed of several pages. For instance, a first page can show a map canvas, and a second page can show the attribute table associated with a layer, while a third one shows an HTML frame linking to your organization website. Or you can add many types of items on each page.
Adding a new page
Futhermore, a layout can be made using different size and/or orientation of pages.
To add a page, select the  Add Pages… tool from the
menu or Layout Toolbar. The Insert
Pages dialog opens and you are asked to fill:
Add Pages… tool from the
menu or Layout Toolbar. The Insert
Pages dialog opens and you are asked to fill:
the number of pages to insert;
the position of the page(s): before or after a given page or at the end of the print layout;
The Page size: it could be of a preset format page (
A4,B0,Legal,Letter,ANSI A,Arch Aand their derivatives as well as a resolution type, such as1920x1080or1024x768) with associated Orientation (Portrait or Landscape).The page size can also be of a
customformat; In that case, you’d need to enter its Width and Height (with locked size ratio if needed) and select the unit to use amongmm,cm,px,pt,in,ft… Conversion of entered values is automatically applied when switching from one unit to another.
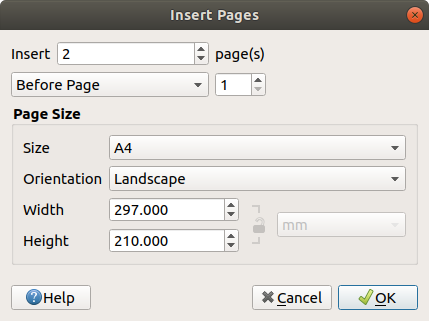
Fig. 18.5 Creating a new page in the Print Layout
Updating page properties
Any page can be later customized through the Page Item Properties panel. Right-click on a page and select Page Properties…. The Item Properties panel opens with settings such as:
the Page size frame described above. You can modify each property using the data defined override options (see Explore Data-defined override buttons with atlas for a use case);
the
 Exclude page from exports to control whether the
current page with its content should be included in the layout output;
Exclude page from exports to control whether the
current page with its content should be included in the layout output;the Background of the current page using the color or symbol you want.
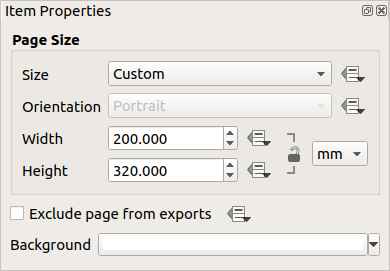
Fig. 18.6 Page properties dialog
18.1.3.4. The Guides Panel
Guides are vertical or horizontal line references you can place on a layout page to assist you on items placement, when creating, moving or resizing them. To be active, guides require the and options to be checked. To create a guide, there are two different methods:
if the option is set, drag out a ruler and release the mouse button within the page area, at the desired position.
for more precision, use the Guides panel from the or by selecting Manage guides for page… from the page’s contextual menu.
Fig. 18.7 The Guides panel
The Guides panel allows creation of snap lines at specific locations:
Select the Page you’d like to add the guides to
Click the
Add new guide button and enter the coordinates
of the horizontal or vertical line. The origin is at the top left corner.
Different units are available for this.The panel also allows adjusting the position of existing guides to exact coordinates: double-click and replace the value.
The Guides panel lists only the items for the current page. It allows creation or removal of guides only in the current page. However, you can use the Apply to All Pages button to replicate the guide configuration of the current page to the other pages in the layout.
To delete a guide, select it and press the
Remove selected
guide button. Use Clear All Guides to remove all the guides
in the current page.
Dica
Snapping to existing layout items
Other than guides and grids, you can use existing items as snapping references when moving, resizing or creating new items; these are called smart guides and require option to be checked. Anytime the mouse pointer is close to an item’s bound, a snapping cross appears.
18.1.3.5. The Items Panel
The Items panel offers some options to manage selection and visibility of items. All the items added to the print layout canvas (including items group) are shown in a list and selecting an item makes the corresponding row selected in the list as well as selecting a row does select the corresponding item in the print layout canvas. This is thus a handy way to select an item placed behind another one. Note that a selected row is shown as bold.
For any selected item, you can :
 set it visible or not;
 lock or unlock its position;
sort its Z position. You can move up and down each item in the list with a click and drag. The upper item in the list will be brought to the foreground in the print layout canvas. By default, a newly created item is placed in the foreground.
change the item ID by double-clicking the text;
right-click an item and copy or delete it or open its properties panel.
Once you have found the correct position for an item, you can lock it by ticking
the box in column. Locked items are not selectable on the canvas.
Locked items can be unlocked by selecting the item in the
panel and unchecking the tickbox or you can use the icons on the toolbar.
18.1.3.6. The Undo History Panel: Revert and Restore actions
During the layout process, it is possible to revert and restore changes. This can be done with the revert and restore tools available in the Edit menu, the Layout toolbar or the contextual menu any time you right-click in the print layout area:
 Revert last change
 Restore last change
This can also be done by mouse click within the Undo history panel (see Fig. 18.8). The History panel lists the last actions done within the print layout. Just select the point you want to revert to and once you do new action all the actions done after the selected one will be removed.
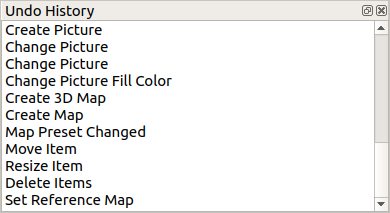
Fig. 18.8 Undo History in the Print Layout