중요
번역은 여러분이 참여할 수 있는 커뮤니티 활동입니다. 이 페이지는 현재 100.00% 번역되었습니다.
20.2. 실시간 GPS 추적
QGIS는 사용자가 GPS 수신기를 가지고 현장 지도를 제작하는 일을 도울 수 있습니다. 이런 실시간 추적 작업은 GPS 툴바 를 통해 이루어집니다. QGIS와 GPS 수신기를 연결하기 전에 기기 환경설정 을 해야 할 수도 있습니다.
20.2.1. GPS 툴바
GPS Toolbar 에는 실시간 추적 세션을 제어할 수 있는 주요 도구들이 있습니다. 메뉴에서 이 툴바를 활성화시킬 수 있습니다. 이 툴바는 프로젝트의 상태, GPS, 그리고 현재 GPS 트랙을 따라가면서 합당한 경우에만 액션들을 활성화시킵니다. QGIS가 기기를 탐지하고 나면, 해당 기기와 쌍방향 작업을 할 수 있을 것입니다:
 Connect to GPS: GPS 연결
 Disconnect from GPS: GPS 연결 해제
 Recenter map on GPS location: 자동 중심 정렬 파라미터 에 상관없이, 즉시 맵의 중심을 현재 GPS 위치로 이동시킬 것입니다.
 Set destination layer for GPS digitized features: QGIS는 기본적으로 피처 디지타이즈 작업에 대해 Follow active layer 활성 레이어를 따를 것입니다. 다시 말해 GPS 디지타이즈 작업 도구가 Layers 패널에서 선택한 레이어에 맞춰 조정되며 그에 따라 해당 레이어에 생성한 피처를 저장할 것이라는 뜻입니다. 어떤 맥락에서는 이 습성이 유용할 수도 있는 반면, 원하지 않는 레이어에 피처를 실수로 저장하는 일을 피하려면 다른 레이어들과의 쌍방향 작업을 신중하게 해야 한다는 의미입니다. 이 옵션은 사용자가 실시간 추적 세션 동안 데이터를 저장하기 위한 레이어를 명확하게 지정할 수 있고, 필요에 따라 바꿀 수 있게 해줍니다. 보이는 도구들 또한 선택한 레이어 유형에 맞게 조정될 것입니다.
GPS 대상 레이어는 피처 생성 시 자동으로 편집 가능 상태가 되며, 이를 사용자에게 알려줍니다.
피처 생성 관련 액션:
 Add vertex to GPS track using GPS current location: GPS 트랙에 꼭짓점을 현재 GPS 위치를 사용해서 추가합니다.
 Create a new point feature at current GPS location: 현재 GPS 위치에 새 포인트 피처를 생성합니다.
 Create a new line feature using the current GPS track: 새 라인 피처를 현재 GPS 트랙을 사용해서 생성합니다.
 Create a new polygon feature using the current GPS track: 새 폴리곤 피처를 현재 GPS 트랙을 사용해서 생성합니다.
 Reset track: 트랙을 리셋합니다.
 Show GPS information: GPS 정보 패널을 엽니다.
사용자에게 필요할 수도 있는 몇몇 GPS 정보에 빠르게 접근하기 위한 표시 상자:
 Show location: 위치 보이기
- Show altitude (Geoid): 고도 보이기 (지오이드)
- Show altitude (WGS 84 ellipsoid): 고도 보이기 (WGS 84 타원체)
- Show ground speed: 지상 속도 보이기
- Show bearing: 방위 보이기
- Show total track length: 총 트랙 길이 보이기
- Show distance from start of track: 트랙의 시작점으로부터의 거리 보이기
 Settings 버튼을 클릭하면 세션 도중 수정할 것이라고 예상되는 공통 설정을 담고 있는 드롭다운 메뉴를 엽니다:
- Show location marker: 위치 마커 보이기
- Show bearing line: 방위선 보이기
- Rotate map to match GPS direction: 맵을 GPS 방향과 일치하도록 회전시키기
맵 중심 재정렬을 제어하기 위한 옵션들:
 Always recenter map: GPS 위치가 맵 캔버스의 중심으로부터 (맵 캔버스 범위의 비율로서의) 일정 거리만큼 오프셋되었을 때 항상 맵의 중심을 다시 정렬합니다.
 Recenter map when leaving extent: GPS 위치가 맵 캔버스 범위를 벗어났을 때 맵의 중심을 다시 정렬합니다.
- Never recenter: 맵의 중심을 다시 정렬하지 않습니다.
- Automatically add track vertices: GPS 기기에서 새 위치를 수신받을 때마다 트랙 꼭짓점을 자동으로 추가합니다.
- Automatically save added features: 피처가 GPS 위치로부터 생성되는 즉시 (일반적인 레이어 편집 버퍼를 건너뛰고) 대상 레이어에 커밋합니다.
Time stamp destination: 대상 레이어에 시간 수정 저장 용 필드를 조정하기 위한 타임스탬프를 기록합니다.
- Log to GeoPackage/SpatiaLite…: 이 옵션을 체크하면, 사용자에게 기존 GeoPackage/SpatiaLite 파일을 선택하라는 또는 새 파일 이름을 입력하라는 메시지가 뜰 것입니다. 이 파일 안에 사전 정의 구조를 가진
gps_points및gps_tracks테이블이 생성될 것입니다.수신되는 모든 GPS 메시지는 GPS에서 나온 속도, 방위, 고도 및 정확도 정보와 함께
gps_points레이어에 로그로 작성될 것입니다.GPS를 연결 해제 했을 때 (또는 QGIS를 종료했을 때)
gps_tracks테이블에 기록된 전체 GPS 트랙을 (트랙 길이, 시작 및 종료 시간 같은 몇몇 계산된 정보와 함께) 추가할 것입니다. - Log NMEA sentences…: 이 옵션을 체크하면, 텍스트 파일에 기기에서 나온 모든 원시(raw) NMEA 문자열을 로그로 작성합니다.
- GPS settings…: GPS의 전체 수준 옵션 대화창을 엽니다.
팁
위치에 대한 실시간 상태 바 정보
GPS 기기를 연결하고 사용자가 맵 캔버스 위로 커서를 이동시키면, 실시간 상태 바 메시지가 커서로부터 GPS 위치까지의 거리와 방위를 표시합니다. 이 표시는 프로젝트 수준 거리 및 방위 설정을 준수합니다. 터치 스크린 기기의 경우 ‘길게 탭하기’ 이벤트로 실시간 상태 바 메시지를 촉발합니다.
20.2.2. GPS 정보 패널
QGIS에서 실시간 GPS 추척을 완전하게 모니터링하려면, GPS Information Panel 을 ( 메뉴 또는 Ctrl+0 키 조합으로) 활성화시켜야 할 수도 있습니다.
GPS Information Panel 의 우상단에 있는 Connect 버튼을 클릭하면 QGIS와 플러그인된 GPS 수신기 사이에 연결을 시작하고, 그 후 Disconnect 로 바뀐 버튼을 클릭하면 연결을 해제합니다.
패널의 좌상단에서는 다음 버튼들을 사용할 수 있습니다:
- Position: GPS 위치와 센서에 대한 실시간 상세 정보를 보여줍니다.
 Signal: 연결된 위성의 GPS 신호 강도를 표시합니다.
- Settings: 세션 도중 수정해야 할 수도 있는 실시간 추적 옵션 을 담고 있는 드롭다운 메뉴입니다.
20.2.2.1. 위치 및 추가 속성
GPS가 위성으로부터 신호를 수신받고 있는 경우, Position 탭에서 사용자의 위치를 위도, 경도 그리고 고도로 ─ 추가 속성들과 함께 ─ 볼 수 있을 것입니다.
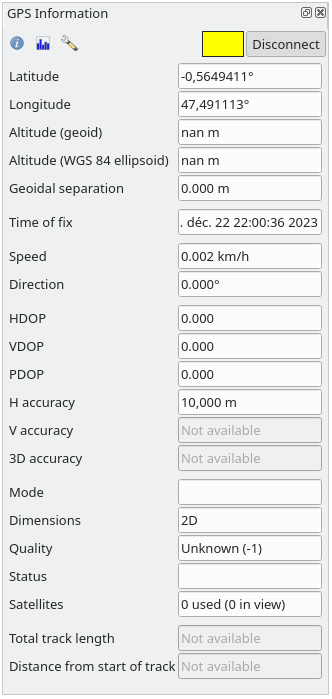
그림 20.3 GPS 위치 추적 및 추가 속성
Latitude: 위도
Longitude: 경도
Altitude (Geoid): 평균 해수면 위 또는 아래 방향 고도/표고
Altitude (WGS 84 ellipsoid): WGS-84 지구 타원체 위 또는 아래 방향 고도/표고
Geoidal separation: WGS-84 지구 타원체와 평균 해수면(지오이드)의 차이로,
-부호는 평균 해수면이 타원체 아래 있다는 의미입니다.Time of fix: 수정 시간
Speed: 지상 속도
Direction: 진북에서부터 여행 방향을 시계 방향으로 측정한 도 단위 방위
HDOP: 수평 정밀도 희석(Horizontal dilution of precision)
VDOP: 수직 정밀도 희석(Vertical dilution of precision)
PDOP: 위치 정밀도 희석(Dilution of precision)
H accuracy: 미터 단위 수평 정확도
V accuracy: 미터 단위 수직 정확도
3D accuracy: 미터 단위 3차원 제곱평균제곱근(RMS; Root Mean Square)
Mode: GPS 수신기의 2차원/3차원 모드 환경설정입니다.
automatic또는manual가운데 하나일 수 있습니다.Dimensions: 위치 수정 차원입니다.
2D,3D또는No fix가운데 하나일 수 있습니다.Quality: 위치정보 품질 지표
Status: 위치 수정 상태입니다.
Valid또는Invalid가운데 하나일 수 있습니다.Satellites: 수정 정보를 얻는 데 사용된 위성의 개수
Total track length: 현재 GPS 트랙의 총 길이
Distance from start of track: 현재 GPS 트랙의 첫 번째 꼭짓점에서 최신 꼭짓점까지의 직선 거리
20.2.2.2. 신호
Signal 탭에서 신호를 수신받고 있는 위성의 신호 강도를 볼 수 있습니다.

그림 20.4 GPS 추적 신호 강도
20.2.3. 실시간 추적을 위해 블루투스 GPS 기기에 연결
현장 데이터 수집을 위헤 QGIS에 블루투스 GPS 기기를 연결할 수 있습니다. 이 작업을 하려면 블루투스 GPS 기기와 사용자 컴퓨터 상에 있는 블루투스 수신기가 필요합니다.
먼저 사용자 컴퓨터가 GPS 기기를 인식하고 페어링해야만 합니다. GPS 기기의 전원을 켠 다음, 사용자 컴퓨터의 알림 영역에 있는 블루투스 아이콘을 클릭하고 새 장치를 검색하십시오.
장치 선택 화면의 우측에서 모든 장치 유형을 선택해서 사용자의 GPS 기기가 연결할 수 있는 장치 목록에 나타나도록 하십시오. 다음 단계에서 시리얼 연결 서비스를 선택할 수 있을 겁니다. 해당 연결을 선택한 다음 Configure 버튼을 누르십시오.
블루투스 속성에서 GPS 연결에 할당된 COM 포트 번호를 확인해서 기억해두십시오.
GPS 기기를 인식한 후, 페어링해서 연결하십시오. 대부분의 경우 인증 코드는 0000 입니다.
이제 QGIS에서 GPS information 패널을 열고 GPS 옵션 화면으로 전환하십시오. GPS 연결에 할당된 COM 포트 번호를 선택한 다음 Connect 버튼을 클릭하십시오. 잠시 후 사용자의 위치를 나타내는 커서가 나타날 것입니다.
QGIS가 GPS 데이터를 받지 못 하는 경우, 사용자 GPS 기기를 재시작하고 5 ~ 10초 동안 기다린 다음 다시 연결을 시도해야 합니다. 대부분의 경우 이렇게 하면 해결됩니다. 다시 연결 오류가 발생한다면 사용자 GPS 기기와 연결된 다른 블루투스 수신기가 근처에 있는지 확인해보십시오.
20.2.4. QGIS에서의 GPS 기기 연결 예시
20.2.4.1. GPSMAP 60cs 사용법
MS 윈도우
이 GPS 기기를 가장 쉽게 사용하는 방법은 GPSGate 라는 (공개 소프트웨어는 아니지만 자유 소프트웨어인) 미들웨어를 사용하는 것입니다.
프로그램을 구동하고 GPS 기기를 스캔한 다음 (USB와 블루투스 연결 둘 다 스캔합니다) QGIS로 가서:
메뉴 항목을 선택해서 플러그인된 기기를 탐지하십시오.
Autodetect 를 선택하면 자동 탐지 모드를 사용할 수 있습니다.GPS Information 패널에서 Connect 버튼을 클릭하십시오.
우분투/민트 GNU/리눅스
윈도우와 마찬가지로 미들웨어를 사용하는 것이 가장 쉬운 방법입니다. 이 경우에는 gpsd 를 다음과 같이 설치하십시오:
프로그램을 설치합니다.
sudo apt install gpsd
그리고
garmin_gps커널 모듈을 다음과 같이 불러오십시오:sudo modprobe garmin_gps
그 다음 기기를 연결하고,
dmesg명령어로 실제 기기가 연결됐는지, 예를 들어/dev/ttyUSB0처럼 마운트됐는지 확인하십시오.이제 다음과 같이
gpsd를 구동할 준비가 끝났습니다:gpsd /dev/ttyUSB0
마지막으로 QGIS의 실시간 GPS 추적 도구와 연결하십시오.
20.2.4.2. BTGP-38KM DataLogger (블루투스 전용)
gpsd (리눅스) 또는 GPSGate (윈도우) 프로그램을 사용하는 것이 가장 쉬운 방법입니다.
20.2.4.3. BlueMax GPS-4044 DataLogger (블루투스 및 USB 둘 다)
MS 윈도우
GPSGate를 사용하든 사용하지 않든, Autodetect 모드를 선택하거나 또는 올바른 포트를 지정하는 것만으로도 USB 및 블루투스 연결 둘 다 실시간 추적이 가능합니다.
우분투/민트 GNU/리눅스
USB 연결
다음과 같이 gpsd 를 통해 실시간 추적을 할 수도 있고:
gpsd /dev/ttyACM3
또는 gpsd 를 사용하지 않고 QGIS 실시간 GPS 추적 도구에 기기를 직접 (예: /dev/ttyACM3) 연결해서 실시간 추적을 할 수도 있습니다.
블루투스 연결
다음과 같이 gpsd 를 통해 실시간 추적을 할 수도 있고:
gpsd /dev/rfcomm0
또는 gpsd 를 사용하지 않고 QGIS 실시간 GPS 추적 도구에 기기를 직접 (예: /dev/rfcomm0) 연결해서 실시간 추적을 할 수도 있습니다.