` `
실시간 GPS 추적
To activate live GPS tracking in QGIS, you need to select Settings ‣ Panels
 GPS information. You will get a new docked window on the
left side of the canvas.
GPS information. You will get a new docked window on the
left side of the canvas.
이 GPS 추적 창에서 다음 4개 화면을 볼 수 있습니다:
 GPS position coordinates and an interface for manually entering
vertices and features
GPS position coordinates and an interface for manually entering
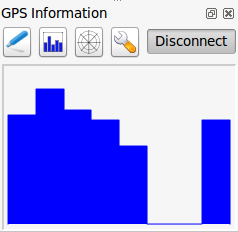
vertices and features 연결된 위성의 GPS 신호 강도를 표시합니다.
 GPS polar screen showing number and polar position of
satellites
GPS polar screen showing number and polar position of
satellites GPS 옵션 화면입니다. (GPS 추적 - 옵션 그림 참조)
With a plugged-in GPS receiver (has to be supported by your operating system), a simple click on [Connect] connects the GPS to QGIS. A second click (now on [Disconnect]) disconnects the GPS receiver from your computer. For GNU/Linux, gpsd support is integrated to support connection to most GPS receivers. Therefore, you first have to configure gpsd properly to connect QGIS to it.
경고
사용자의 위치를 캔버스에 기록하고 싶다면, 먼저 새 벡터 레이어를 생성한 다음 사용자의 트랙을 기록할 수 있게 편집 가능 상태로 전환해야 합니다.
위치 및 추가 속성
If the GPS is receiving signals from satellites, you will
see your position in latitude, longitude and altitude together with additional
attributes.
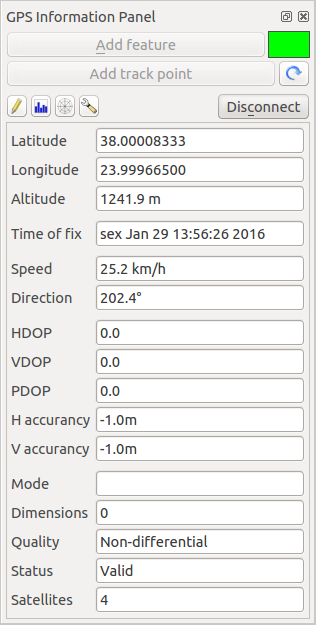
GPS 추적 - 위치 및 추가 속성
GPS polar window
If you want to know where in the sky all the connected
satellites are, you have to switch to the polar screen. You can also see the
ID numbers of the satellites you are receiving signals from.
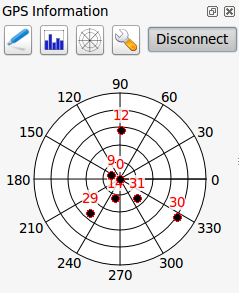
GPS tracking polar window
GPS 옵션
연결에 문제가 생겼을 경우, 다음 가운데 하나로 전환할 수 있습니다:
 Autodetect
 Internal
- Serial device
- gpsd (사용자 GPS가 연결돼 있는 호스트, 포트 및 기기를 지정)
A click on [Connect] again initiates the connection to the GPS receiver.
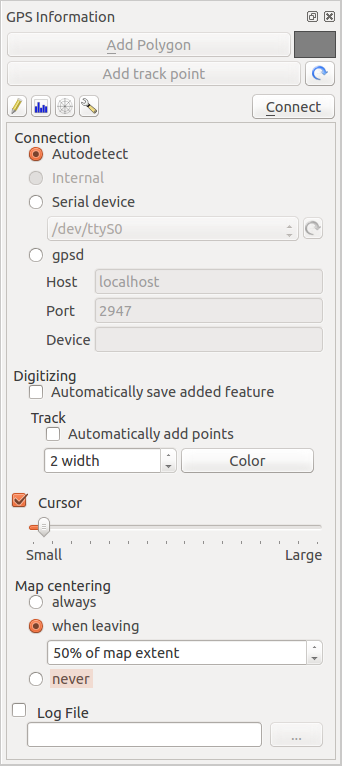
GPS 추적 - 옵션
편집 모드 상태라면 Automatically save added features 옵션을 활성화할 수 있습니다. 또는 Automatically add points 옵션을 활성화해서 맵 캔버스에 포인트를 지정한 크기와 색상으로 자동 추가할 수도 있습니다.
Cursor 옵션을 활성화하면, 슬라이드 바  를 통해 캔버스 상에서 위치 표시 커서의 크기를 줄이거나 키울 수 있습니다.
Map centering 옵션을 활성화하면 캔버스를 어떤 방식으로 업데이트할지 결정할 수 있습니다. ‘always’를 선택하면 좌표가 기록될 때마다, ‘when leaving’을 선택하면 기록되는 좌표가 캔버스 밖으로 나가는 시점에 맵 캔버스를 업데이트합니다. 또는 ‘never’를 선택해서 맵 범위를 유지할 수도 있습니다.
마지막으로, Log file 옵션을 활성화하면 GPS 추적 관련 로그 메시지를 기록할 경로 및 파일명을 정의할 수 있습니다.
If you want to set a feature manually, you have to go back to
Position and click on [Add Point] or [Add track point].
실시간 추적을 위해 블루투스 GPS 기기에 연결
현장 데이터 수집을 위헤 QGIS에 블루투스 GPS 기기를 연결할 수 있습니다. 이 작업을 하려면 블루투스 GPS 기기와 사용자 컴퓨터 상에 있는 블루투스 수신기가 필요합니다.
먼저 사용자 컴퓨터가 GPS 기기를 인식하고 페어링해야만 합니다. GPS 기기의 전원을 켠 다음, 사용자 컴퓨터의 알림 영역에 있는 블루투스 아이콘을 클릭하고 새 장치를 검색하십시오.
On the right side of the Device selection mask make sure that all devices are selected so your GPS unit will probably appear among those available. In the next step a serial connection service should be available, select it and click on [Configure] button.
블루투스 속성에서 GPS 연결에 할당된 COM 포트 번호를 확인해서 기억해두십시오.
GPS 기기를 인식한 후, 페어링해서 연결하십시오. 대부분의 경우 인증 코드는 0000 입니다.
Now open GPS information panel and switch to GPS
options screen. Select the COM port assigned to the GPS connection and click
the [Connect]. After a while a cursor indicating your position should
appear.
QGIS가 GPS 데이터를 받지 못 하는 경우, 사용자 GPS 기기를 재시작하고 5 ~ 10초 동안 기다린 다음 다시 연결을 시도해야 합니다. 대부분의 경우 이렇게 하면 해결됩니다. 다시 연결 오류가 발생한다면 사용자 GPS 기기와 연결된 다른 블루투스 수신기가 근처에 있는지 확인해보십시오.
GPSMAP 60cs 사용법
 MS 윈도우
Easiest way to make it work is to use a middleware (freeware, not open) called GPSGate.
Launch the program, make it scan for GPS devices (works for both USB and BT
ones) and then in QGIS just click [Connect] in the Live tracking panel
using the Autodetect mode.
 우분투/민트 GNU/리눅스
윈도우와 마찬가지로 미들웨어를 사용하는 것이 가장 쉬운 방법입니다. 이 경우에는 gpsd 를 다음과 같이 설치하십시오:
sudo apt-get install gpsd
그리고 garmin_gps 커널 모듈을 다음과 같이 불러오십시오:
sudo modprobe garmin_gps
그 다음 기기를 연결하고, dmesg 명령어로 실제 기기가 연결됐는지, 예를 들어 /dev/ttyUSB0 처럼 마운트됐는지 확인하십시오. 이제 다음과 같이 gpsd 를 구동할 준비가 끝났습니다:
gpsd /dev/ttyUSB0
마지막으로 QGIS의 실시간 GPS 추척 도구와 연결하십시오.
BTGP-38KM DataLogger (블루투스만)
gpsd 또는 GPSGate 프로그램을 사용하는 것이 가장 쉬운 방법입니다.
BlueMax GPS-4044 DataLogger (블루투스 및 USB 둘 다)
MS 윈도우
GPS Information Panel 의 GPS 옵션 화면에서 Autodetect 모드를 선택하거나, 또는 올바른 포트를 지정하는 것만으로 – GPSGate를 사용하거나 사용하지 않거나 – 블루투스 및 USB 연결 양쪽에서 모두 실시간 추적이 가능합니다.
우분투/민트 GNU/리눅스
USB 연결
다음과 같이 gpsd 를 통해 실시간 추적을 할 수도 있고:
gpsd /dev/ttyACM3
또는 gpsd 를 사용하지 않고 QGIS 실시간 GPS 추척 도구에 기기를 직접 (예: /dev/ttyACM3) 연결해서 실시간 추적을 할 수도 있습니다.
블루투스 연결
다음과 같이 gpsd 를 통해 실시간 추적을 할 수도 있고:
gpsd /dev/rfcomm0
또는 gpsd 를 사용하지 않고 QGIS 실시간 GPS 추척 도구에 기기를 직접 (예: /dev/rfcomm0) 연결해서 실시간 추적을 할 수도 있습니다.