Важно
Перевод - это работа сообщества : ссылка:Вы можете присоединиться<translation_guidelines>. Эта страница в настоящее время переводится |прогресс перевода|.
1. Пошаговое руководство
Примечание
Хотя для демонстрации процесса используется QGIS-Documentation, все команды и шаги, показанные ниже, применимы и к QGIS-Website.
Если вы читаете эти строки, то наверняка хотите внести свой вклад в написание документации по QGIS и ищете руководство к действию. Вы пришли в нужное место! В этом документе мы расскажем вам о различных способах достижения этой цели, покажем основные шаги, которые необходимо выполнить, приемы, которые можно использовать, и ловушки, о которых следует знать.
Если вам нужна помощь, не стесняйтесь спрашивать в комментариях к отчету о проблеме, которую вы пытаетесь исправить, или пишите в список QGIS-community-team. Ознакомьтесь с общей информацией о поддержке сообщества QGIS <https://qgis.org/resources/support/>`_.
Теперь давайте погрузимся в процесс.
Documentation sources are stored using the Git version control system and are available on GitHub at https://github.com/qgis/QGIS-Documentation. A list of issues to fix and features to explain can be found at https://github.com/qgis/QGIS-Documentation/issues.
Совет
Если вы впервые участвуете в проекте и не знаете, с чего начать, возможно, вам будет интересно разобраться с нашими «приветственными» отчетами о проблемах <https://github.com/qgis/QGIS-Documentation/contribute>`_.
Существует два основных способа изменения файлов, не исключающих друг друга:
1.1. Использование веб-интерфейса GitHub
Веб-интерфейс GitHub позволяет выполнять следующие действия:
редактировать файлы
просмотрите и зафиксируйте изменения
оформите запрос на притяжение, чтобы ваши изменения были добавлены в основной репозиторий
создавать, обновлять или удалять ветви
If you are not yet familiar with Git and GitHub vocabulary, you may want to read the GitHub Hello-world project to learn some basic vocabulary and actions that will be used below.
Примечание
Если вы устраняете проблему, о которой было сообщено
Если вы вносите изменения для исправления проблемы, добавьте комментарий к отчету о проблеме, чтобы назначить ее своей. Это не позволит нескольким людям работать над одной проблемой.
1.1.1. Форк QGIS-Документация
Предполагая, что у вас уже есть аккаунт на GitHub <https://github.com/signup>`_, сначала вам нужно форкнуть исходные файлы документации.
Перейдите на страницу QGIS-документация репозитория и нажмите на кнопку  в правом верхнем углу.
В вашем аккаунте на GitHub вы найдете репозиторий QGIS-документация (https://github.com/<YourName>/QGIS-Documentation). Этот репозиторий является копией официального репозитория QGIS-Documentation, где у вас есть полный доступ на запись, и вы можете вносить изменения, не затрагивая официальную документацию.
1.1.2. Внести изменения
Существуют различные способы внесения вклада в документацию QGIS. Ниже мы покажем их по отдельности, но вы можете переключаться с одного процесса на другой без какого-либо ущерба.
Альтернатива 1: Используйте ярлык Редактировать на GitHub
Pages on the QGIS documentation website can be edited quickly and easily
by clicking on the Edit on GitHub link:
at the top right of each page,
or in the drop-down menu at the bottom of the left sidebar.
Это откроет файл в ветке
qgis:masterс сообщением в верхней части страницы о том, что у вас нет доступа на запись в это хранилище и ваши изменения будут применены к новой ветке вашего репозитория.Примечание
If you do have write access to the QGIS repository, no message is displayed and your changes will likely be saved directly in the main repository instead of your fork. However, to keep the repository clean, it is recommended that even contributors with write access work from their forks when editing documentation.
Внесите свои изменения. Поскольку документация написана с использованием синтаксиса reStructureText, в зависимости от ваших изменений, вам может понадобиться руководствоваться Руководством по написанию.
Закончив изменение файла, нажмите Коммитировать изменения… и добавьте короткий заголовок, объясняющий ваши изменения. При необходимости вы можете дать более подробное объяснение.
Нажмите Предложить изменения, сохранив модификации в вашем репозитории. В результате в вашем репозитории будет создана выделенная ветвь <https://docs.github.com/en/pull-requests/collaborating-with-pull-requests/proposing-changes-to-your-work-with-pull-requests/about-branches>`_ (
patch-xxx), а в веб-браузере откроется страница :guilabel:Сравнение изменений.Если проблема, которую вы решаете, не нуждается в дальнейших изменениях, перейдите к разделу Поделиться своими изменениями через Pull Request ниже.
Если вы хотите внести дополнительные изменения перед отправкой в QGIS, выполните следующие действия:
Перейдите к вашему форку QGIS-документации (
https://github.com/<YourName>/QGIS-Documentation)Нажмите на
 и найдите новую ветку
 patch-xxx.Выберите его. Кнопка
теперь будет отображать Ветвь: patch-xxx.Перейдите к разделу :ref:`Изменение файлов<modify_files> ` ниже.
Альтернатива 2: Создайте специальную ветку в репозитории документации
Вы можете редактировать файлы прямо из форка Документации QGIS.
Сначала убедитесь, что ваша ветка master обновлена до последней версии, т. е. ветки qgis/QGIS-Documentation:master. Для этого:
Перейдите на главную страницу вашего репозитория, то есть
https:/<YourName>/github.com//QGIS-Documentation. Веткаmasterдолжна быть активной с упоминанием того, обновлена ли она доqgis/QGIS-Documentation:masterили нет.Если она имеет коммиты, опережающие ветку восходящего потока, лучше использовать предыдущую альтернативную кнопку быстрого доступа, пока вы не выровняете свою
мастерскуюветку.Если за ним стоят только коммиты:
Раскройте раскрывающееся меню :guilabel:«Синхронизация форка» справа. Вы можете:
Сравните ветки и посмотрите новые изменения в верхней ветке, которых еще нет в вашей.
Fetch and merge: переносит изменения из вышестоящей ветки в вашу.
Нажмите Fetch и merge: после завершения процесса ваша ветка будет указана как обновленная до
qgis/QGIS-Documentation:master.
Щелкните
в верхнем левом углу вашего форка репозитория QGIS-Documentation и введите уникальное имя в текстовое поле, чтобы создать новую ветвь branch. Рекомендуется, чтобы название новой ветки было связано с проблемой, которую вы собираетесь исправить. Это удобно для идентификации ветки в дальнейшем.Нажмите Создать ветвь<branch_name> из master. Кнопка
теперь должна отображать branch_name.Вы готовы начать новые изменения в новой ветке.
Внимание
Вносите изменения в специальную ветку, никогда в мастер ветку
По правилам, не вносите изменения в свою ветку master, за исключением тех случаев, когда вы сливаете изменения из ветки master в свою копию репозитория QGIS-Documentation. Отдельные ветки позволяют вам работать над несколькими проблемами одновременно, не вмешиваясь в работу других веток. Если вы допустите ошибку, вы всегда можете удалить ветку и начать заново, создав новую из основной ветки.
1.1.3. Изменение файлов
Убедитесь, что ветвь, которую вы хотите изменить, активна: ее название отображается в верхнем левом меню или в URL-адресе страницы.
Просмотрите исходные файлы и найдите файл, который необходимо изменить.
Нажмите кнопку
 Изменить этот файл.
Обновите текст, следуя :ref:`рекомендациям по написанию<QGIS-documentation-guidelines> `
Закончив изменение файла, нажмите Коммитировать изменения… и добавьте короткий заголовок, объясняющий ваши изменения. При необходимости вы можете дать более подробное объяснение.
Убедитесь, что выбран параметр :guilabel:«Зафиксировать непосредственно в<branch_name> ветке».
Нажмите Commit изменения, чтобы сохранить ваши изменения в ветке.
Чтобы обновить или добавить новый файл изображения:
Перейдите в папку с файлом, который необходимо обновить или добавить.
В правом верхнем углу используйте меню , чтобы выбрать и загрузить файлы с вашего диска. Советы по форматированию изображений для документации можно найти в разделе управление_скриншотами.
Если файл с таким же именем уже существует, он будет перезаписан.
Еще раз зафиксируйте свои изменения в целевой ветке.
Повторите предыдущие шаги для всех других файлов, которые необходимо обновить, чтобы устранить проблему.
1.1.4. Поделитесь своими изменениями через Pull Request
Вам необходимо создать запрос на извлечение, чтобы интегрировать ваши изменения в официальную документацию.
Начните новый запрос на привлечение ресурсов
Если вы использовали ссылку
Edit on GitHub, после фиксации изменений GitHub автоматически откроет новую страницу, на которой будут сравниваться изменения, внесенные вами в веткуpatch-xxx, с веткойqgis/QGIS-Documentation:master.Во всех случаях страницу сравнения изменений можно открыть, перейдя на страницу «Запросы на слияние» вашего репозитория и нажав на Новый запрос на слияние.
Сравнить изменения
Если вы видите два диалоговых окна, в одном из которых написано база:мастер, а в другом сравнить:имя_ветви (см. рисунок), это означает, что изменения из одной из ваших веток будут слиты только в вашу мастер-ветку. Чтобы исправить это, нажмите на ссылку Сравнить все ветки.

Рис. 1.8 Если ваша страница Сравнение изменений выглядит так, нажмите на ссылку Сравнить по форкам.
Вы увидите четыре выпадающих меню. Они позволят вам сравнить изменения, внесенные в вашу ветку, с мастер-веткой, в которую вы хотите слиться. К ним относятся:
базовый форк: форк, в который вы хотите слить свои изменения
база: ветвь базового форка, в которую вы хотите слить свои изменения
головная вилка: вилка, в которой есть изменения, которые вы хотите включить в базовую вилку
** сравнить**: ветвь с этими изменениями
Выберите qgis/QGIS-документация в качестве базового форка с мастер в качестве базового, установите головной форк на ваш репозиторий <YourName>/QGIS-документация, и установите compare на вашу модифицированную ветку.

Рис. 1.9 Сравнение изменений между qgis/QGIS- Документация и вашим репозиторием
Зеленая галочка с надписью Возможность слияния показывает, что ваши изменения могут быть слиты в официальную документацию без конфликтов.
Нажмите на кнопку Создать запрос на притяжение.
Предупреждение
Если вы видите 
Это означает, что существуют конфликты. Файлы, которые вы изменяете, не обновлены в ветке, на которую вы нацелились, потому что кто-то другой сделал коммит, который конфликтует с вашими изменениями. Вы всё ещё можете создать запрос, но вам нужно будет исправить все конфликты, чтобы завершить слияние.
Совет
Несмотря на то, что документация QGIS переводится, поддерживается самая последняя версия <https://docs.qgis.org/latest>`_ и исправляются существующие проблемы. Если вы исправляете проблемы для другого выпуска, измените базу с мастер на соответствующую ветку релиза_... в шагах выше.
Опишите ваш запрос на притяжение
Откроется текстовое поле: введите название и любое соответствующее описание предлагаемых вами изменений.
Если это относится к определенному выпуску <https://github.com/qgis/QGIS-Documentation/issues>`_, добавьте номер выпуска к своим комментариям. Для этого введите # и номер проблемы (например #1234). Если перед комментарием стоит выражение исправить или закрыть, то соответствующий вопрос будет закрыт, как только запрос будет объединен.
Добавьте ссылки на все изменяемые страницы документации.
Нажмите на Создать запрос на притяжение.
Просмотр и комментирование запроса на выгрузку
Как видно из вышеизложенного, каждый может вносить изменения в документацию с помощью запросов на выгрузку. Точно так же каждый может просматривать запросы на изменения с вопросами и комментариями. Возможно, стиль написания не соответствует рекомендациям проекта, в изменении не хватает каких-то важных деталей или скриншотов, а может быть, все выглядит отлично и в полном порядке. Рецензирование помогает улучшить качество вклада, как по форме, так и по содержанию.
Чтобы просмотреть запрос на притяжение:
Перейдите на страницу pull requests и нажмите на pull request, который вы хотите прокомментировать.
В нижней части страницы вы найдете текстовое поле, в котором можно оставить общие комментарии о запросе.
Чтобы добавить комментарии к определенным строкам,
Нажмите на
 и найдите файл, который хотите прокомментировать. Возможно, вам придется нажать на < > Отобразить разницу в исходном коде, чтобы увидеть изменения.
Прокрутите страницу до строки, которую вы хотите прокомментировать, и нажмите на
 . Откроется текстовое поле, в котором вы сможете оставить комментарий.
Конкретные комментарии к строкам могут быть опубликованы либо:
как отдельные комментарии, используя кнопку Добавить отдельный комментарий. Они публикуются по мере добавления. Используйте эту кнопку только в том случае, если у вас мало комментариев или если вы отвечаете на другой комментарий.
или как часть обзора, нажав на кнопку Начать обзор. Ваши комментарии не отправляются автоматически после проверки, что позволяет вам отредактировать или отменить их впоследствии, добавить краткое изложение основных моментов обзора или глобальные инструкции относительно запроса на вынос и того, одобряете вы его или нет. Этот способ удобен, поскольку он более гибкий и позволяет структурировать обзор, редактировать комментарии, публиковать их, когда вы будете готовы, и отправлять одно уведомление последователям репозитория, а не по одному уведомлению на каждый комментарий. Получите более подробную информацию <https://docs.github.com/en/pull-requests/collaborating-with-pull-requests/reviewing-changes-in-pull-requests/reviewing-proposed-changes-in-a-pull-request>`_.
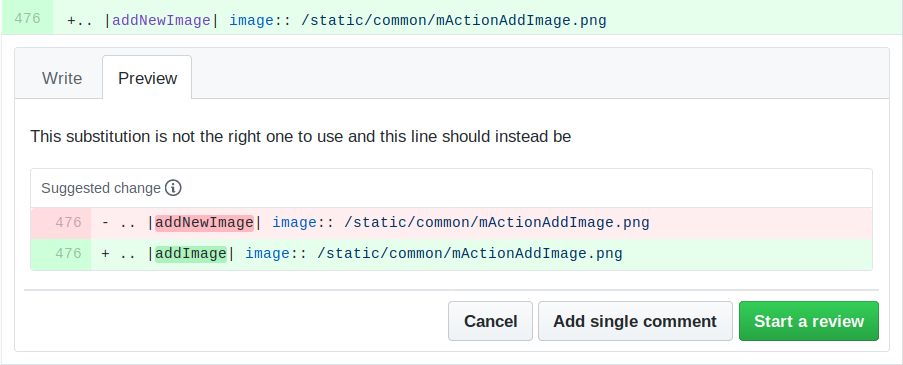
Рис. 1.10 Комментирование строки с предложением об изменении
В комментариях к строкам могут содержаться предложения, которые автор заявки может применить к заявке. Чтобы добавить предложение, нажмите кнопку  Вставить предложение в верхней части текстового поля комментария и измените текст в блоке предложения.
Совет
Предпочитаем фиксировать предложения в запросе на вытягивание как пакет
Как автор pull request, при непосредственном включении отзывов рецензентов в свой pull request, избегайте использования кнопки Коммитировать предложение в нижней части комментария, если у вас много предложений, которые нужно рассмотреть, и вы предпочитаете добавлять их в виде пакетного коммита, то есть:
Перейти на вкладку
Нажмите Добавить предложение в пакет для каждой переформулировки, которую вы хотите включить. Вы увидите, что счетчик увеличивается по мере выполнения.
Нажмите любую из кнопок Коммитировать предложения, когда будете готовы применить предложения к вашему pull request, и введите сообщение с описанием изменений.
Это добавит все изменения в вашу ветку как один коммит, что приведет к более разборчивой истории изменений и уменьшит количество уведомлений для последователей репозитория. Кстати, выполнение этой процедуры также сэкономит вам много кликов.
Внести исправления
Новый pull request будет автоматически добавлен в список Pull requests. Другие редакторы и администраторы будут просматривать ваш запрос на доработку и могут вносить предложения или просить внести исправления.
Запрос на внесение изменений также запускает автоматические проверки сборки (например, форматирование rst, синтаксис кода python), а отчеты отображаются внизу страницы. Если найдена ошибка, рядом с вашим коммитом появится красный крестик. Нажмите на красный крестик или на Детали в разделе резюме в нижней части страницы pull request, чтобы увидеть подробности ошибки. Вы должны будете исправить все сообщения об ошибках или предупреждениях до того, как ваши изменения будут зафиксированы в репозитории qgis/QGIS-Documentation.
Вы можете вносить изменения в свой пулл-реквест до тех пор, пока он не будет объединен с основным репозиторием, чтобы улучшить свой запрос, учесть запрошенные изменения или исправить ошибку сборки:
Нажмите на вкладку
на странице вашего запроса на извлечение.Нажмите … меню справа от имени файла, который вы хотите изменить, и выберите Редактировать файл.
Файл откроется в режиме редактирования; внесите изменения и сохраните их.
Любые дополнительные изменения будут автоматически добавлены к вашему запросу на исправление, если вы внесете их в ту же ветку, которую вы отправили в запросе на исправление. По этой причине вам следует вносить дополнительные изменения только в том случае, если они относятся к проблеме, которую вы собираетесь исправить с помощью этого запроса.
Если вы хотите исправить другую проблему, создайте новую ветку для этих изменений и повторите описанные выше шаги.
Администратор объединит ваш вклад после исправления всех ошибок сборки, а также после того, как вы и администраторы будут удовлетворены вашими изменениями.
1.1.5. Удалите вашу объединенную ветвь
Вы можете удалить ветку после того, как ваши изменения будут объединены. Удаление старых веток избавит вас от неиспользуемых и устаревших веток в вашем репозитории.
Перейдите к вашему форку репозитория QGIS-документация (
https://github.com/<YourName>/QGIS-Documentation).Нажмите на вкладку Ветки. Под Ваши ветки вы увидите список ваших веток.
Нажмите на значок
 Удалить эту ветвь, чтобы удалить ненужные ветви.
1.2. Использование командной строки Git
Веб-интерфейс GitHub — это простой способ обновить репозиторий документации QGIS с помощью ваших вкладов, но он не предлагает инструментов для:
группируйте свои коммиты и очищайте историю изменений
устранить возможные конфликты с основным репозиторием
создать документацию для тестирования ваших изменений
You need to install Git on your hard drive in order to get access to more advanced and powerful tools and have a local copy of the repository. Some basics you may often need are exposed below. You’ll also find rules to care about even if you opt for the web interface.
В приведенных ниже примерах кода строки, начинающиеся с символа «$», обозначают команды, которые необходимо ввести, а символы «#» — комментарии.
1.2.1. Локальный репозиторий
Теперь вы готовы получить локальную копию вашего репозитория QGIS-Documentation.
Вы можете клонировать свой репозиторий QGIS, используя веб-URL, следующим образом:
# move to the folder in which you intend to store the local repository
$ cd ~/Documents/Development/QGIS/
$ git clone https://github.com/<YourName>/QGIS-Documentation.git
The former command line is simply an example.
You should adapt both the path and the repository URL, replacing <YourName>
with your GitHub user name.
Проверьте следующее:
# Enter the local repository
$ cd ./QGIS-Documentation
$ git remote -v
origin  https://github.com/<YourName>/QGIS-Documentation.git (fetch)
origin  https://github.com/<YourName>/QGIS-Documentation.git (push)
$ git branch
* master
origin — это имя удаленного репозитория вашего репозитория QGIS-Documentation.
master — это основная ветвь по умолчанию. Ни в коем случае не используйте ее для внесения изменений! Ни в коем случае!
В качестве альтернативы вы можете клонировать репозиторий QGIS с помощью протокола SSH:
# move to the folder in which you intend to store the local repository
$ cd ~/Documents/Development/QGIS/
$ git clone [email protected]:<YourName>/QGIS-Documentation.git
Совет
Ошибка «Доступ запрещен (открытый ключ)»?
Если при выполнении предыдущей команды вы получаете ошибку «Permission denied (publickey)», возможно, проблема связана с вашим SSH-ключом. Подробности см. в Справке GitHub.
Если вы использовали протокол SSH, проверьте следующее:
# Enter the local repository
$ cd ./QGIS-Documentation
$ git remote -v
origin  [email protected]:<YourName>/QGIS-Documentation.git (fetch)
origin  [email protected]:<YourName>/QGIS-Documentation.git (push)
$ git branch
* master
You can start to work here but in the long term process you will get a lot of issues when you will push your contribution (called Pull Request in GitHub process) as the master branch of the qgis/QGIS-Documentation repository will diverge from your local/remote repository. You then need to keep track of the main remote repository and work with branches.
1.2.2. Добавить еще один удаленный репозиторий
Чтобы иметь возможность следить за работой в основном проекте, добавьте новый удаленный репозиторий в свой локальный репозиторий. Этот новый удаленный репозиторий — репозиторий QGIS-Documentation из проекта QGIS:
$ git remote add upstream https://github.com/qgis/QGIS-Documentation.git
$ git remote -v
origin  https://github.com/<YourName>/QGIS-Documentation.git (fetch)
origin  https://github.com/<YourName>/QGIS-Documentation.git (push)
upstream        https://github.com/qgis/QGIS-Documentation.git (fetch)
upstream        https://github.com/qgis/QGIS-Documentation.git (push)
Аналогичным образом, вы можете использовать протокол SSH для добавления удаленного репозитория в ваш локальный репозиторий:
$ git remote add upstream [email protected]:qgis/QGIS-Documentation.git
$ git remote -v
origin  [email protected]:<YourName>/QGIS-Documentation.git (fetch)
origin  [email protected]:<YourName>/QGIS-Documentation.git (push)
upstream        [email protected]:qgis/QGIS-Documentation.git (fetch)
upstream        [email protected]:qgis/QGIS-Documentation.git (push)
Теперь у вас есть выбор между двумя удаленными репозиториями:
origin для отправки вашей локальной ветки в ваш удаленный репозиторий
upstream для объединения (если у вас есть на это право) вашего вклада с официальным ИЛИ для обновления вашей основной ветки локального репозитория из основной ветки официального репозитория.
Примечание
upstream — это всего лишь ярлык, своего рода стандартное название, но вы можете называть его как хотите.
1.2.3. Обновить базовую ветвь
Перед тем как приступить к работе над новым вкладом, всегда обновляйте основную ветвь в локальном репозитории. Предполагая, что вы хотите отправить изменения в тестовую документацию, выполните следующие команды:
# switch to master branch (it is easy to forget this step!)
$ git checkout master
# get "information" from the master branch in the upstream repository
# (aka qgis/QGIS-Documentation's repository)
$ git fetch upstream master
# merge update from upstream/master to the current local branch
# (which should be master, see step 1)
$ git merge upstream/master
# update **your** remote repository (aka <YourName>/QGIS-Documentation)
$ git push origin master
Теперь у вас есть локальный и удаленный репозитории, в которых ветка «master» обновлена до официальной ветки «master» QGIS-Documentation. Вы можете приступить к работе над своим вкладом.
Примечание
Переключитесь на ветку, если хотите внести свой вклад в выпущенную документацию.
Наряду с тестовой документацией, мы продолжаем исправлять ошибки в последней версии, что означает, что вы также можете внести свой вклад в ее развитие. Следуйте примеру кода из предыдущего раздела, заменив master на соответствующую ветвь последней версии документации.
1.2.4. Внесите свой вклад в производство
Теперь, когда ваша базовая ветвь обновлена, вам нужно создать специальную ветвь, в которую вы добавите свой вклад. Всегда работайте на ветви, отличной от базовой! Всегда!
# Create a new branch
$ git checkout -b myNewBranch
# checkout means go to the branch
# and -b flag creates a new branch if needed, based on current branch
# Let's check the list of existing branches (* indicates the current branch)
$ git branch
master
release_2.18
...
* myNewBranch
# You can now add your contribution, by editing the concerned file(s)
# with any application (in this case, vim is used)
$ vim myFile
# once done
$ git add myFile
$ git commit
Несколько слов о командах commit/push:
старайтесь вносить только одно изменение (атомарное изменение), т. е. решайте только одну проблему
постарайтесь тщательно объяснить, что вы изменили, в названии вашего коммита и в описании. Первая строка является названием и должна начинаться с заглавной буквы и иметь длину 80 символов, не заканчиваться точкой «.». Будьте лаконичны. Ваше описание может быть длиннее, заканчиваться точкой «.» и содержать гораздо больше деталей.
Используйте символ «#» с номером для ссылки на проблему. Если вы исправили проблему, добавьте префикс «Fix»: ваша фиксация закроет проблему.
Теперь, когда ваши изменения сохранены и зафиксированы в локальной ветке, вам необходимо отправить их в удаленный репозиторий, чтобы создать запрос на слияние:
$ git push origin myNewBranch
1.2.6. Очистите локальный и удаленный репозитории
After your PR has been merged into the official QGIS-Documentation, you can delete your branch. If you work a lot this way, in few weeks you will get a lot of useless branches. So keep your repository clean this way:
# delete local branch
$ git branch -d myNewBranch
# Remove your remote myNewBranch by pushing nothing to it
$ git push origin :myNewBranch
И не забудьте обновить ветку «master» в вашем локальном репозитории!
1.3. Дополнительная литература
Other than the GitHub web interface and the Git command line tools exposed above, there are also GUI applications you can use to create and manage your contributions to the documentation.
Когда изменения в пул-реквесте конфликтуют с недавними изменениями, отправленными в целевую ветвь, конфликты необходимо разрешить, прежде чем будет возможна слияние:
Если конфликт касается нескольких конкурирующих строк, на странице запроса на слияние GitHub доступна кнопка Разрешить конфликты. Нажмите кнопку и разрешите проблему, как описано в разделе «Разрешение конфликта слияния на GitHub <https://docs.github.com/en/pull-requests/collaborating-with-pull-requests/addressing-merge-conflicts/resolving-a-merge-conflict-on-github>»_.
if the conflict involves files renaming or removal, then you’d need to resolve the conflict using Git command lines. Typically, you have to first rebase your branch over the target branch using
git rebase targetBranchcall and fix the conflicts that are reported. Read more at Resolving a merge conflict using the command line
Иногда в конце процесса корректуры вы можете получить изменения, разбитые на несколько коммитов, которые не всегда оправданы. Командная строка Git поможет вам сжать эти коммиты до меньшего количества и более значимых сообщений коммитов. Некоторые подробности в Использование git rebase в командной строке