Important
Traducerea este un efort al comunității, la care puteți să vă alăturați. În prezent, această pagină este tradusă 65.97%.
4. Panoul Navigatorului
Panoul Navigatorului QGIS este un instrument excelent pentru navigarea, căutarea, inspectarea, copierea și încărcarea resurselor QGIS. Doar resursele pe care QGIS știe să le gestioneze sunt afișate în browser.
Folosind panoul Navigatorului puteți localiza, inspecta și adăuga date, așa cum este descris în Panoul Navigatorului. În plus, panoul Navigatorului acceptă glisarea și plasarea multor resurse QGIS, cum ar fi fișierele de proiect, scrípturile Python, scrípturile de procesare și modelele de procesare.
Scrípturile Python, scrípturile și modelele Processing pot fi, de asemenea, deschise pentru editare într-un editor extern și în modelatorul grafic.
You can drag and drop layers from the Layers panel to the Browser panel, for instance into a GeoPackage or a PostgreSQL database.

Fig. 4.1 Panoul Navigatorului
Panoul navigatorului (Fig. 4.1) are o ierarhie extensibilă, cu câteva intrări fixe de nivel superior care organizează resursele gestionate. Intrările nodurilor sunt extinse făcând clic pe  din stânga numelui intrării. Orice ramură este restrânsă făcând clic pe
  . Butonul |colapseTree| Restrânge Tot restrânge toate intrările de nivel superior.
În este posibilă dezactivarea resurselor. Dacă, de exemplu, nu doriți să afișați scrípturi Python în browser, puteți debifa intrarea , iar dacă doriți să scăpați de folderul de casă din navigator, puteți debifați intrarea .
( Filtrarea Navigării) poate fi folosită pentru căutarea pe baza numelor intrărilor (atât intrările subordonate, cât și intrările nodurilor din ierarhie). Folosind meniul derulant
  Oțiuni de lângă câmpul de text al filtrului, puteți
efectua Căutare Senzitivă
seta Sintaxa modelului de filtrare la
Normal
Metacaracter(e)
Expresii Regulate
Controlul grafic al Proprietăților, care arată informații utile despre unele intrări/resurse, poate fi activat/dezactivat folosind butonul |metadate| Activează/dezactivează controlul grafic al proprietăților. Când este activat, se deschide în partea de jos a panoului navigatorului, așa cum se arată în Fig. 4.2.
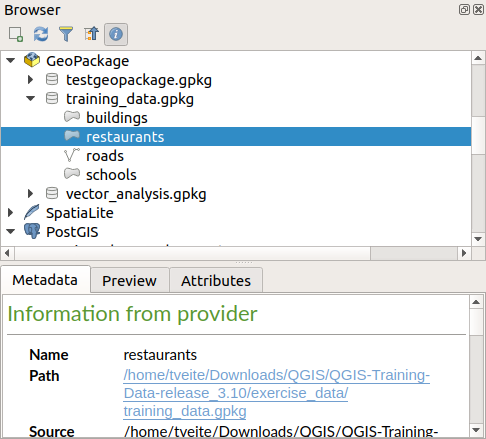
Fig. 4.2 Controlul grafic al proprietăților
A second browser panel can be opened by activating the Browser (2) panel in . Having two browser panels can be useful when copying layers between resources that are locationed deep down in different branches of the browser hierarchy.
4.1. Resources that can be opened / run from the Browser
A lot can be accomplished in the Browser panel
Add vector, raster and mesh layers to your map by double-clicking, dragging onto the map canvas or clicking the
 Add Selected Layers button (after selecting layers)
Run Python scripts (including Processing algorithms) by double-clicking or dragging onto the map canvas
Run models by double-clicking or dragging onto the map canvas
Extract Symbols… from QGIS Project files using the context menu
Open files with their default applications (Open <file type> Externally… in the context menu). Examples: HTML files, spreadsheets, images, PDFs, text files, …
Copy entries
Rename and delete (multiple) layers (context menu: )
Open a file explorer window and directly select the file Show in Files
Resource specific actions are listed for the different resource groups sorted under the top-level entries listed below.
4.2. Browser panel top-level entries
4.2.1. Favorites
Often used file system locations can be tagged as favorites. The ones you have tagged will appear here.
In addition to the operations described under Home, the context menu allows you to Rename Favorite… and Remove Favorite.
4.2.2. Semne de Carte Spațiale
This is where you will find your spatial bookmarks, divided into Project Bookmarks and User Bookmarks.
Nivel |
Contextual menu |
|---|---|
Spatial Bookmarks |
New Spatial Bookmark… |
Show the Spatial Bookmark Manager |
|
Import Spatial Bookmarks… |
|
Export Spatial Bookmarks… |
|
Bookmark group (Project Bookmarks and User Bookmarks) |
New Spatial Bookmark… |
Import Spatial Bookmarks… |
|
Export Spatial Bookmarks… |
|
Individual bookmark |
Zoom to Bookmark |
Edit Spatial Bookmark… |
|
Delete Spatial Bookmark |
4.2.3. Project Home
Available once the project file has been saved, the Project home entry is a folder containing data and other contents (scripts, models, text, …) that may be used within the current project. Displayed in the Browser panel, it allows you to quickly access data and other files of the project.
It defaults to the project file folder but can be changed through the option, or by right-clicking on the Project Home item of the Browser panel and selecting Set project home…. Customizing that folder is especially useful in contexts where QGIS projects are not stored in the root folder of an organisational «project», along with datasets.
4.2.4. Drives and file system
The next items of the Browser panel depend on the OS in use and concern the top level entries of its file system.
They are mainly:
The Home folder, pointing to the current user home folder
on Unix-based machines, the root / folder
the connected drives, either local or network. Depending on the OS, they are directly listed (eg,
C:\,D:\) or through the/Volumesentry.
From the contextual menu of each of these folders or drives, you can:
refresh the contents
create a subitem that is a Directory, GeoPackage or ESRI Shapefile format dataset
hide the directory (Hide from Browser)
Set color: customize the folder icon color, aiding in rapid browser navigation of complex folder structures
enable Scanning:
 Monitor for changes: allows to manually control
whether a particular directory should be monitored and automatically updated.
This setting applies to the selected directory and all subdirectories.
This means that you can manually opt-in to monitoring of network drives
if you know there’s no issue, or manually opt-out of monitoring of large
directories which you don’t want monitored for other reasons.
By default, remote or network drives are not automatically monitored.
Monitor for changes: allows to manually control
whether a particular directory should be monitored and automatically updated.
This setting applies to the selected directory and all subdirectories.
This means that you can manually opt-in to monitoring of network drives
if you know there’s no issue, or manually opt-out of monitoring of large
directories which you don’t want monitored for other reasons.
By default, remote or network drives are not automatically monitored. Fast scan this directory
open the directory in your file manager (Open Directory…)
open the directory in a terminal window (Open in Terminal…)
inspect the Properties… or the parent Directory Properties…
4.2.5. Tipul datei
Level and Context menu |
Tipuri de straturi |
|||
|---|---|---|---|---|
|
|
|
|
|
File |
||||
Ștergere Fișier <dataset name> |
|
|
||
Arată în Fișiere |
|
|
|
|
|
|
|
|
|
File Properties… |
|
|
|
|
Open <file type> Externally… |
|
|||
Strat |
||||
Adăugare Strat în Proiect |
|
|
|
|
|
|
|||
Layer Properties… |
|
|
|
|
Open with Data Source Manager… |
|
|
||
Execute SQL… |
|
|||


4.2.6. Intrările bazei de date
În funcție de SO și driverele instalate, puteți utiliza QGIS cu diverse tipuri de baze de date. Mai jos sunt enumerate diferite intrări ale meniului contextual, la fiecare nivel al arborelui de date.
Level and Context menu |
Tipuri de baze de date |
|||||
GeoPackage ([1]) |
SpatiaLite |
PostgreSQL |
SAP HANA |
MS SQL Server |
Oracle |
|
Top menu |
||||||
Creează o Nouă Conexiune… către o bază de date existentă |
|
|
|
|
|
|
Creare Bază de Date… |
|
|
||||
Creare Bază de Date și Strat… |
|
|||||
Salvare Conexiuni… detaliate într-un fișier |
|
|
|
|||
Încărcare Conexiuni… |
|
|
|
|||
Connection / Database |
||||||
Actualizare conexiune |
|
|
|
|
||
Editare Conexiune setări |
|
|
|
|
||
Duplicare Conexiune |
|
|
|
|
||
Eliminare Conexiune… |
|
|
|
|
|
|
Import Vector Layer… |
|
|
|
|
|
|
|
||||||
|
||||||
|
||||||
New Relationship… |
|
|||||
Ștergere <database_name> |
|
|
||||
Compact Database (VACUUM) |
|
|||||
Create a New Schema… |
|
|
|
|||
Create a New Table… |
|
|
|
|
||
Execute SQL… query |
|
|
|
|
||
Schema |
||||||
Refresh a schema |
|
|
|
|||
|
|
|
||||
|
|
|
||||
Create a New Table… |
|
|
||||
Execute SQL… query |
|
|
||||
Table / Layer |
||||||
|
|
|
||||
|
|
|||||
Execute SQL… query |
|
|
|
|||
|
|
|
|
|
||
|
|
|
||||
|
|
|
|
|
||
|
|
|
|
|
||
|
|
|
|
|
||
|
|
|
|
|
||
|
|
|||||
Open Layer Properties… dialog |
|
|
|
|
|
|
Open File Properties… dialog |
|
|||||
Open with Data Source Manager |
|
|
||||
Fields |
||||||
Add New Field… |
|
|
|
|
||
Câmp |
||||||
Set Field Domain |
|
|||||
Rename Field ([2]) |
|
|
|
|||
Setare Alias… |
|
|||||
Setare Comentariu… |
|
|
||||
Ștergere Fișier… |
|
|
|
|
||


4.2.6.1. Importing vector layers into databases using Browser panel
QGIS allows you to import vector layers directly into a database from the Browser panel.
This provides a simple way to transfer datasets into supported database
formats without using  DB Manager (see DB Manager Plugin).
You can start the import in two ways:
Drag and drop a single vector layer from the Browser panel or from the Project into a database connection or schema item.
Right-click on a database connection or schema item and choose Import Vector Layer… from the context menu.
Notă
When multiple layers are dragged into a database, they are imported immediately without further options. All imports run in the background, so the QGIS interface remains responsive during the process.

Fig. 4.3 Import Vector Layer dialog
To add a layer using Import Vector Layer… follow these steps:
Add Source layer: the layer to import, chosen from the current QGIS project. To import only selected features of the source layer use the
Selected features only option.Set the Table name: the name of the destination table in the database. By default, it is taken from the source layer name but can be modified. You can also use the
Replace destination table (if exists)
to overwrite an existing table.Define the Output CRS: the coordinate reference system of the destination table. By default, it is the CRS of the source layer, but it can be changed using the CRS selector.
Configure the Attributes:
Source expression: expression used to populate the field. By default, this corresponds to the original source field.
Name: name of the field in the destination table.
Type: field data type (integer, text, real, etc.).
Length and Precision: length and precision of the field, where applicable.
Constraints: rules to enforce on the field values (e.g. NOT NULL, UNIQUE, DEFAULT). Support depends on the destination database.
Alias: an alternate display name for the field.
Comment: a description or note attached to the field.
You can use buttons on the right side to:
 Add new field to add a new field to the destination table.
 Delete selected field to remove a field from the destination table.
 Move selected field up or
  Move selected field down to reorder fields.
 Reset all fields to clear all fields and start from scratch.
 Convert All Fields To Lowercase or Convert All Fields To Uppercase,
to change the case of all field names.
Convert All Fields To Lowercase or Convert All Fields To Uppercase,
to change the case of all field names.
Optionally, apply a spatial filter with Filter by Extent. This restricts the import to features within a defined bounding box.
Optionally, apply an attribute filter with Feature filter. This allows you to use an expression to select which features are imported.
4.2.7. Tiles and Web Services
Level and Context menu |
Tipuri de servicii |
||||
|---|---|---|---|---|---|
WMS / WMTS |
XYZ Tiles |
WCS |
WFS / OGC API - Features |
ArcGIS REST Servers |
|
Top menu |
|||||
Create a New Connection… |
|
|
|
|
|
Salvare Conexiuni… detaliate într-un fișier |
|
|
|
|
|
Încărcare Conexiuni… |
|
|
|
|
|
Connection |
|||||
Actualizare conexiune |
|
|
|
|
|
Editare Conexiune setări |
|
|
|
|
|
Duplicare Conexiune |
|
|
|
|
|
Eliminare Conexiune… |
|
|
|
|
|
View Service Info in Web browser |
|
||||
Table / Layer |
|||||
|
|
|
|
|
|
Adăugare Strat în Proiect |
|
|
|
|
|
Add Filtered Layer to Project… |
|
||||
Open Layer properties… dialog |
|
|
|
|
|
View Service Info in Web browser |
|
||||


Level and Context menu |
Tipuri de servicii |
||||
|---|---|---|---|---|---|
Plăcuțe Vectoriale |
Scene |
Cloud |
SensorThings |
STAC |
|
Top menu |
|||||
Create a New Connection… |
|
|
|
|
|
Create a New Generic Connection… |
|
||||
Create a New ArcGIS Vector Tile Service Connection… |
|
||||
Save Connections… details to a file |
|
|
|
|
|
Încărcare Conexiuni… |
|
|
|
|
|
Connection |
|||||
Editare Conexiune setări |
|
|
|
|
|
Duplicare Conexiune |
|
|
|
|
|
Delete Connection… |
|
|
|
|
|
Refresh |
|
||||
Details… |
|
||||
Table / Layer |
|||||
|
|||||
Adăugare Strat în Proiect |
|
|
|
||
Open Layer properties… dialog |
|
|
|
||
Refresh |
|
||||
Download assets… |
|
||||
Details… |
|
||||


4.2.8. Project and supported file types
File type |
Meniu contextual |
|---|---|
QGIS Project file (.qgz, .qgs) |
|
(opens Style Manager to export symbols to XML, add to default style, or export as PNG/SVG) |
|
QGIS Layer Definition (.qlr) |
|
Processing Model (.model3) |
|
Print Composer Template (.qpt) |
|
Python script (.py) |
|